If you’re considering getting a tattoo, you might be wondering about the most painful areas to avoid—or maybe you’re interested in challenging yourself by choosing one of the more sensitive spots. Either way, you’re in the right place!
For those new to tattoos, you’re probably leaning toward finding a spot that’s less likely to hurt. And while all tattoos involve some pain, it’s generally tolerable and, as any tattoo lover would say, completely worth it. Whether you’re feeling a little nervous or ready to push your pain tolerance to the limit, this guide has you covered.
In this post, we’ll answer common questions about tattoo pain, what to expect after getting inked, and which areas tend to hurt the most. Plus, we’ve included some tips to help reduce pain during your session. But first, let’s dive into the most pressing question: how painful will it really be?
DOES GETTING A TATTOO HURT?
Yes, getting a tattoo does involve some level of pain. Tattoos are created using specially designed needles that rapidly puncture the skin. The speed is quick enough to pierce the skin without tearing it, but slow enough to cause some discomfort or pain. As a result, there’s generally no significant bleeding during the tattooing process. For the ink to become permanent, the needle must go beyond the outer layer of the skin (the epidermis) and into the dermis—the layer capable of healing itself and holding the ink long-term.
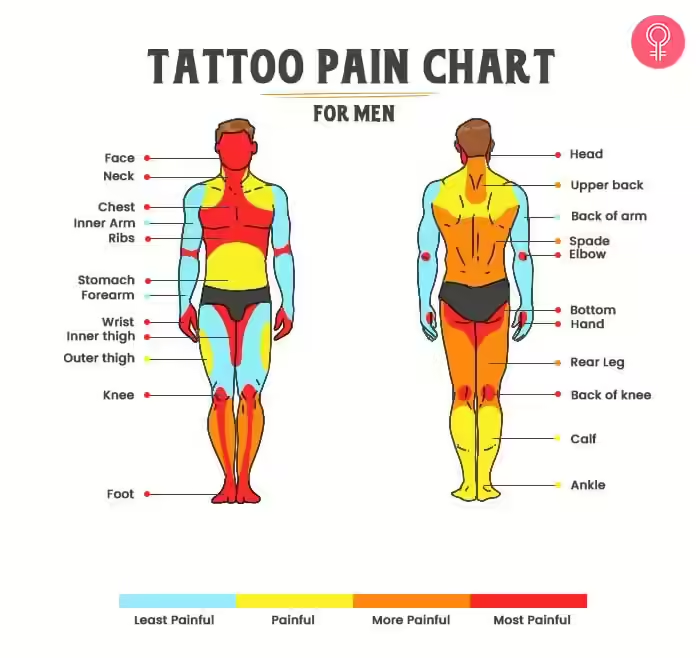
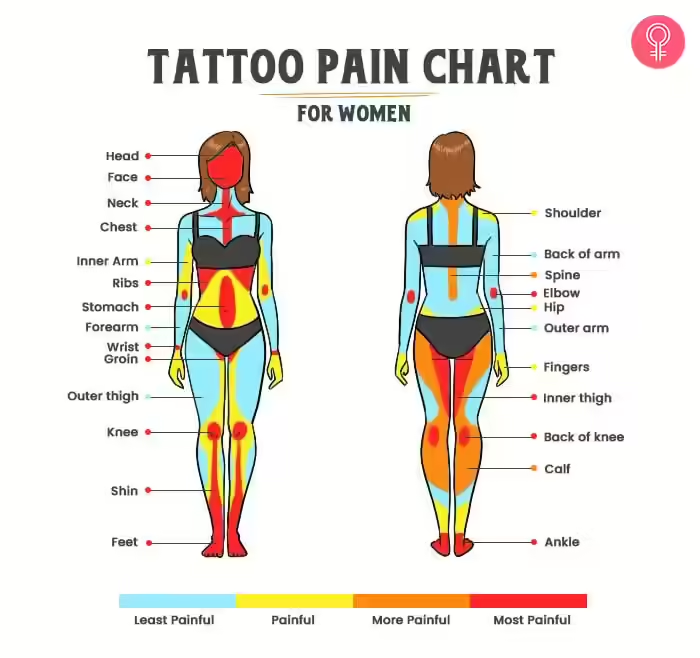
Some parts of the body are more painful to tattoo than others. The following tattoo pain chart highlights these areas and can help you prepare for the level of discomfort you might experience, depending on where you choose to get inked. Continue reading to learn more!
TATTOO PAIN CHART
The tattoo pain chart acts as a useful, yet subjective guide for those thinking about getting inked. It outlines different areas of the body, ranking them from minimal discomfort to intense sensations, so you can better anticipate the pain you may feel during the process.
Curious about which spots might hurt a bit more? Check out the tattoo pain chart for men—it’s your ultimate cheat sheet to help plan a smoother, more comfortable tattoo session!
Ladies, if you’re thinking about getting a tattoo, this tattoo pain chart for women is your must-have guide. It breaks down which areas of the body may be easier to handle and which might cause a bit more of a pinch. Use this chart to get a better idea of what to expect, and dive into the tattoo world with confidence!
While tattoos can be painful in general, certain body parts can significantly amplify the discomfort. If you’re curious about which areas might be the most challenging, keep reading to discover some of the most agonizing and sensitive spots to get tattooed. This will help you better prepare for your tattooing experience!
WHAT ARE THE MOST PAINFUL PLACES TO GET A TATTOO?
Getting a tattoo will involve pain, no matter where you decide to get it. However, certain areas of the body are known to hurt far more than others. If you’re considering any of the spots below, you might want to think twice due to the high level of discomfort associated with them:
- Armpit: The armpit is one of the most painful places to get tattooed. Many experienced tattoo artists even advise against it due to the extreme pain and difficulty of the area.
Pain level: 9/10 - Ribcage: With the ribcage being full of bones and constantly moving as you breathe, tattooing this area can be incredibly painful and is often considered one of the most painful spots to get inked.
Pain level: 9/10
Quick tip: Aftercare is important—wear loose, breathable clothing and avoid bras if the tattoo is near the band. - Ankles, Shins, Feet, and Toes: The thin skin on these areas makes for a sharp, vibrating pain that can be quite intense.
Pain level: 9/10 - Nipples and Breasts: These are some of the most sensitive parts of the body due to the many nerve endings, leading to high pain levels during tattooing.
Pain level: 7/10 - Groin: The groin area, rich with nerve endings and connected to various lymph nodes, is highly sensitive, resulting in intense pain.
Pain level: 8/10 - Elbows and Knees: Both areas have thin skin with little cushioning, leading to sharp, intense pain, especially on the knee.
Pain level: 8/10 for elbows, 10/10 for knees - Hips: The pelvic bone is close to the skin in the hip area, and those with less body fat in this region may experience sharp, vibrating pain.
Pain level: 8/10 - Neck and Spine: These areas contain many nerves, making tattooing here quite painful. While the back of the neck is slightly more bearable, the front can be excruciating.
Pain level: 7/10 - Head, Face, and Ears: With little muscle or fat to cushion these areas and many nerve endings, tattoos here can cause significant pain.
Pain level: 8/10 - Lips: The lips and inside of the mouth are highly sensitive and prone to bleeding, making tattoos here both painful and tricky.
Pain level: 6/10 - Hands and Fingers: Due to constant use and the many nerve endings, tattoos on hands and fingers can be very painful, with movement also complicating healing.
Pain level: 8/10 - Stomach: Pain here varies depending on body shape. Looser skin, which is more common in people with higher body weight, tends to cause more pain, while tighter skin often hurts less.
Pain level: 6/10 - Inner Thigh: The inner thighs are particularly painful due to the presence of major nerves and sensitive skin, though they tend to heal relatively easily.
Pain level: 7/10 - Inner Bicep: The inner bicep is delicate and undergoes constant friction, making it quite sensitive to tattooing pain.
Pain level: 6/10 - Behind the Knees: The area behind the knees is full of nerve endings and located near the joint, making tattooing here very uncomfortable.
Pain level: 7/10
Now, let’s take a look at some of the areas where getting a tattoo is comparatively less painful.
WHAT ARE THE LEAST PAINFUL PLACES TO GET A TATTOO?
Getting a tattoo can hurt, but there are certain spots on the body that tend to be much less painful. If you’re looking for a more comfortable tattooing experience, check out these less painful areas:
- Upper or Outer Thigh: This area has thicker skin and fat, which makes the pain more tolerable. Most describe the sensation as a dull background pain.
Pain level: 4/10 - Forearm: With its thick skin and muscle padding, the forearm is one of the easier places to get tattooed. It’s a popular choice for both artists and clients alike.
Pain level: 3/10
Trivia: The upper arm is one of the most common places for tattoos. - Shoulder and Outer Bicep: The skin here is thicker, and there’s plenty of muscle, making it one of the least painful spots to get inked.
Pain level: 3/10 - Upper and Lower Back: The back tends to be less painful, especially if you avoid bony areas like the shoulder blades or spine.
Pain level: 4/10 - Calves: Calf muscles have a generous layer of fat and muscle, which provides cushioning and reduces sensitivity to pain.
Pain level: 4/10
These areas provide a smoother tattoo experience, especially for those who may have a lower tolerance for pain.
HOW PAINFUL IS A TATTOO?
Tattoo pain can vary widely depending on the individual, their pain tolerance, and the area of the body being tattooed. Some people hardly react to the pain, while others may find it overwhelming. It’s important to understand your own pain threshold and communicate it with your tattoo artist before the session begins.
Tattoo pain can feel like different sensations, which are typically described as:
- Burning: This sensation feels like something hot pressing against your skin. It’s not extremely intense but noticeable, especially if the artist spends extra time on one part of your body.
- Dull: This is the type of pain most people prefer. It’s muted and not very sharp, allowing you to focus on other things or distract yourself. You might feel this once or twice during the session, but it doesn’t last long.
- Scratching: Similar to the sting of a paper cut or a scratch from a cat, this type of pain is mild but still present. It isn’t overwhelming, but you’ll notice it.
- Sharp: Also known as stinging pain, this is more intense. It occurs when the needle goes deeper into the skin or when fine details are being drawn. It can be particularly painful in areas with thin skin or near bones and might even cause fainting in rare cases.
- Vibrating: Vibrating pain happens when the needle works near a bone, causing a vibrating sensation in the surrounding nerves. It’s common in bony areas like the outer wrist, ribs, ankles, and knees.
While tattoos usually come with some degree of pain, certain factors can influence how intense that pain feels. In the next section, we’ll explore the key factors that affect the level of discomfort during the tattooing process.
HOW TO MINIMIZE THE PAIN CAUSED BY TATTOOING
Here are some essential tips to help make your tattooing experience more comfortable and minimize pain:
- Get a good night’s sleep: Being well-rested will help you feel more comfortable and relaxed during the session, reducing anxiety.
- Stay sober: Avoid alcohol before getting a tattoo. Alcohol thins your blood, which can complicate the tattooing process and lead to poor results.
- Consider numbing creams: Ask your tattoo artist if it’s okay to use numbing creams to reduce the pain.
- Avoid eating right before a stomach tattoo: Having a full stomach might cause discomfort, especially if you’re getting a tattoo in that area.
- Choose an experienced tattoo artist: Make sure your artist is certified and experienced to ensure a safer and smoother experience.
- Bring distractions: Candy or music can help divert your attention from the discomfort during the tattoo session.
- Follow aftercare instructions: Proper aftercare is crucial to avoid unnecessary pain and ensure your tattoo heals well.
- Stay hydrated: Drink plenty of water before and during your session to stay hydrated.
- Bring a supportive companion: Having a friend with you can boost your morale, but avoid bringing too many people to avoid distractions.
- Be certain about your tattoo: Commit to your decision to avoid second-guessing, which might add to the stress and discomfort.
By preparing both physically and mentally, you can make the tattooing process smoother and less painful.
CONCLUSION
The experience of tattoo pain is highly subjective and can vary greatly from person to person. Factors such as pain tolerance, location of the tattoo, needle depth, and the artist’s technique all play a role in the level of discomfort experienced. While some areas of the body are generally considered less painful, such as the outer arm, calf, and shoulder blades, individual experiences may differ. Areas with thinner skin, like the inner wrist or ankle, can be more sensitive. Ultimately, the best way to determine your pain tolerance is to consult with a tattoo artist and discuss your options. Remember, the beauty of a tattoo often outweighs the temporary discomfort of the process.