15 KIDS CORNROWS HAIRSTYLE IDEAS

Cornrows, also known as cornrow braids, are a stunning protective hairstyle that is braided closely to the scalp, creating a flat, neat look. This versatile style is perfect for both adults and children, and works for both boys and girls. With endless styling options, cornrows are far from boring. They can be done on natural hair or enhanced with extensions for added flair. In this post, I’ll be showcasing 20 unique cornrow styles, divided into two sections: one for girls and one for boys.
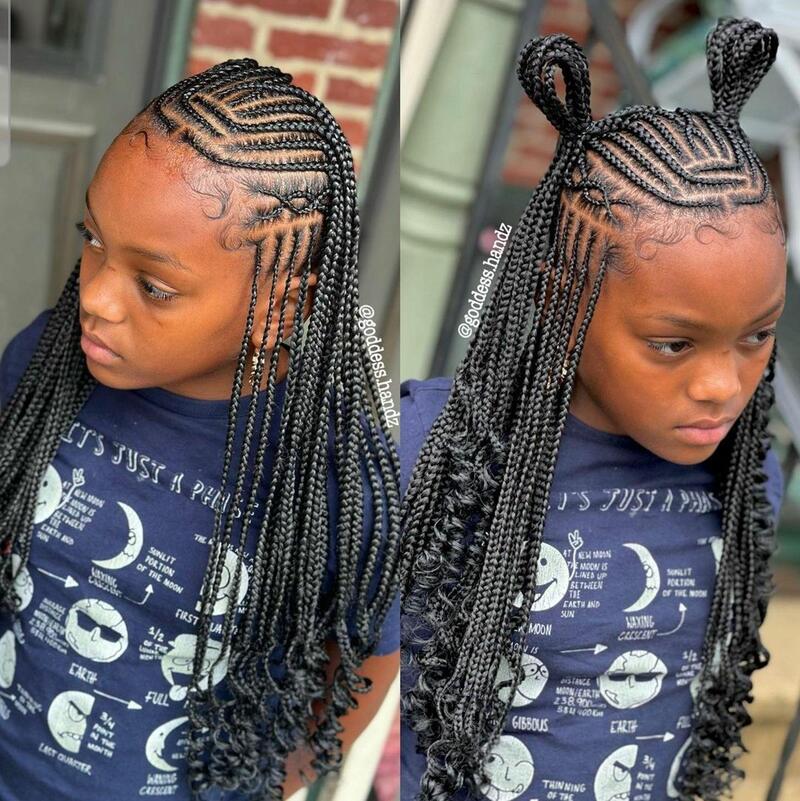
ALL-BACK CORNROWS
This all-back cornrow style is anything but basic, featuring a heart design, a zigzag part on one side, stitch and fishbone braids, crisscross rubber band braids on top, and two single braided bangs with curly ends. It’s a truly captivating look.
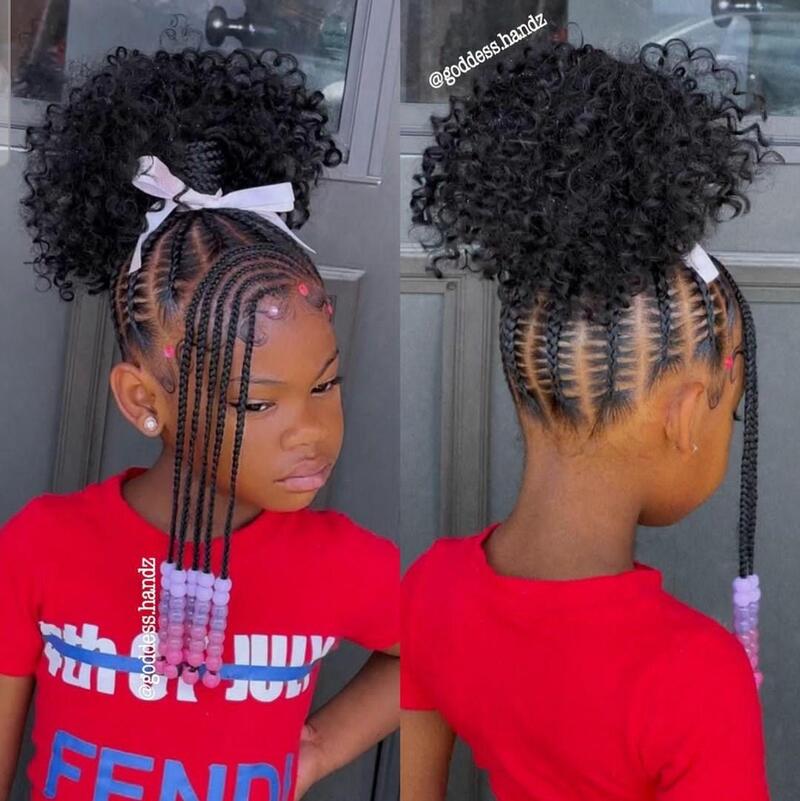
CURLY PONYTAIL
A charming kids’ hairstyle with stitch braids, braided bangs, and a curly ponytail, adorned with accessories for added flair.

TOP PONYTAIL WITH TWISTED ENDS
This cornrow ponytail is adorned with leaf designs at the front and back, braided bangs, and twisted ends with beads, offering a unique and stylish finish.

SPACE BUNS
This fun style splits the hair into two equal parts, braided into identical cornrows, and rolled into knots at the ends, forming playful space buns.
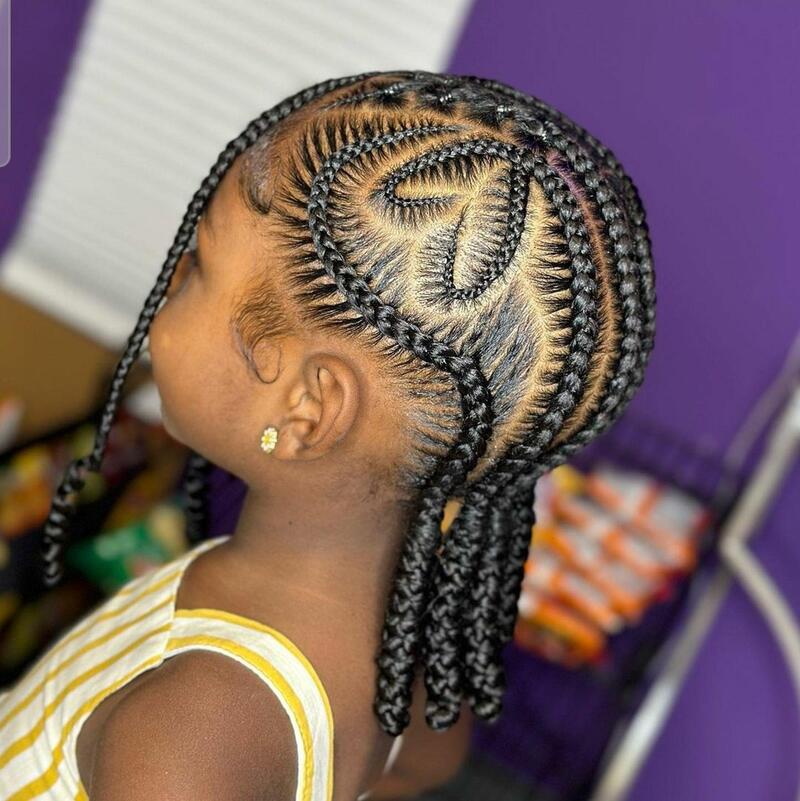
HEART CORNROW
A single heart-shaped cornrow adds a fun twist to a simple braid, elevating the look with a touch of creativity.
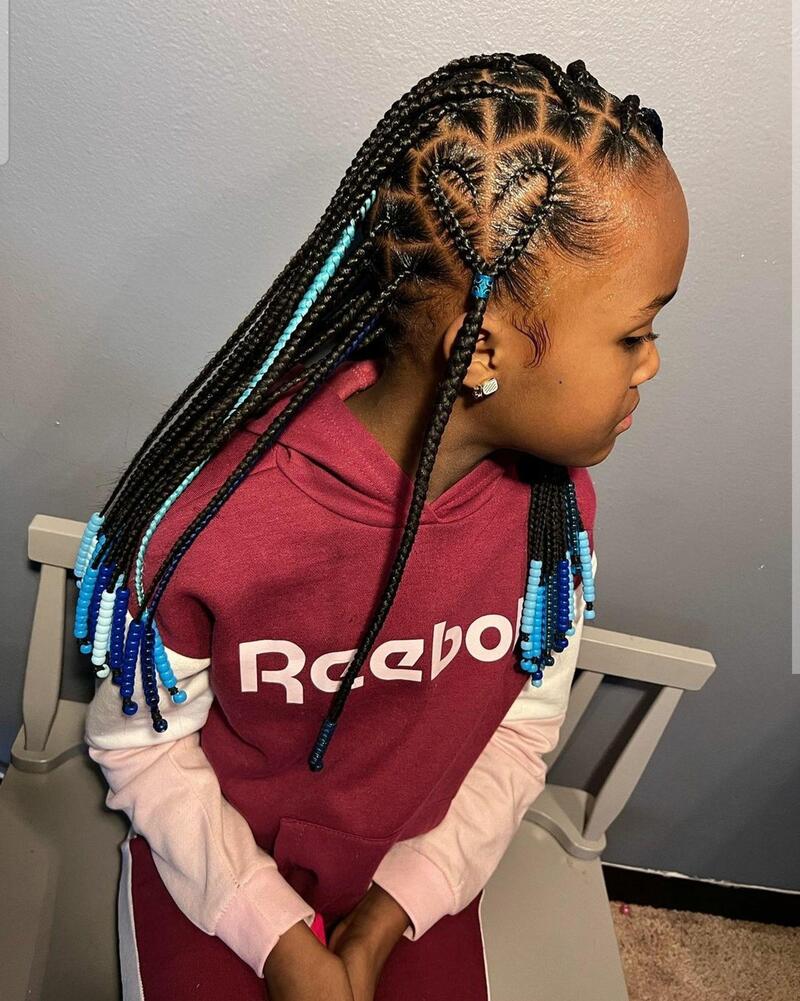
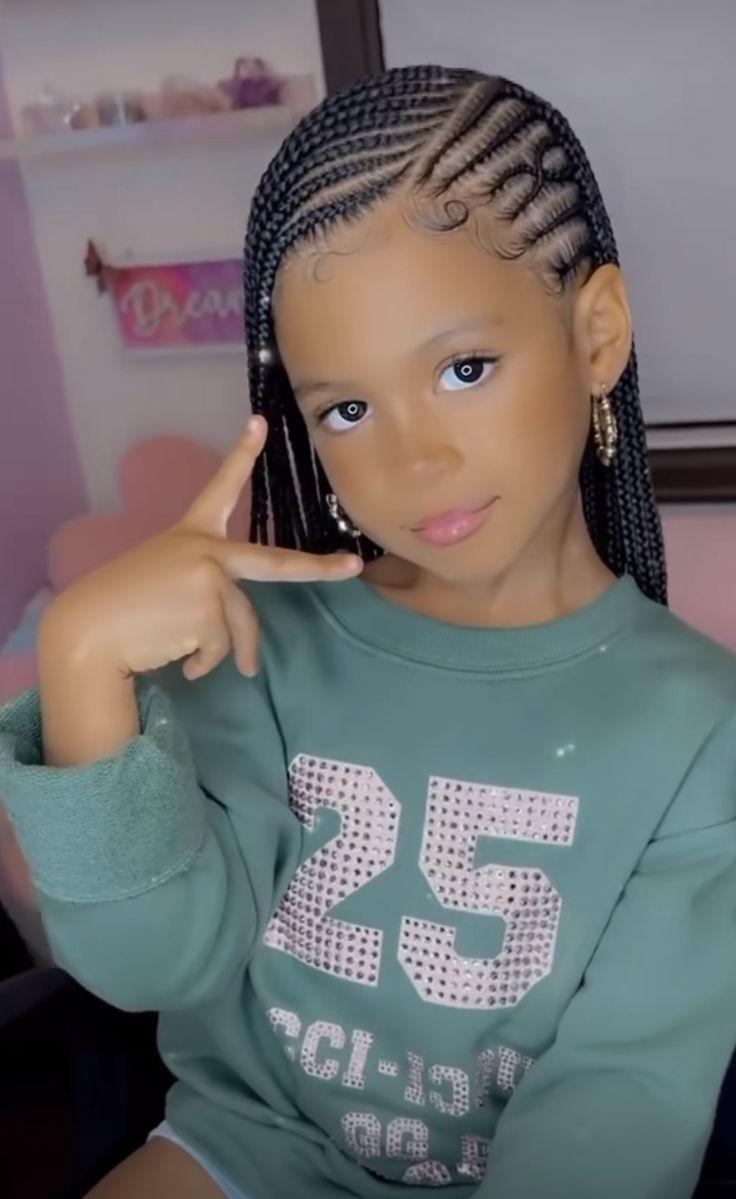
FULANI BRAIDS
These Fulani cornrows feature a crisscross design with a maze pattern at the front, offering a chic and stylish vibe. It can also be styled into two knots for extra flair.

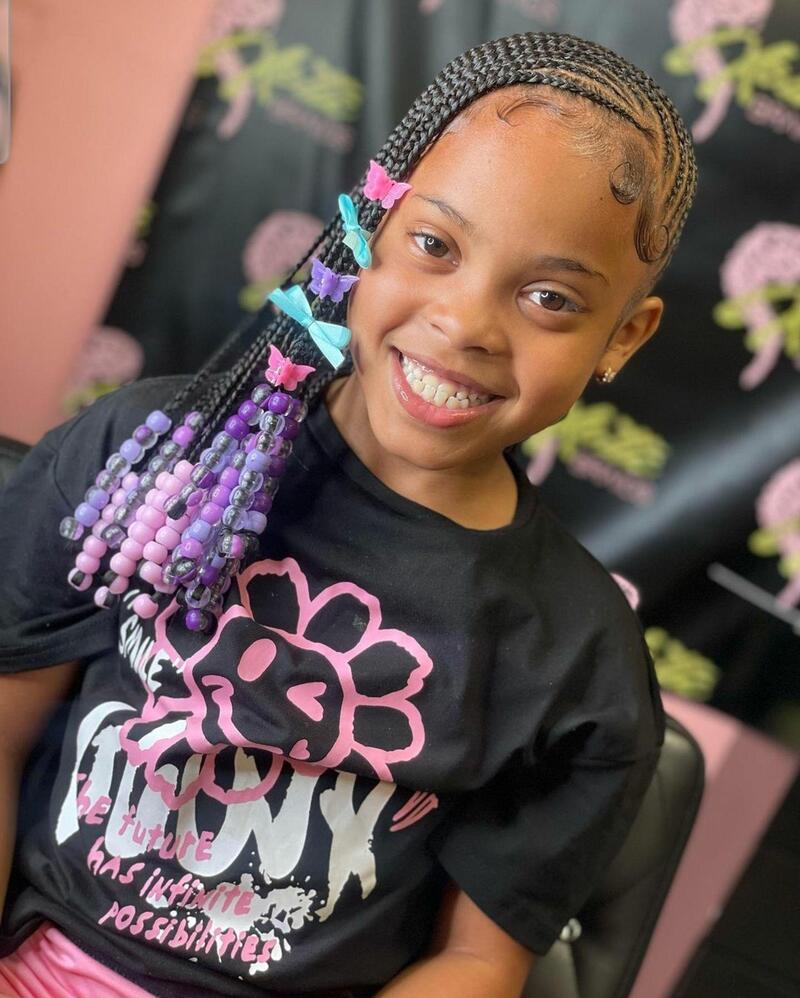
HALF SIDE-SWEPT CORNROWS
This style features braids sweeping from one side of the face to the other, with single braids in the back. It’s finished off with bows, butterfly clips, and purple beads for a playful, decorated look.
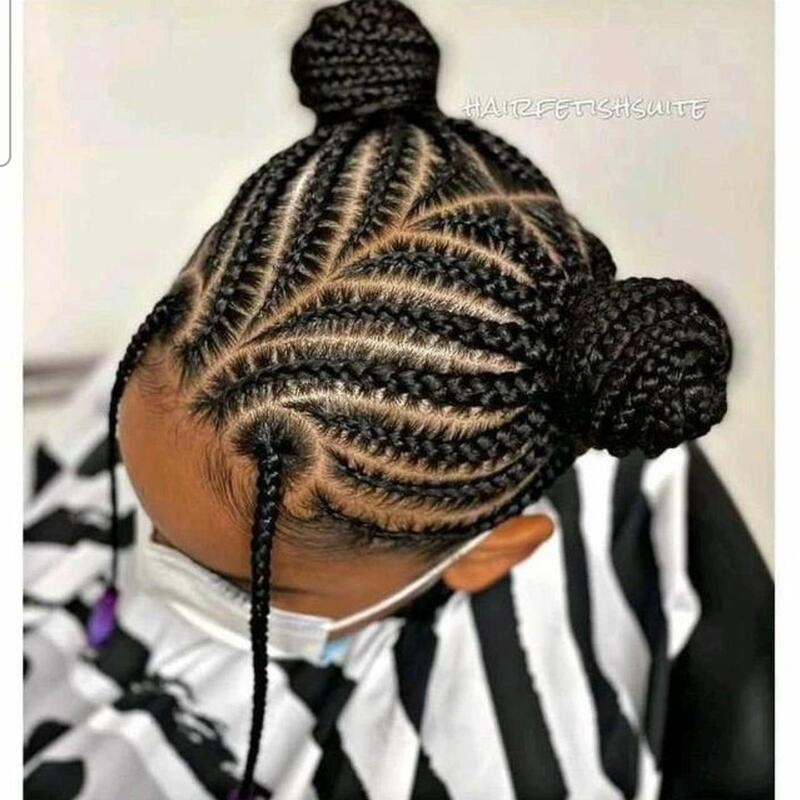
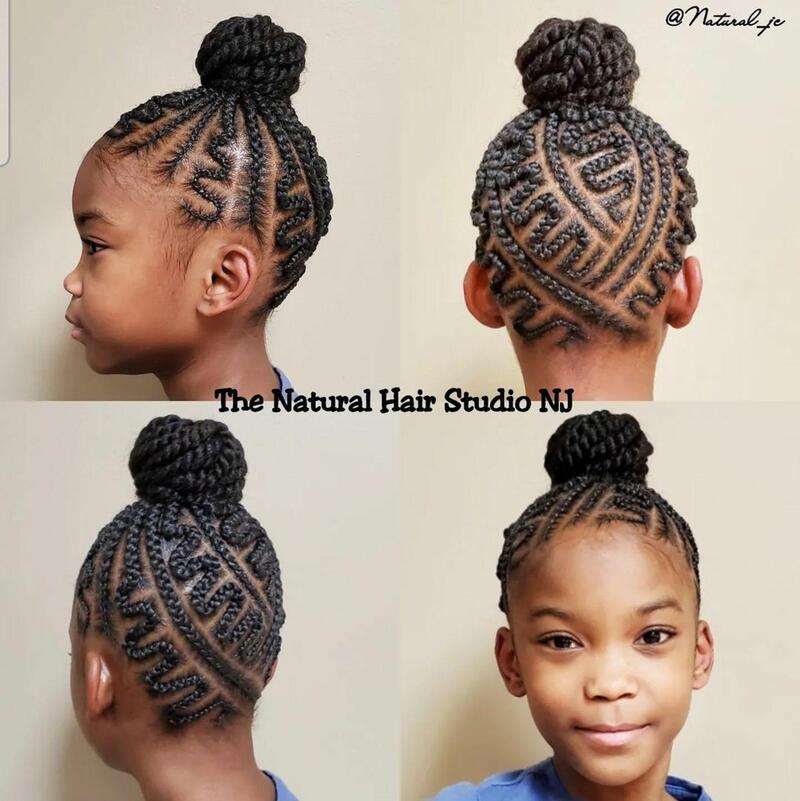
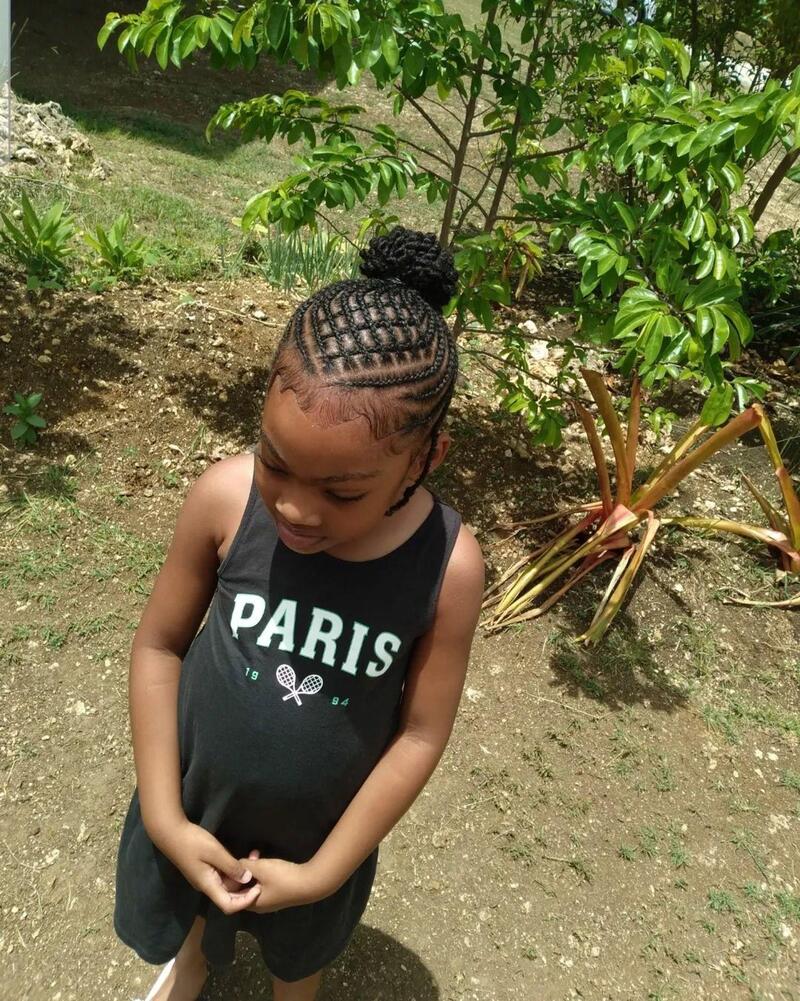
ZIGZAG CORNROW BUN
A simple yet exquisite look, this style involves braiding the hair in zigzag and straight lines that meet at the top of the head, creating a chic bun.

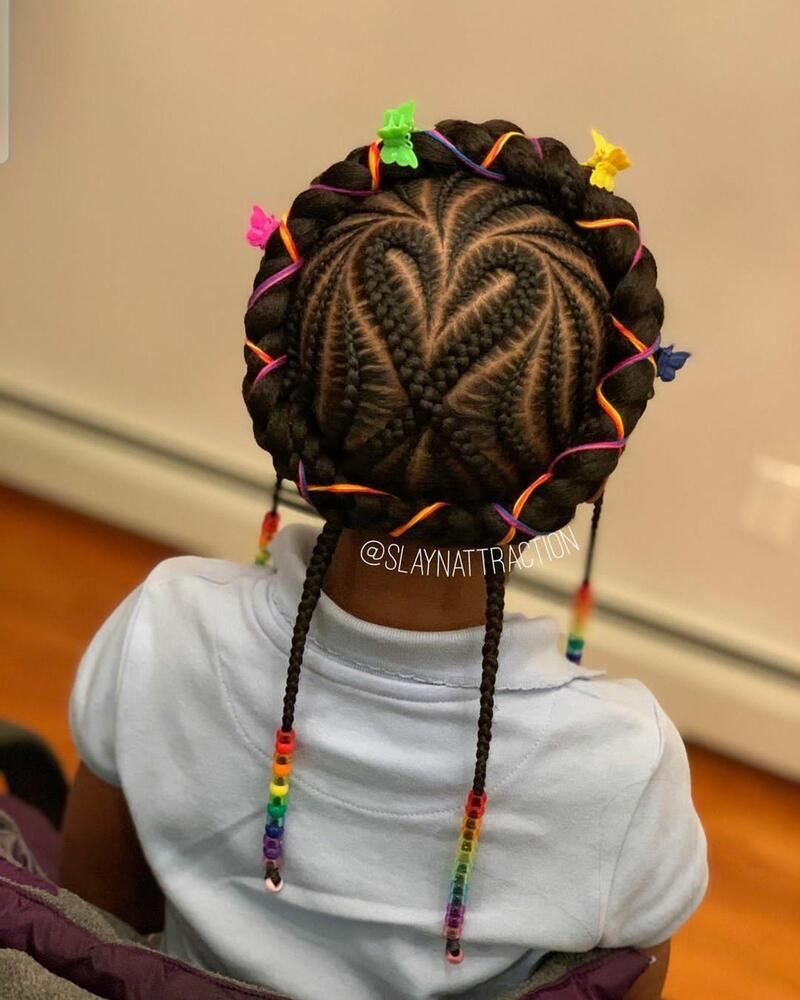
CROWN CORNROW BRAIDS
Bold and large, this crown cornrow braid circles the head, decorated with colorful hairbands and clips. A heart part and four hanging single braids complete this regal style.

BASKETWEAVE BRAIDS
Inspired by crisscross styles, this elegant braid pattern weaves the hair into a basket design, making it a perfect option for a chic, textured look.

FISHTAIL BUN
A trendy style for boys featuring fade and half-stitch braids, starting at the hairline and stopping at the middle of the head, with a sleek fishtail bun.

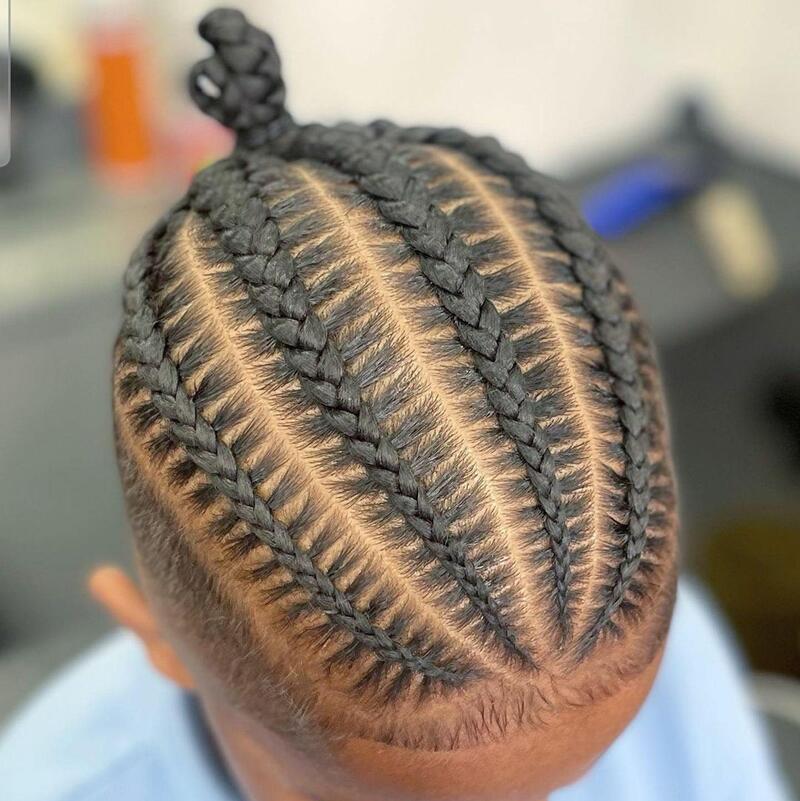
JUMBO FEED-IN BRAIDS
This bold look features jumbo cornrows starting from the top, flowing down the sides and back of the head. Arrow and crisscross braids add detail to the back for a modern twist.
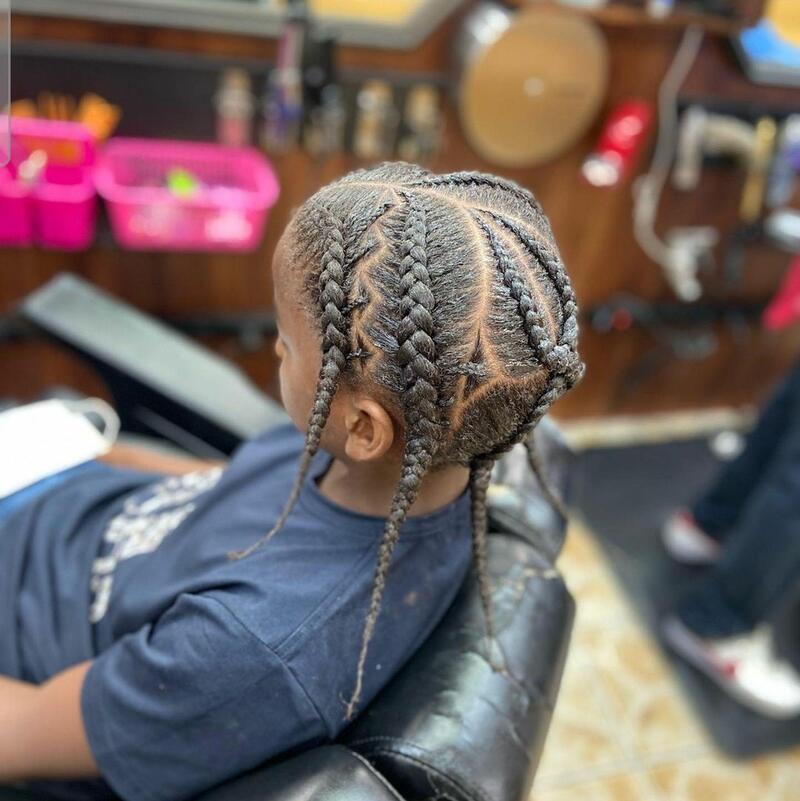
FRENCH BRAIDS
These classic French cornrow braids work beautifully on boys, keeping the hair neat and away from the face, with the option to tuck in the ends for a clean finish.
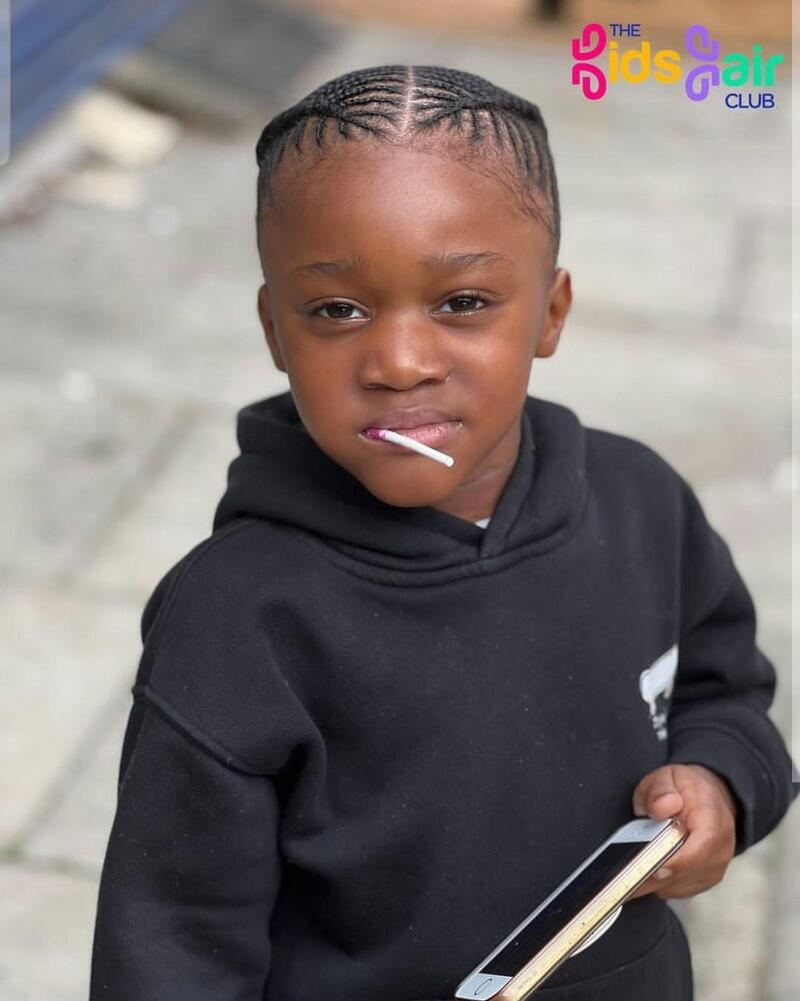
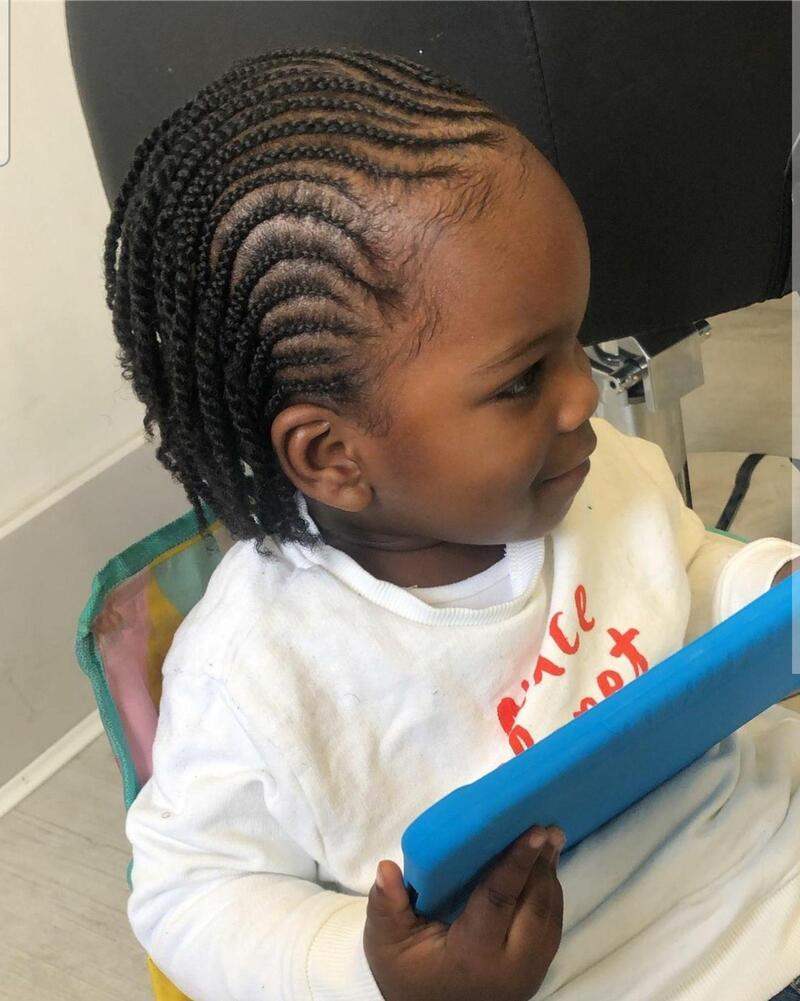
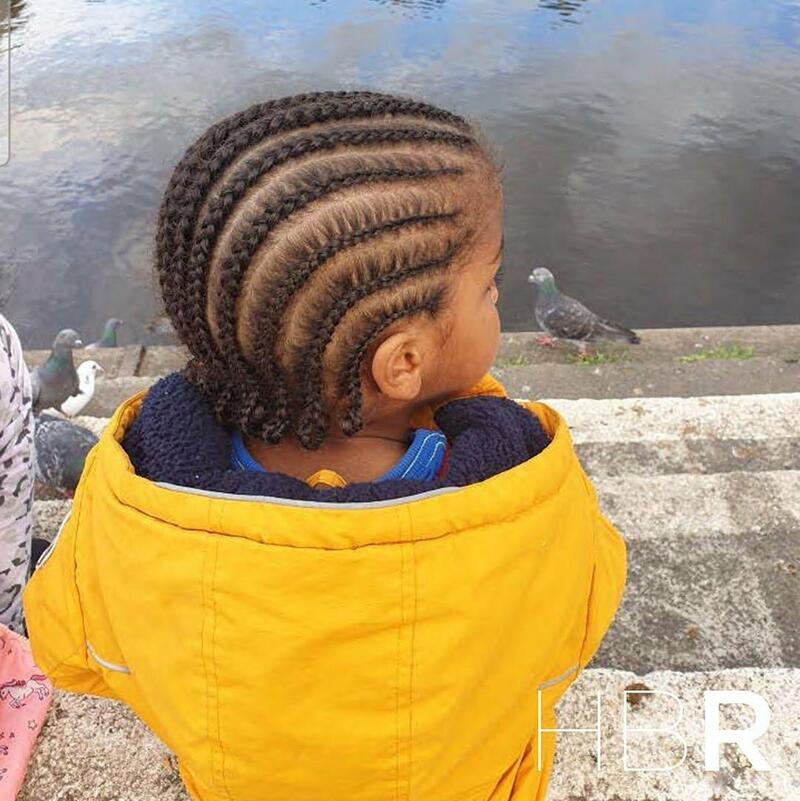
ALL-BACK CORNROWS
A no-fuss, neat style, perfect for little boys. These all-back cornrows are simple and stylish, keeping hair in place effortlessly.

WATERFALL CORNROW BRAIDS
A mix of half-all back cornrows and single braids, this style is perfect for boys of all ages, offering a clean and easy-to-maintain look.


CURLY HAIR ROUTINE FOR BEGINNERS 

Curly hair is beautiful and unique, but it can also be challenging to manage. If you’re new to embracing your curls, don’t worry! This beginner’s guide will walk you through a simple yet effective routine to help you achieve defined, bouncy, and frizz-free curls. Let’s embark on this curly hair journey together!

CHOOSING THE RIGHT SHAMPOO

The “right” shampoo is one that’s gentle and designed to enhance your curls. With so many options out there, it can feel overwhelming, but starting with a sulfate-free shampoo is a great choice—these are increasingly common as more brands release sulfate-free ranges.

Most products will be clearly labeled as sulfate-free, but if you’re unsure, you can easily check. Just search for the shampoo’s ingredients online, then copy and paste them into CURLSBOT, a tool that instantly tells you if it’s Curly Girl-approved. I keep CURLSBOT saved on my phone—it’s a lifesaver at any stage of the curly journey!

CHOOSING THE RIGHT CONDITIONER

The “right” conditioner for curly hair means opting for a silicone-free formula. If you’re used to products with silicones, going silicone-free may feel like a big change, but it’s an important step in a curl-friendly routine.

Many commercial conditioners contain silicones, so it’s worth checking labels. Silicone-free conditioners don’t need to be expensive—they simply avoid silicones that can build up on your hair, causing greasiness, weighing curls down, and reducing bounce.

A T-SHIRT FOR DRYING

That’s right—a simple t-shirt is perfect for drying curly hair! Unlike a regular towel, a t-shirt is much softer and won’t roughen the hair cuticle.

You can use it as you would a towel, or you can try “plopping.” To plop, gently lower your hair forward into the t-shirt, then wrap and secure it around your head. Leave it on for 10-40 minutes to absorb moisture while helping curls form into defined clumps.

Alternatively, there’s “micro-plopping,” where you scrunch each curl individually with the t-shirt to remove excess water. Whether plopping or micro-plopping, a t-shirt is gentler than a towel, though a microfiber towel is also a good option for curly hair.

CHOOSING A STYLING PRODUCT – GEL, MOUSSE, OR CREAM

When starting a curly hair routine, it’s common to use a gel, mousse, or cream. Some people even layer all three! For beginners, starting with one product is ideal; you can experiment and build up your routine as you get to know what works for your curls.

It’s a good idea to check product ingredients, avoiding “nasties” like drying alcohols (e.g., Alcohol Denat) and silicones. This extra step helps keep curls healthy and bouncy.

Apply styling products on soaking wet hair to lock in moisture and minimize frizz. Scrunch the product up to the roots, aiming to shape your curls while wet and keep that definition as they dry.

GEL

Gel is great for setting curls in a “cast” as it dries, holding the shape until you’re ready to scrunch out the crunch, leaving soft, defined curls. A favorite gel for many is the Umberto Giannini Curl Jelly.

CREAM

Creams reduce frizz and add moisture, giving a softer look and more volume, though they typically don’t define curls as much as gel.

MOUSSE

A lightweight mousse helps define curls and add volume, especially at the roots. It should be light and non-sticky, so curls feel soft once dry. Each product offers unique benefits—try one and see how your curls respond!

A DIFFUSER

While air-drying is a solid option, many people find that a diffuser becomes an essential tool for styling curls. Air-drying can take a long time, especially since curly hair tends to dry in clumps and retains more moisture with the products you’re using.

Using a diffuser can speed up drying while encouraging curl formation by lifting and holding curl clumps closer to the scalp. For best results, use a low heat setting to reduce potential heat damage.

Avoid using a regular dryer without a diffuser, as it can disrupt curl clumps. If you don’t have a diffuser attachment, it’s actually better to air-dry. And as you transition into a new curl routine, try to minimize the use of heated tools like curling wands—your curls will thank you!

A DEEP CONDITIONER

Deep conditioning is key to keeping curls hydrated and healthy. Aim to deep condition at least every two weeks, or even weekly if your hair needs the extra moisture. A quality deep conditioner helps rehydrate naturally dry curls, while also softening and detangling them.

These treatments often contain nourishing oils and butters. Simply apply after shampooing and let it sit for around 30 minutes before rinsing out.

Another option is a “pre-poo” treatment, where you apply an oil or conditioning treatment like Olaplex to dry hair before shampooing. Leave it on overnight or for a few hours to give your curls a deep boost before you wash.

FINAL TIP

Keep track of your washday routine to fine-tune your curly hair care and see what works best for you. Here’s what to note down:

  • Which cleansing and conditioning products you used, including any deep conditioners
  • Did you plop or micro-plop?
  • Which styling products you applied, and in what order
  • Did you apply them with your hair hanging forward or back?
  • Did you scrunch the products in?
  • Did you diffuse until your hair was 100% dry or just 80%?

Also, take photos of your results! They’ll be invaluable when you’re figuring out what works best for your curls. I still jot down small changes I make to my routine, as even minor adjustments can lead to major differences in results.

I created a tracker for myself to keep track of my washdays, and I’m sharing it here because I’ve found it super helpful!

CONCLUSION

Congratulations, you’ve taken the first step towards embracing your natural curls! Remember, consistency is key. As you continue to experiment with your routine, you’ll discover what works best for your unique hair type.

Don’t be afraid to seek advice from other curly-haired individuals or consult with a hairstylist who specializes in curly hair. By following these basic steps and tailoring them to your specific needs, you’ll be well on your way to achieving healthy, beautiful, and bouncy curls.