If it’s your first fall with your new baby, you might be eager to explore some fun, seasonal arts and crafts together. You might wonder if it’s possible at this age, and the answer is yes!
Of course, you’ll need to supervise and assist your little one throughout the process, just as you do with most things at this stage. There are also plenty of fall-themed sensory activities that, while they may not result in a keepsake, offer valuable bonding time.
Here are some fun and simple fall crafts for infants that toddlers will enjoy too, along with sensory play activities perfect for the season.
FALL PROCESS ART PROJECTS FOR INFANTS
Most of the fall arts and crafts for infants listed below will require significant assistance (after all, what doesn’t with a baby?), but since these activities focus on process art, you’re encouraging your infant to explore and experiment rather than concentrating on a finished product. Be prepared for some messy fun!
There are also some mess-free painting projects that you can try with your little one if you prefer a cleaner experience.
By the end of each activity, you might just end up with a keepsake, but remember that the goal is to allow your child to express themselves freely and enjoy the creative process. Embrace the mess and the joy of exploration!
EASY FALL LEAF CRAFT FOR INFANTS AND TODDLERS
This easy and fun fall craft allows infants to engage in open-ended exploratory play while creating a pretty outcome—an instant suncatcher! Best of all, it’s a no-mess activity.
Simply tape a piece of contact paper to a window at a height your infant can reach, with the sticky side facing out. Provide faux craft leaves and encourage your little one to stick them onto the contact paper. At first, you may need to model and guide the process, but your infant will love watching their leaf pattern come to life as they stick the leaves on the paper.
CORN PAINTING PROCESS ART
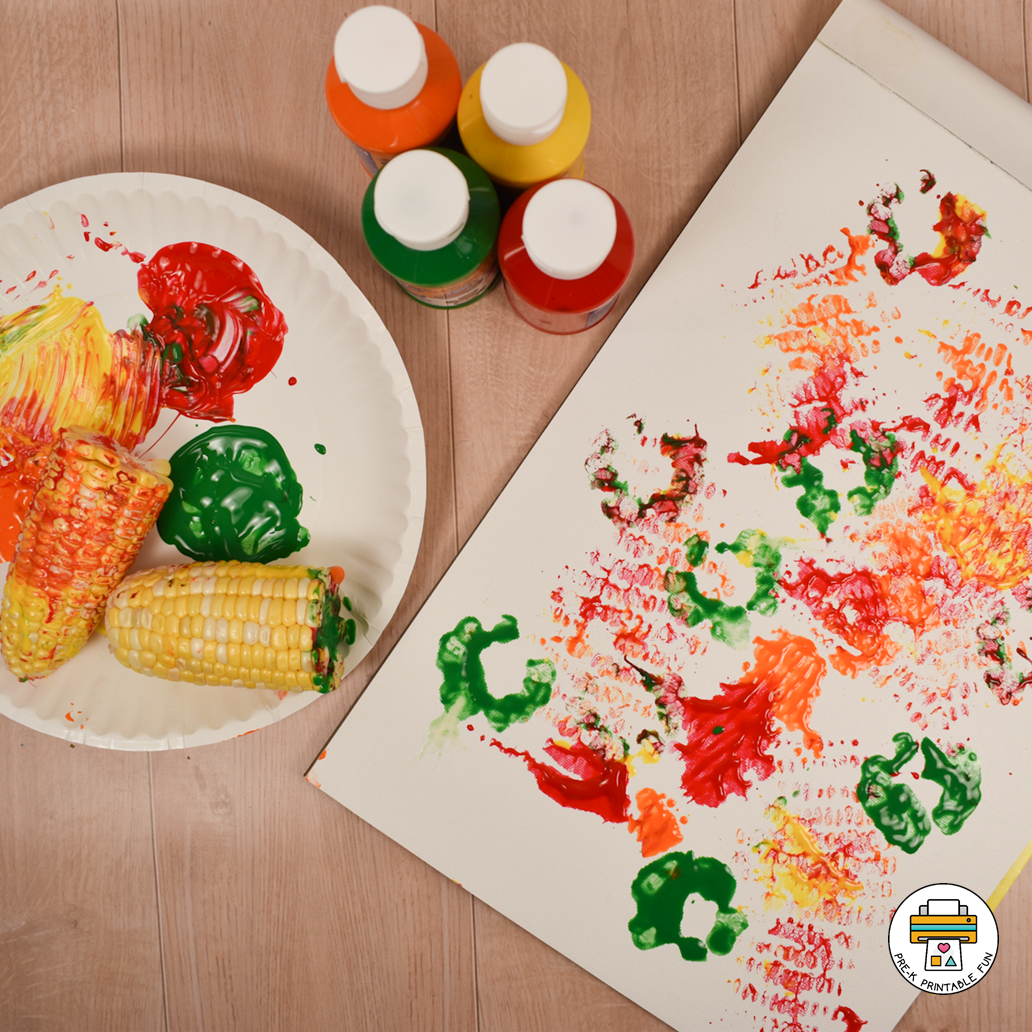
This corn painting process art activity is a simple and fun way for infants and toddlers to explore textures while engaging in fall-themed art. A cob of corn becomes a unique tool for spreading paint across paper. To start, pick some fall-inspired paint colors, place blobs of paint onto paper plates, and then dip the corn cob into the paint. Help your infant roll the cob over the paper and watch the colorful patterns emerge.
Alternatively, you can use a paintbrush to coat the corncob with paint first, and then make prints on the paper together with your little one.
Your infant may even prefer to rub their hands in the paint and feel the texture of the corncob, enjoying the sensation of wet paint on its bumpy surface. Just make sure you’re using baby-safe paints! Whether they create clear corn prints or not, the focus is on letting them explore and enjoy the creative process.
As your infant interacts with the corn and paint, you can make simple observations, like talking about how the corn feels bumpy or how the paint feels wet. Over time, your modeling will help them develop their own ability to observe and describe their sensory experiences.
PUMPKIN PATCH STAMPING
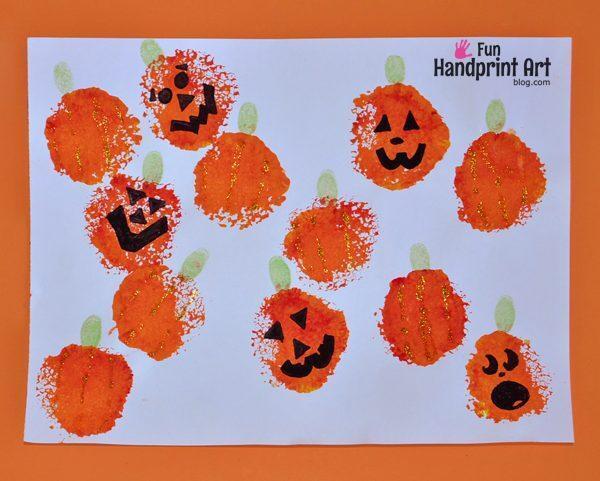
This pumpkin patch stamping activity is an adorable fall craft perfect for infants and toddlers. Begin by drawing some simple pumpkin vines on a piece of paper. Then, create a “pumpkin stamper” by attaching a pom-pom or cotton ball to a clothespin. This combination makes it easier for little hands to manage compared to a traditional paintbrush, and the round pom-pom will become the pumpkins in your child’s pumpkin patch.
You’ll likely need to dip the pom-pom stamper into the orange paint and demonstrate how to press it onto the paper, but once they get the hang of it, they’ll be ready to go! This is a fun art project that also helps develop fine motor skills. Once they’re done stamping, you can add some pumpkin leaves—and if it doesn’t quite resemble a pumpkin patch, feel free to label it for that extra cute touch!
PUMPKIN MARBLE PAINTING
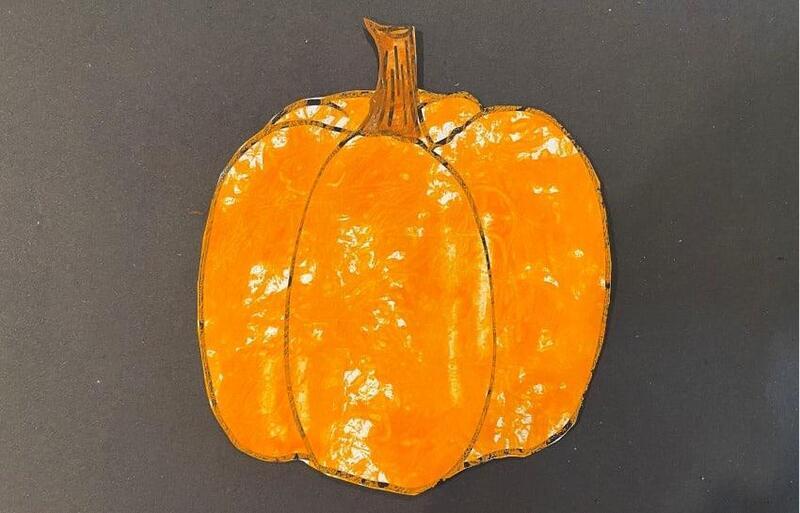
For a fun and unique painting activity without paintbrushes, try this pumpkin marble painting! Start by printing a pumpkin template on cardstock or paper. You’ll need orange non-toxic paint, marbles, and a shallow, flat container. Place the pumpkin template inside the container, then add small blobs of paint around the edges of the template to avoid large blotches directly on the pumpkin.
Next, let the marbles do the painting! As they roll across the container, they will create streaks of paint on the cardstock. Older children can tilt the container to control the marble movement, and while this action may be challenging for most infants, they’ll enjoy watching the marbles roll through the paint and over the pumpkin, creating a beautiful pattern.
ACORN PAINTING CRAFT
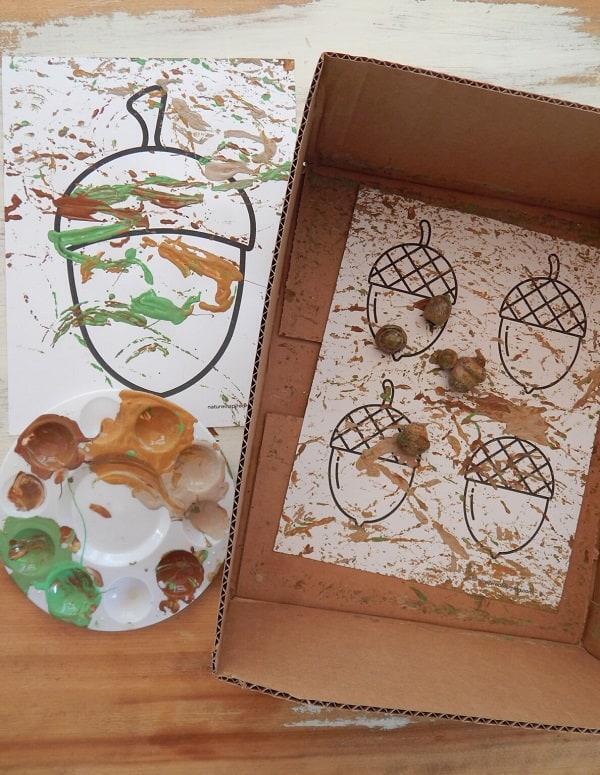
For this adorable acorn painting craft, gather some acorns (real or faux), baby-safe fall-colored or natural-colored paint, a shallow plastic tub, and plain paper. This fun process art project is similar to the marble painting activity, but you’ll use acorns instead of marbles and can swap the pumpkin outline for an acorn one.
You can either apply the paint directly to the acorns or place blobs of paint on the paper. Then, shake or tilt the tub so the acorns roll through the paint and across the paper, creating a colorful pattern. Older infants might even try to lift the box to watch the acorns roll, which helps develop both fine and gross motor skills.
Some infants may enjoy holding the acorns and painting with them directly—just be sure to supervise and prevent any from going into their mouth!
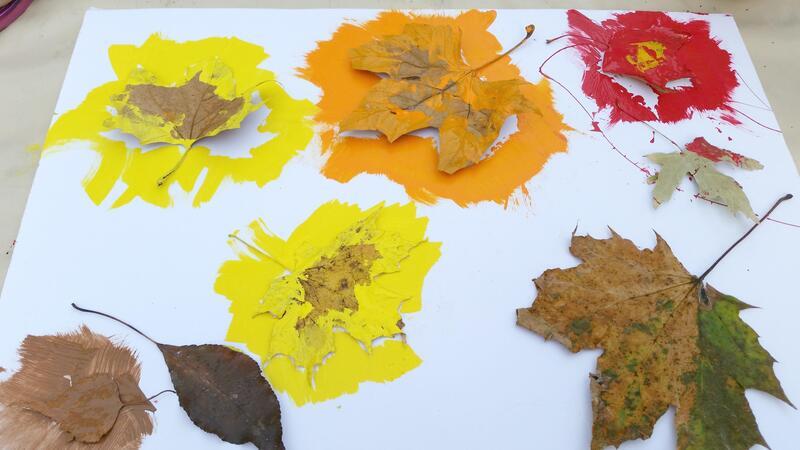
LEAF PRINTING
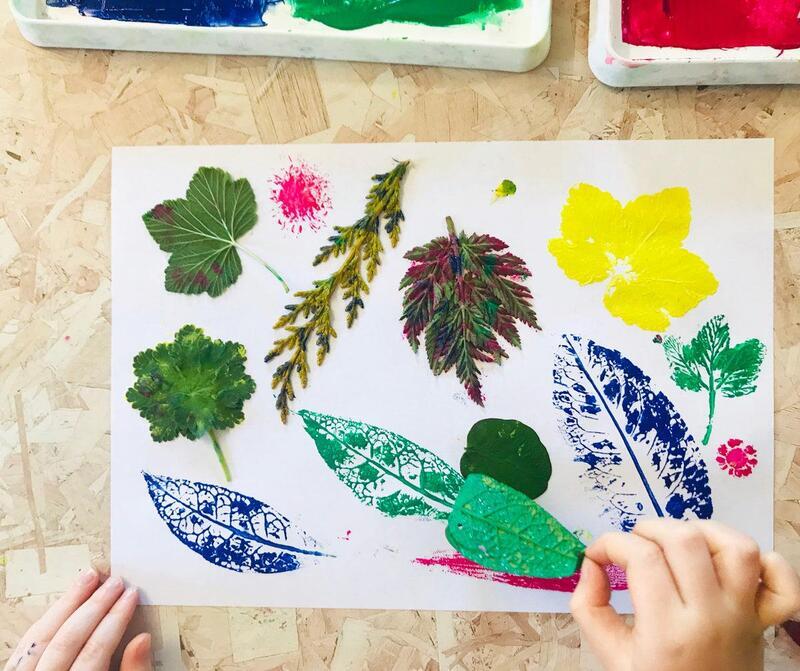
For this leaf printing activity, start by putting your baby in the stroller and taking a nature walk to gather some beautiful leaves—this in itself is a fun and engaging activity. Once you’ve collected your leaves, help your infant cover them with tempera paint in whichever way they can. They can paint the leaves and then press them onto paper to leave behind colorful leaf prints.
If you want to simplify the process, you can cover the leaves with paint for them and assist your infant in pressing the painted leaves onto the paper. Adjust this fall craft to match your baby’s current abilities, ensuring they can explore and enjoy the activity at their own pace.
TURN LEAVES INTO CONFETTI
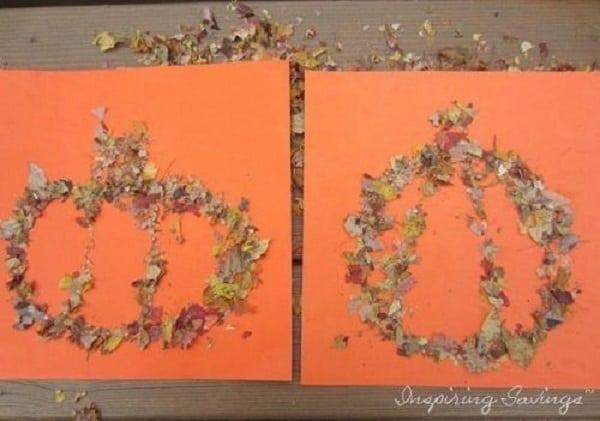
This unique art project lets you turn autumn leaves into confetti for a fun, open-ended fall craft with your infant. Start by taking a lovely stroller walk to observe and collect different dry leaves—dried, crunchy leaves work best. If needed, you can dry them in the microwave for a minute.
Now the fun begins! Let your infant rip, tear, and shred the leaves into tiny pieces, creating leaf confetti. Keep a close eye to ensure they’re not putting any leaves in their mouth.
Next, apply clear Elmer’s glue to a piece of orange construction paper and sprinkle the leaf confetti all over it. You’ll likely need to help guide your infant through the process, but they’ll enjoy the sensory experience of playing with the leaves and glue.
FUN FALL CRAFTS FOR INFANTS
There’s no better way to celebrate the fall season than by creating some adorable autumn crafts! The projects listed below will lead to charming finished products, and while the emphasis is on achieving a specific look, the process will help develop fine and gross motor skills. Plus, these activities provide wonderful opportunities for bonding time with your little one. Enjoy the creative fun together!
FALL LEAVES WREATH
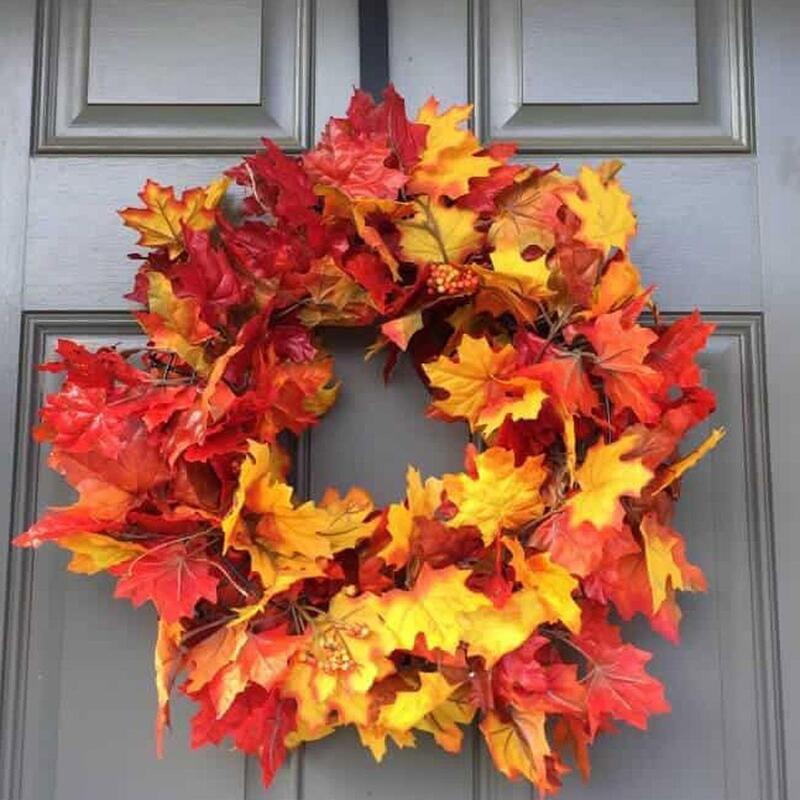
This simple fall leaves wreath is a lovely keepsake that can be cherished for years to come. To make it, you’ll need faux fall-colored leaves (often available at the dollar store), plain paper plates, ribbon for hanging, scissors, and a hole punch (which will help feed the ribbon through the wreath).
Start by folding the paper plate in half and cutting out a semicircle from the center to create a ring. Next, cover the cutout paper plate with glue and assist your infant in gluing the leaves onto the plate. Your child will have a great time decorating the wreath with the vibrant leaves, creating a beautiful autumn decoration that you can display proudly!
REVERSE FALL LEAF PAINTING
For this simple leaf painting craft, you’ll need to collect real leaves from your yard—just make sure they aren’t too dry and brittle, as they can break easily. Faux leaves can also work well!
Gather your materials: poster board or paper, double-sided tape (to attach the leaves), fall-colored paint, and toddler-friendly brushes like foam brushes (though a young child may prefer using their fingers and hands).
Start by sticking the leaves to the poster board. Then, let your infant play with the paint, helping them paint around and on the leaves to create a clear leaf silhouette if desired. Once they finish painting, carefully remove the leaves and tape, and set the artwork aside to dry.
For a more lasting keepsake, consider doing this project on a canvas instead of poster board or paper. You can also laminate the finished piece to preserve this sweet fall art project for years to come!
APPLE TREE STAMPING CRAFT
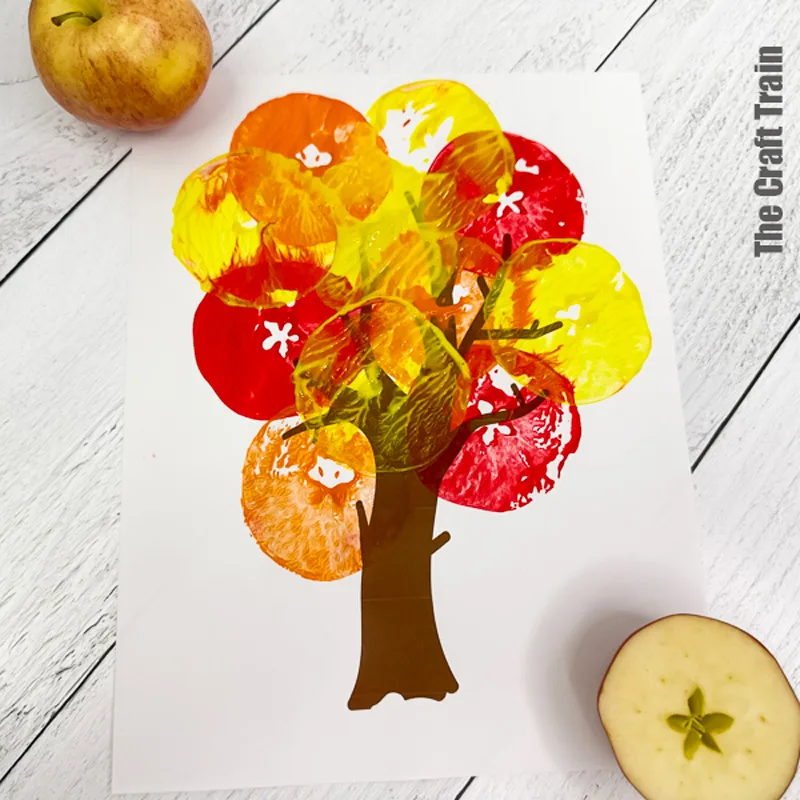
Who knew sliced apples could be such a fun painting tool? For this apple tree stamping craft, simply cut some apples in half and gather fall-colored paint, paper, and a paintbrush.
Begin by drawing the structure of an apple tree with branches on the paper. Then, apply paint to the flat side of the cut apple, and it’s time for your infant to get creative! Help them stamp the apples all over the tree to create colorful foliage. For an added twist, you could draw a basket alongside the tree, and they can stamp apples into the basket as well. This engaging activity combines art and exploration while celebrating the fall season!
FALL SUNCATCHERS
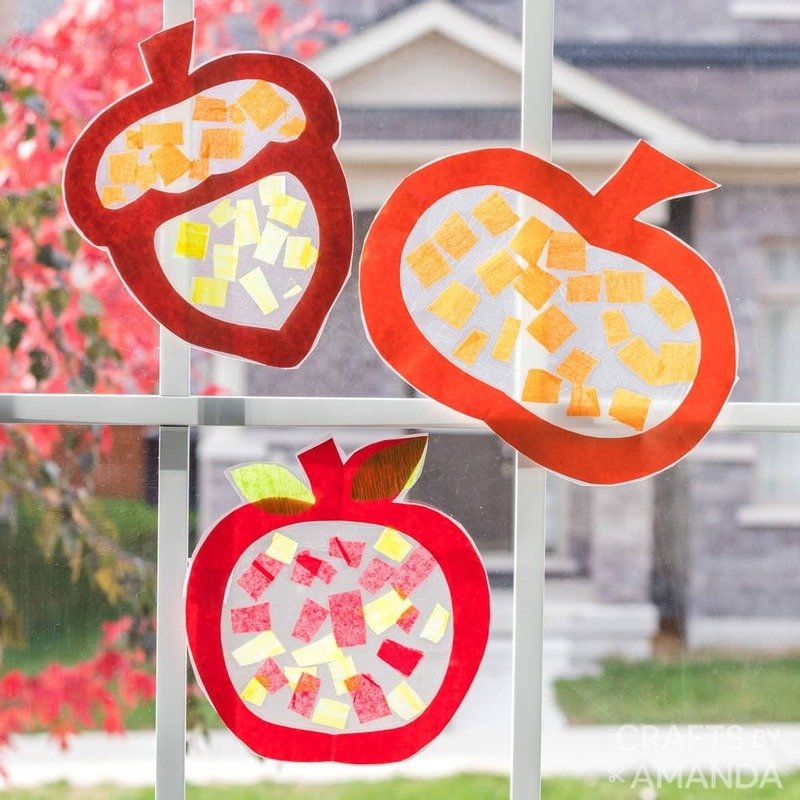
Creating these fall suncatchers is a fun and easy, no-mess craft perfect for infants. To make fall-themed shapes like apples, pumpkins, or acorns, simply cut out the shapes, leaving the centers empty (check the linked tutorial above for an easy guide on how to draw and cut these shapes).
Next, attach a piece of contact paper to one side of each cutout, ensuring the sticky side is facing up so your child can stick tissue paper squares onto it. Let them decorate the contact paper however they like!
Once they finish decorating, add a second sheet of contact paper, sticky side down, to seal and protect the suncatcher. You can then display it in a window to brighten up your fall decor for years to come.
Older siblings and preschoolers can help with cutting out the shapes, while infants can enjoy sticking the tissue paper squares onto the sticky contact paper. This activity is a great example of how to tailor crafts to meet the developmental needs of different ages!
ADORABLE HAND, FOOT & FINGERPRINT ARTS AND CRAFTS TO DO WITH YOUR BABY
For the art projects listed in this section, most of the work will be parent-led to create adorable fall handprint creations. These activities focus more on achieving a cute final result rather than the process itself.
Keep in mind that crafts involving painted handprints may require several attempts to get right—expect a few smudged handprints along the way! I’ve found that sponge brushes work best for applying paint to skin instead of traditional bristle brushes, as they allow for quicker and thicker coverage.
Despite the effort involved, a good handprint craft makes a beautiful keepsake you’ll cherish for years to come. Try one of these fall crafts to celebrate your infant’s first autumn season!
Be sure to use baby-safe paints, such as child-safe finger paints or tempera paint. Avoid acrylic paint, as it’s not gentle on the skin, especially for a baby’s delicate skin. Additionally, acrylics can be sticky and tricky to clean off.
TURKEY HANDPRINT ART
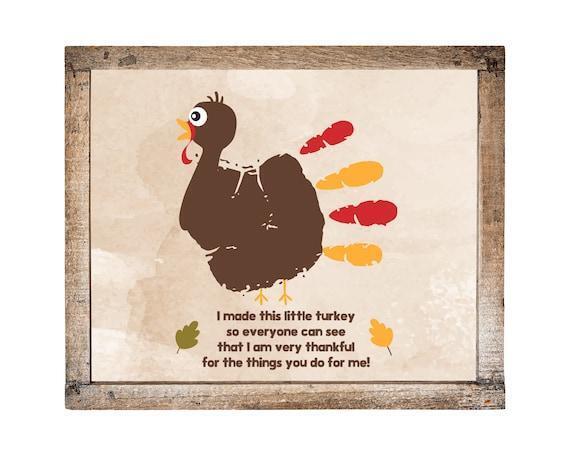
This turkey handprint art activity is one of the simplest fall crafts for infants, and it’s nearly mess-free! Start by tracing around your baby’s hand with a marker. Then, give them large grip crayons and let them scribble over their handprint outline.
To transform the handprint into a turkey, add a beak and feet. You can also include your own handprint next to theirs for an adorable family keepsake. How cute is that?
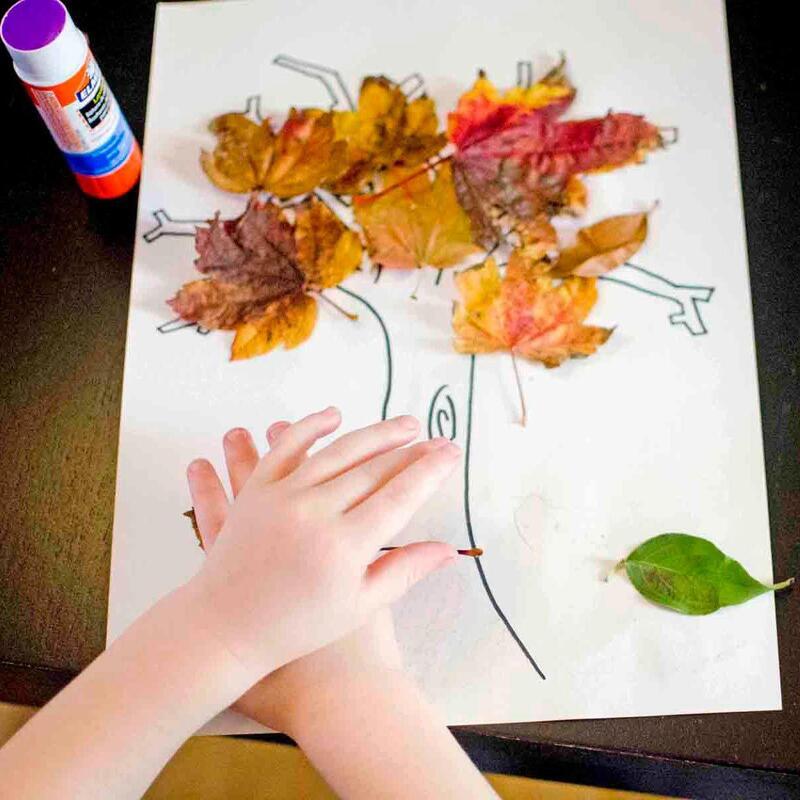
FALL TREE
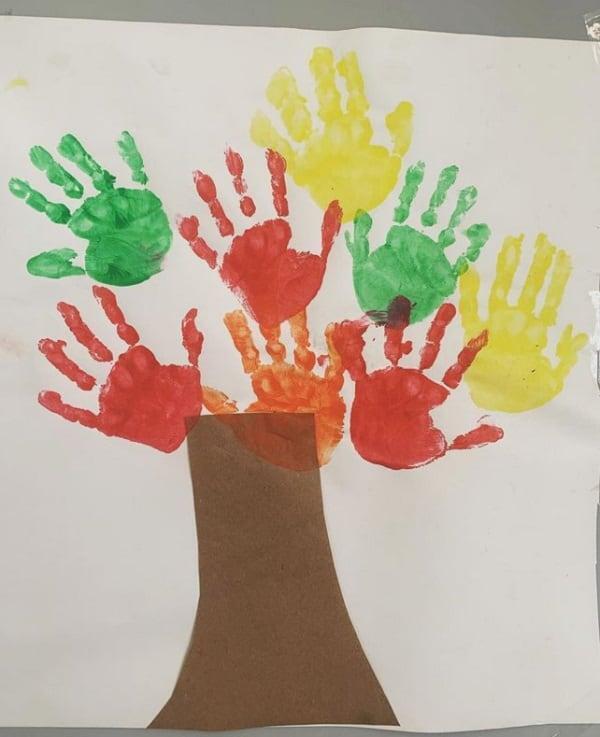
This adorable fall tree art project is a wonderful keepsake and a fun way to teach your little one about the changing colors of autumn leaves. Start by cutting out a tree trunk from brown construction paper and gluing it onto a sheet of white paper. Next, use non-toxic, baby-safe paints in various fall colors to cover your baby’s hand. Press their hand onto the paper at the top of the tree trunk to create vibrant leaves, making this a delightful fall craft for infants!
FALL HANDPRINT LEAVES
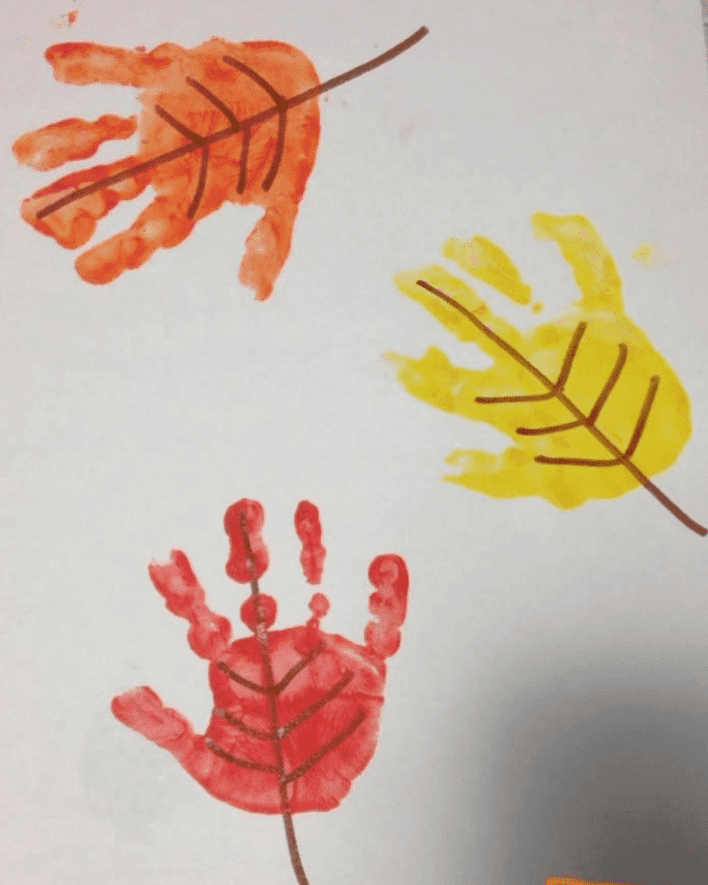
These fall handprint leaves are absolutely adorable and definitely worth trying with your infant! Start by covering their hand in fall-colored paint (think orange, brown, green, etc.) and then press their hand onto a piece of paper.
Don’t worry if it doesn’t turn out perfectly the first time; practice makes improvement! Once the paint is dry, you can draw leaf veins and a stem on their handprint to complete the leaf shape. Consider laminating the finished piece to preserve it as a special fall decoration or keepsake for years to come!
HANDPRINT LEAF WREATH
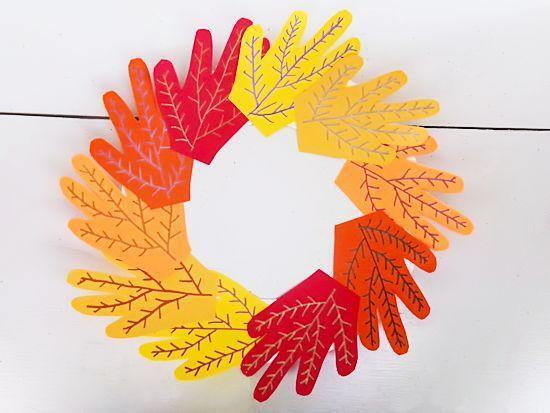
This handprint leaf wreath activity is a wonderful way to engage your infant and the whole family! Start by helping your baby create handprints in various fall colors to make colorful leaves. They’ll love exploring the temperature, texture, and colors of the paints as you create together.
Once the handprint leaves are dry, carefully cut them out and attach them to a circular base made from cardboard. Alternatively, you can cut the middle out of a paper plate and use the plate’s edge as the wreath base.
To make it even more special, involve other family members in making their own handprint leaves. This can turn into a beautiful family keepsake that’s definitely worth framing if it turns out well!
FALL SENSORY PLAY ACTIVITIES FOR BABIES
Sensory play is a highly effective and engaging way for young children to learn. Through experimenting and interacting with a diverse range of materials that provide various textures, colors, shapes, smells, and sounds, children quickly absorb new information. This type of play encourages exploration and stimulates multiple senses, all within a safe environment.
With these fun fall crafts, your baby will have the opportunity to engage in sensory experiences while discovering new concepts and enjoying the seasonal themes.
ORANGE GLITTER FALL SLIME
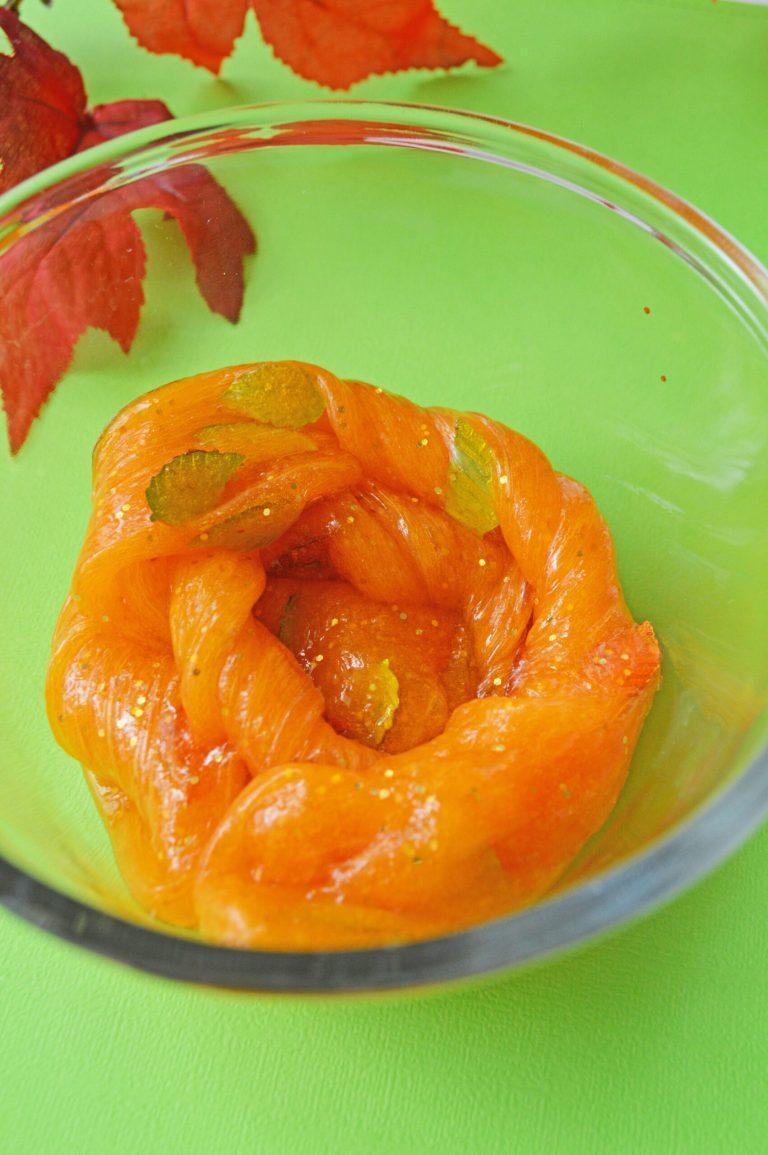
Your infant will surely enjoy the delightful soft and sticky texture of this orange glitter fall slime, which adds colorful and sparkly elements to a classic slime recipe.
To make it, you’ll need Elmer’s glue, baking soda, orange food coloring, gold glitter, fall leaf confetti, and contact lens solution. Start by pouring the glue into a bowl, then gradually add each ingredient, making sure to add the contact lens solution last.
Be sure to stir well as you go along. Once the slime begins to solidify, take it out of the bowl and continue mixing with your hands. You can store the slime in the refrigerator to prolong its freshness. Just remember to supervise closely as your baby explores this new texture, ensuring their safety and protecting your furniture!
EDIBLE CANDY CORN SLIME

This edible candy corn slime is a great way to put all of that leftover candy corn to good use. Is it only me that buys a bag every year, only to not finish because I remember how bad it is?! To the candy corn you need add marshmallows, vegetable oil, and powdered sugar.
Heat the ingredients in the microwave as detailed in the linked tutorial above. This is obviously an edible recipe, but under ones aren’t meant to have sugar, so you’re still going to have be a little careful if your infant puts too much in their mouth.
FALL COLORED OATS SENSORY BIN
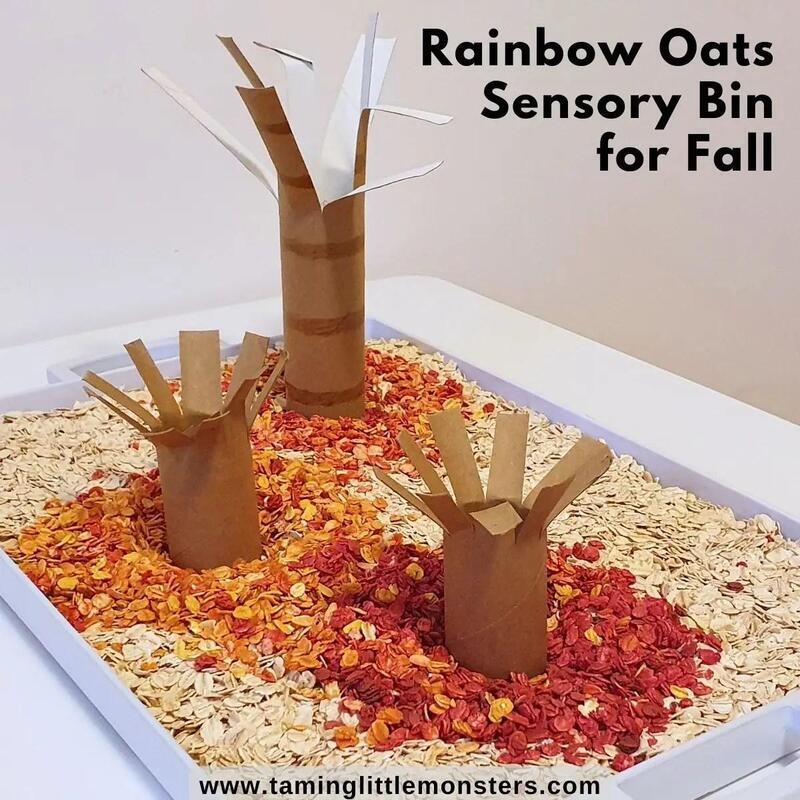
To create a fall-colored oats sensory bin, start by preparing a rainbow oats recipe in advance. It’s simple to make but requires some time to dry. You’ll also need a tub or bin and any tools that are safe for your baby’s small hands, such as silicone spatulas and measuring spoons.
Your infant will love scooping and pouring the oats, watching the colors blend together, and simply exploring the textures in this engaging fall sensory activity.
For infants, this setup is usually sufficient, but if you have a toddler as well, check the link above for details on making cardboard tube trees to enhance the play experience. Alternatively, consider adding one or two fall-themed materials to the bin to further enrich your infant’s sensory exploration.
FALL SENSORY BIN WITH CORN
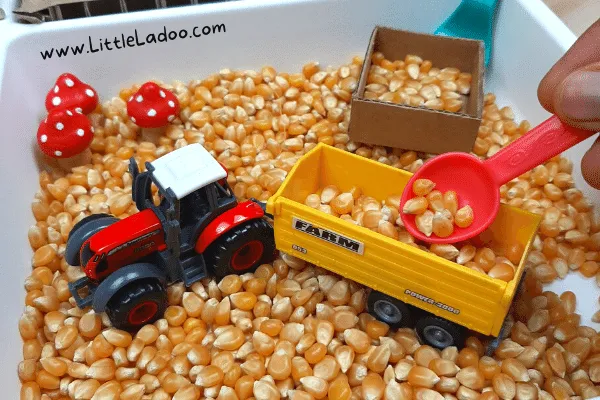
The key to creating a corn fall sensory bin for infants is simplicity. Start with a base of dry corn kernels and add just a few toys or pinecones, along with a tool or two. You can mix real and artificial items for added interest.
While the linked tutorial provides a more elaborate setup, it’s essential to remember that less is often more for infants. Their short attention spans and developing physical and cognitive skills mean they require less stimulation than older children.
In fact, having too many items can lead to sensory overload, causing infants to disengage completely. Purposeful play is crucial, so focus on including fewer items that hold greater significance, rather than a multitude of items that may lack purpose.
FALL APPLE TREE SENSORY BIN
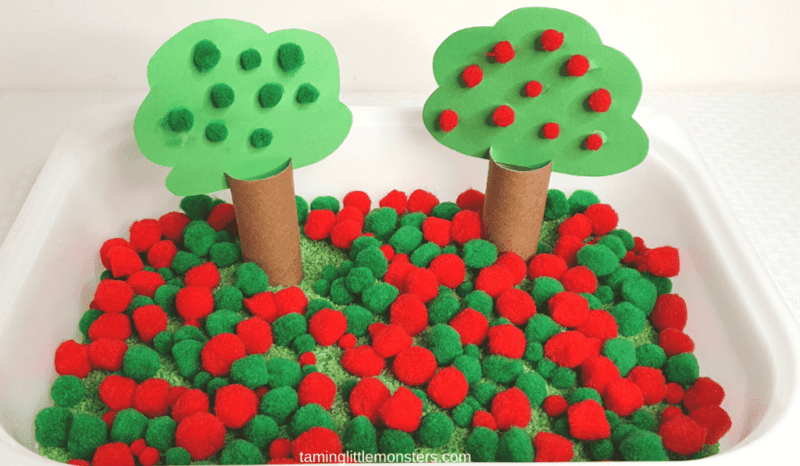
For the apple tree sensory bin, gather green dyed rice, red, green, and yellow craft pom poms, cardboard tubes, green cardstock or craft paper, glue, and scissors. It’s best to prepare the apple trees ahead of time, as this part of the project isn’t suitable for infants, but an older toddler sibling might enjoy helping out.
Alternatively, you can simplify the activity by focusing solely on the pom poms, with or without the rice. One of the joys of infant play is the flexibility to adapt any activity to suit your child’s age and the materials you have on hand. You don’t need to use every item listed in the tutorial; just choose what works best for your setup and your little one’s developmental stage!
PINECONES AND TISUE PAPER
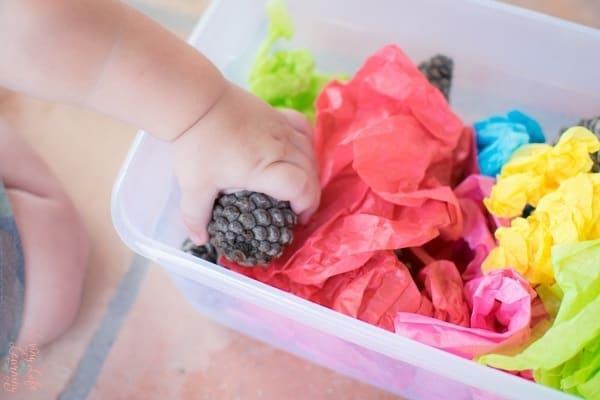
This pinecones and tissue paper sensory bin is a super simple yet engaging activity and you only need three materials: pinecones, tissue paper and a bin or tub of some kind. You could also use a cardboard box if you have one laying around (as I tend to do from the many Amazon packages that come through our door on a regular basis!)
Your baby will love feeling the texture of the tissue paper and hearing the sounds it makes as they move it around and the pinecone provides such a contrasting texture and weight. Exploring the two together makes for a fun fall sensory activity for an infant, with the hard, rippled outer of the pinecone and it’s relatively heavier weight versus the soft, light and crinkly tissue paper.
PUMPKIN BOATS WATER SENSORY
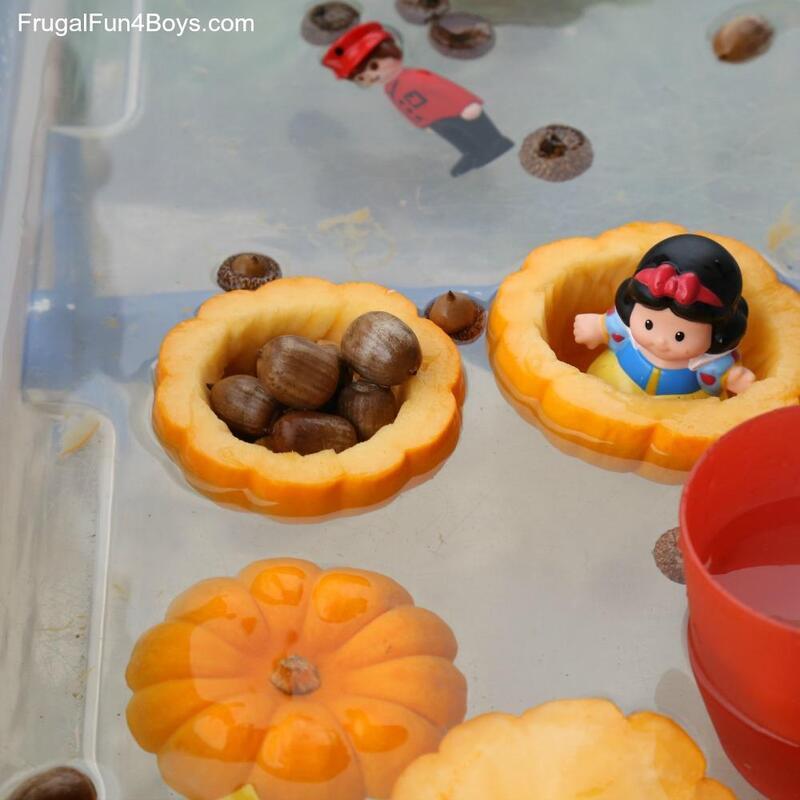
For this cute pumpkin boats sensory activity, you’ll need small pumpkin-shaped gourds or “Jack-Be-Little” pumpkins (yes, that’s their real name!). You can also use pie pumpkins from the grocery store or any small pumpkins you can find.
Begin by cutting the tops off the little pumpkins and hollowing them out to create tiny pumpkin boats. Provide some toy figures for the boats—this will likely be engaging enough for an infant. You can also add pine cones or other interesting items to enhance this fun, water-based fall sensory experience.
These pumpkin boats can even be used in the tub during bath time for an extra splash of fun!
CONCLUSION
In conclusion, these 22 fun and simple fall arts, crafts, and sensory activities for infants and toddlers provide an excellent way for young children to explore their creativity while developing essential motor skills and sensory awareness. Each activity is designed to be engaging and age-appropriate, allowing little ones to experiment with textures, colors, and shapes in a safe and nurturing environment. Whether it’s creating vibrant handprint art, exploring colorful sensory bins, or enjoying tactile experiences with slime and paint, these projects not only foster artistic expression but also promote bonding time with caregivers.
Remember, the emphasis should be on the process rather than the final product, encouraging your child to express themselves freely and learn through play. With these delightful activities, you can embrace the beauty of the fall season while creating lasting memories and keepsakes that celebrate this special time in your child’s early development. So gather your materials, get creative, and enjoy the joyful mess of fall crafting with your little ones!