How to Shave Your Legs: Tips for a Smooth and Safe Shave

When it comes to achieving that silky, touchable perfection on your legs, shaving is often the go-to method. Whether you’re a seasoned pro or a newbie to the world of leg shaving, we’ve got you covered with some fantastic tips and tricks. In this guide, we’ll walk you through the art of how to shave your legs for the smoothest, most radiant results. So, let’s dive into this leggy adventure and unveil the secrets to your best shave ever!

How to Shave Your Legs

What You’ll Need

  • Razor
  • Shaving cream or gel
  • Warm water
  • Towel
  • Moisturizer

Step 1: Prepare Your Skin

Begin by taking a warm shower or bath. The warm water helps soften your hair and opens up the hair follicles, making the shaving process more comfortable and effective. Spend a few minutes allowing your legs to soak in the warm water.

Step 2: Gather Your Tools

Ensure you have all the necessary tools on hand: a clean, sharp razor, shaving cream or gel, a towel, and moisturizer.

Step 3: Exfoliate (Optional)

Before shaving, you can exfoliate your legs using a gentle scrub or exfoliating mitt. This step removes dead skin cells and can result in a closer shave. However, be gentle to avoid over-exfoliating, which can irritate the skin.

Step 4: Apply Shaving Cream or Gel

Apply a generous amount of shaving cream or gel to your legs. This helps create a protective barrier between the razor and your skin, reducing the risk of nicks and irritation. Choose a product suitable for your skin type.

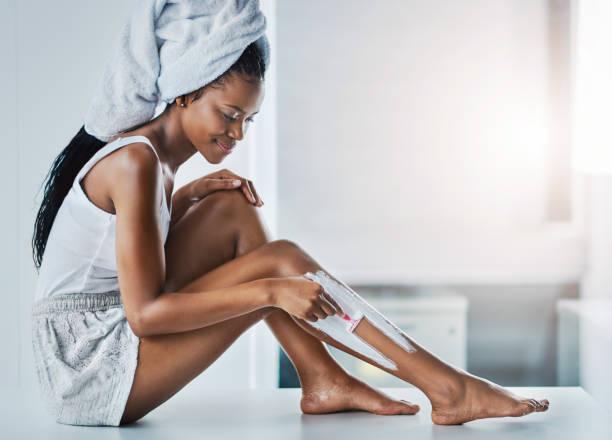
Step 5: Start Shaving

Hold the razor at a slight angle against your skin and start shaving from your ankle, moving upward in the direction of hair growth. Shaving with the grain helps prevent ingrown hairs and irritation. Use smooth, even strokes.

Step 6: Use Light Pressure

Maintain a light, gentle touch while shaving. There’s no need to press hard; the razor should glide smoothly over your skin.

Step 7: Rinse the Razor

Rinse the razor blade frequently under warm running water to remove accumulated shaving cream, hair, and debris.

Step 8: Pay Attention to Curved Areas

Be extra cautious when shaving your knees and ankles, as these areas have curvier surfaces. Shave slowly and carefully to avoid nicks or cuts.

Step 9: Check for Missed Spots

After completing the shave, carefully inspect your legs for any missed patches. Touch up these areas as needed.

Step 10: Rinse and Pat Dry

Rinse your legs thoroughly with cool water to close the pores and remove any remaining shaving cream. Pat your skin dry with a clean towel; avoid rubbing to prevent irritation.

Step 11: Apply Moisturizer

Finish by applying a moisturizer or lotion to keep your skin hydrated and prevent dryness. Opt for a fragrance-free, hypoallergenic moisturizer if you have sensitive skin.

Side effects of shaving legs

Shaving legs is a common and generally safe method of hair removal. However, like any grooming technique, it may have side effects, especially if not done correctly or if you have sensitive skin. Here are some potential side effects of shaving legs:

Razor Burn

Razor burn is a common side effect of shaving. It appears as redness, irritation, and sometimes small, itchy bumps. It often occurs when you shave too quickly, apply too much pressure, or use a dull blade.

Ingrown Hairs

Ingrown hairs can develop when the shaved hair curls back into the skin instead of growing outward. They can be painful and appear as red, raised bumps. Exfoliating before shaving and using proper shaving techniques can help prevent them.

Skin Irritation

Some people may experience skin irritation, especially if they have sensitive skin or allergies to shaving products. Using hypoallergenic shaving creams or gels can reduce this risk.

Cuts and Nicks

Accidental cuts or nicks can happen when shaving, particularly if you’re not careful or if your razor is not sharp. Always use a sharp, clean razor, and take your time to avoid these.

Uneven Shave

Sometimes, an uneven shave can occur, leaving behind patches of hair or missed spots. Pay attention to detail when shaving and check your legs afterward to ensure you haven’t missed any areas.

Folliculitis

Folliculitis is the inflammation of hair follicles and can be caused by shaving. It may appear as red, pimple-like bumps and can be itchy or painful. Proper shaving techniques and hygiene can help prevent it.

Darkening of Skin

Some individuals may notice a darkening of the skin after frequent shaving. This is known as post-inflammatory hyperpigmentation and can occur due to the irritation caused by shaving. Using sunscreen on shaved areas can help prevent this.

common mistakes to avoid when shaving your legs

Not Prepping Your Skin

Skipping the pre-shave preparation can lead to rough results. Make sure to soak your legs in warm water for a few minutes before shaving to soften the hair and open the pores.

Using an Old or Dull Razor

A dull razor can cause nicks, cuts, and irritation. Razor blades can harbor bacteria and become dull over time. Always use a sharp, clean razor for the best results. Replace your razor blade regularly.

Dry Shaving

Shaving without using any shaving cream, gel, or soap can lead to friction and irritation. Apply a good-quality shaving cream or gel to create a barrier between the razor and your skin.

Shaving Against the Grain

Shaving against the direction of hair growth may result in ingrown hairs and irritation. Shave in the same direction as hair growth to minimize these issues.

Skipping Post-Shave Moisturizing

Applying moisturizer after shaving is crucial to keep your skin hydrated and prevent dryness and irritation.

FAQs

  1. How often should I shave my legs? This depends on your personal preference and hair growth rate. Some people may need to shave every day, while others can go several days between shaves.
  2. Can I use soap instead of shaving cream? While it’s possible to use soap as a lubricant when shaving, it’s not recommended. Soap can dry out the skin and make it more prone to irritation and razor burn.
  3. Should I shave my legs before or after showering? It’s generally recommended to shave your legs after showering, as the warm water helps to soften the hair and open up the pores.
  4. How do I avoid getting razor burn when shaving my legs? To avoid razor burn when shaving your legs, make sure to use a sharp razor and plenty of lubrication. Shave in short, gentle strokes and avoid going over the same area too many times. It’s also important to avoid using hot water or scrubbing the skin too vigorously after shaving, as this can further irritate the skin.
  5. Can I shave my legs if I have sensitive skin? Yes, you can still shave your legs if you have sensitive skin. However, you may also want to consider shaving in the direction of hair growth instead of against it, as this can be less irritating for some people.

Final Takeaway

We’ve reached the end of our journey through the world of leg shaving. By now, you’re armed with the knowledge and techniques to achieve those irresistibly smooth and touchable legs you’ve been dreaming of. Remember, the key to a perfect shave is taking your time, using the right products, and showing your skin a little extra love. So go ahead, pamper yourself, and confidently flaunt those beautiful, silky legs. Happy shaving!

Gua Sha Back Chart: Navigating the Path to Wellness

Are you ready to discover a hidden gem within the world of gua sha? As we enter the fascinating world of the gua sha back chart, be ready for an interesting journey. Your back is in for a pleasant surprise thanks to this age-old therapeutic technique, which we are here to walk you through with a grin. In this post, we’ll take you on an explorational voyage as we reveal the gua sha back chart’s marvels and show you how it may open up a world of renewal and harmony. Come learn how to use gua sha to target certain parts of your back, giving relief, relaxation, and a deeper connection to your general well-being. Get ready to dig into the symbols and locations depicted on this chart. So relax, and join us on this amicable journey to discover the wonder of the gua sha back chart. 

What is Gua Sha Therapy?

An ancient Chinese therapeutic method called gua sha treatment involves scratching the skin with an instrument having a smooth edge in order to increase blood flow and accelerate recovery. Over 2,000 years ago, the method was utilized to cure a number of illnesses, such as fever, coughing, and stomach problems.

Gua sha has gained popularity as a non-drug pain reliever in the West in recent years. It is often used to address chronic pain issues including migraines, fibromyalgia, and arthritic pain.

This therapy activates the body’s own healing mechanisms. Scraping the skin causes an immunological reaction that boosts blood flow to the injured region. This increased blood flow provides the tissues with new oxygen and nutrients, aiding in healing and lowering inflammation.

It also aids in the release of fascial and muscular tension, which may be a factor in the development of chronic pain. Gua sha may assist with regaining mobility and reducing stiffness in the afflicted region by removing adhesions and scar tissue.

How to Use a Gua Sha Back Chart

  • Choose a comfortable position: You can use a gua sha back chart while sitting or standing, whichever is most comfortable for you.
  • Apply oil or lotion to your skin: Before you begin, apply a thin layer of oil or lotion to your back to help the gua sha tool glide smoothly over your skin.
  • Start at the top of your back: Begin at the top of your back and work your way down, using long, sweeping strokes with the gua sha tool. Be sure to use gentle pressure and avoid pressing too hard.
  • Work in sections: Divide your back into sections and work on one section at a time. Use circular motions or long strokes, depending on which feels most comfortable for you.
  • Take breaks: Take breaks as needed to rest your arm and give your back a chance to relax.
  • Finish with gentle strokes: Once you’ve covered your entire back, finish with a few gentle strokes to help soothe your skin and promote relaxation.

Pros and Cons of Gua Sha for Back Pain

Pros

  • Non-invasive: Gua sha is a non-invasive therapy that doesn’t require needles or medication.
  • Cost-effective: Compared to other forms of therapy, gua sha is relatively inexpensive and can be done at home.
  • Safe: When done correctly, gua sha is a safe therapy that rarely leads to injury.
  • Effective: Many people find gua sha to be an effective therapy for relieving back pain.

Cons

  • Bruising: Gua sha can cause bruising and temporary discoloration of the skin, especially if done too vigorously.
  • Not suitable for everyone: Gua sha may not be suitable for people with certain medical conditions or who are taking certain medications.
  • Discomfort: Some people may find gua sha uncomfortable, especially if they have sensitive skin.
  • Limited research: While gua sha has been used for centuries, there is limited scientific research on its effectiveness.

Comparing Gua Sha Back Charts

If you’re interested in purchasing a gua sha back chart but are not sure which one to choose, here’s a comparison of some popular options:

Body Back Buddy Trigger Point Therapy Self Massage Tool

The Body Back Buddy is a self-massage tool that can be used to relieve tension and pain in the back and other areas of the body. It features several knobs and curved edges that can be used to apply pressure and trigger points.

The benefits of the Body Back Buddy include its user-friendly design, making it easy to apply pressure to specific areas. Additionally, it is an affordable option compared to specialized gua sha tools or professional massages, providing a cost-effective solution for self-care.

Yet, while the Body Back Buddy can be utilized for self-massage purposes, it is not specifically designed for gua sha therapy. Gua sha involves specific techniques and tools tailored for the scraping and stimulation of the skin to promote circulation and healing.

Jade Gua Sha Scraping Massage Tool

The Jade Gua Sha Scraping Massage Tool is a handheld tool made from jade that is designed specifically for gua sha therapy. It features a smooth edge that can be used to scrape the skin and promote blood flow.

One of the significant advantages of the Jade Gua Sha Scraping Massage Tool is its specialized design tailored for gua sha therapy. Being made from natural jade, this tool also offers the added benefit of harnessing the energetic properties associated with the stone. Jade is believed to have calming and balancing effects, enhancing the therapeutic experience during gua sha sessions. In terms of usability, the Jade Gua Sha Scraping Massage Tool is user-friendly and easy to incorporate into your skincare routine. 

The Jade Gua Sha Scraping Massage Tool is expensive than other options on the market. Additionally, as jade is a relatively softer material, it may be less durable than metal tools over time. Careful handling and regular maintenance can help prolong its lifespan.

Stainless Steel Gua Sha Scraping Massage Tool

The Stainless Steel Gua Sha Scraping Massage Tool features a smooth edge that can be used to scrape the skin and promote blood flow.

Stainless Steel Gua Sha Scraping Massage Tool is specific design catering to gua sha therapy. Its smooth edge is carefully honed to glide smoothly over the skin, stimulating circulation and addressing muscle tension and discomfort.

Durability is a key benefit of this stainless steel tool, ensuring it withstands regular use over an extended period. Moreover, stainless steel is easy to clean, promoting hygiene and making maintenance a breeze.

Stainless Steel Gua Sha Scraping Massage Tool may come at a higher price compared to alternative options. Additionally, some individuals may find tools made from softer materials more comfortable to use, as stainless steel can feel firmer on the skin.

Tips for Using a Gua Sha Back Chart

If you’re new to gua sha therapy, here are a few tips to keep in mind:

  • Start slowly: Begin with gentle pressure and work your way up to more intense pressure over time.
  • Use oil or lotion: Applying a thin layer of oil or lotion to your back can help the gua sha tool glide smoothly over your skin.
  • Take breaks: Take breaks as needed to rest your arm and give your back a chance to relax.
  • Be patient: It may take several sessions before you notice a significant improvement in your back pain.

Conclusion

Gua sha treatment is something to think about if you’re seeking a natural cure for back pain. While gua sha facial chart targets delicate areas to promote lymphatic drainage and sculpting, gua sha back chart focuses on larger areas to address muscle tension and promote deeper tissue release. You may increase blood flow and encourage healing in your back muscles and fascia, which can lessen stiffness and discomfort, by utilizing a gua sha back chart.

To prevent damage or pain, keep in mind to start gently, use oil or lotion, and take breaks as required. Gua sha treatment may, with time and effort, help you get rid of your back discomfort and regain mobility.

FAQs

  1. Is gua sha therapy safe for everyone? Gua sha therapy may not be suitable for people with certain medical conditions or who are taking certain medications. It’s important to talk to your doctor before trying gua sha therapy.
  2. How often should I use a gua sha back chart? It’s best to start with once or twice a week and gradually increase frequency as your body adjusts to the therapy.
  3. Is it normal to experience bruising after using a gua sha back chart? Yes, some bruising and temporary discoloration of the skin is normal after using a