BROW LAMINATION BEFORE AND AFTER: WHAT TO EXPECT

Eyebrows play a crucial role in framing and balancing facial features, yet not everyone is fortunate enough to naturally possess thick and beautiful brows. In recent years, brow lamination has emerged as a popular beauty trend embraced by many. So, what is brow lamination? How does the brow lamination process unfold? What can you expect your eyebrows to look like after undergoing this procedure? This article aims to address all your inquiries regarding brow lamination.

What is Brow Lamination?

Brow lamination is a cosmetic procedure designed to enhance the appearance of the eyebrows by giving them a fuller, more defined, and well-groomed look. It involves the use of a specialized chemical solution to reshape and set the eyebrow hairs in a desired direction, creating a neater and more uniform appearance.

  HOW DID YOU PREPARE FOR BROW LAMINATION? 

Research and Choose a Professional

Look for a reputable brow artist or salon that specializes in brow lamination. Read reviews, ask for recommendations, and ensure the professional is trained and experienced.

Consultation

Schedule a consultation with the brow artist to discuss your desired brow shape, style, and any concerns you may have. This is an opportunity to communicate your expectations and understand the process.

Patch Test

Some professionals may conduct a patch test at least 24 hours before the appointment to check for any allergic reactions to the products used in the lamination process.

Communicate Medications and Treatments

Inform the brow artist of any skin medications you are using or recent intense facial treatments you’ve undergone. This information is crucial for a safe and effective procedure.

Arrive with Clean Skin

Ensure your eyebrow area is clean and free from makeup or oils on the day of the appointment. This helps the lamination products adhere properly to the brow hairs.

The Brow Lamination Process: Step-by-Step

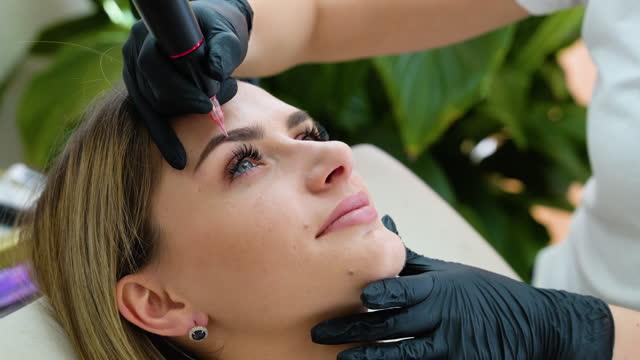
Brow lamination is a popular beauty treatment that helps to create fuller, thicker, and more defined eyebrows. Here’s a step-by-step guide to the brow lamination process:

Brow lifting

A lifting solution is applied to browse to soften the hairs and make them more pliable. This solution breaks down the bonds within the hair structure, allowing them to be manipulated into a new shape.

Neutralizing

Upon completing the predetermined processing time of the lifting solution, the next crucial step unfolds in the hair treatment journey. The application of a specialized neutralizer takes center stage, serving as the antidote to arrest the lifting process and meticulously restore the hair’s natural structure. This carefully calibrated solution not only halts the chemical transformation but also plays a vital role in ensuring the hair emerges with renewed strength and integrity. 

Brow shaping

With the hairs now softened to pliable perfection, the next phase unfolds in the meticulous process of achieving your ideal brow aesthetics. A skilled touch is employed to delicately brush and shape the hairs, guiding them into the precise direction and position that align with your envisioned brow style. The careful consideration given to each stroke and contour ensures that your brows not only follow the latest trends but also accentuate your unique facial features.

Tinting (optional)

Brow tinting emerges as an artful technique to enhance the allure of eyebrows, imparting not only color but also a refined definition. The meticulous process involves the application of a specialized tinting solution, expertly selected to complement your desired aesthetic. As the tinting solution takes effect, it gradually infuses the brows with a customized hue, accentuating their shape and framing the eyes. 

Setting

Setting lotion is an essential styling aid that ensures the longevity and precision of your chosen hairstyle. With meticulous application, it creates a resilient foundation, firmly securing each strand in place. Whether you prefer a sleek look or a carefree tousle, setting lotion serves as a reliable ally, allowing you to sculpt your hair with flexibility and firmness

Your brow lamination results and aftercare

If you’ve ever experienced any type of perm, you’re likely familiar with the golden rule — no water for the first 24 hours (a lesson we all remember from Legally Blonde). Moisture can break the chemical hold of the perm, causing your brows to revert to their natural state. Although this aspect can be a bit inconvenient, it’s a small price to pay for the overall benefits. On the night of the treatment, you carefully washed your face using a washcloth, hoping for the best outcome. 

After two weeks, your eyebrows maintained a lifted appearance, with the hairs lying somewhat flat against your skin. However, the remarkable flexibility allowed me to brush them in different directions; brushing them downwards, for instance, would keep them in that position until I brushed them back up. They didn’t stay in a permanently stiff or unnatural position. Occasionally, they appeared a bit disheveled in the morning, especially since you tend to sleep on your side, which could slightly flatten them. Yet, a quick and easy brush-up with a clean spoolie brush effortlessly restored their power-puffed look.

How much is brow lamination? 

The cost of brow lamination can vary depending on several factors, including the location, the expertise of the brow artist, and any additional services included in the package. On average, brow lamination prices can range from $50 to $150 or more. It’s recommended to check with local salons, brow studios, or beauty professionals in your area to get specific pricing information. Additionally, some places may offer package deals that include other services such as brow tinting or shaping, which can affect the overall cost.

How long does brow lamination last?

The duration of brow lamination results can vary from person to person, but on average, the effects typically last around 4 to 6 weeks. Factors that can influence how long brow lamination lasts include individual hair growth patterns, skincare routines, and exposure to water and other elements. After this period, you may notice the brows gradually returning to their natural state as new hair growth occurs. To maintain the desired look, individuals often schedule touch-up appointments every 4 to 6 weeks or as needed.

Is brow lamination worth it?

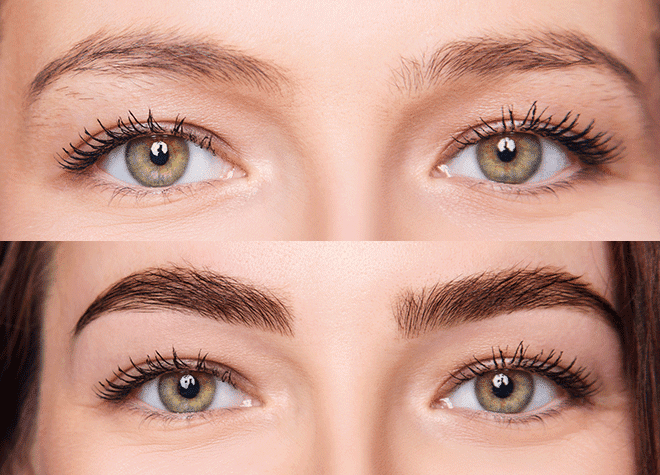
For a budget-friendly cost of under $100, I would unquestionably repeat this experience. I absolutely adore the transformation my brows underwent – they’ve become the power shoulders of my face, exuding a commanding and business-like aura. I aimed for a style reminiscent of Farrah Fawcett’s iconic feathery ‘do, albeit with a subtle hint of a wild she-wolf, perfectly encapsulating my preferred vibe. Whether dealing with thinning brows or just a touch of unruliness, opting for brow lamination provides a simple yet highly effective method to elevate their appearance significantly. A quick scroll through the Instagram hashtag reveals numerous impressive before-and-after photos, showcasing the truly transformative nature of this procedure.

CONCLUSION

One of the key benefits of Brow Lamination is its ability to deliver natural-looking results while preserving individuality. After this process, we can clearly observe the transformation, with the eyebrows appearing glossy, robust, and more uniform. Therefore, if you are seeking a quick and effective way to enhance the appearance of your eyebrows, Brow Lamination may be a suitable choice.

FAQs

  1. What happens if I get my brow lamination wet?

If you get your brows wet following a brow lamination treatment, it can affect the chemical process happening on your eyebrows. Your brow lamination won’t set, causing your brows to lose shape.

  1. What should I avoid before eyebrow lamination?

Before eyebrow lamination, it’s essential to avoid applying any makeup or skincare products on and around your eyebrows. These products can create a barrier, hindering the effectiveness of the lamination solutions. Additionally, refrain from using oil-based products as they may affect the adhesion of lamination adhesive.

  1. How do you laminate eyebrows at home?

To laminate eyebrows at home, start with a clean, dry browse free of any makeup or oils. Use a brow lamination adhesive or glue to shape and secure the brows in the desired position. Gently comb the brow hairs into the chosen shape using a brow brush. Apply a brow lamination solution, as per the product instructions, allowing it to soften and set the hairs. After the recommended time, apply a neutralizing solution to halt the lamination process. Finish by hydrating the brows with a nourishing serum or oil.

  1. Can you do brow lamination without wrap?

Brow lamination typically involves using a wrap or cling film during the process to hold the brows in place and enhance the effects of the lamination solutions. While some techniques may omit the use of wraps, it’s recommended to follow the specific instructions provided with your brow lamination kit for the best results. The wrap helps maintain the desired shape and ensures even application of the lamination products.

Brazilian Wax Before And After: What Should You Do?

Have you ever wondered what you should do with your pubic hair? Deciding what to do with your pubic hair is a personal matter, and it’s completely up to you. If you don’t mind it, simply keep it. But if you are a person who likes unique, interesting, and adventurous elements, then Brazilian waxing will certainly not disappoint you.. So what exactly is Brazilian waxing? How do you use it? What should you prepare before and after Brazilian hair removal? Please continue reading to get your answers.

What’s a Brazilian Wax?

People often use the terms “Brazilian wax” and “bikini wax” to talk about removing hair down there. Seven sisters from Brazil, working at J.Sisters beauty salon in Manhattan, New York, came up with this idea in 1987, and that’s why it’s called Brazilian wax. A Brazilian wax entails the complete removal of pubic hair from the frontal area, upper thighs, and buttocks. Depending on your personal preference, you have the option to retain a small strip, a triangle, or a square of hair in the front. The picture shows different ways you can get your hair waxed.

You don’t have to remember all the fancy names. When you go to a professional beauty salon, you can talk to the staff about what you want. You can choose to wax everything or leave some parts, wax only on the outside, or get into all the small details. There are many ways to get your Brazilian wax just the way you like it. It’s pretty interesting, right? Keep reading for more info if you’re curious.

Does Brazilian Wax Hurt?

Yes, Brazilian waxing can be uncomfortable and painful for many individuals. The process involves the removal of hair from the entire pubic region, including the bikini line, genital area, and sometimes the buttocks. The level of pain experienced can vary from person to person. It may depend on factors such as individual pain tolerance, the skill of the esthetician performing the wax, and whether it’s the first time or a regular occurrence.

The pain is often described as a quick, intense sensation as the wax is applied and then removed, taking the hair with it. However, many people find that the discomfort lessens with repeated sessions, as the hair becomes finer and the follicles weaker over time. Applying a numbing cream before the procedure and taking over-the-counter pain relievers may help mitigate the discomfort. It’s essential to communicate with the esthetician about any concerns or preferences during the waxing process.

How To Prepare For A Brazilian Wax 

Hair Length

Having the right length of pubic hair is essential for a successful waxing experience. Aim for a quarter to a half-inch length, as this ensures proper adhesion of the wax to the hair and facilitates effective removal. If the hair is too short, the wax may not adhere adequately, compromising the efficiency of the waxing process.

Exfoliation

In preparation for your waxing appointment, consider gently exfoliating the targeted area one to two days prior. Exfoliation plays a crucial role in eliminating dead skin cells, creating a smoother surface for waxing, and minimizing the likelihood of ingrown hairs by preventing trapped hair beneath the skin’s surface. This simple pre-waxing step enhances the overall effectiveness of the hair removal process and contributes to a smoother, longer-lasting result.

Hygiene

On the day of your waxing appointment, prioritize personal hygiene by taking a thorough shower and cleansing the entire pubic area. This practice not only contributes to a more pleasant experience for both you and your esthetician but also helps remove any oils, sweat, or residues that could interfere with the waxing process. Clean skin provides an optimal canvas for wax adhesion and ensures a more hygienic and comfortable waxing session.

Avoid Moisturizers

On the day you get waxed, avoid putting on lotions, creams, or oils. These things can make it tough for the wax to stick well, causing challenges during the hair removal process. Keeping your skin free from these products ensures a smoother and more effective waxing experience.

Pain Relief

If you’re worried about pain, think about taking a regular pain reliever like ibuprofen about 30-45 minutes before your appointment. Just make sure to follow the recommended amount, and if you have any questions, it’s a good idea to talk to a healthcare professional. This can help make the waxing process more comfortable for you.

Comfortable Clothing

When you go for your appointment, choose loose and comfy clothes. Tight outfits might bother your skin after waxing, so it’s better to keep things relaxed for a more comfortable post-waxing feeling.

Timing

Pick a time for your appointment when you’re not on your period. Sensitivity is usually higher during menstruation, so if you can, it’s a good idea to choose a different time for your waxing session. This way, you can make the experience more comfortable for yourself.

Relaxation Techniques

Practice deep breathing to ease nerves during waxing. Communicate openly with your esthetician, especially if it’s your first time or if you have preferences or concerns. A skilled esthetician will ensure your comfort and provide personalized advice

Avoid Sun Exposure

Avoid spending too much time in the sun or using tanning beds before your appointment since this can make your skin more sensitive. Keeping your skin less exposed to the sun helps ensure a more comfortable waxing experience.

Avoid Alcohol or Caffeine

Before your appointment, try not to have too much alcohol or caffeine, as these can make your skin more sensitive. Keeping these in check can help make your waxing experience more comfortable.

What Should You Do After Brazilian Wax?

Choose a high-quality wax for a smoother experience during hair removal. There are numerous effective soft waxes designed to make your waxing process easier, each offering unique features to enhance the overall experience.

The main result of Brazilian waxing is to remove hair from the bikini area, leaving smooth skin accompanied by a burning sensation and possibly a slight itch, so after waxing, you must take careful care of your skin. Wear loose and breathable clothing to avoid irritation, and steer clear of hot baths, saunas, or heavy workouts for at least 24 hours. Applying a soothing, alcohol-free moisturizer to the waxed area can help hydrate the skin and reduce redness. Additionally, avoid sun exposure and tight clothing to prevent further irritation, and refrain from exfoliating for a few days to give your skin time to recover. If you experience any discomfort or redness, consider applying aloe vera gel or a post-waxing product recommended by your esthetician.

How Long Does A Brazilian Wax Last

Following a Brazilian wax, the smoothness of your skin can last anywhere from three to six weeks, and this duration varies based on the speed of your hair’s regrowth. For optimal results, consider booking your subsequent waxing sessions approximately every three to four weeks after your initial one. This consistent schedule not only helps in slowing down the regrowth of hair but also contributes to a cumulative effect over time. With regular waxing, you may notice that your hair tends to become thinner, enhancing the effectiveness of each waxing session and extending the time between treatments for longer-lasting results.

How Much Does A Brazilian Wax Cost

The cost of a Brazilian wax can vary depending on various factors such as the location, the salon or spa’s reputation, and the expertise of the esthetician. On average, you can expect to pay anywhere from $50 to $120 for a Brazilian wax. It’s advisable to check with local salons or spas to get specific pricing in your area. Some establishments may offer package deals or discounts for regular appointments, so it’s worth inquiring about any promotions they may have. Keep in mind that prices may also vary based on additional services, the use of premium wax, or the inclusion of aftercare products.

FAQ

1. Can I Take a Brazilian Wax At Home?

Yes, you can do Brazilian wax at home, but it’s important to follow proper procedures and take necessary precautions.

2. Can I get a bikini wax or Brazilian wax if I’m having my period?

Certainly! Be aware that your pubic area is typically more sensitive during this period, so you might feel more discomfort than usual. To ensure a successful waxing session, using a tampon is necessary.

3. Is it safe to have Brazilian wax while pregnant?

You can still get a bikini or Brazilian wax during pregnancy, but be aware of potential increased skin sensitivity due to hormonal changes. If planning to wax in the last two months of pregnancy, consult with your doctor first.

4. When should you not get a Brazilian?

Wait to get a wax if you have temporary skin issues. Reschedule your appointment if you have a sunburn or other skin irritation. You’ll want to wait for it to clear up so you avoid extra pain or irritation during and after the wax.

5. What should you use to care for your skin after a Brazilian wax?

Using high-quality wax and wax aftercare products will help ensure a better result. Here are our top product picks that we guarantee will give your clients an amazing Brazilian wax experience. 

GiGi Hard Wax Beads: Created by a leader in the hair removal industry for over 40 years. Preferred by beginners and at-home waxers with their top-notch waxing products and easy-to-follow instructions.

GiGi Crème Wax: Made with wonderfully hydrating ingredients that won’t strip away your skin’s natural moisture along with the hair; promotes skin elasticity and suppleness leaving you with firmer and more plump skin; brighter and lighter complexion.

Conclusion

Just like women, men are embracing the manzilian wax, initially intimidating but ultimately freeing. The Brazilian wax, a rite of passage for many, can be an intimidating yet liberating experience. Remember, proper care is the key to a comfortable recovery and long-lasting results. So, listen to your skin, indulge in gentleness, and embrace the freedom that comes with feeling bare and beautiful in your skin.