TURN TOILET PAPER ROLLS INTO ELEGANT SNOWFLAKE ORNAMENTS

Looking for a creative way to repurpose empty toilet paper rolls? Get ready to be inspired as we transform them into delicate and enchanting snowflake ornaments. Welcome to a world where upcycling meets artistry, turning everyday waste into beautiful holiday décor!

In this guide, we’ll walk you through the step-by-step process of crafting these stunning winter decorations. From collecting your supplies to adding those magical finishing touches, you’ll learn how to create unique snowflake ornaments that bring charm and eco-friendly flair to your home. So, gather your materials and let’s dive into this delightful DIY project together!

Gather Your Materials

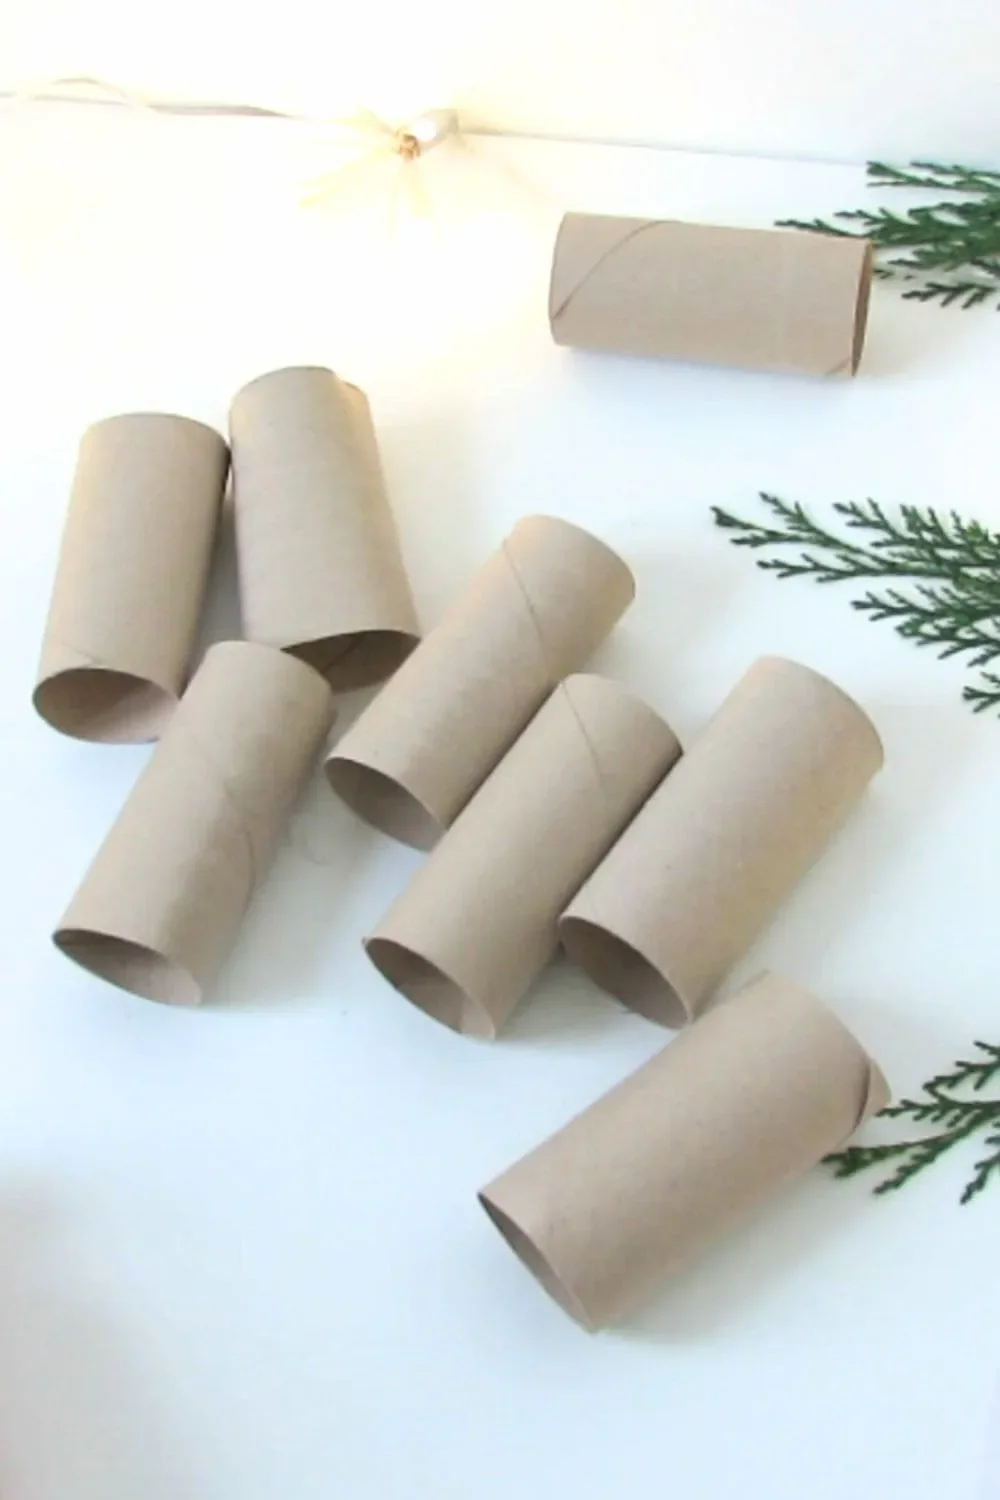
Before we get started on this fun crafting journey, let’s make sure we have all the materials needed to create these beautiful snowflake ornaments. One of the joys of this project is its simplicity and the ability to use items you likely already have at home.

Materials You’ll Need:

  • 8 toilet paper rolls
  • Scissors
  • Pencil
  • Glue gun
  • Paint (any color you love—try metallics for an extra festive touch!)
  • Decorative elements of your choice (think glitter, rhinestones, sequins, or even small beads)

With these supplies in hand, you’re ready to start crafting your enchanting snowflake ornaments! Let’s transform the ordinary into something extraordinary.

Prepare the Toilet Paper Rolls

To get your toilet paper rolls ready for their magical transformation into snowflake ornaments, it’s important to prepare them properly for crafting.

PREPARATION STEP:

  • Clean the Rolls: Carefully remove any leftover toilet paper from the rolls to ensure they are smooth and ready for decorating.
  • Flatten the Rolls: Using your hands or a flat surface, press down gently on each roll to flatten it. Apply even pressure to create a smooth, flattened surface, which will make cutting and shaping them into snowflakes much easier.
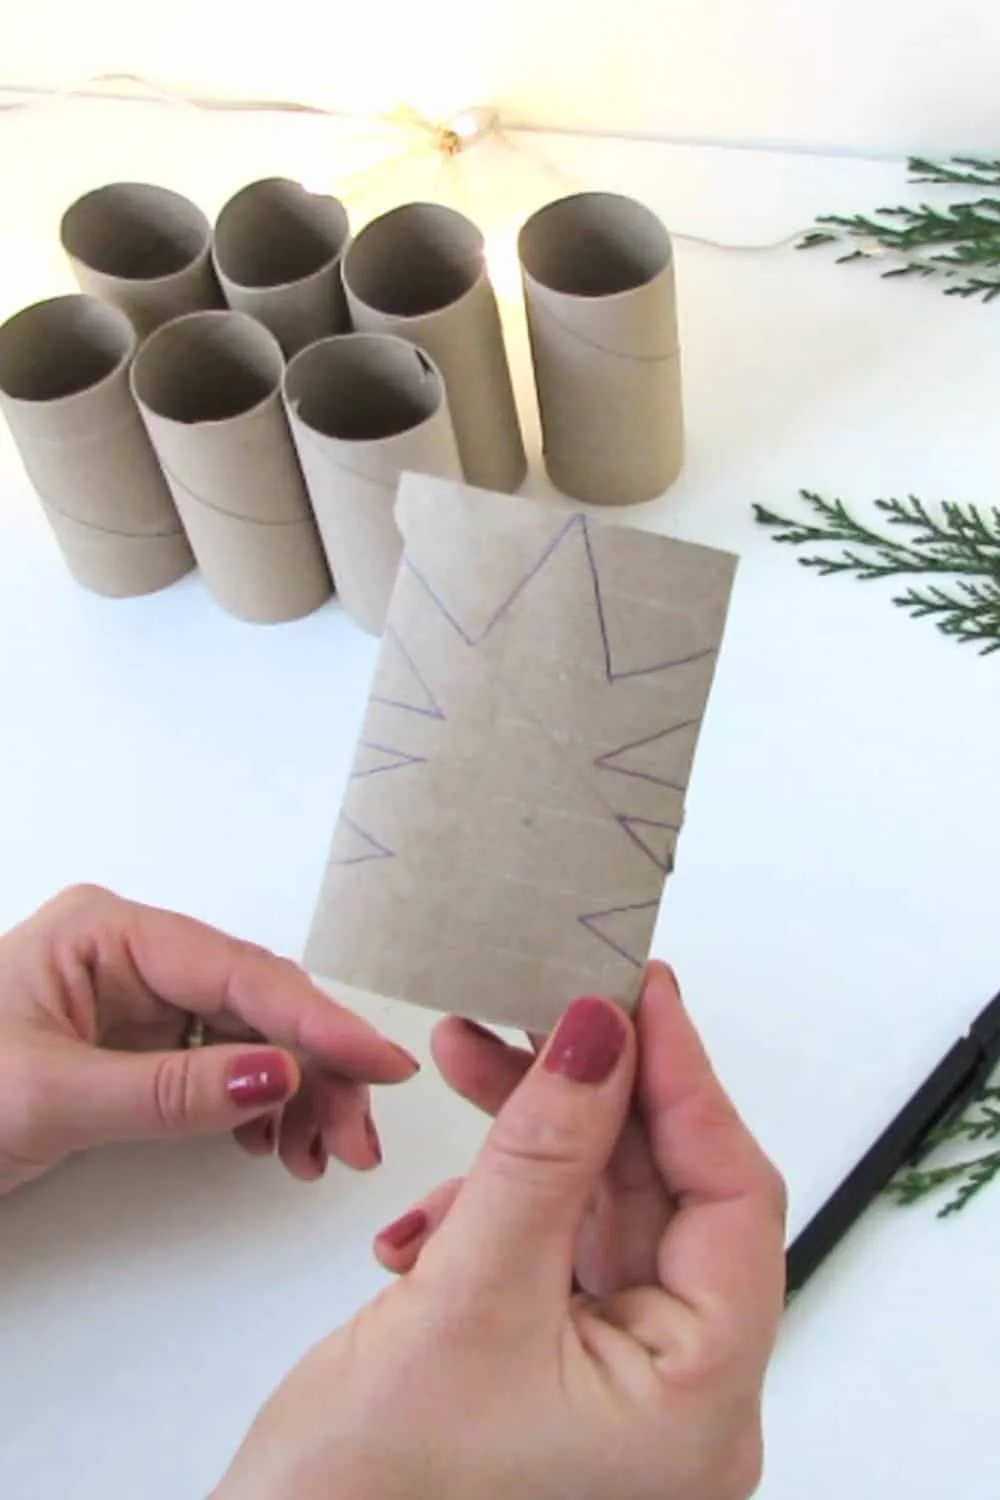
  • Draw Geometric Shapes: Once the rolls are flattened, draw symmetrical geometric shapes (such as diamonds, rectangles, or triangles) on the cardboard. Make sure the design is even on both sides.

You can use a ruler to help guide your shapes, ensuring they are neat and precise.

These marks will act as guides for cutting the rolls, helping you create perfectly symmetrical snowflake ornaments!

Cutting the Snowflake Shapes

Now that the rolls are properly prepared, we can move on to the next step: cutting out the snowflake shapes. This is the moment when the delicate toilet paper roll snowflakes really start to take form. Using sharp scissors or a craft knife, carefully follow the marks you’ve drawn on the tube. Take your time with this step to ensure precision, as accurate cuts are essential for achieving symmetrical snowflake shapes.

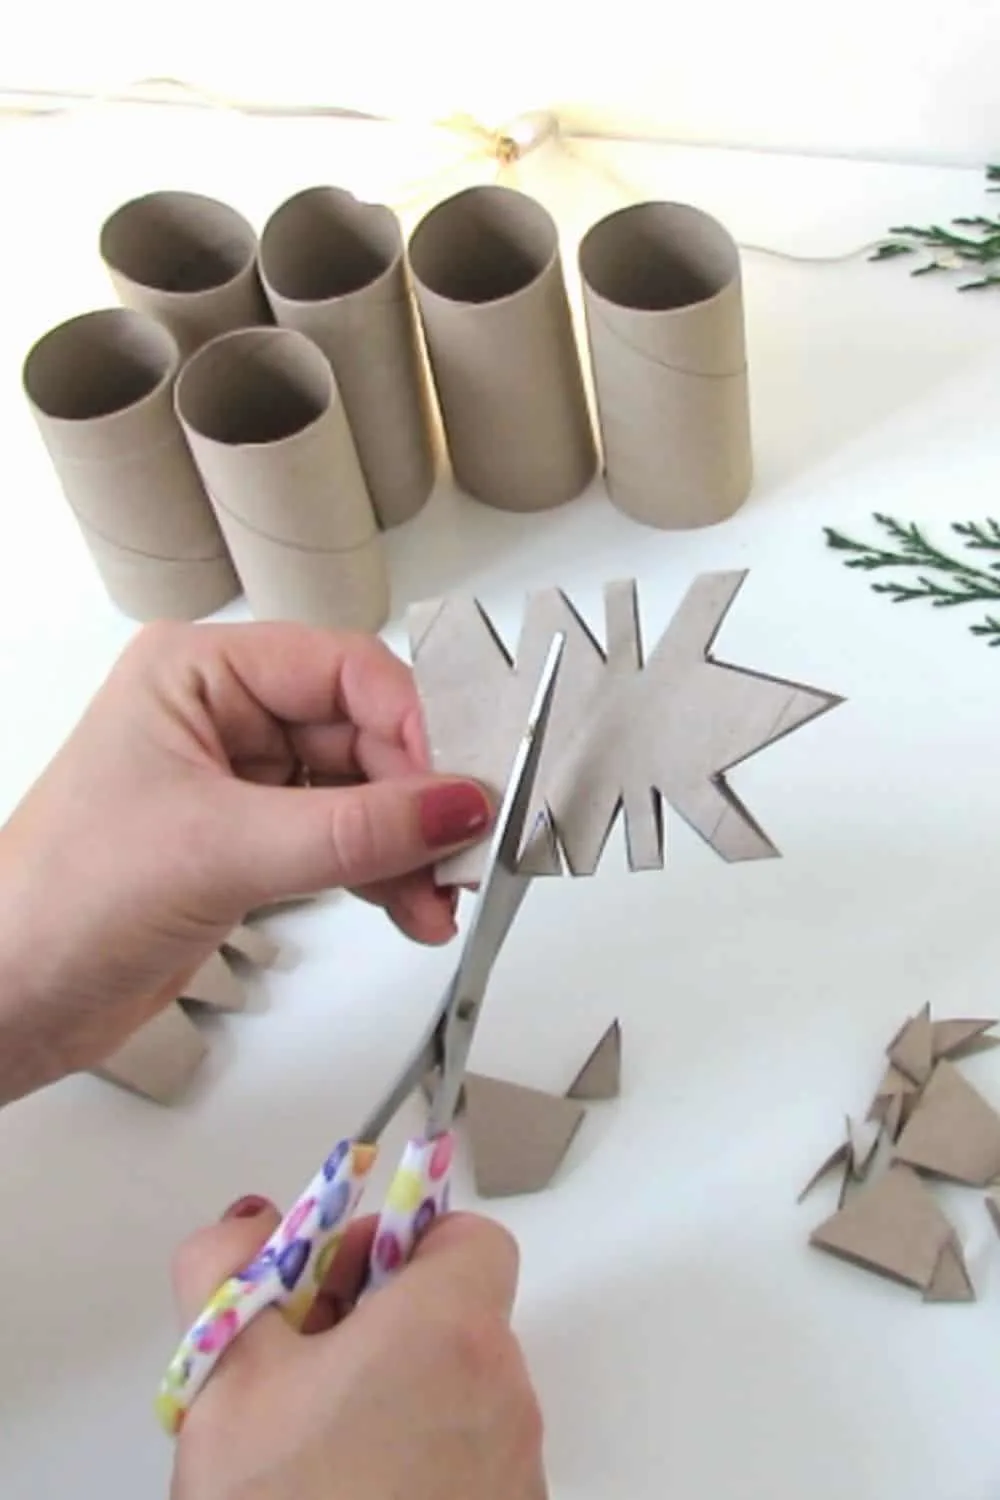
Remember, no two snowflakes are alike, and that’s part of what makes them so charming. Embrace the individuality of each cut, as it adds character and beauty to your ornament.

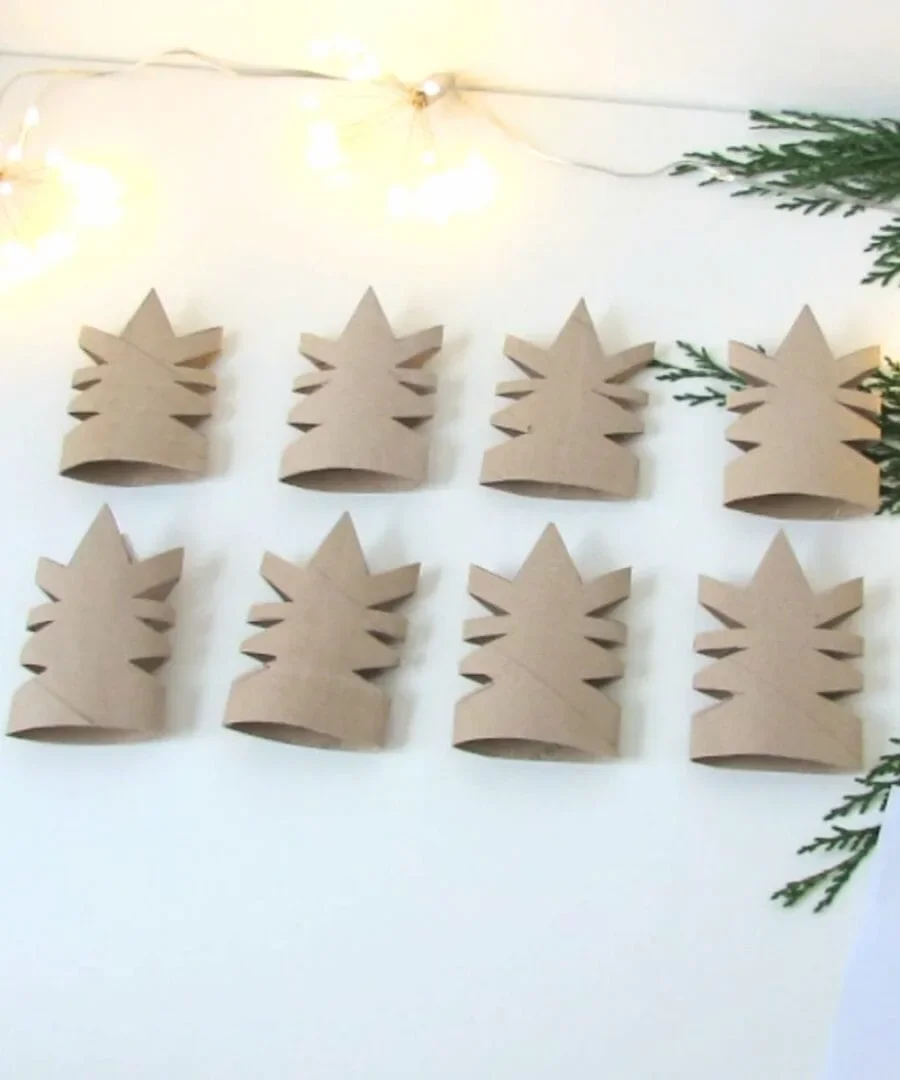
Once you’ve cut your first tube into a snowflake shape, use it as a template to replicate the same cut lines on the remaining toilet rolls. You’ll need 8 rolls to complete one snowflake ornament.

As you slice through each roll, watch as the cut segments begin to form unique patterns, much like the delicate designs found in real snowflakes. Make sure to cut all the way through each section, but avoid cutting too close together, as this can weaken the snowflake’s structure.

Feel free to experiment with different cutting styles and techniques to add your own creative flair. Whether you prefer elegant, lacy curves or sharp, intricate angles, let your imagination lead the way as you transform each plain roll into a one-of-a-kind snowflake ornament.

Assemble the Ornament

Now that you’ve carefully cut out your snowflake shapes, it’s time to assemble your ornaments.

Start by placing one snowflake shape flat on your workspace. Apply a small amount of hot glue along the base and a tiny strip of glue in the center of the tube. Then, position a second tube on top and press gently to secure it in place.

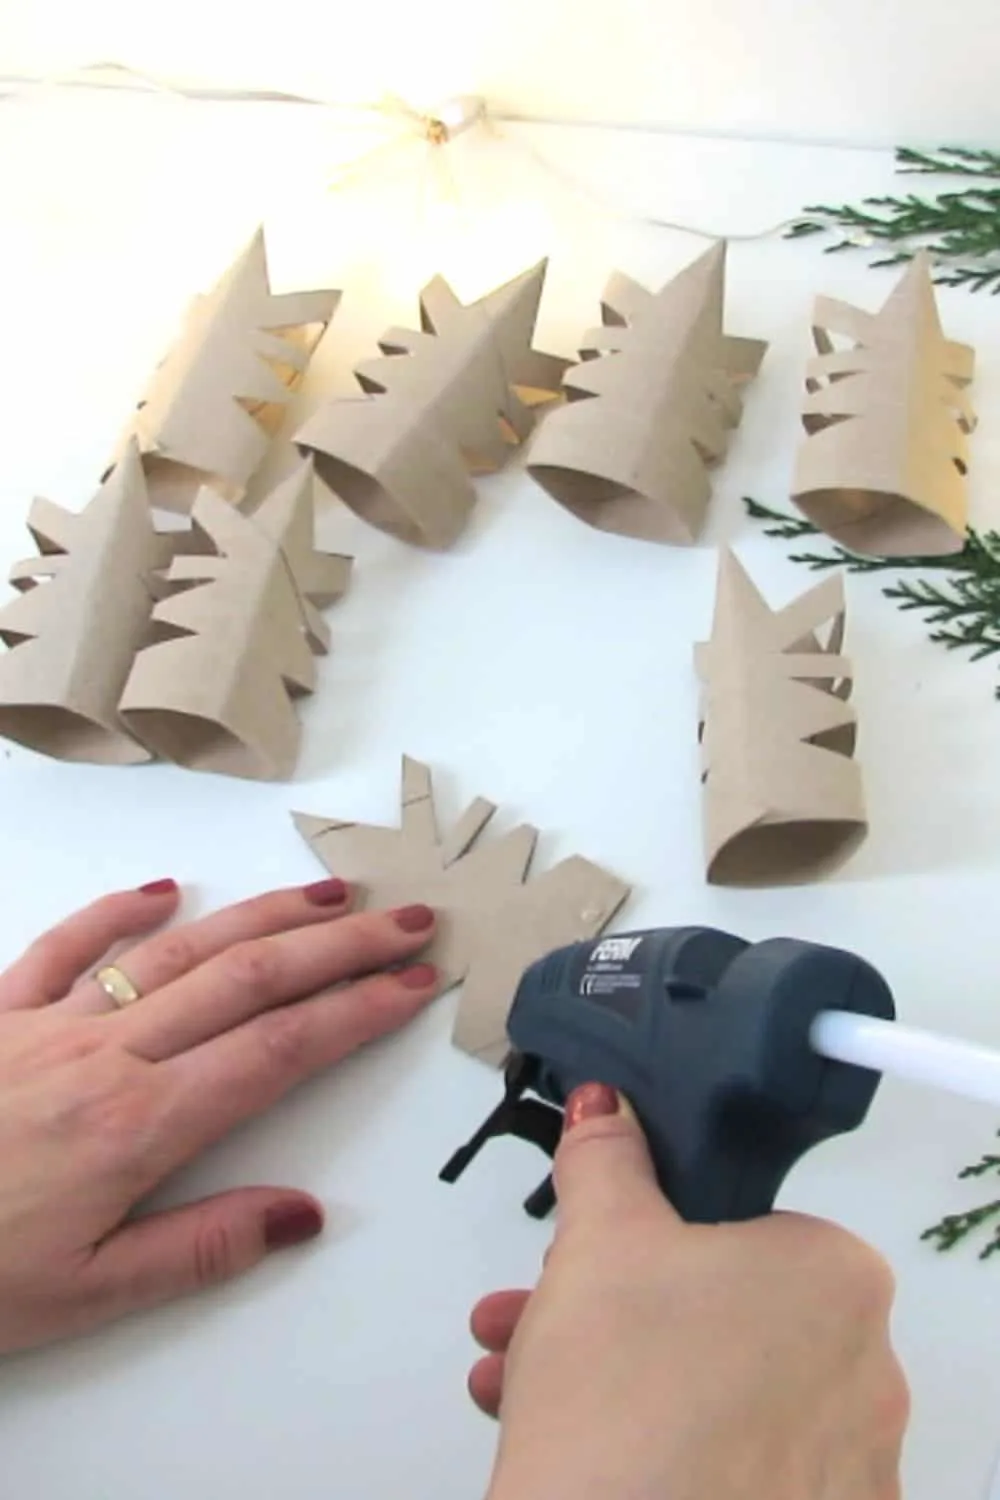
Continue the process, gluing each of the remaining 7 toilet rolls on top of the previous one. Apply glue to the base and center of each roll before pressing it onto the stack to ensure they adhere securely. Repeat this until all 8 rolls are glued together, forming your complete snowflake ornament.

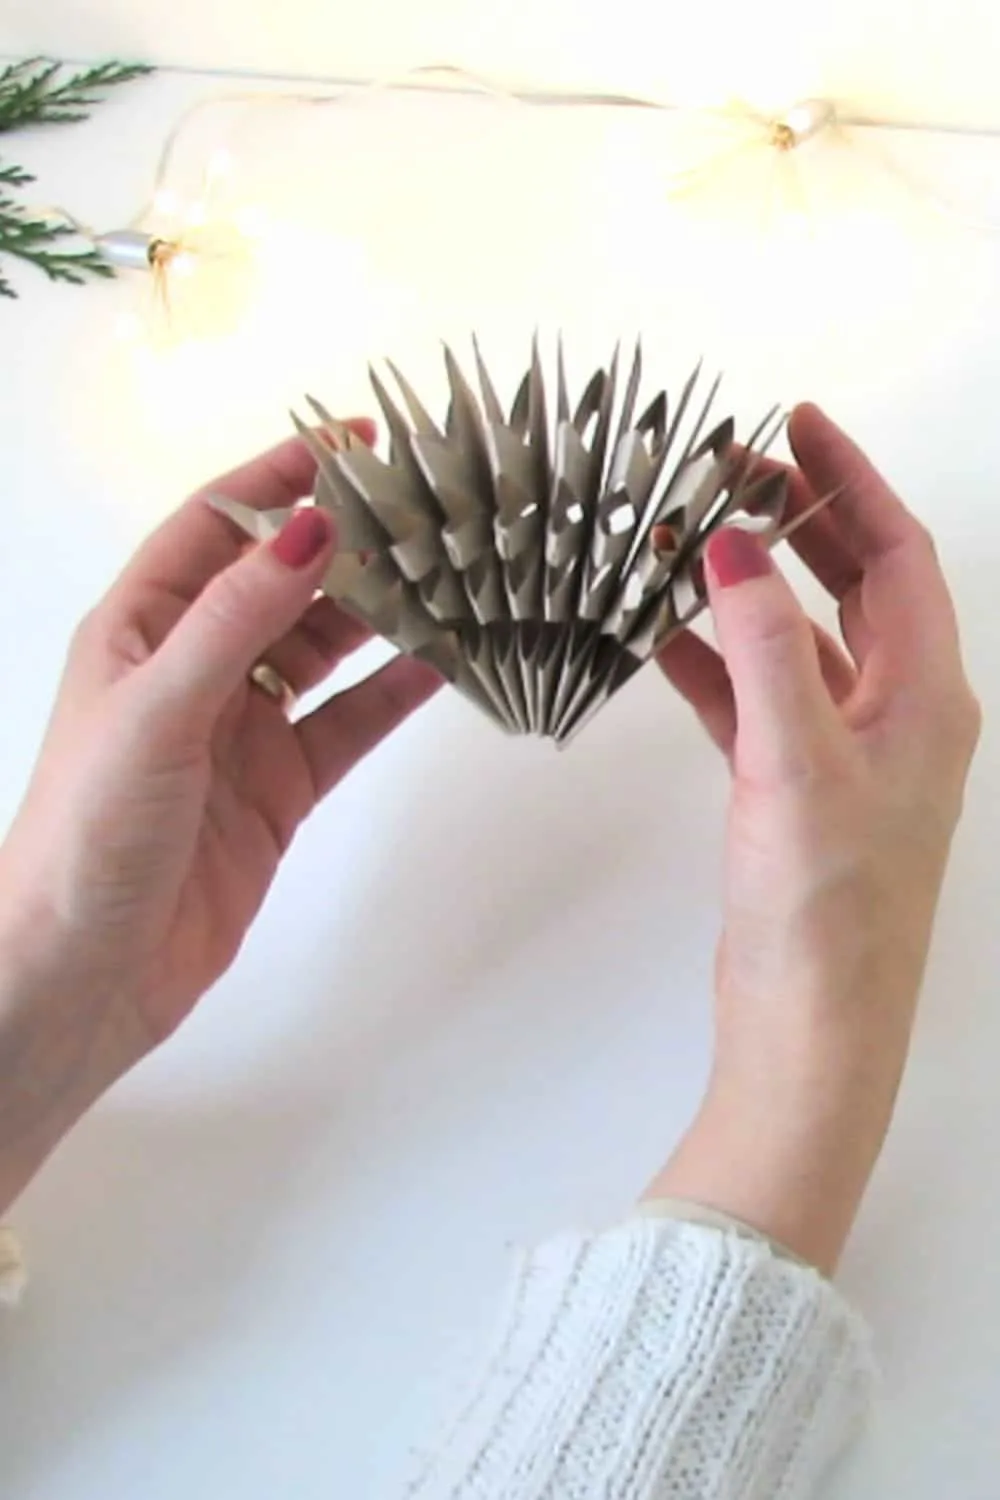
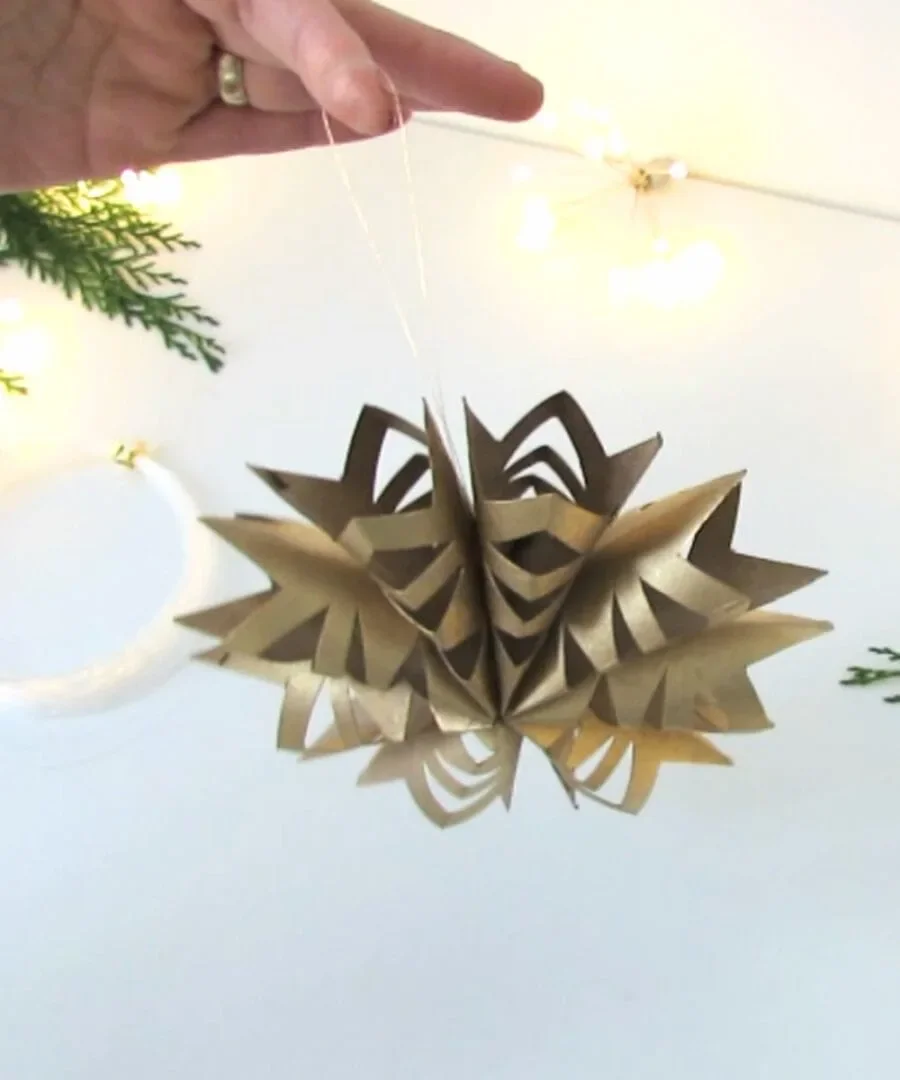
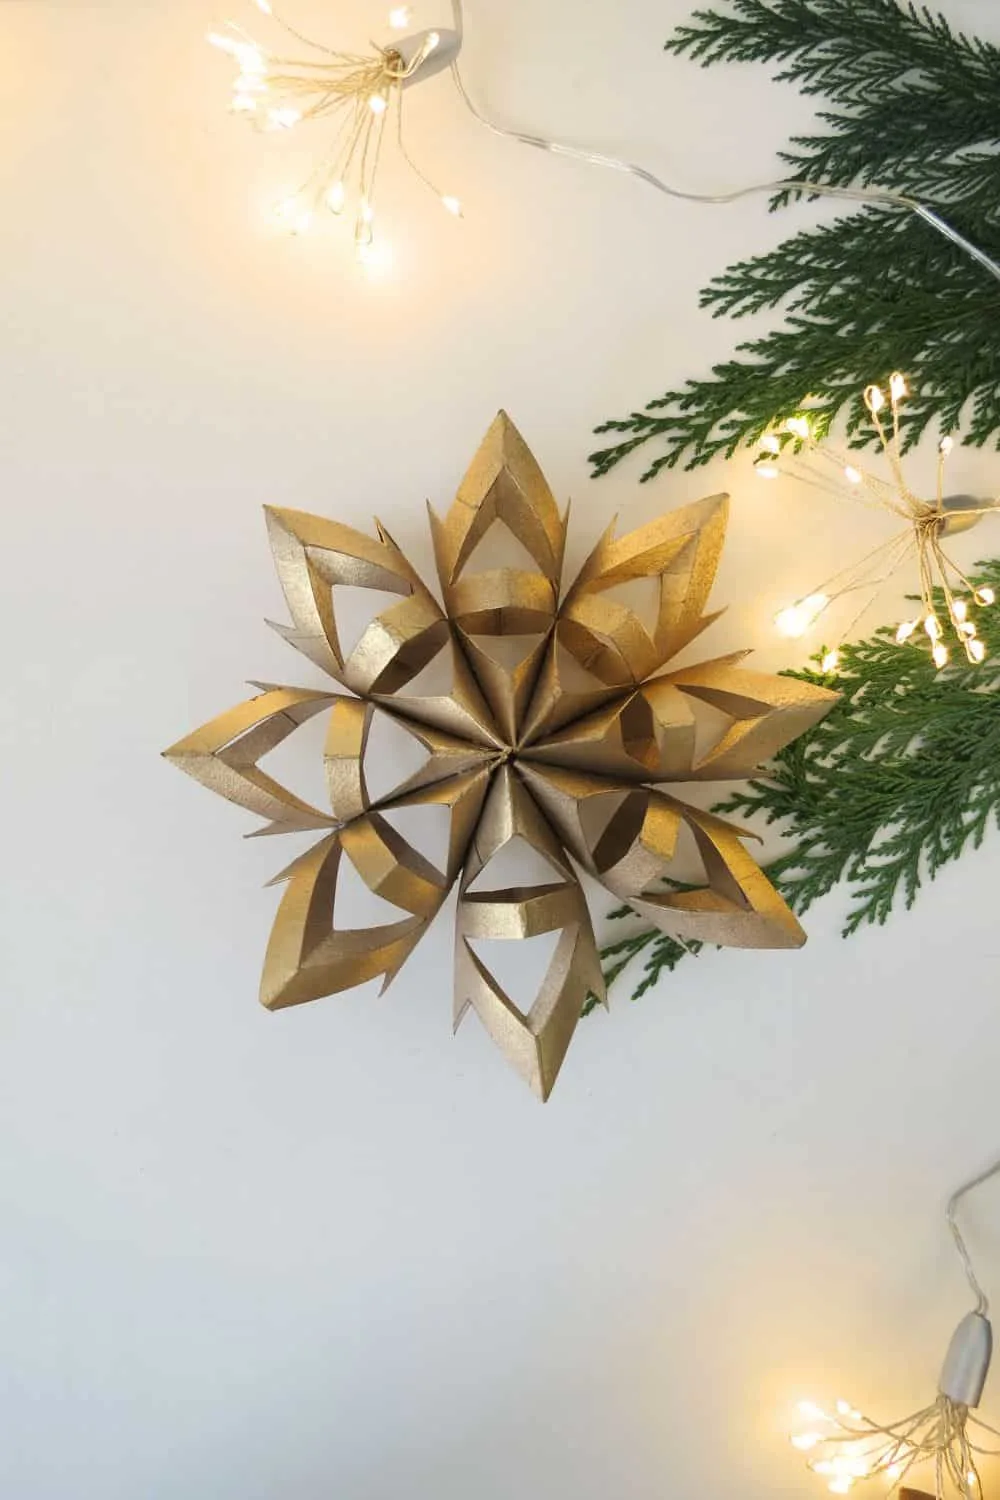
Once all the tubes are glued together, gently open them to create the snowflake shape. Carefully adjust the rolls until they form a symmetrical, star-like pattern. Once you’re happy with the shape, apply glue to the last two sides and press them together to hold the shape in place. This will secure your snowflake ornament, giving it a delicate, finished look.

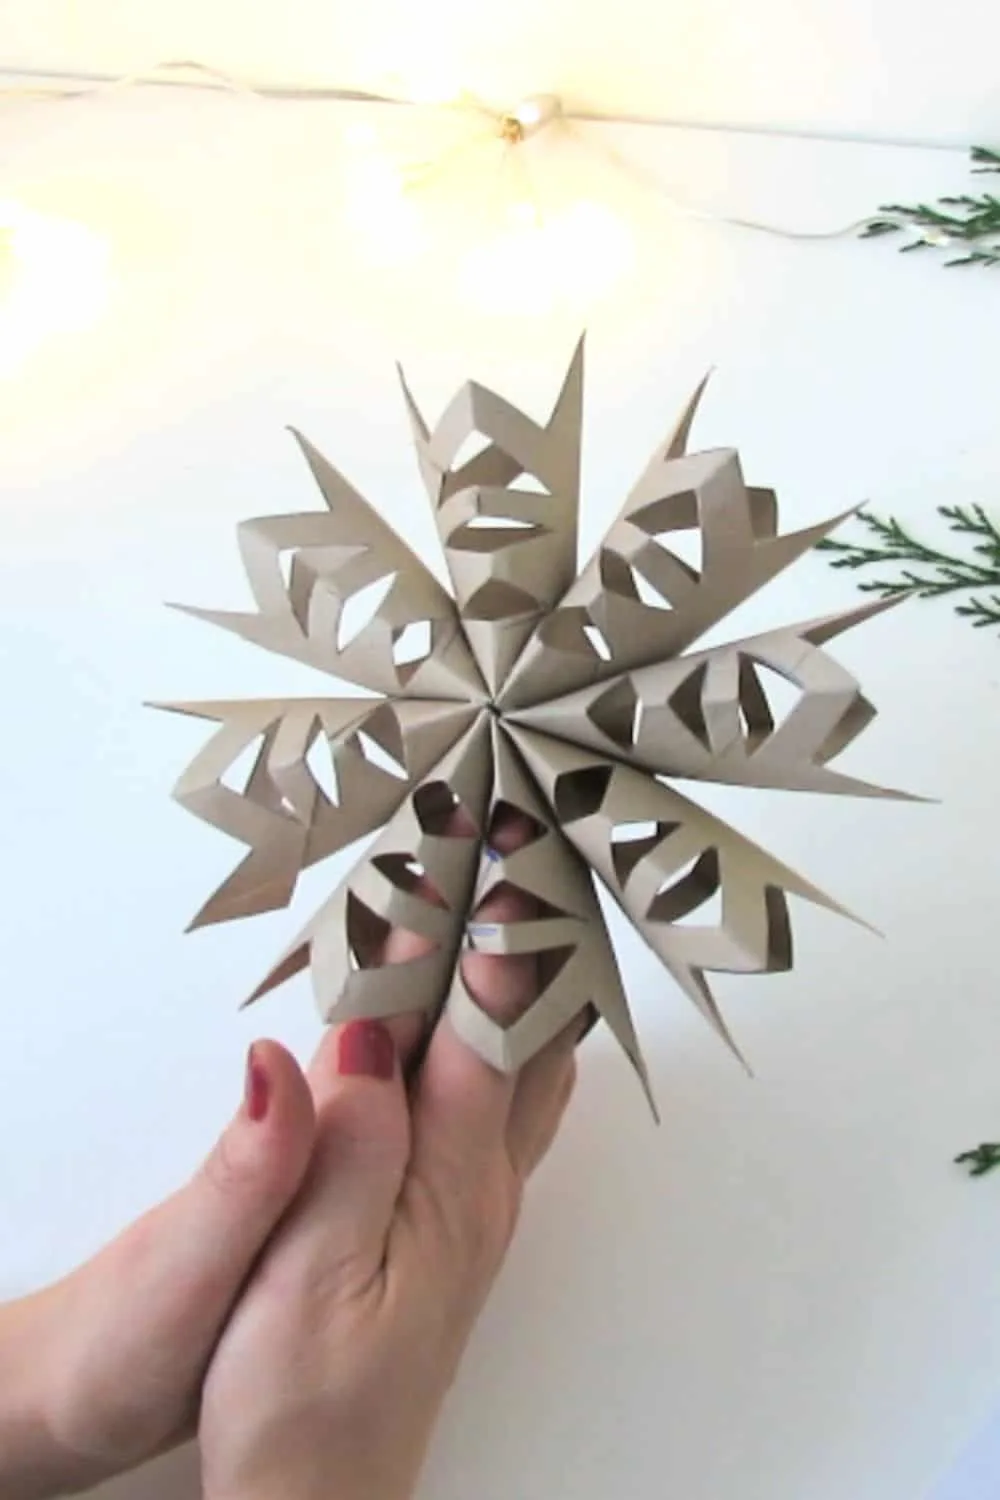
Decorate and Personalize your toilet paper roll snowflakes

With your snowflake ornament assembled, it’s time to move on to the fun part—decorating and personalizing! Let’s continue turning these toilet paper rolls into enchanting winter wonders.

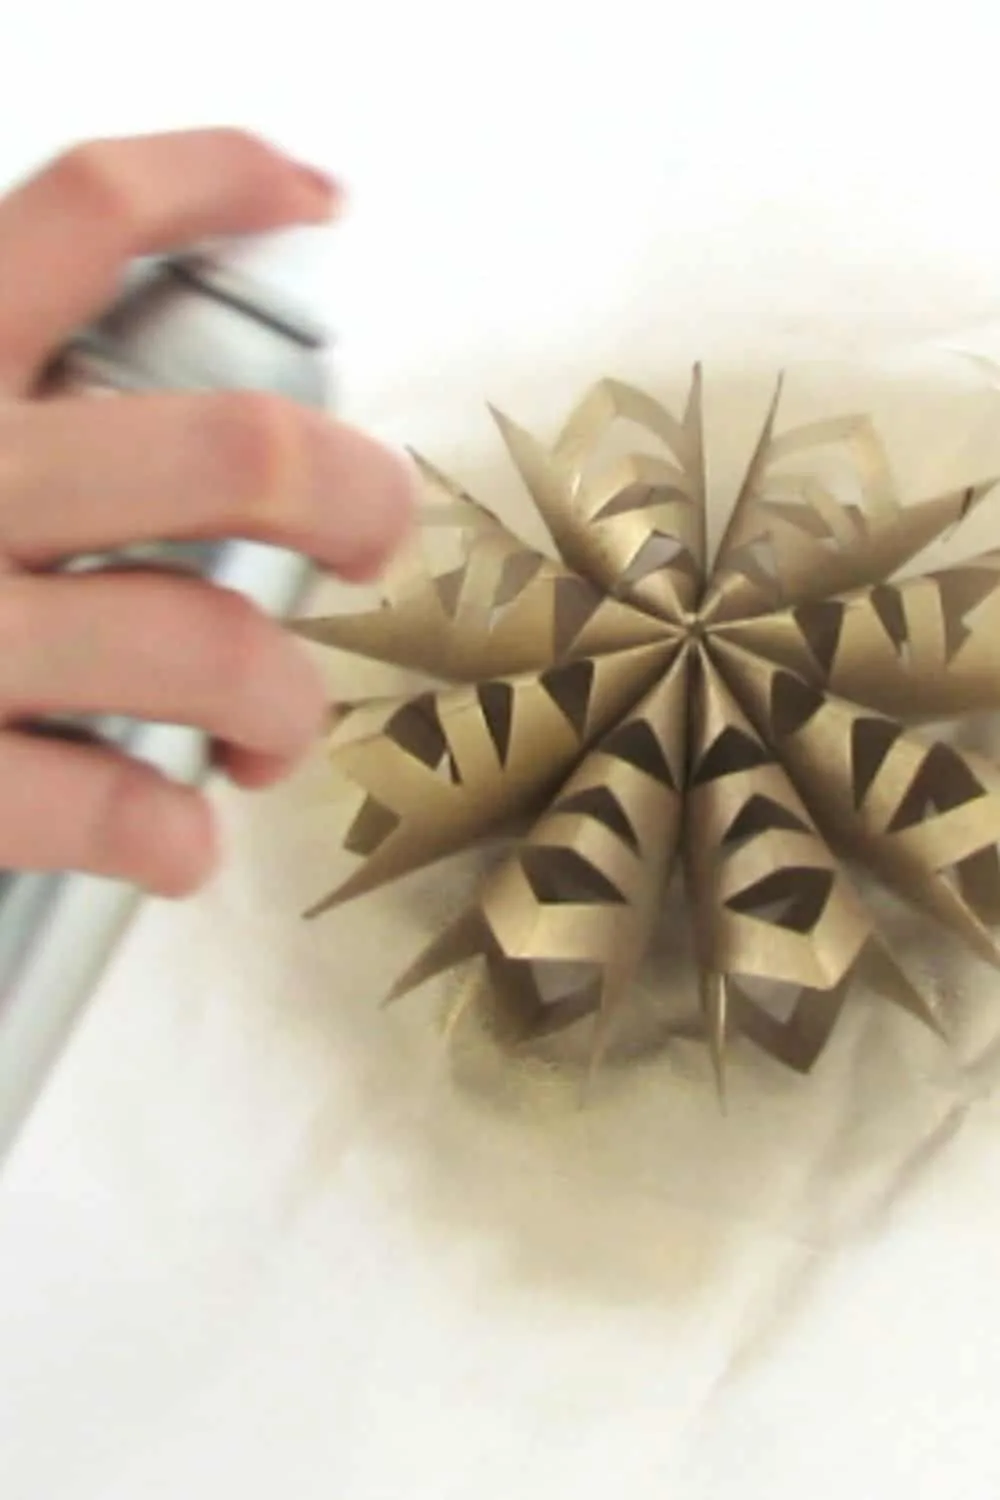
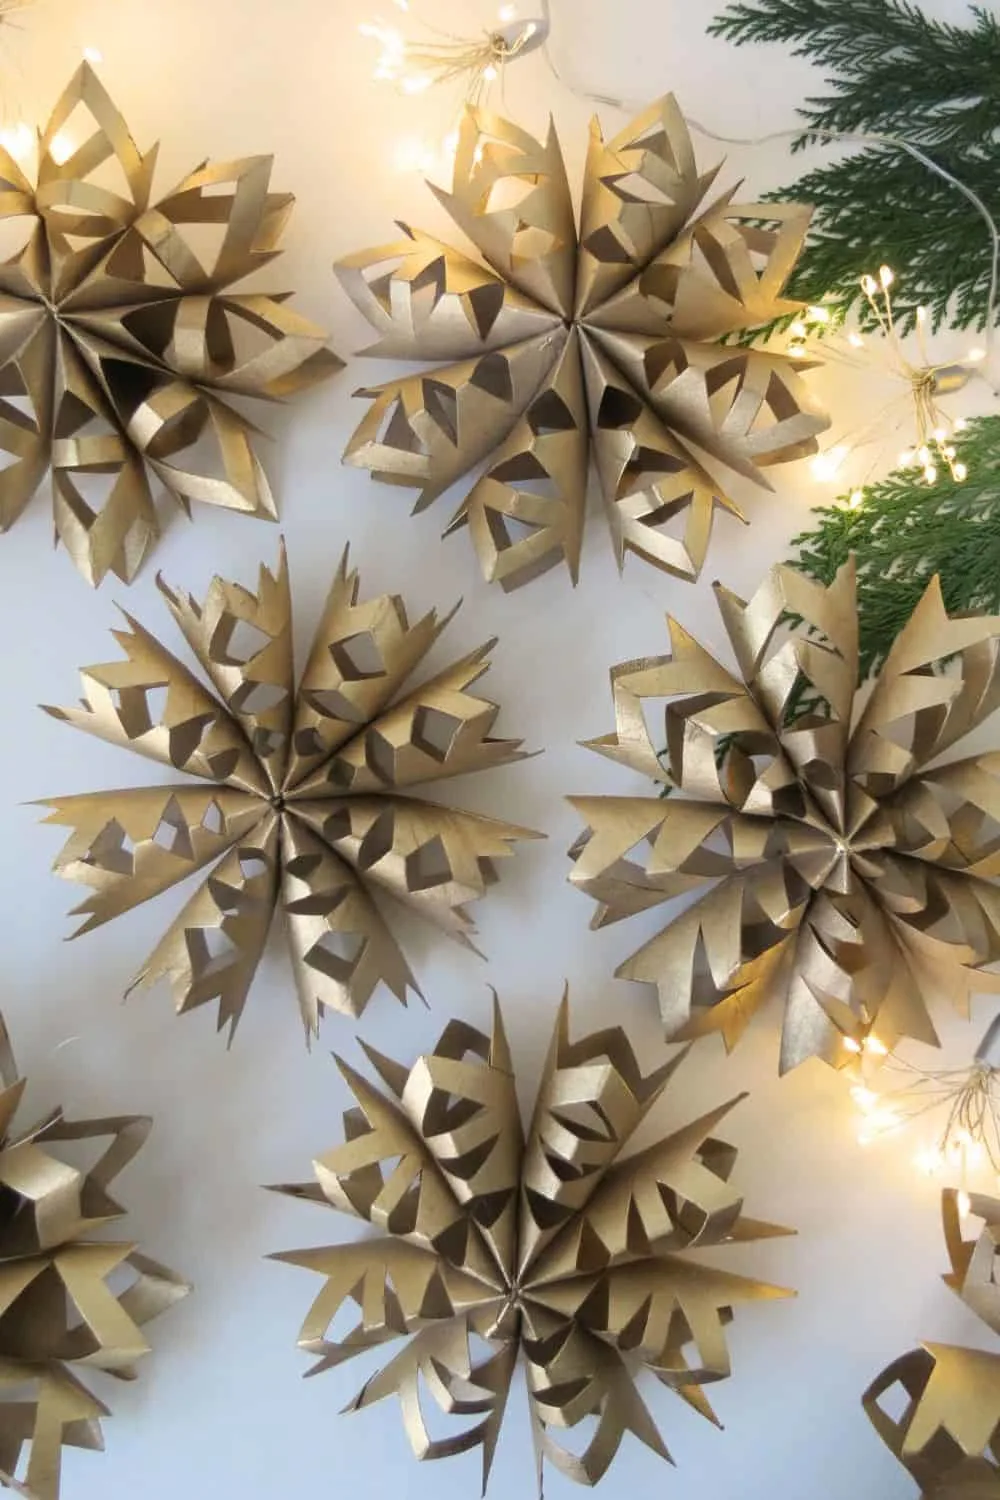
Start by painting your snowflake ornament. You can apply a thin layer of acrylic paint with a brush for a more detailed finish, or use spray paint for a quicker result. Choose any color that complements your holiday décor—whether it’s classic white, cool blue, shimmering gold, or elegant silver, the possibilities are endless!

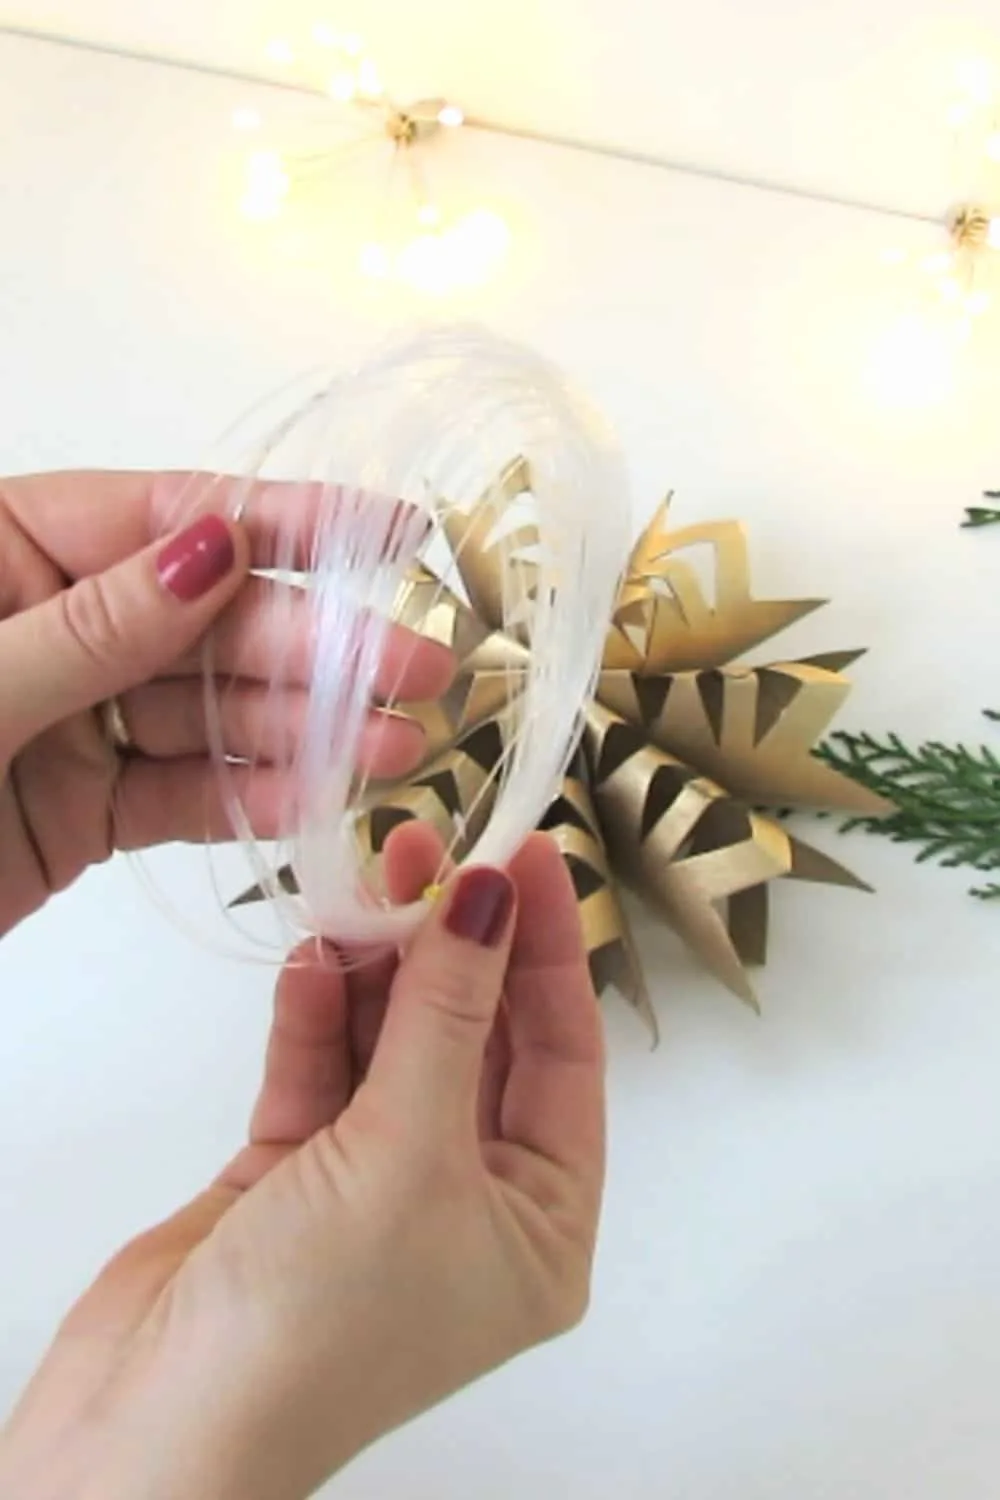
Once the paint is dry, you can start adding extra flair to your snowflake ornaments. Experiment with a touch of glitter, additional paint, or other festive elements like beads and sequins to enhance their beauty.

To add glitter, apply craft glue to specific areas of the snowflake and gently sprinkle glitter over the glue. Let it dry for a few minutes before shaking off any excess. The twinkling glitter will mimic the look of fresh frost on a winter morning, adding a magical touch to your ornaments.

For a more personalized look, consider adding small beads or sequins to the tips of each snowflake arm using hot glue. The sparkle from these decorative touches will catch the light, giving your snowflakes even more dimension.

With each unique addition, your DIY ornaments will evolve from simple toilet paper rolls into stunning works of art. Let your creativity shine through and add those final touches that reflect your personal style and capture the holiday spirit.

Remember, even the most ordinary materials can be transformed into extraordinary creations. Embrace the art of repurposing and discover the hidden treasures that await in the world of crafting. Toilet paper rolls, once considered waste, can become the epitome of both beauty and functionality with a little creativity.

So gather your materials, let your imagination soar, and bring these delicate snowflakes to life. Your home is ready to be filled with the enchanting charm of snowflakes, all born from the simplest of beginnings.

conclusion

In conclusion, this simple yet creative project proves that with a little imagination and some repurposed materials, you can transform everyday items into beautiful, festive decorations. These toilet paper roll snowflakes are not only charming but also a meaningful way to celebrate the season while being environmentally mindful. Whether you’re looking to add a personal touch to your holiday décor or engage in a fun, crafty activity, this project offers endless possibilities. So, let your creativity shine and enjoy the process of turning humble materials into works of art that will brighten your home this holiday season.

THE HISTORY AND TUTORIAL OF AUTHENTIC 1940S MAKEUP

1940s makeup is one of the most “vintage” looks, and is rather simple to recreate. There was a push for all things natural, unlike the 1930s and 1950s, which favored reshaping eyebrows and contouring the face. 1940s makeup enhanced natural beauty with just a few tools.

During the war, European women dealt with huge cosmetics shortages, since petroleum and alcohol – some of the main ingredients in makeup at the time – were used for the war effort. When makeup ran out, women turned to home remedies to substitute, such as using beetroot juice to stain lips and petroleum jelly to darken lashes and shape eyebrows.

In the United States, cosmetics continued to be manufactured throughout the war and were seen by the government as a morale booster for the busy women on the home front. Women were encouraged to wear makeup all the time to hide sadness and attract men, even while at work. Athletes even wore makeup. Color films had a big impact on the market, as women could now imitate the shades worn by Hollywood starlets. By 1948, between 80 and 90 percent of women wore lipstick, two thirds wore rouge, and a quarter wore eye makeup.

The 1940s makeup look exudes classic sophistication and is surprisingly easy to recreate. The emphasis was on a flawless, fresh-faced appearance—natural, never overly done. Less was definitely more, which worked out well, especially during the war years when many women had to make do with fewer products and resources.

Although the final result seems simple, a woman’s 1940s makeup routine could take some time—quick five-minute makeup wasn’t a thing! The process began with applying and blending thick foundation. Women were encouraged to shape their face with both light and dark shades of foundation—darker tones could be used to contour areas like a large nose, broad forehead, or square jaw, while lighter shades on the cheeks would add a fuller, plumper appearance.

Next, eye shadow was applied, followed by moist rouge. This was often used not only for color but also for subtle shaping, always ensuring the look remained natural. Afterward, a generous application of powder was pressed into the face with a large velour or wool puff. The powder was applied heavily to ensure a matte finish, covering the entire face. Excess powder was then brushed away with a powder brush to reveal a smooth, polished look.

If the moist rouge needed extra reinforcement, a powdered version was applied on top of the powder. The final steps included defining the eyebrows with an eyebrow pencil, applying mascara for fuller lashes, and finishing with the signature bold lipstick.

What You’ll Need:

  • Foundation: Choose a shade that closely matches your skin tone.
  • Powder: Loose powder that matches your skin tone to set the foundation.
  • Cream Rouge: Go for a rose-pink cream rouge (avoid powder if possible, unless that’s all you have).
  • Eyebrow Pencil: Choose a pencil that matches your natural brow color, or one shade darker than your hair.
  • Eye Shadow: (Optional, for evening wear) Use matte shadows that match your eye color—avoid shimmer.
  • Mascara: Dark brown or black mascara, or you can even use petroleum jelly (like Vaseline) for a more subtle lash effect.
  • Lipstick: A classic, matte red lipstick for that bold, vintage look.

1940s Foundation and Powder

Foundations in the 1940s were quite different from today’s lightweight options. There were fewer shades available, and most foundations had a pinkish tint, which worked well for white women, but wasn’t always suitable for women of color. Many Black women, for instance, either mixed their own makeup or often went without powder.

Foundations during this time were much thicker and creamier compared to today’s formulations. Liquid foundations as we know them didn’t exist, and the creamier formulas helped provide a fuller coverage. Face powder, which was essential, was used to set the foundation and keep the face matte throughout the day. It matched the skin tone but was also used to help the foundation adhere better to the face—foundation alone would often cause powder to slip off.

The foundation and powder were extended down the neck and onto the blouse or dress line, as it was common for the foundation shade to not perfectly match the skin on the rest of the body. This helped create a seamless, blended look.

Tip: For a smooth application, lightly coat your face with baby oil (or mineral oil) before applying foundation. This helps create a smooth base and allows the foundation to blend more easily.

1940S FACE POWDER

Powders should match your natural skin tone as much as possible. Light shades kept a woman looking fresh and youthful, while a slightly bronzed shade added a sun kissed glow, popular with movie stars. Almost all makeup lines carried a sun kissed color or two.

If you are over 40, your skin is prone to yellowing, in which case a powder with a pink tinge will work better for you.  To apply, use a puff to dust your face all over and then brush from the neck up to the forehead. Only brush down once to finish and smooth out face fuzz.

Tip: A fluffy face puff makes a difference. Don’t use compressed powder with a flat pad for early 1940s looks. Pan-cake compressed makeup came out in the mid 1940s with big success. To women who could afford it, it provided more coverage applied in less time. Just remember to always brush up, never down.

1940s Blush

In the 1940s, blush (referred to as rouge) was applied sparingly to create a natural, rosy glow. The shades of rouge were limited, typically ranging from peach and coral to raspberry tones, with darker shades for those with bronze or deeper skin tones. Cream rouge (moist rouge) was the preferred choice, giving a more natural look, and was often blended directly into the foundation. Powdered rouges were also used lightly over the cheeks to give a soft flush.

Although rouge was an important part of the look, it wasn’t strictly necessary for achieving the 1940s style. You could still achieve the desired effect without it.

Tip: If you can’t find cream rouge, a light matte lipstick in a pink or peach shade works well. Simply apply it with your fingers, dab it on the cheeks, and blend it in until it seamlessly matches your skin tone.

Cream or liquid rouges were sometimes found in theatrical costume makeup stores and, in modern times, can be found in some makeup brands on platforms like Amazon.

1940s Eyebrows

The 1940s eyebrows were a continuation of the 1930s style, with thin, beautifully arched brows being the key feature. Eyebrows were kept natural-looking, with only stray hairs removed to maintain a soft, even arch. The arch itself was well-groomed but not overly thin—most women didn’t over-pluck.

Eyebrows were often defined with a pencil that was slightly darker than the hair color, or some women simply applied a bit of petroleum jelly to keep the brows in place and enhance their natural shape. For daywear, this softer look was more common, while in the evening, brows might be more defined.

As the decade progressed, the full, more defined brows of the late ’40s began to take hold, but they were never as thick as modern-day brows.

1940s Eye Makeup

Eye makeup in the 1940s was quite minimal, especially during the daytime. Most women wore just a light coat of mascara, often in dark brown or black. Some even used petroleum jelly (Vaseline) to achieve a subtle lash definition. Mascara came in different forms—liquid, paste, or cake—often built up by adding a little water or spit to the cake to get the desired consistency. Mascara was applied to both the upper and lower lashes for a fuller look.

For evening looks, eye shadow could be used, but only in neutral tones. The colors were typically chosen to match the eye color—blue-grey for blue eyes, grey for green eyes, and brown for brown or hazel eyes. The eyeshadow was applied in a single color, blended from the lash line up to the brow for an elegant and simple look. No smoky eyes or contouring here—just one shade blended well. For evening looks, sometimes silver or gold was added to create a little extra glamour.

Eyeliner wasn’t commonly used in the early 1940s; it was considered too harsh and “fake-looking.” It didn’t make an appearance until the late ’40s, and even then, it was applied only to the top lash line.

1940s Lipstick

Lips were the focal point of 1940s makeup, especially during the war years, when red lipstick was seen as a mood booster. Lipstick shades varied from bluish reds to orange-toned reds, but they were all red! Bright pinks weren’t worn until the 1950s, so reds were a constant. In the fall, red lipstick tended to get darker, and in the spring, it lightened up a bit.

Most lipsticks of the time were matte, and women were advised to moisturize their lips before applying. After applying lipstick, they would often blot their lips with a tissue to ensure the color stayed put. By 1948, lipstick pencils were introduced, allowing for a more precise application and a perfect outline around the lips.

The ideal lip shape was full and even, with a smooth contour on the top and bottom lips. The “Hunter’s Bow” lip shape, popularized by Joan Crawford, involved slightly over-drawing the lips to make them appear plumper. However, actresses like Lauren Bacall and Ingrid Bergman embraced their naturally thin lips and didn’t over-draw them.

Tip: To achieve a perfectly shaped lip, start with the cupid’s bow and draw the pencil out to the corners of the mouth. Fill in with lipstick and gently rub your lips together to ensure an even finish. Touch up any uneven spots on the bottom lip.

1940s Fingernail Polish

In the 1940s, nails were always neatly trimmed, often filed into a long oval shape. During wartime, nails were kept a bit shorter for safety, but they were still manicured regularly. Cuticles were carefully trimmed and moisturized for a polished look.

Nail polish in the ’40s was almost always red, and matching your nails to your lipstick was the norm. Other shades like pink, coral, rose, and burgundy were also popular. A clear topcoat was always used for durability, and some women embraced the “half-moon” style, where the base of the nail (around the cuticle) was left unpainted.

Tip: To create a half-moon shape on your nails, apply paper reinforcements to the base of each nail, aligning the top of the hole with the cuticle. Paint your nails, then remove the reinforcements before the polish fully dries for a neat, vintage look.

1940s Makeup Products to Buy Today

To create an authentic 1940s look today, you don’t need a complicated routine. A bit of face powder, black mascara, well-defined brows, and red lipstick will give you that classic, vintage style. Modern makeup tends to have more shine and glitter, but for a true 1940s look, opt for matte products—especially for your lips, cheeks, and eyes.

Tip: Many modern makeup lines offer matte formulas, but brands like Revlon and Max Factor (which were popular in the 1940s) still offer products that capture that vintage style. Besame is another brand that specializes in recreating vintage makeup colors and formulas from the ’40s.

For a more subtle daytime look, keep your makeup light—just a dusting of powder, a touch of blush, and a swipe of mascara. For a more dramatic evening or pinup style, go heavier on the lipstick and mascara, and use a little more rouge for that retro glam.