Spooky season has arrived, which means it’s the perfect time to go bold with Halloween makeup without raising any eyebrows. We’ve gathered some of the top Halloween makeup looks from Instagram, featuring everything from iconic villains to mind-bending optical illusions. Beginners will love the easy-to-master dark eyeshadow styles, while beauty enthusiasts can dive into more intricate and spooky creations. Let’s dive into the looks!
CLASSIC WICKED WITCH MAKEUP
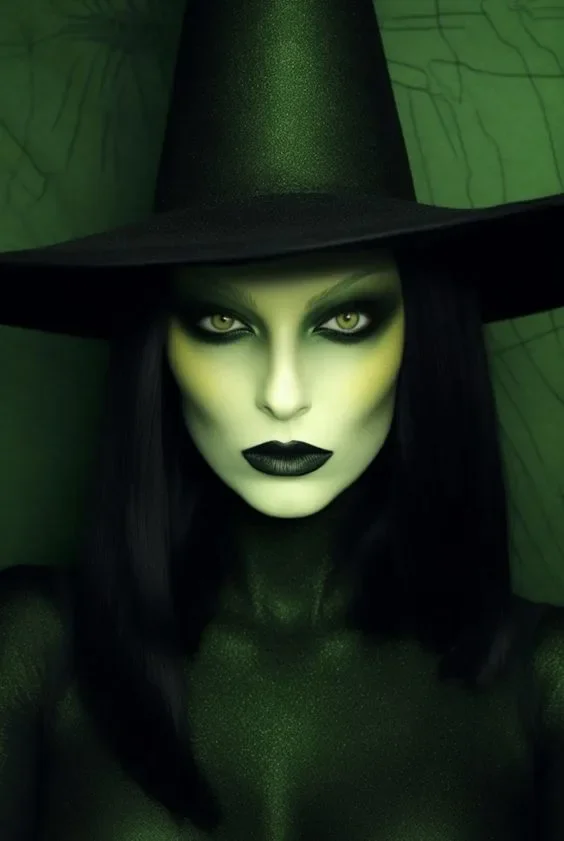
To fully embrace the green witch aesthetic, start by applying green body paint to your face and body. Enhance your look with heavy black eyeliner for a dramatic effect, and opt for a striking black lipstick. A large witch hat is essential, and if your hair isn’t already green, consider wearing a dark wig. Don’t forget to practice your best evil laugh—it might come in handy! And remember, if your cat looks frightened, you know you’ve nailed the vibe.
GHOSTFACE EYESHADOW MAKEUP
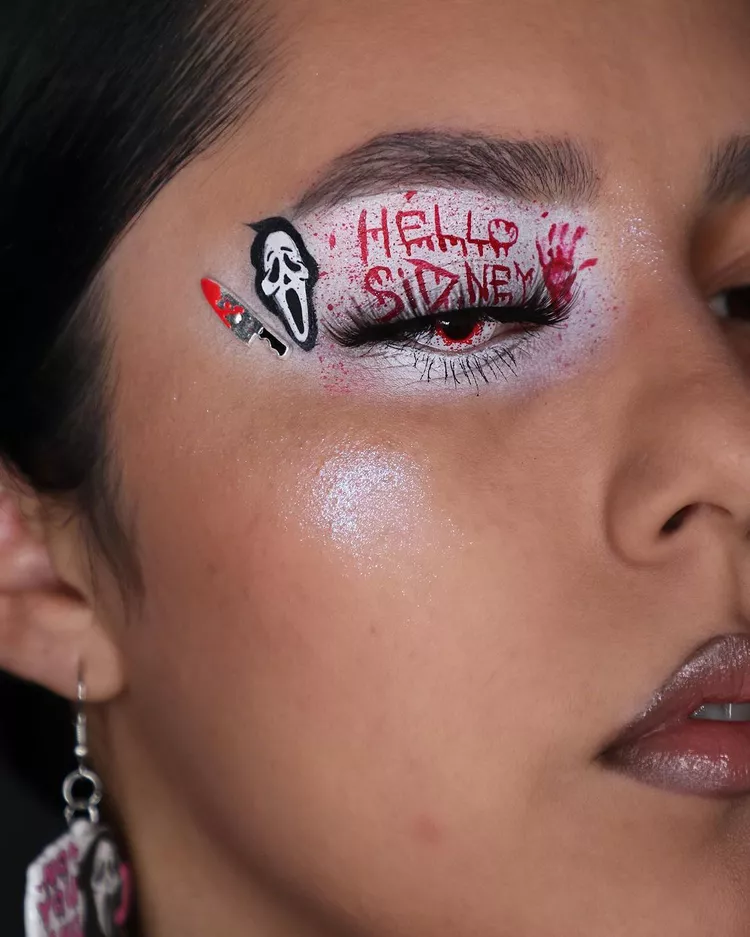
Channel the essence of classic slasher films with an eye look inspired by Scream. Makeup artist Kim Salgado transformed her eyelids with a bloody effect using cream face paint from Mehron and Tag Body Art. To complete the look, she accessorized with a tiny knife and bloodshot drop contacts from Pinky Paradise. It’s a perfect way to pay homage to the genre while making a bold statement!
SPIDER GLAM MAKEUP
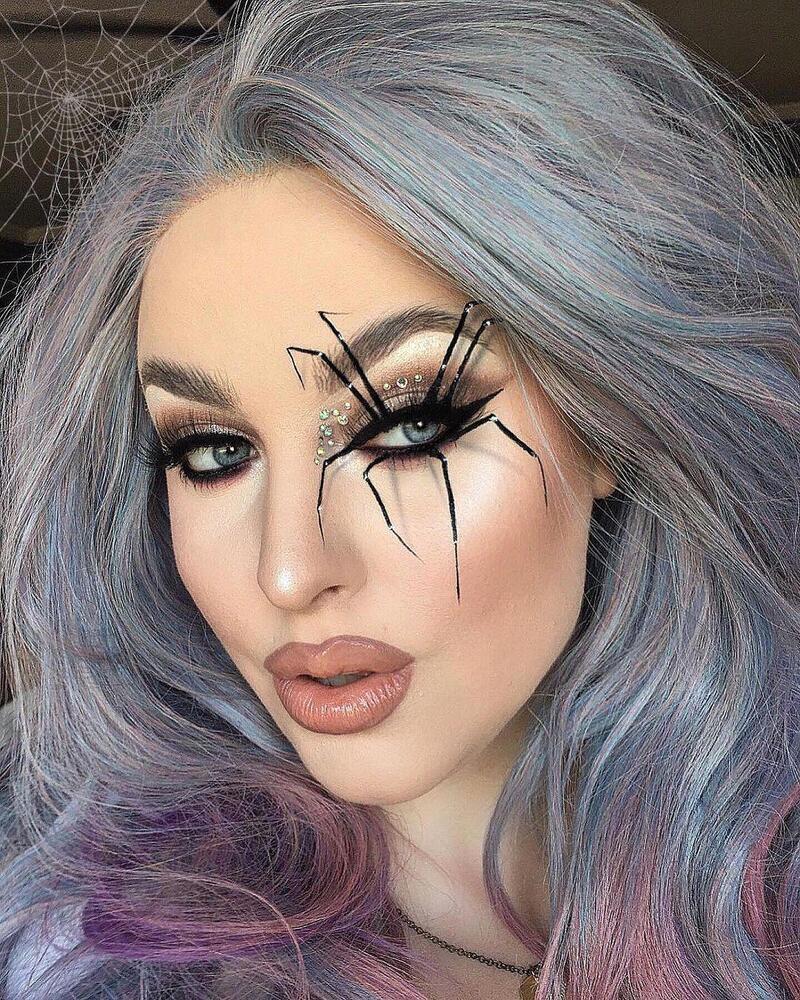
For a combination of scary, sexy, and DIY-friendly, you can easily craft your own spider-inspired glam lashes using Glamnetic’s Lush Lashes and black eyeliner to draw the “spider legs.” If you prefer a quicker option, consider investing in creepy-crawly eye shadow stickers that achieve the same eerie effect. Both methods will elevate your look for a hauntingly glamorous vibe!
BLACK AND WHITE HARLEQUIN MAKEUP
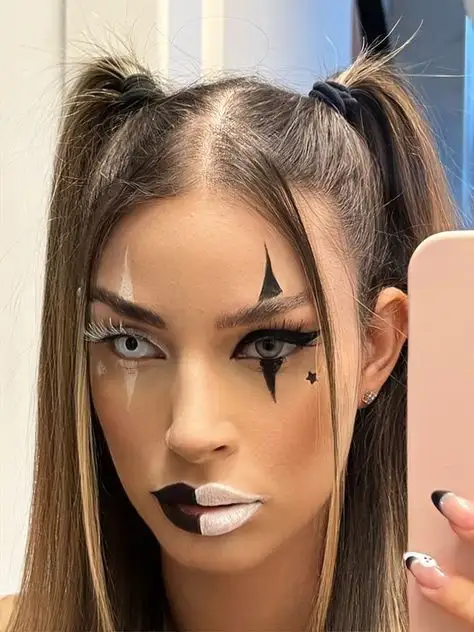
To achieve a striking black and white harlequin look, start by applying white face paint evenly across your face. Next, take black face paint to create sharp lines, forming triangles around your eyes and a split lip effect in black and white. For an extra touch, add a few small stars or diamonds near your eyes to enhance the overall design. This playful yet bold look is sure to stand out!
SPOOKY HOLLY GOLIGHTLY MAKEUP
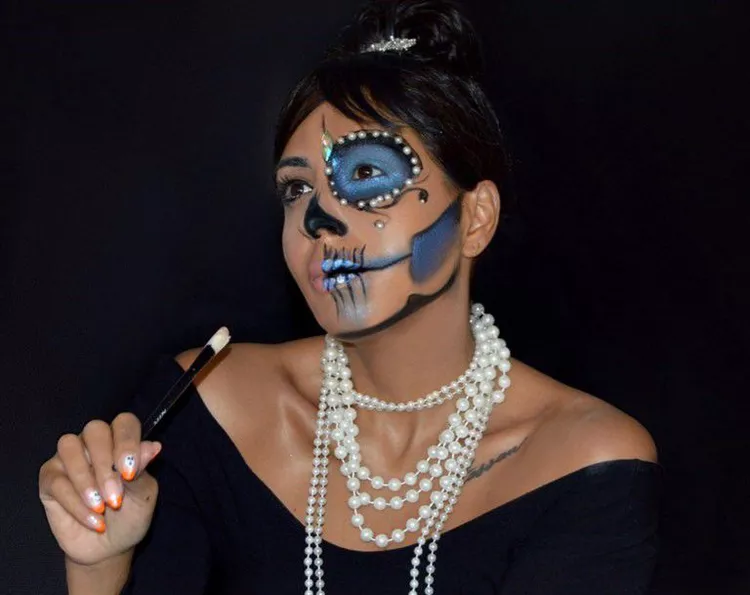
You’ll definitely turn heads at the costume party with this unique twist on Audrey Hepburn’s Holly Golightly from Breakfast at Tiffany’s. Create a look that embodies quiet luxury on one side of your face, complete with classic makeup and a chic updo. On the other side, go for dazzling skeleton vibes, incorporating bold makeup and intricate designs. This striking contrast will make you the center of attention!
MINNIE MOUSE MAKEUP
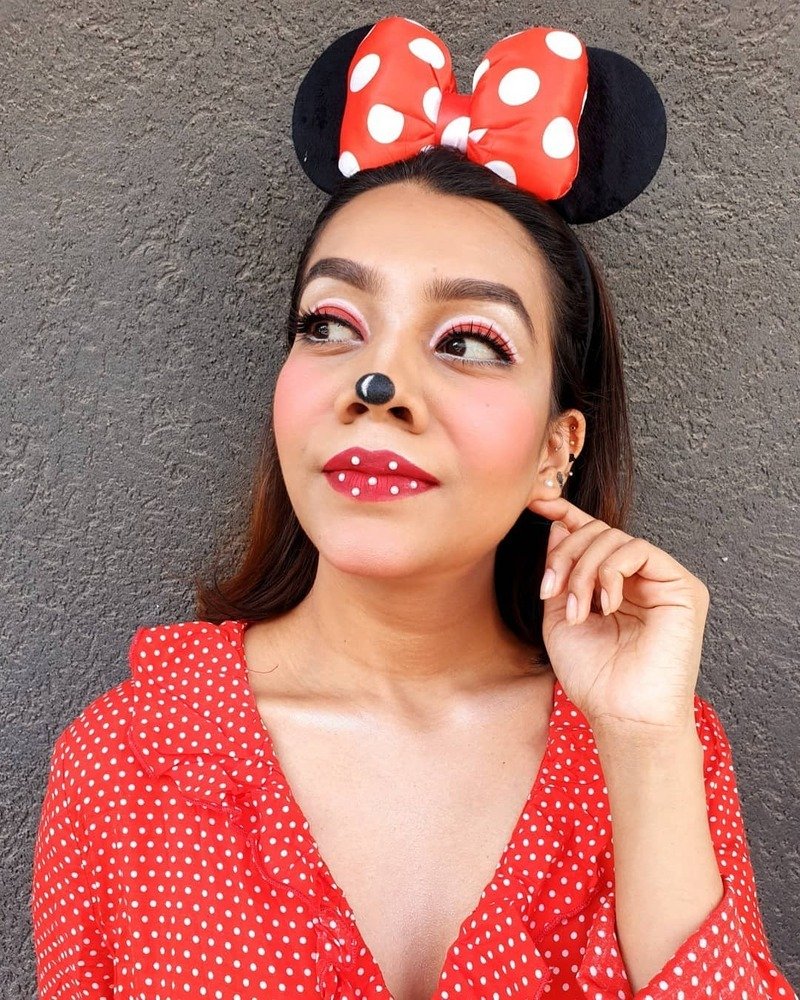
Dressing up as Minnie Mouse is an adorable and easy costume idea! Start with a classic polka dot dress and add Minnie ears for that signature touch. Complete the look with a bright red lip and a cute nose detail. This ensemble will transport you right back to Disney World!
Bonus: Halloween eye makeup is simple to create and can be a fun activity to do with your best friends. It’s super cute and perfect for adding a little extra magic to your Minnie Mouse look!
MELTING WITCH MAKEUP
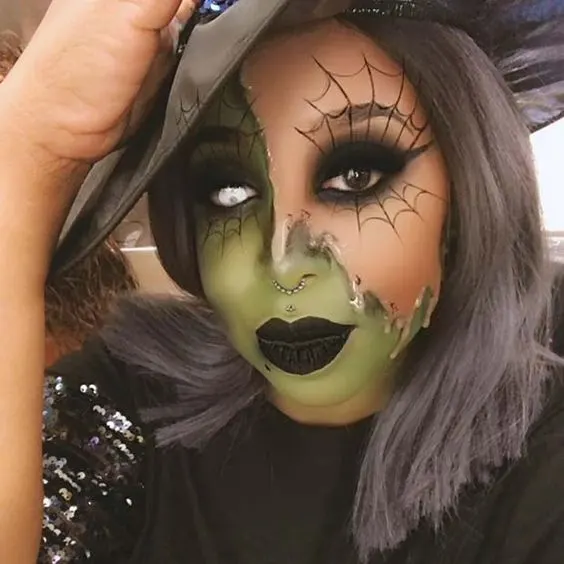
To achieve a striking melting witch look, begin with green face paint, applying it generously to one side of your face and blending it out as if you’re covering up a bad hair day. Next, take black eyeliner and draw spider webs around your eyes for an eerie effect. If you’re feeling adventurous, use liquid latex or silicone to create that melting skin vibe for an even more dramatic look. Finish off with dark lips and smoky eyes, and you’ll be all set to scare some folks!
THE NIGHTMARE BEFORE HALLOWEEN MAKEUP
If you’re a fan of Tim Burton’s The Nightmare Before Christmas, this look is perfect for you! Makeup artist @Ashslays_xx crafted a stunning Sally Shock-inspired Halloween glam using paint from the female-owned brand Elli J Beauty. This creative transformation captures Sally’s essence while adding a unique twist, making it a fantastic choice for any Halloween celebration!
PINK GIRAFFE HALLOWEEN MAKEUP
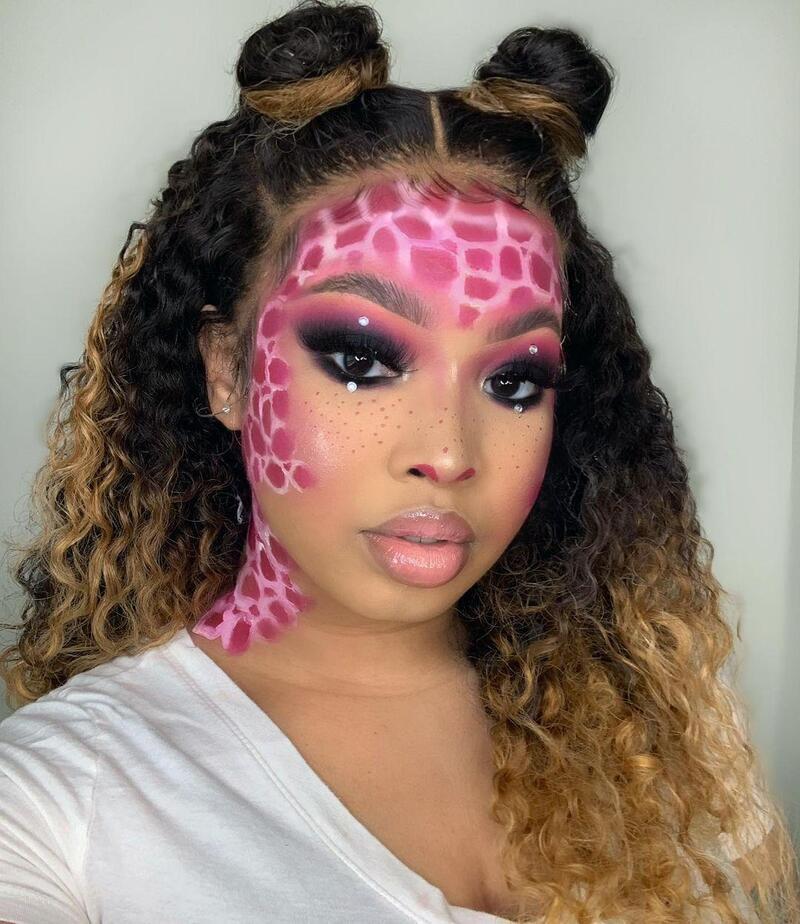
Unleash your creativity with this Pretty in Pink giraffe makeup look for Halloween! It’s a stunning design that doesn’t require a steady hand, making it accessible for everyone.
This look features curly hair adorned with pink and white details that will leave everyone in awe. To achieve this style, you’ll need pink, white, and black eyeshadow from your favorite palette. Complete the ensemble with baby pink lips and a touch of blush for a cohesive and adorable finish. Enjoy showcasing your artistic flair!
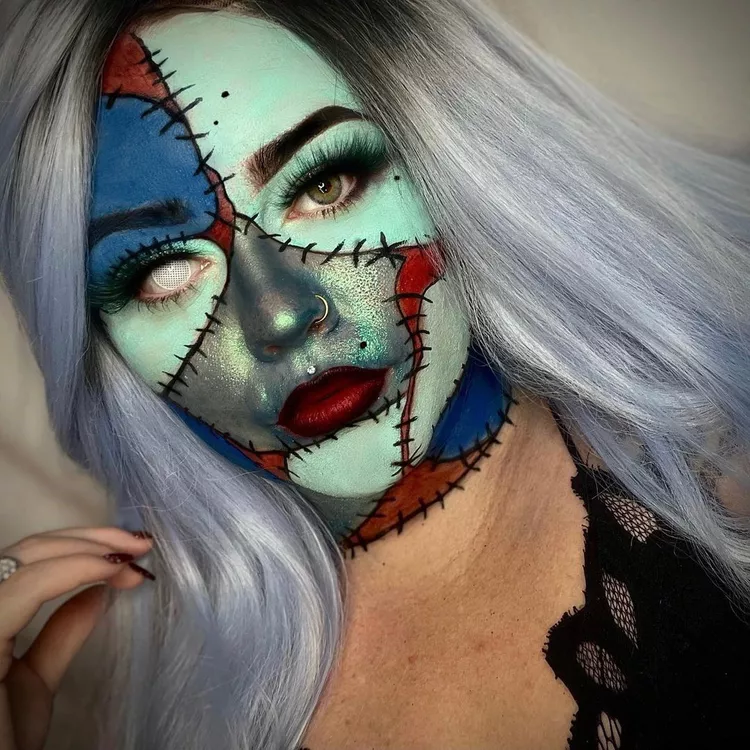
STITCHED DOLL MAKEUP
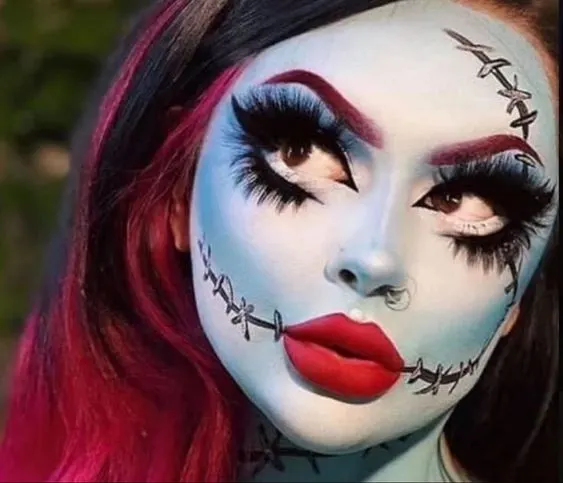
To create a striking stitched doll look, begin with blue face paint to establish that perfect doll aesthetic. Next, use black eyeliner to draw stitches around your mouth and forehead, as if you’ve just stepped out of a sewing class gone awry. Add some big false lashes to make your eyes really pop. Finally, finish off the look with bold red lips and well-defined brows for an eye-catching, playful effect. You’ll be ready to impress and enchant!
IT CLOWN PENNYWISE HALLOWEEN MAKEUP LOOK
Get ready for a dramatic and stunning IT clown Pennywise Halloween makeup look! Bring the iconic horror character from Stephen King’s IT to life with a bright red wig and deep red eyeshadows. Grab your favorite smoky palette and dark red lipstick to achieve that unsettling clown vibe. Use burgundy lipstick and add line details on your face for an extra creepy touch. This look will definitely make a bold statement and send shivers down spines!
CHESHIRE CAT MAKEUP
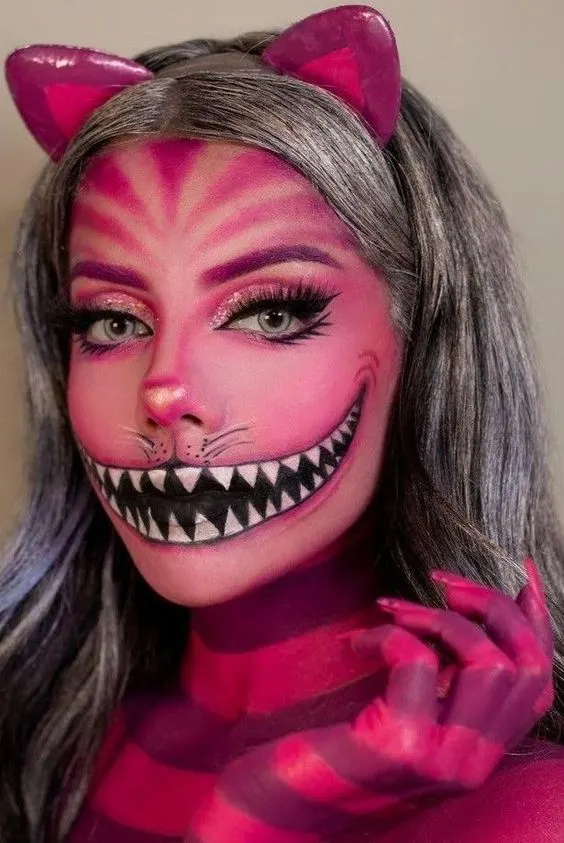
To channel a Cheshire Cat vibe, start by applying pink and purple face paint, creating fun stripes all over your face and body. Next, use black and white face paint to draw a large grin with sharp teeth—this will definitely be an eye-catcher! Add some sparkly eyeshadow and big lashes to enhance that magical, whimsical look. Finally, don’t forget to top it off with cat ears to complete your feline aesthetic. You’ll look like you just stepped out of Wonderland!
GLITTERING SKULL GLAM MAKEUP
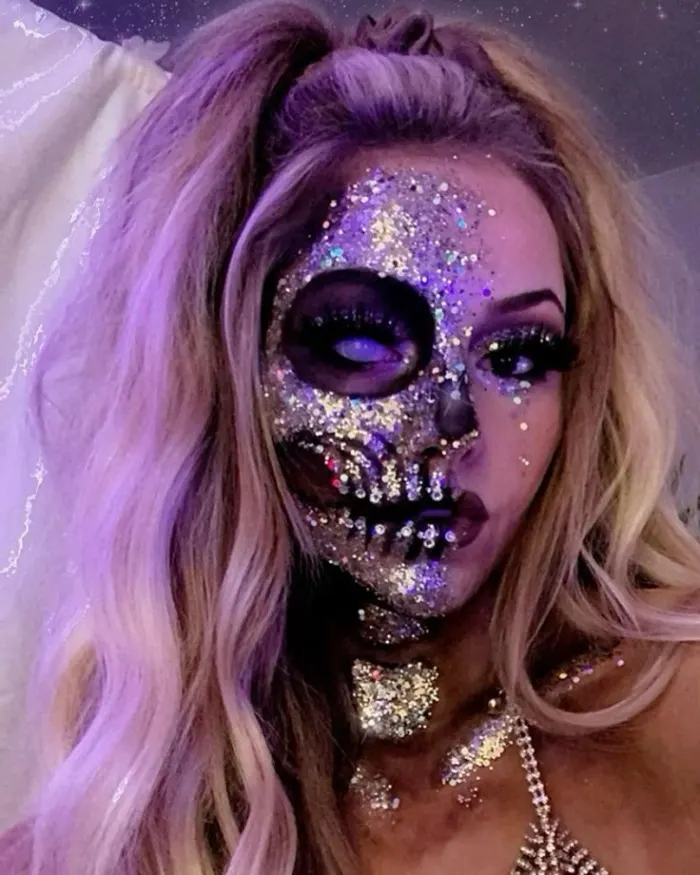
To achieve a stunning glittery skull glam, begin by painting half your face black to create that skull effect. Then, go wild with glitters—use a mix of big and tiny glitters, applying them all over for added depth and sparkle. Don’t forget to add dramatic lashes to make your eyes really pop. Finally, finish off with a spritz of setting spray to ensure your look stays intact while you terrorize the party. You’ll be the glittering star of the night!
CYBORG MAKEUP
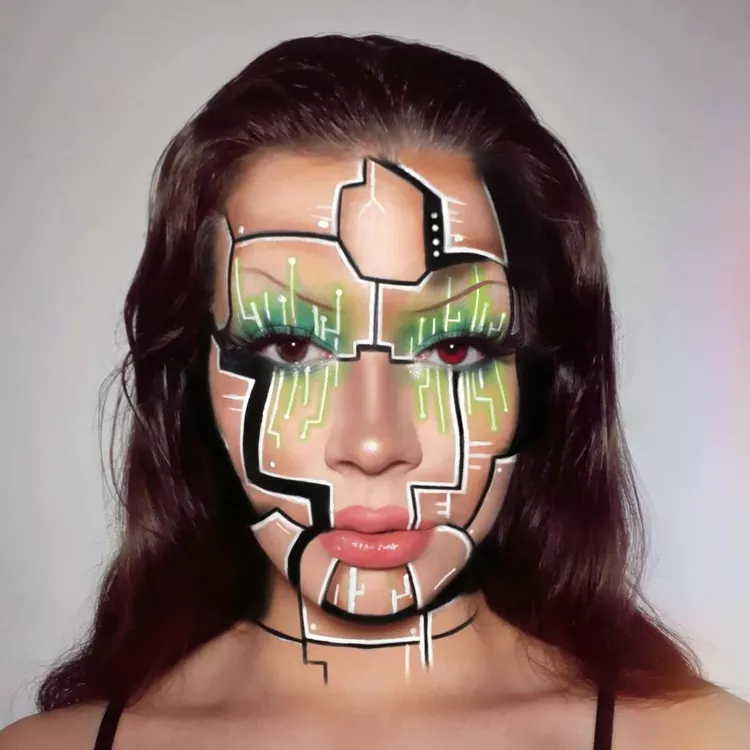
Showcase your superhuman makeup skills with a striking cyborg-inspired look! With intricate metallic details and futuristic elements, you’ll make everyone believe you’ve just stepped out of another dimension. Use silver and chrome face paints to create sleek lines and robotic features, and consider adding LED lights or metallic accessories for an extra wow factor. This look is sure to leave a lasting impression and elevate your Halloween game!
MYSTIC RUNE SORCERESS MAKEUP
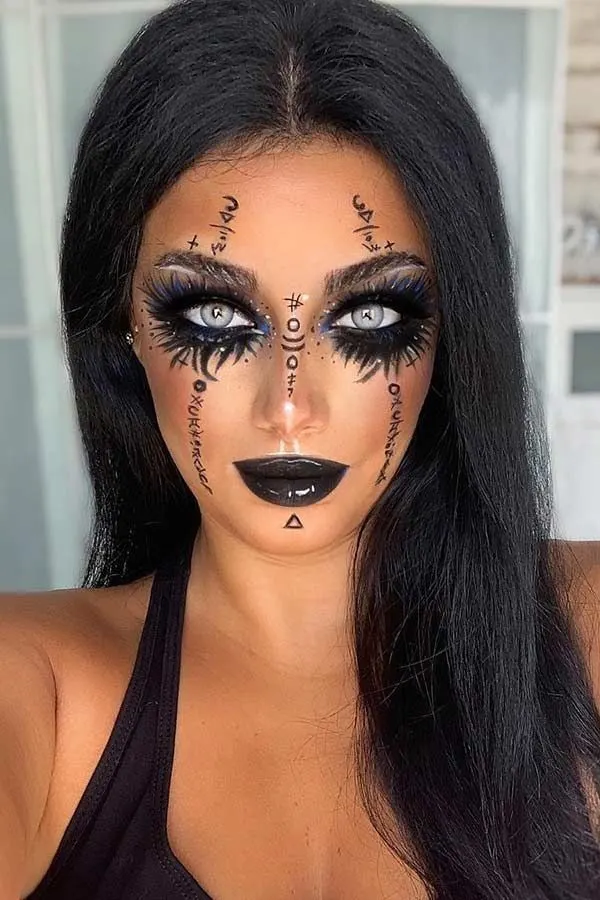
This mystic rune sorceress look is definitely wild and enchanting! Start by applying bold black lipstick to set the tone. Next, enhance your dramatic eyes with heavy mascara for a striking effect. Using fine eyeliner, draw rune symbols all over your face to add that mystical touch. For an extra spooky vibe, don’t forget to pop in some white contacts. You’ll create a mesmerizing look that’s sure to captivate everyone around you!
CHUCKY MAKEUP
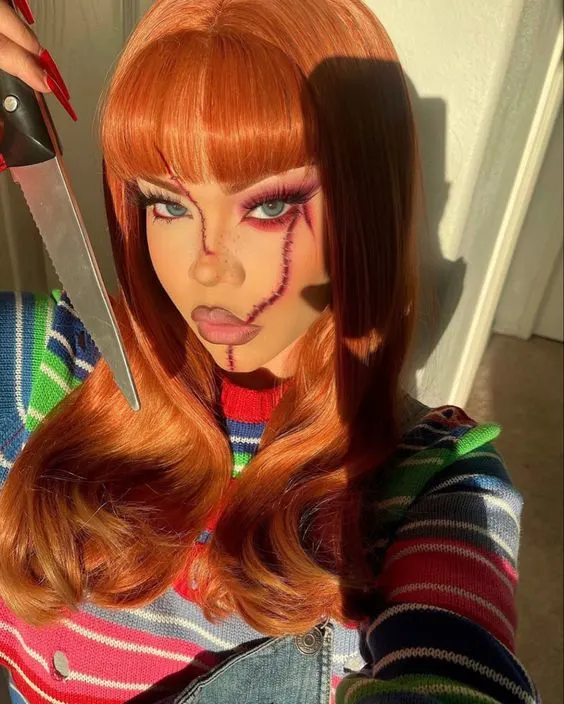
This look is all about embracing your fierce side with vibrant orange hair and striking stitched makeup. Start with a skin-tone base, then use black eyeliner to draw stitches across your face for that edgy effect. Add a touch of red eyeshadow around the stitches to enhance the overall look. Finish off with a sharp lip color and fierce nails to complete your transformation. And remember, those scissors are just for show—no real cutting involved! You’ll be ready to command attention wherever you go!
OPTICAL ILLUSION MAKEUP
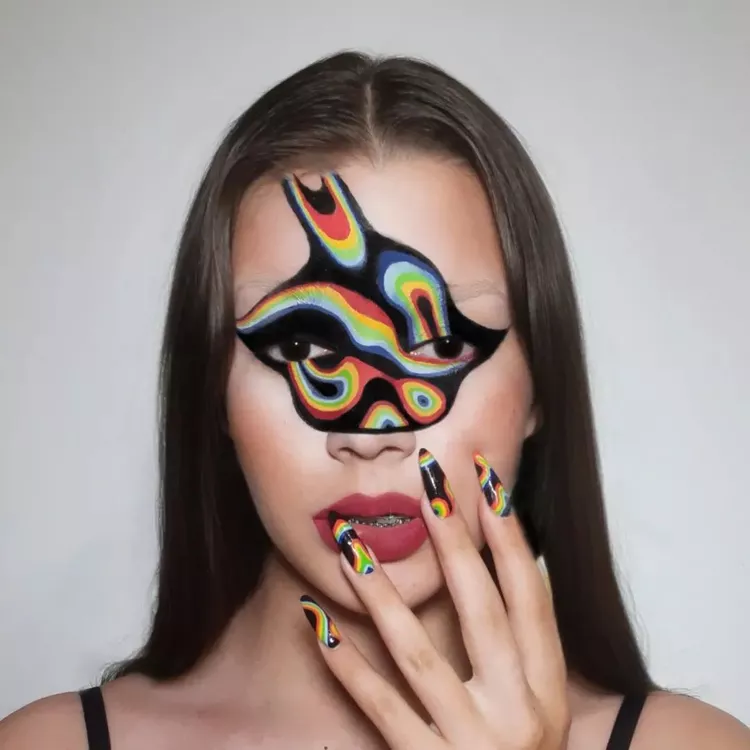
You’ll leave everyone seeing double with this stunning optical illusion makeup look! The rainbow-shaded eyes take center stage, showcasing a vibrant blend of colors that mesmerize. Creative artist Brigitta Varga added a touch of long-wear red lipstick for a subtle yet striking pop of color, perfectly complementing the bold eye design. This look is sure to turn heads and spark conversations wherever you go!
Splitting Apart Makeup
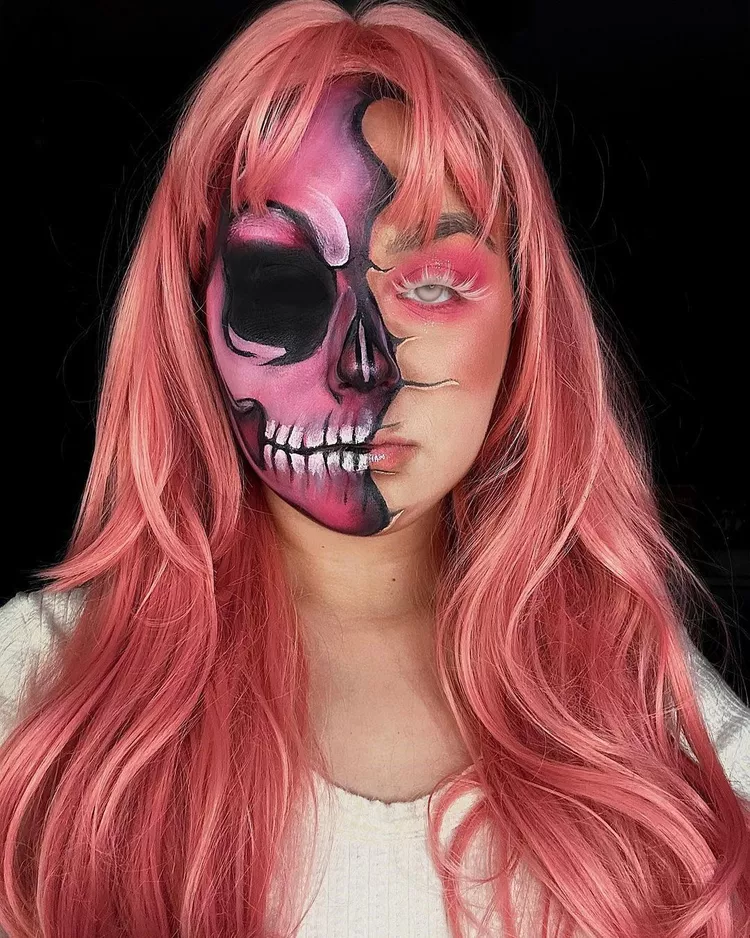
Embrace a darker twist on Barbiecore pink by blending classic beauty favorites with bold, edgy flair. Start with trusted essentials like ELF Cosmetics’ Power Grip Primer and KVD Beauty’s Good Apple Liquid Foundation for a flawless base on the “normal” side. For the skull design, turn to face paint from CC Beauty and create intricate details using eyeliners from Gavissi Beauty and Glisten Cosmetics.
GORGEOUS GHOUL MAKEUP
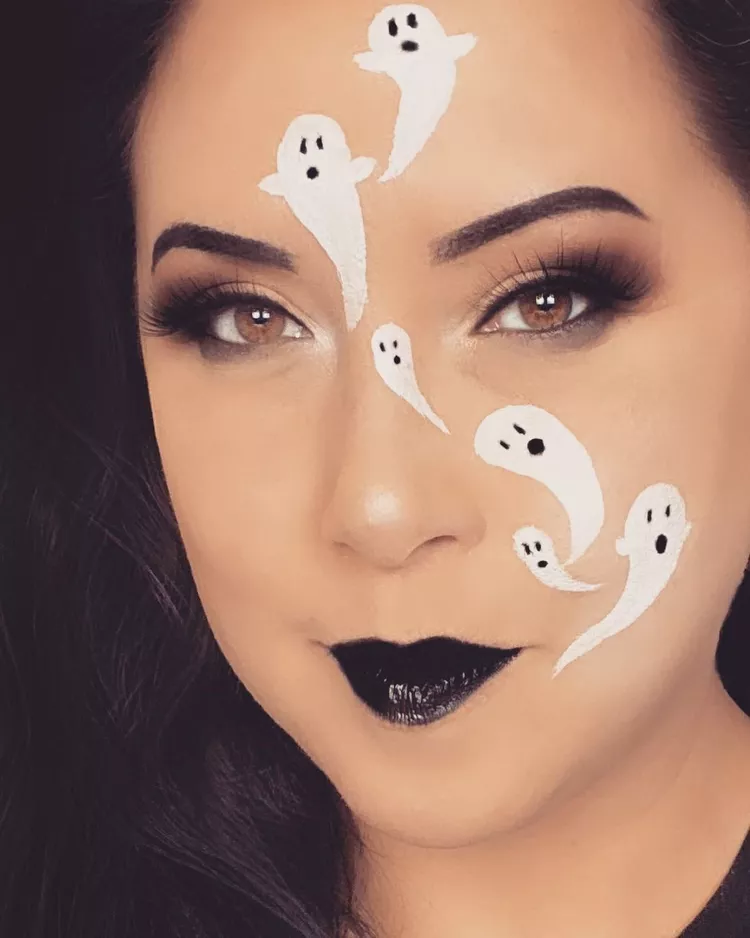
Casper may be a friendly ghost, but you’ll be the most gorgeous ghoul around! Start by grabbing your favorite black and white eyeliners to trace as many playful ghosts across your face as you desire.
CHIC SCARECROW MAKEUP
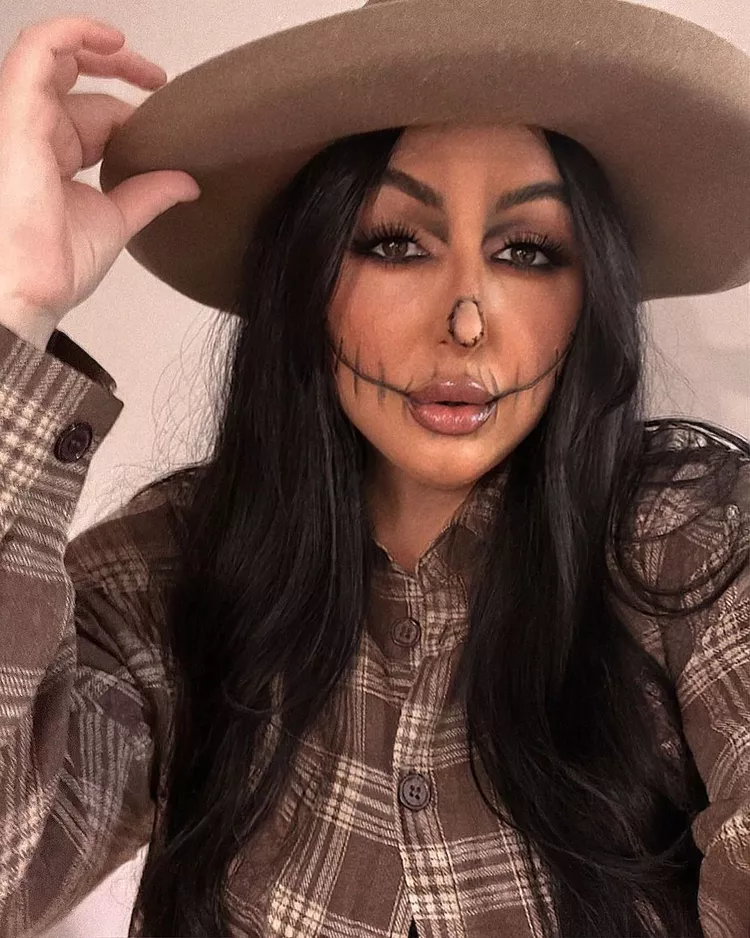
If you’re short on time but still want a festive Halloween look, a scarecrow is the perfect choice! Start by using black eyeliner or eyeshadow to draw stitches across your mouth for that classic scarecrow vibe. Then, create a cute circle around your nose to add to the charm. Pair this with some earthy tones in your outfit, and you’ll achieve a fun and easy look that’s perfect for any Halloween celebration!
GLAMOROUS FRANKENSTEIN MAKEUP
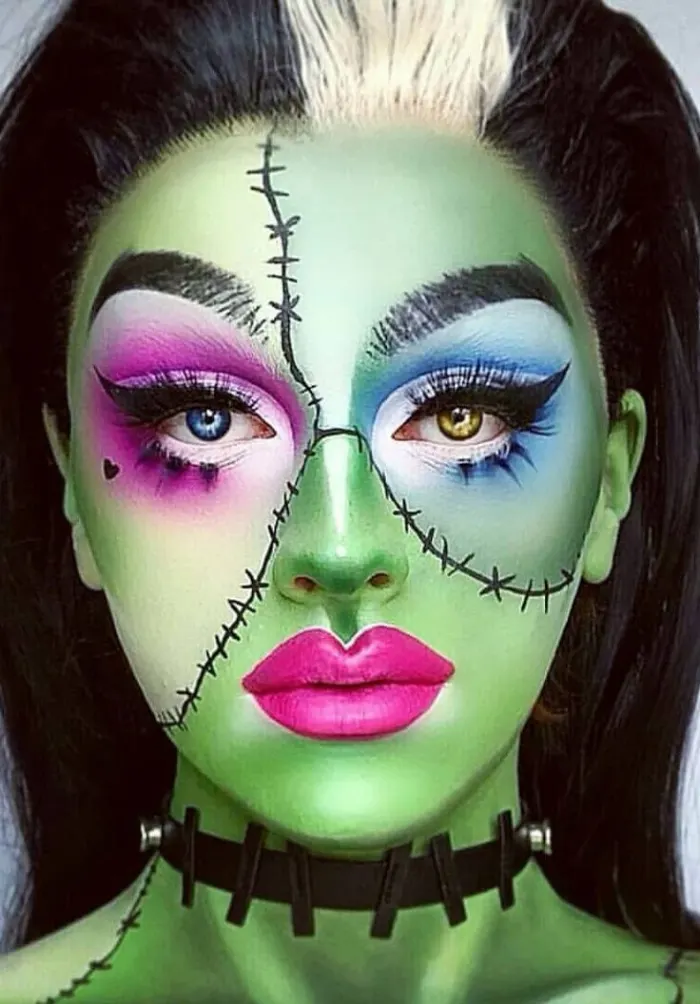
Add a fun twist to the classic Frankenstein look with bright green skin and colorful makeup! Start by applying green face paint as your base. For an interesting touch, use different shades of eyeshadow for each eye. Then, draw stitched details around your eyes and mouth with black eyeliner for that signature look. Finish off with a bright pink lip to create a vibrant pop. Just remember, with those bolts in place, be careful not to trip as you strut your stuff! You’ll be an eye-catching and playful version of this iconic character!
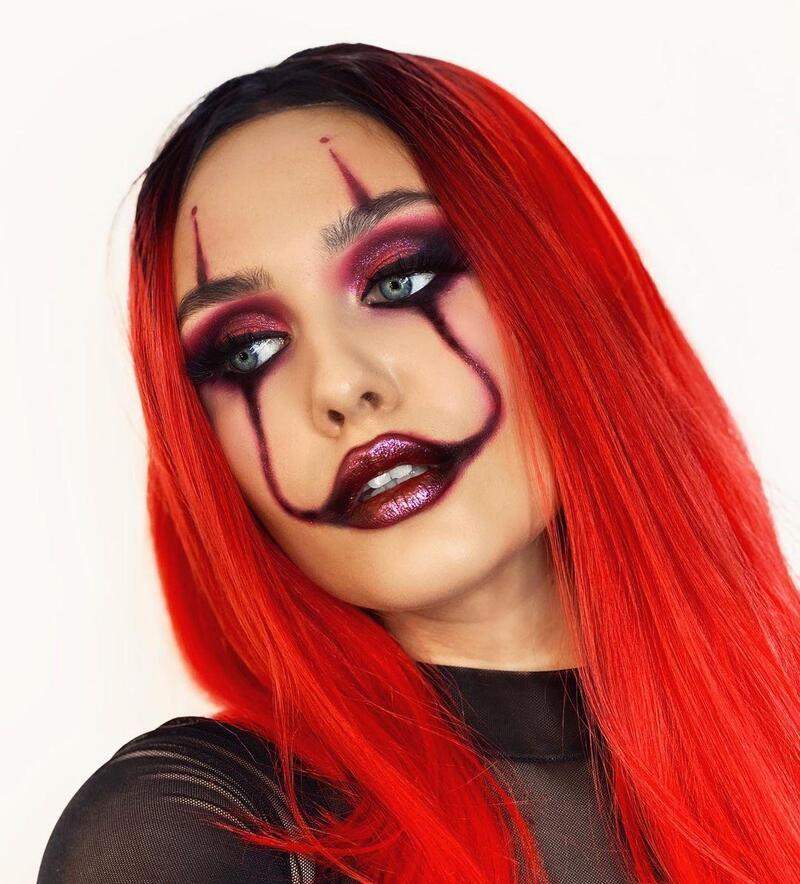
TEARS OF A CLOWN MAKEUP
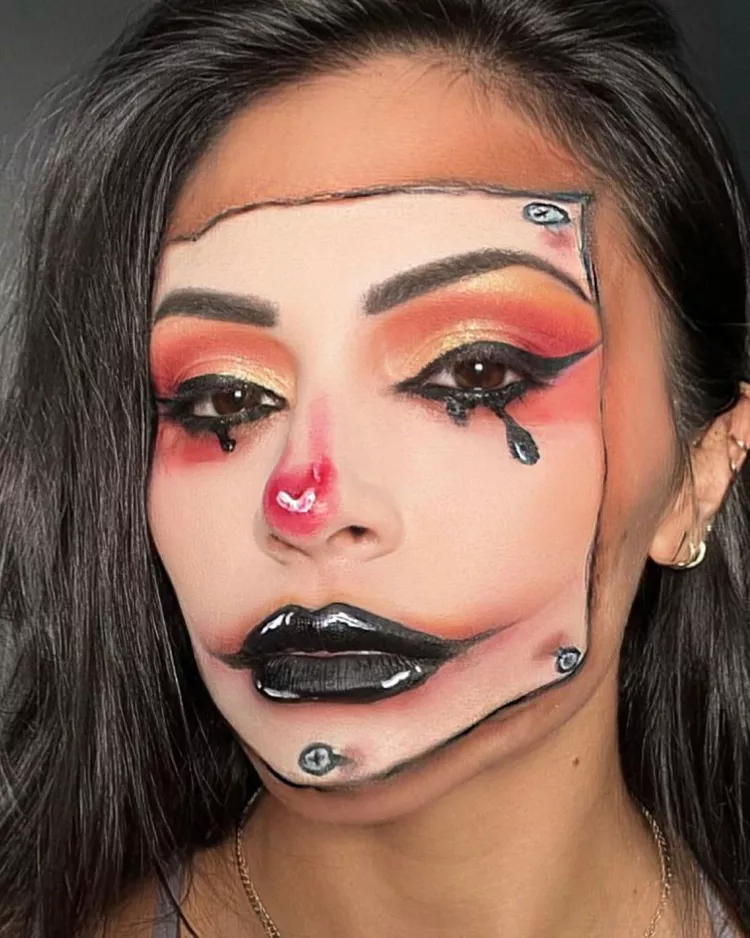
You can never go wrong with dramatic clown makeup, especially with a pop art-inspired twist! This style elevates the classic spooky look to a whole new level. Start with a bold base in bright colors, and use graphic outlines to create exaggerated features. Incorporate playful dots and lines for that comic book feel. Finish with dramatic lashes and a striking lip color to complete your transformation. This eye-catching look is sure to make a memorable statement at any Halloween event!
CONCLUSION
Whether you’re a seasoned makeup artist or a beginner looking to experiment, these 20+ mystery-themed Halloween makeup ideas offer a world of possibilities. From spooky skeletons to enchanting witches, there’s a look to suit every taste and skill level. So, gather your makeup supplies, let your creativity run wild, and prepare to be the star of the Halloween party. Happy haunting!