There’s nothing quite like watching your child light up the stage at an eisteddfod or dance concert. Hair and makeup play just as big a role as the costume, ensuring each dancer looks their best under the stage lights.
For many parents—and even dancers applying their own makeup—creating the perfect stage look can feel overwhelming, especially if makeup isn’t your strong suit.
To help, we’ve put together some essential tips for achieving dance makeup that truly stands out.
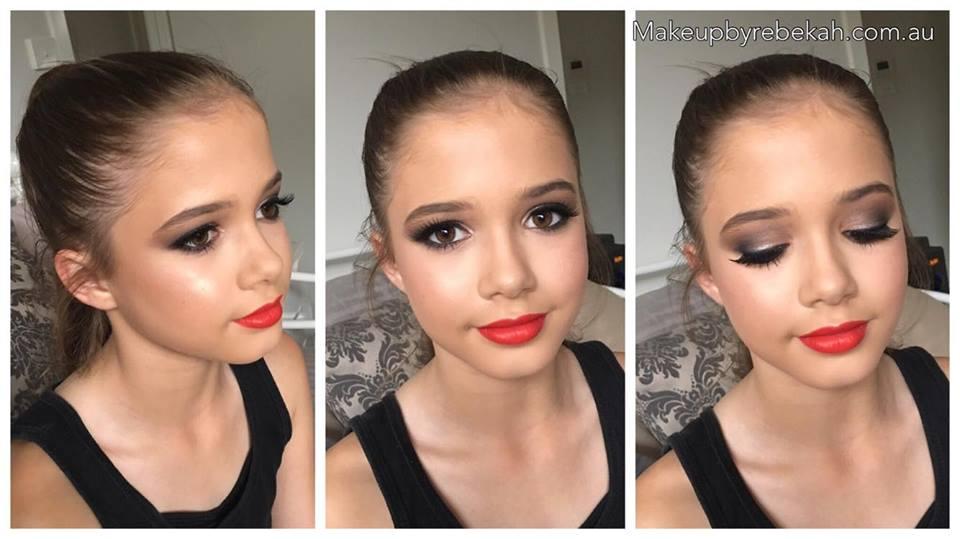
First, let’s take a look at a before-and-after photo of the lovely Isabella. Her makeup highlights her features, making them pop beautifully on stage!

Great makeup starts with the right tools! Investing in a good-quality yet affordable brush set can make all the difference in achieving a polished look. Priceline offers budget-friendly options, including Manicare and Models Prefer brushes. For a reliable choice, Real Techniques brushes are among my personal favorites!
Step 1 – Primer
Dancers often wear their makeup for an entire day, so choosing the right products to enhance longevity is essential. Primer plays a crucial role in keeping foundation in place and creating a smooth base for application.
One of my favorite primers is the Laura Mercier Primer, available at David Jones, but if you’re looking for a budget-friendly option, the Face of Australia Primer from Priceline is a great choice for under $12.
For teenagers with oily skin, a mattifying primer helps control shine, especially in the T-zone. I highly recommend the Make Up For Ever Step 1 Mattifying Primer for this.
Don’t forget to prep your lips! Apply a nourishing lip balm like Lanolips or Paw Paw Ointment to keep them soft. Regularly exfoliating with a toothbrush is a simple trick to remove dead skin and keep your lips smooth.
Step 2 – Eyes
I always start with the eyes first, especially for stage makeup, as eyeshadow fallout can get messy. Doing this before foundation allows for easy cleanup and gives the primer more time to settle into the skin.
Prepping the Eyes
- Apply your foundation over the eyelid and under the eyes to create an even base.
- Use an eye primer to ensure eyeshadow adheres properly and stays in place. This also prevents smudging and creasing throughout the day.
- Top picks: Too Faced Shadow Insurance (Mecca Maxima) or Urban Decay Eyeshadow Primer Potion.
- Budget-friendly option: Face of Australia Eye Primer (Priceline, under $9).
- If you don’t have an eye primer, concealer can work as an alternative.
Eyeshadow Application
- Set the base – Apply a nude eyeshadow over the entire lid.
- Define the crease – With a small fluffy brush, blend a soft brown shade into the crease and down toward the lash line.
- Deepen the outer lid – Layer a medium brown/taupe shade on the outer lid, blending well. Gradually build intensity by adding darker brown, then black, ensuring the black remains closest to the lash line. Use a clean blending brush to seamlessly blend the shades together.
- Brighten the inner lid – Apply a shimmery gold or bronze shade to the inner lid and inner corners to open up the eyes.
- Highlight the brow bone – Use a pearl shimmer shade just below the eyebrows.
- Lower lash line – With an angled brush, apply lighter shades toward the inner corner and darker shades on the outer lash line for added dimension.
For a great dance-friendly eyeshadow palette, try the CHI CHI Nudes Palette (Target, under $23) or Models Prefer Nude Palettes (Priceline).
Finishing Touches
- Clean up fallout using micellar water and cotton buds or a makeup wipe.
- Line the eyes:
- Apply gel or liquid eyeliner along the upper lash line.
- Line the lower lash line, stopping just short of the outer corner, then extend it horizontally for a lifted effect. A pencil liner works well here.
- Mascara: Coat the top and bottom lashes for added volume.
- False lashes:
- Trim strip lashes to fit your eye shape.
- Apply lash glue and wait about 20 seconds until tacky before placing them on the lid.
- To create a lifted effect, position the outer corner slightly above the lash line.
- Press the false lashes into your natural lashes using tweezers or fingers.
For stage-perfect lashes, I recommend Modelrock’s Pick and Mix lashes—affordable at under $2 per pair. Styles 212, 259, and 236 are great for stage performances.

Step 3 – Base
With the eyes complete and the skin prepped, it’s time to perfect the base.
Foundation
- Use a buffing brush to blend a waterproof foundation into the skin.
- For stage makeup, choose a shade one to two shades darker than your natural skin tone to ensure your features stand out under bright lights.
- I used the Atelier Paris Waterproof Foundation on Isabella, but a great alternative is Revlon ColorStay Foundation.
- Investing in a high-quality foundation is worthwhile, as it lasts longer and eliminates the need for frequent touch-ups.
(For local dance mums and students, I offer color-matching if you’re interested in ordering Atelier Paris foundations.)
Concealer
- Apply concealer in a V shape under the eyes, down the nose bridge, and on the center of the forehead and chin for a brightened, even complexion.
- I used MAC Pro Longwear Concealer, but Maybelline offers great budget-friendly options as well.
Blending is key—use a smaller buffing brush or a damp beauty sponge for a seamless finish.

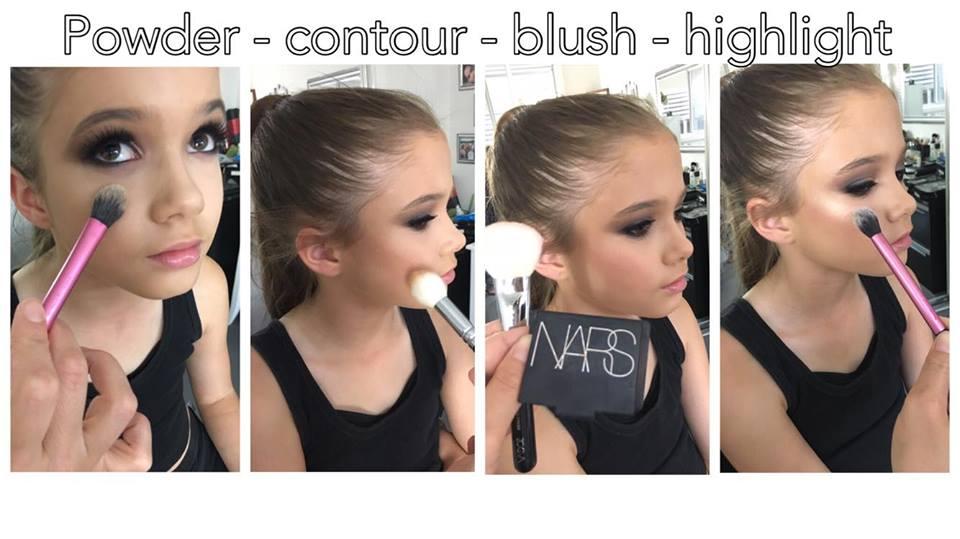
Step 4 – Contour, Blush & Highlight
Once your base is perfectly blended, set everything in place with a translucent powder. A colorless powder is best to avoid altering the foundation shade. I recommend Ben Nye Translucent Powder, available from Scotty’s.
Contour
- Using a contour powder, apply a line just below the cheekbones and blend upwards (making a “fish face” helps find the right placement).
- Blend contour along the temples, jawline, and sides of the nose for added definition.
- I used the Anastasia Contour Palette, but a great budget alternative is Models Prefer Contour Powder from Priceline for just $10.
Blush
- Use a fluffy brush to apply a rosy pink blush to the cheekbones for a natural flush.
- On Isabella, I used NARS Deep Throat, but any soft pink blush works well.
Highlight
- Apply a highlighter to the tops of the cheekbones for a radiant glow.
- My favorite is The Balm Mary-Lou Manizer, available at David Jones and Sephora for under $30.
- A great budget-friendly option is the Models Prefer Highlighter, available at Priceline for under $11.
Blending is key—make sure all the products transition smoothly for a flawless, stage-ready finish!
Step 5 – Brows & Lips

Brows
- Fill in the eyebrows using a brow pencil or an eyeshadow that is one shade lighter than your natural brow color.
- Apply with an angled brush for precision and blend well for a natural yet defined look.
- Remember, eyebrows frame the eyes, so shaping them correctly enhances the overall makeup!
Lips
- Outline the lips with a red lip liner to define the shape and prevent feathering.
- Fill in the lips with a long-lasting red lipstick for a bold, stage-ready look.
- Revlon ColorStay is a fantastic option for a vibrant, long-wearing red.
Step 6 – Setting Spray
To lock in the makeup and ensure it lasts under the bright stage lights, finish with a makeup setting spray.
- Skindinavia Setting Spray is my go-to for long-lasting wear.
- For a budget-friendly option, the Models Prefer Setting Spray from Priceline (under $15) works well to keep everything in place.
A few spritzes will help prevent smudging, fading, or melting—so your dancer’s look stays flawless from the first step to the final bow!
Let the show begin!!!!!