Are you struggling with drawing perfect eyebrows for your makeup look? Don’t worry, you’re not alone. Many people find it challenging to create symmetrical and precise eyebrows. But with some practice and the right techniques, you can master the art of eyebrow drawing and achieve flawless results every time.
In this guide, we will discuss different methods to draw eyebrows step-by-step.Whether you prefer a natural or dramatic look, you’ll learn everything you need to know about how to draw eyebrows like a pro.
Method 1: Using Eyebrow Pencil
Eyebrow pencils are one of the most popular tools for drawing eyebrows. They come in various shades and textures, from soft and creamy to firm and waxy. Here’s how to use an eyebrow pencil to create a natural-looking eyebrow:
Start by brushing your eyebrow hairs upwards with a spoolie brush or a clean mascara wand.
Choose an eyebrow pencil color that matches your hair color or is one shade lighter for a more subtle look.
Begin filling in the sparse areas of your eyebrow using light strokes in the direction of your hair growth. Avoid harsh lines or over-filling the brow area.
Use the spoolie brush or a clean angled brush to blend and soften the eyebrow pencil strokes. This will help create a natural-looking gradient from the inner corner to the outer corner of the eyebrow.
Set the eyebrow pencil with a clear eyebrow gel or a tinted eyebrow mascara to keep the hairs in place and add more definition if needed.
Method 2: Using Eyebrow Powder
Eyebrow powders are natural-looking, suitable for everyday wear and easy to remove. Here’s how to use eyebrow powder:
Choose an eyebrow powder shade that matches your hair color or is one shade lighter for a more natural look.
Dip an angled brush into the powder and tap off any excess.
Begin filling in the sparse areas of your eyebrow using light strokes in the direction of your hair growth. Start at the inner corner and work your way towards the outer corner.
Use the spoolie brush or a clean angled brush to blend and soften the eyebrow powder strokes. This will help create a seamless transition from the inner corner to the outer corner of the eyebrow.
Set the eyebrow powder with a clear eyebrow gel or a tinted eyebrow mascara to keep the hairs in place and add more definition if needed.
Method 3: Using Eyebrow Pomade
Eyebrow pomade is a waterproof and long-lasting option for those who want a bold and defined eyebrow look. Here’s how to use eyebrow pomade:
Choose an eyebrow pomade shade that matches your hair color or is one shade darker for a more dramatic effect.
Dip an angled brush into the pomade and scrape off any excess on the container’s rim.
Begin drawing the outline of your eyebrow’s shape using small and precise strokes. Start at the arch and work your way towards the tail and then the inner corner. Avoid creating harsh lines or over-filling the brow area.
Use the spoolie brush or a clean angled brush to blend and soften the eyebrow pomade strokes. This will help create a natural-looking gradient from the inner corner to the outer corner of the eyebrow.
Set the eyebrow pomade with a clear eyebrow gel or a tinted eyebrow mascara to keep the hairs in place and add more definition if needed.
How to Choose the Right Eyebrow Products
Now that you know the different methods to draw eyebrows, let’s talk about how to choose the right products for your eyebrow type and preference. Here are some tips:
Eyebrow pencils are suitable for beginners or those who want a quick and easy solution. They’re also great for filling in sparse areas or correcting minor mistakes.
Eyebrow powders are ideal for those who prefer a softer or more natural-looking finish. They also work well for creating an ombre or gradient effect.
Eyebrow pomades are best for those who want a bold and long-lasting result. They’re also suitable for oily skin or hot and humid weather conditions.
Choose an eyebrow product shade that matches your hair color or is one shade lighter for a more subtle look. If you have dark hair, avoid using black products as they can look too harsh.
how to draw eyebrows for different face shapes
Oval Face
Oval faces are considered balanced and versatile. Maintain your natural brow shape by slightly arching your brows, following the natural curve. Avoid overly angular or rounded brows.
Round Face
To add definition, create higher and more defined arches. Avoid round brows as they can emphasize the roundness of your face. Angular, slightly arched brows help create a more elongated appearance.
Square Face
Soften the angles of a square face with curved or slightly rounded brows. A gentle arch complements your strong jawline, making it less prominent.
Heart-Shaped Face
Balance the wider forehead with slightly curved brows. Avoid overly thin or straight brows. A natural arch that isn’t too high works well for this face shape.
Drawing Eyebrows: General Tips
Use a spoolie brush or a clean mascara wand to brush your eyebrow hairs upwards before and after applying the product. This will help you see the natural shape of your eyebrows and ensure even application.
Use an angled brush with synthetic bristles for more precise and controlled strokes. The angle can also help create a sharper and defined tail.
If you prefer a softer or more diffused effect, use a rounded brush with soft bristles to blend the product and soften any harsh lines.
Begin at the inner corner of your brow, following your natural shape. Create small, hair-like strokes.
Define the arch by extending the tail slightly upward and outward.
Blend the product with a spoolie brush for a soft, natural finish.
Avoid over-plucking or over-drawing your brows. Natural-looking brows are the goal.
How to maintain Healthy Eyebrows
Avoid over-plucking or over-trimming your eyebrows as it can damage the hair follicles and lead to sparse or uneven growth.
Use a gentle cleanser or micellar water to remove any makeup or dirt from your eyebrows before going to bed.
Apply a nourishing eyebrow serum or oil to stimulate hair growth and keep the hairs healthy and shiny.
Avoid rubbing or scratching your eyebrows as it can irritate the skin and cause redness or inflammation.
Final Takeaway
Drawing eyebrows may seem intimidating at first, but with the right techniques and tools, anyone can achieve beautiful and flattering eyebrows. Whether you prefer a natural or dramatic look, it’s essential to choose the right products and tools for your eyebrow type and preference. Don’t be afraid to experiment with different eyebrow shapes or methods to find what works best for you. With practice and patience, you’ll be able to master the art of eyebrow drawing and enhance your overall makeup look.
85+ GORGEOUS SIMS 4 CC CLOTHING PACKS (SIMS 4 DRESSES) TO ENHANCE YOUR CC COLLECTION
Are your Sims tired of the same old outfits? Do you crave a wardrobe refresh that injects tons of gorgeous style into their lives? Well, get ready to revamp their look! We’ve curated a list of a whopping 85+ incredible Sims 4 CC clothing packs, specifically focusing on stunning dresses.
This collection offers a treasure trove of variety, from casual and chic to elegant and glamorous. Whether you’re building a trendsetting fashionista or a timeless beauty, there’s a perfect dress pack waiting to be discovered. So, dive in, explore the diverse styles, and get ready to dress your Sims to impress!
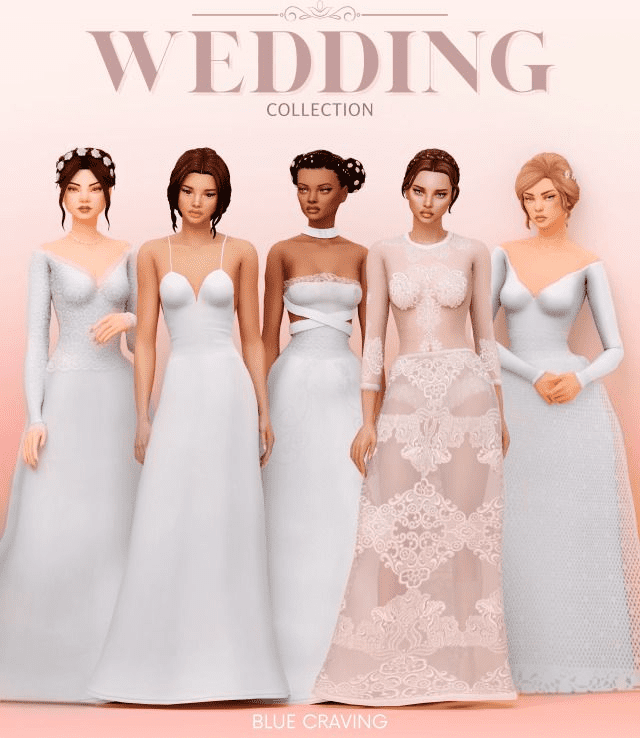
SIMS 4 WEDDING CC CLOTHES – ZEUSSIM
Creator Zeussim offers a dream collection for your Sims’ big day! Look no further for stunning wedding attire with the Zeussim Sims 4 CC clothes. Their designs are known for elegance and variety, ensuring you find the perfect dress or suit for your Sim’s unique wedding style. Whether you crave a classic silhouette or a modern twist, Zeussim’s CC has you covered!
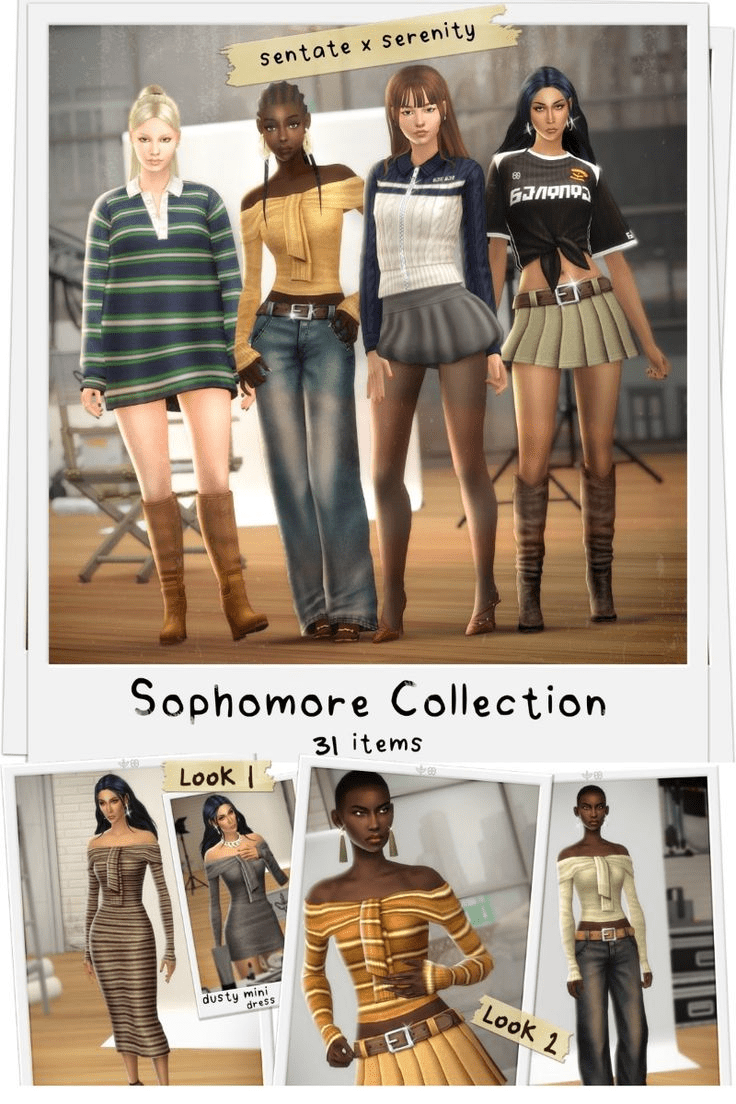
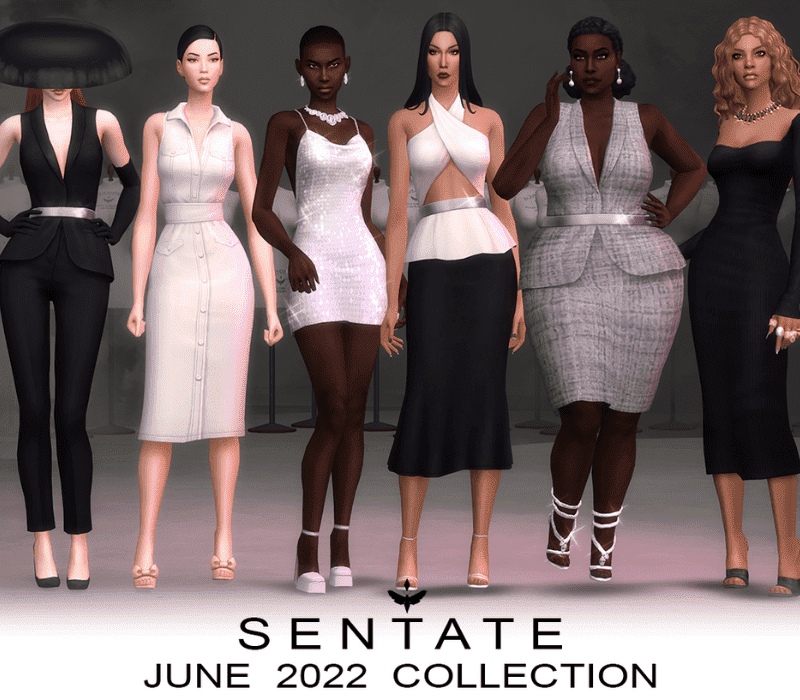
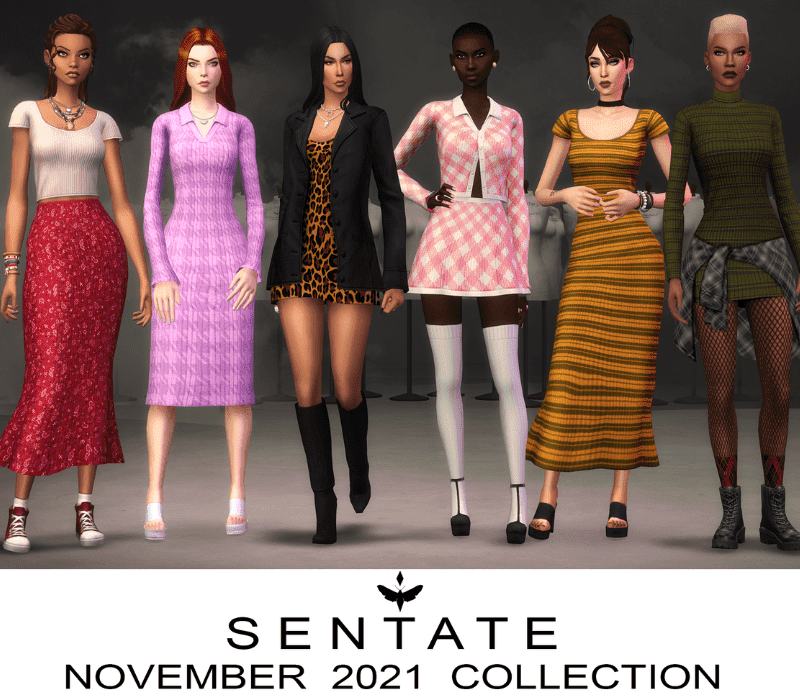
THE SOPHOMORE SIMS 4 CC CLOTHES PACK – SENTATE & SERENITY
Calling all fashion-forward teens! Breathe new life into your sophomore Sims’ wardrobes with The Sophomore Collection by Sentate & Serenity. This Sims 4 CC clothing pack, created by the collaborative duo Sentate and Serenity, is packed with trendy styles perfect for the high school scene. Expect a mix of casual and dressy pieces that capture that quintessential sophomore vibe. From everyday essentials to statement outfits, The Sophomore Collection will have your Sims looking their best for every occasion.
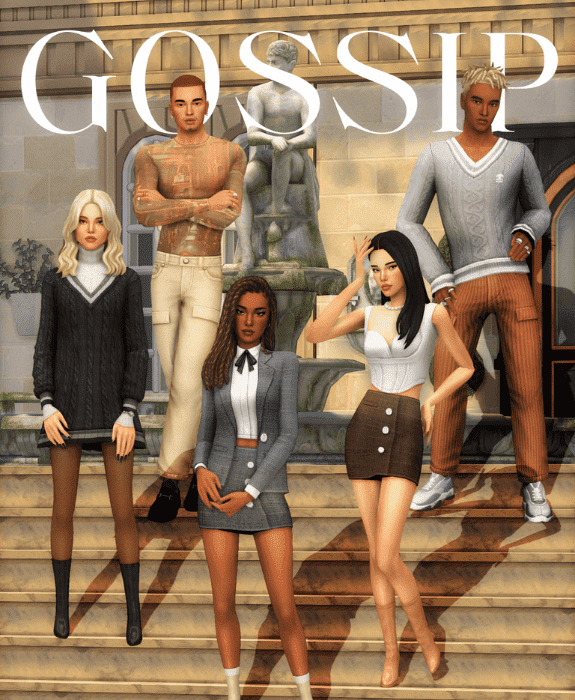
GOSSIP COLLECTION SIMS 4 CC CLOTHES – GREENLLAMAS
Dish up some drama with the Gossip Collection by greenllamas! This Sims 4 CC clothing pack isn’t for the faint of heart. It’s brimming with bold and statement pieces that are sure to turn heads. Whether your Sim is a trendsetter or a socialite with a flair for the dramatic, the Gossip Collection has the perfect outfit to make them the center of attention. Expect a mix of styles – some sleek and sophisticated, others edgy and daring. Get ready to fuel the rumor mill with these unforgettable looks!
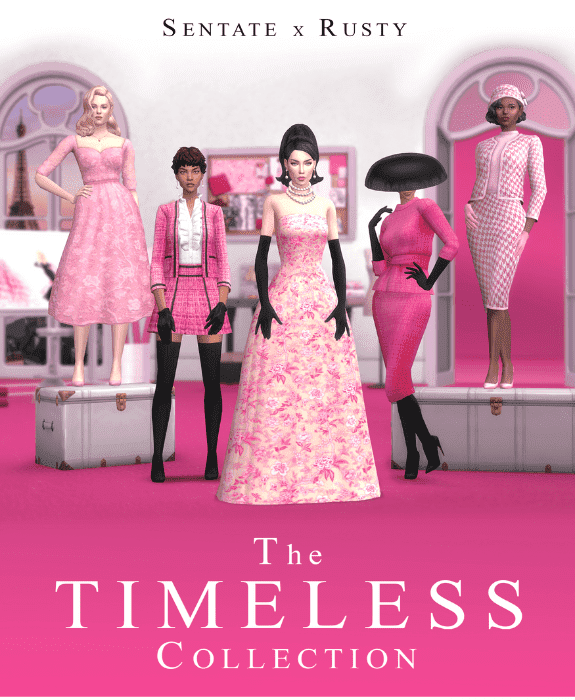
THE TIMELESS COLLECTION SIMS 4 CC CLOTHES – RUSTY X SENTATE
Embrace enduring elegance with The Timeless Collection by Rusty x Sentate for Sims 4. This CC clothing pack is a collaboration between two powerhouse creators, offering a curated selection of outfits that transcend trends. Expect classic silhouettes with a modern twist, perfect for Sims who appreciate quality and sophistication. The Timeless Collection caters to various styles, ensuring you’ll find pieces that embody timeless grace for all your Sims’ formal and semi-formal occasions.
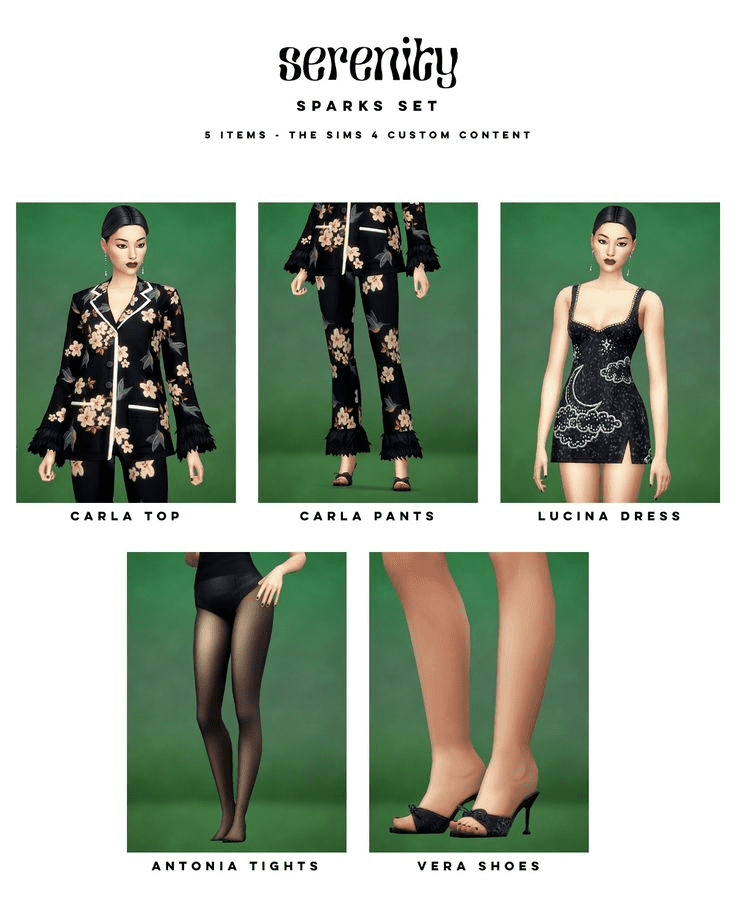
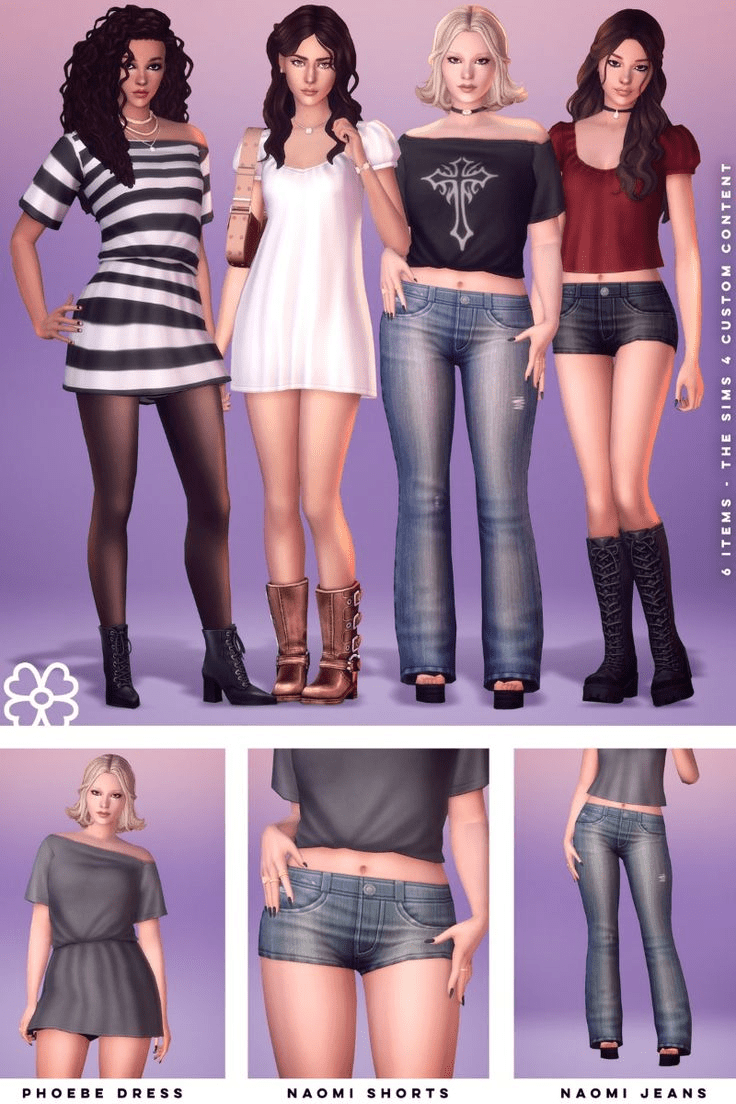
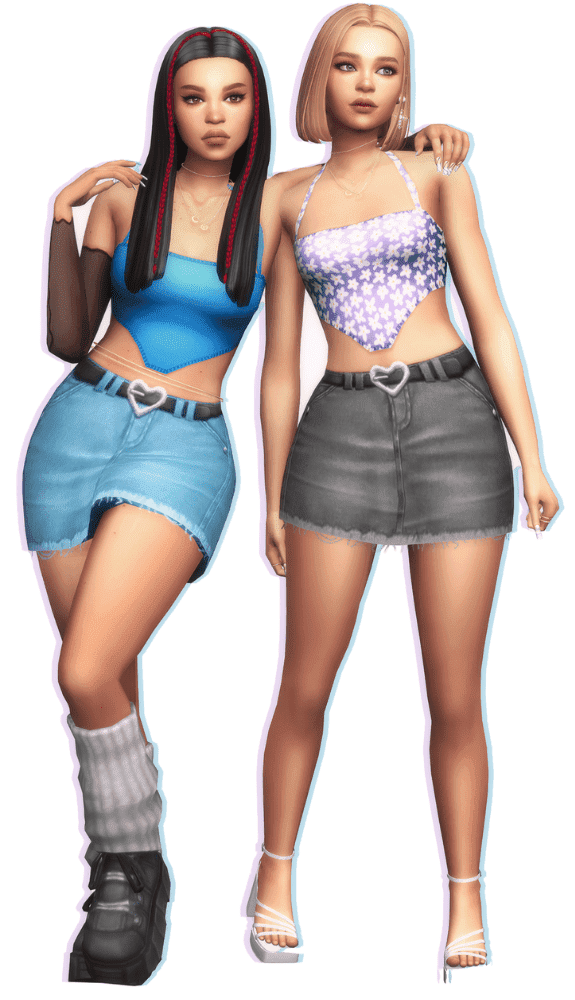
SPARKS SIMS 4 FEMALE CLOTHES CC SET – SERENITY
The SPARKS Sims 4 Female Clothes CC Set – Serenity is a stylish collection that brings a fresh, modern look to your Sims’ wardrobes. This set features an array of beautifully designed outfits that range from casual wear to chic evening attire, perfect for any occasion. Each piece in the Serenity collection showcases high-quality textures and meticulous detailing, making them look realistic and appealing in-game. The versatile color palette allows for easy mixing and matching, enabling players to create unique and personalized ensembles for their Sims. With this CC set, players can enhance their gameplay experience by adding a touch of elegance and sophistication to their Sims’ fashion choices.
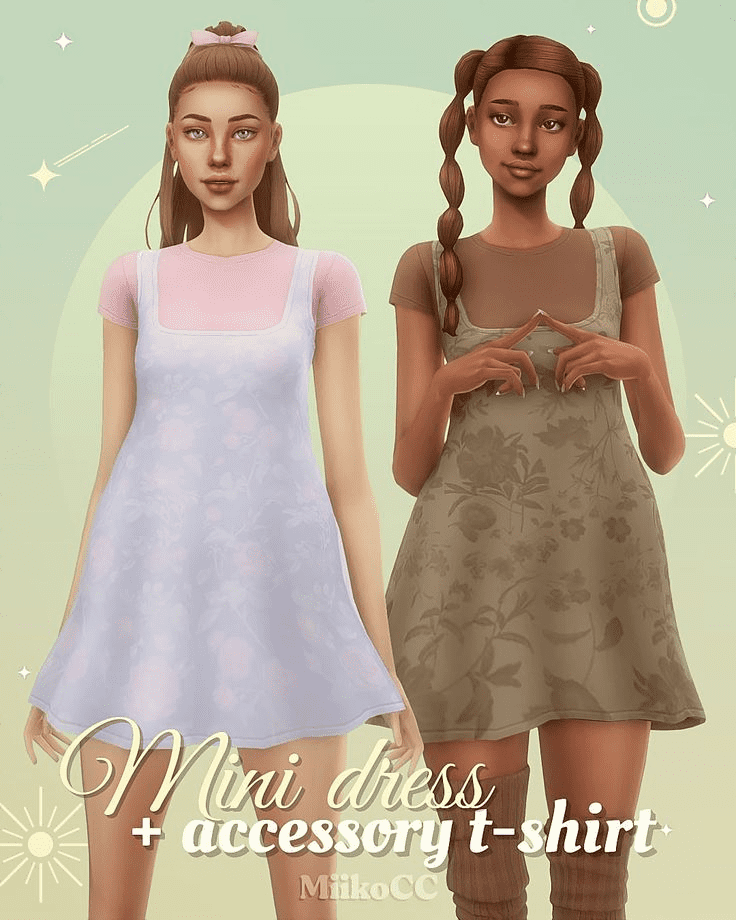
SIMS 4 MINI DRESS AND ACCESSORY T-SHIRT CC – MIIKO
The Sims 4 Mini Dress and Accessory T-Shirt CC by Miiko offers a trendy and playful addition to your Sims’ wardrobe. The mini dress features a flattering silhouette that is perfect for both casual outings and stylish events. Complementing the dress, the accessory T-shirt adds a versatile layer that can be worn underneath or styled separately for a more relaxed look. The high-quality design and attention to detail in this CC ensure that each piece looks vibrant and realistic in the game. With a variety of color options, players can effortlessly mix and match to create unique and fashionable outfits for their Sims.
THE CRANBERRY SIMS 4 FEMALE CC CLOTHES COLLECTION – SONDESCENT
The Cranberry Sims 4 Female CC Clothes Collection by Sondescent is a vibrant and stylish addition to any Sim’s wardrobe. This collection includes a variety of trendy pieces, from chic tops to elegant dresses, all designed with a modern and fashionable flair. Each item features high-quality textures and detailed patterns, making them stand out in the game. The collection’s color palette is diverse, offering bold and muted tones to suit different styles and preferences. With its unique and fashionable designs, the Cranberry collection allows players to create standout looks for their Sims, enhancing their virtual fashion experience.
EUPHORIA COLLECTION SIMS 4 CC CLOTHES – SERENITY
The Euphoria Collection for Sims 4 CC Clothes by Serenity introduces a bold and edgy aesthetic to your Sims’ fashion lineup. This collection features an array of striking pieces, including vibrant tops, stylish skirts, and eye-catching accessories, all inspired by the hit show “Euphoria.” Each item is crafted with high-quality textures and intricate details, ensuring a realistic and immersive look in-game. The collection’s color palette is diverse, offering everything from neon hues to dark, moody shades, perfect for creating unique and dramatic outfits. With its daring designs and trendy appeal, the Euphoria Collection allows players to push the boundaries of their Sims’ style, making every outfit a statement.
THE SUNSET SIMS 4 CC CLOTHES COLLECTION – SENTATE
The Sunset Sims 4 CC Clothes Collection by Sentate brings a touch of classic elegance and contemporary style to your Sims’ wardrobe. This collection includes a variety of sophisticated pieces, from tailored blazers to flowing dresses, all designed with a keen eye for detail. Each item features high-quality textures and meticulous craftsmanship, ensuring a polished and realistic appearance in-game. The Sunset collection’s color palette ranges from warm, sunset-inspired hues to timeless neutrals, allowing for versatile styling options. With its blend of classic and modern designs, the Sunset collection by Sentate offers players the ability to create refined and stylish looks for their Sims, enhancing their overall gaming experience.
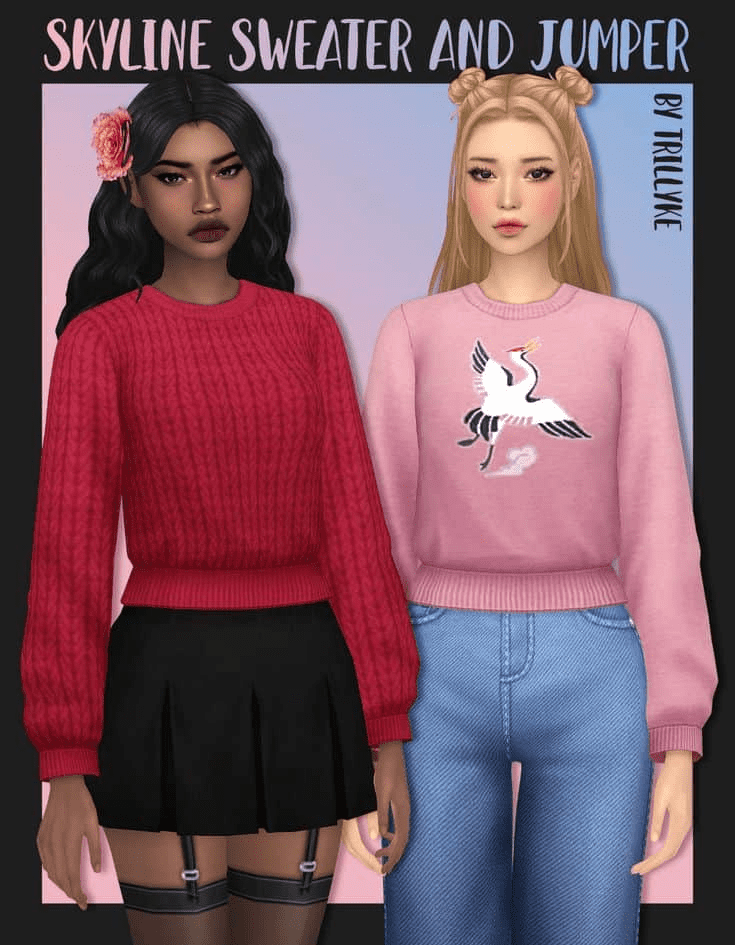
SKYLINE SIMS 4 SWEATER AND JUMPER CC – TRILLYKE
The Skyline Sims 4 Sweater and Jumper CC by Trillyke offers cozy and chic options for your Sims’ cold-weather wardrobe. This collection features a range of stylish sweaters and jumpers, each designed with comfort and fashion in mind. The pieces boast high-quality textures and detailed knitting patterns, providing a realistic and appealing look in-game. The color palette includes soft pastels and rich, warm tones, allowing for versatile and trendy outfit combinations. With its blend of comfort and style, the Skyline collection by Trillyke ensures that your Sims stay warm and fashionable during the colder seasons.
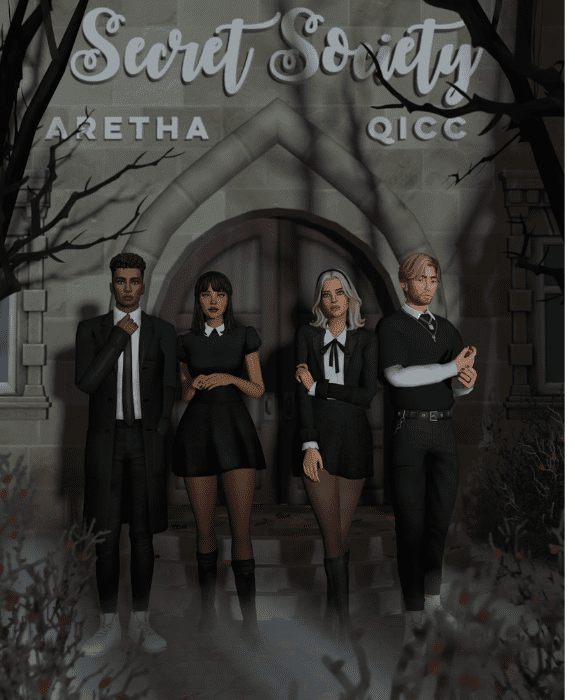
SECRET SOCIETY SIMS 4 CC CLOTHES – ARETHA X QICC
The Secret Society Sims 4 CC Clothes collection by Aretha x QICC introduces an aura of mystery and sophistication to your Sims’ wardrobe. This collection features an array of enigmatic pieces, including cloaks, tailored suits, and elaborate gowns, each exuding a sense of exclusivity and intrigue. The designs are crafted with high-quality textures and intricate detailing, ensuring a luxurious and realistic appearance in-game. The color palette is rich and moody, featuring deep blacks, royal blues, and striking reds, perfect for creating dramatic and elegant outfits. With its unique and captivating designs, the Secret Society collection allows players to immerse their Sims in a world of hidden elegance and allure.
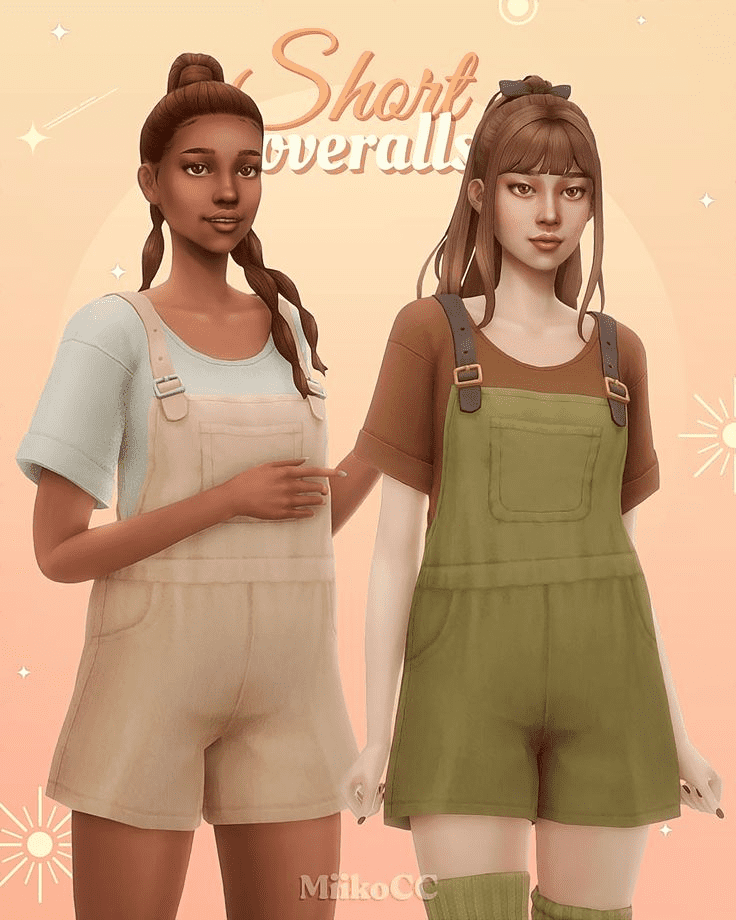
SIMS 4 SHORT OVERALLS CC – MIIKO
The Sims 4 Short Overalls CC by Miiko brings a playful and casual vibe to your Sims’ fashion options. This collection features a range of stylish short overalls, perfect for creating fun and laid-back summer outfits. Each piece is designed with high-quality textures and detailed stitching, providing a realistic and charming look in-game. The overalls come in a variety of colors and patterns, allowing players to mix and match with different tops and accessories for a personalized style. With its blend of comfort and trendiness, the Short Overalls CC by Miiko is a great addition to any Sim’s warm-weather wardrobe.
BALANCE & GRACE SIMS 4 ACTIVEWEAR CC – DAYLIFESIMS X JOLIEBEAN
The Balance & Grace Sims 4 Activewear CC by Daylifesims x Joliebean offers a stylish and functional range of athletic wear for your Sims. This collection includes a variety of pieces, such as sports bras, leggings, and hoodies, designed to provide both comfort and performance during workouts. Each item is crafted with high-quality textures and meticulous detailing, ensuring a realistic and appealing appearance in-game. The color palette features a mix of vibrant and neutral tones, allowing players to create versatile and fashionable fitness outfits. With its combination of style and functionality, the Balance & Grace collection by Daylifesims x Joliebean ensures that your Sims stay active and fashionable during their fitness routines.
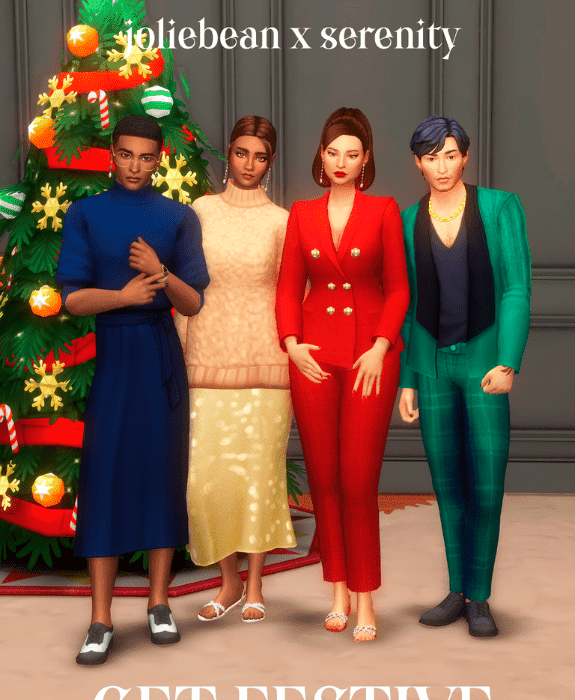
GET FESTIVE SIMS 4 CUSTOM CONTENT CLOTHES PACK
The “Get Festive” Sims 4 custom content clothes pack brings holiday cheer and celebratory vibes to your Sims’ wardrobes. This pack includes a variety of festive clothing items suitable for various occasions, from Christmas parties to New Year’s Eve celebrations. Players can dress their Sims in cozy sweaters, elegant dresses, and whimsical accessories, all designed with festive themes and vibrant colors. Each piece is meticulously crafted with high-quality textures and attention to detail, ensuring a festive and realistic look in-game. With the “Get Festive” pack, players can create memorable and joyous moments for their Sims during special holidays and events.
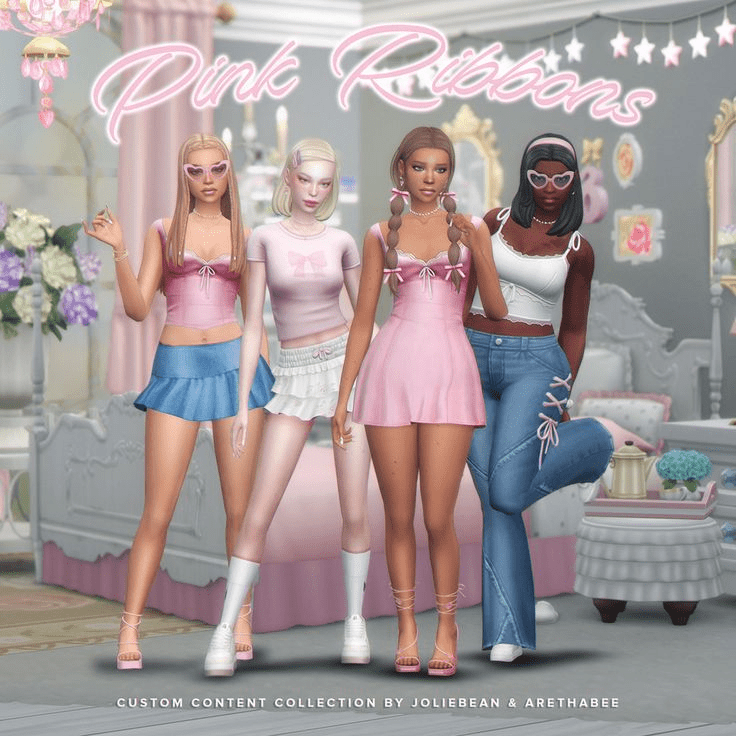
PINK RIBBONS SIMS 4 CC PACKS – JOLIEBEAN X ARETHABEE
The Pink Ribbons Sims 4 CC Packs by Joliebean x Arethabee offer a charming and stylish collection inspired by themes of femininity and elegance. This pack includes a variety of clothing items and accessories, featuring delicate pink ribbons as a recurring motif throughout the designs. Each piece is meticulously crafted with high-quality textures and intricate details, ensuring a realistic and graceful appearance in-game. The color palette revolves around soft pastels and shades of pink, adding a touch of sophistication to every outfit. With its blend of romance and refinement, the Pink Ribbons CC Packs allow players to dress their Sims in chic and timeless ensembles, perfect for various occasions.
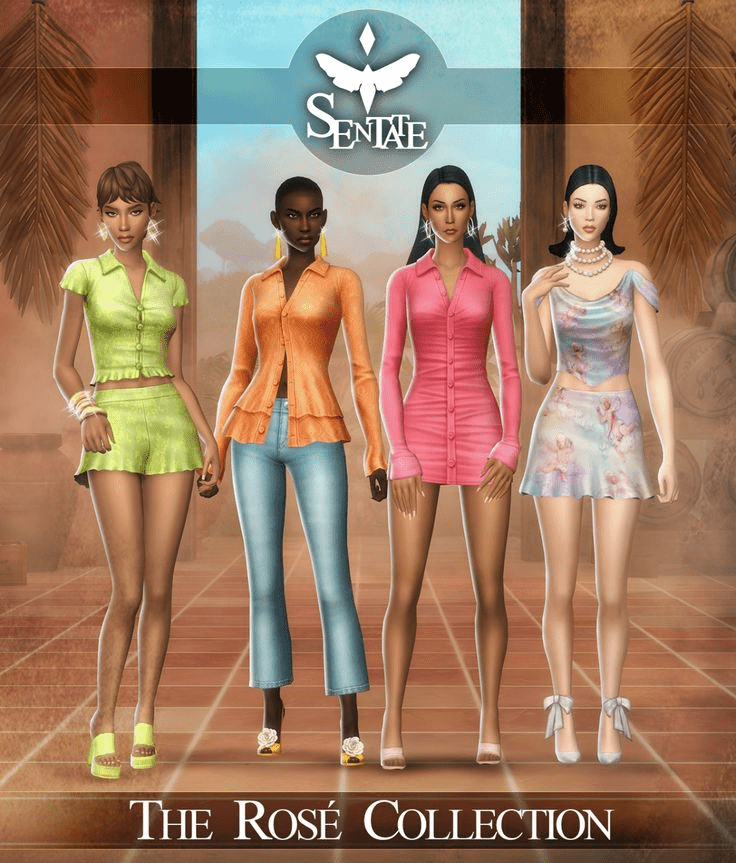
THE ROSE SIMS 4 FEMALE CC CLOTHES PACK – SENTATE
The Rose Sims 4 Female CC Clothes Pack by Sentate offers a collection that exudes elegance and modern sophistication for your Sims. This pack features a range of stylish clothing items, including dresses, tops, and skirts, all designed with a focus on sleek lines and luxurious textures. Each piece showcases meticulous attention to detail, from intricate patterns to finely tailored cuts, ensuring a realistic and high-fashion look in-game. The color palette of the Rose collection includes soft roses, deep burgundies, and classic neutrals, allowing for versatile and sophisticated outfit combinations. With its sophisticated designs, the Rose CC pack by Sentate provides players with the tools to elevate their Sims’ wardrobes to new heights of style and glamour.
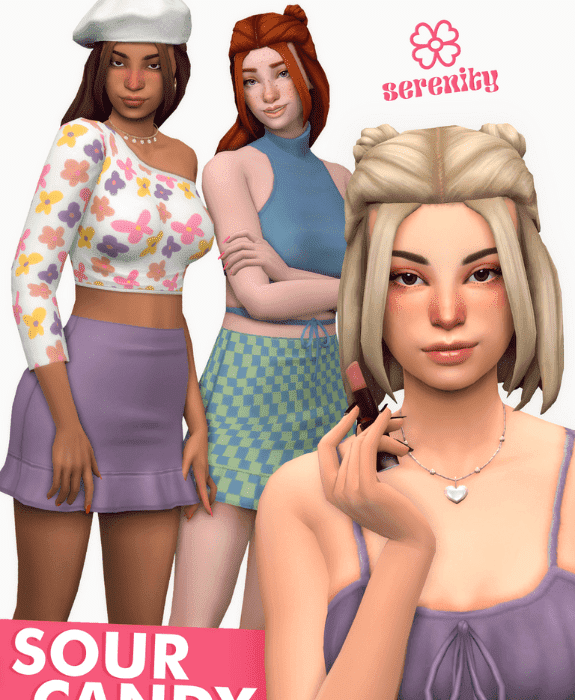
SOUR CANDY SIMS 4 CC CLOTHES PACK – SERENITY
The Sour Candy Sims 4 CC Clothes Pack by Serenity introduces a bold and playful aesthetic to your Sims’ fashion choices. This pack includes a variety of vibrant and eye-catching clothing items, such as tops, pants, and accessories, designed to stand out in any virtual wardrobe. Each piece features high-quality textures and detailed designs, ensuring a realistic and stylish appearance in-game. The color palette of the Sour Candy collection includes bright yellows, vivid blues, and energetic pinks, perfect for creating dynamic and energetic outfits. With its lively designs and attention-grabbing colors, the Sour Candy CC pack by Serenity allows players to inject fun and personality into their Sims’ attire.
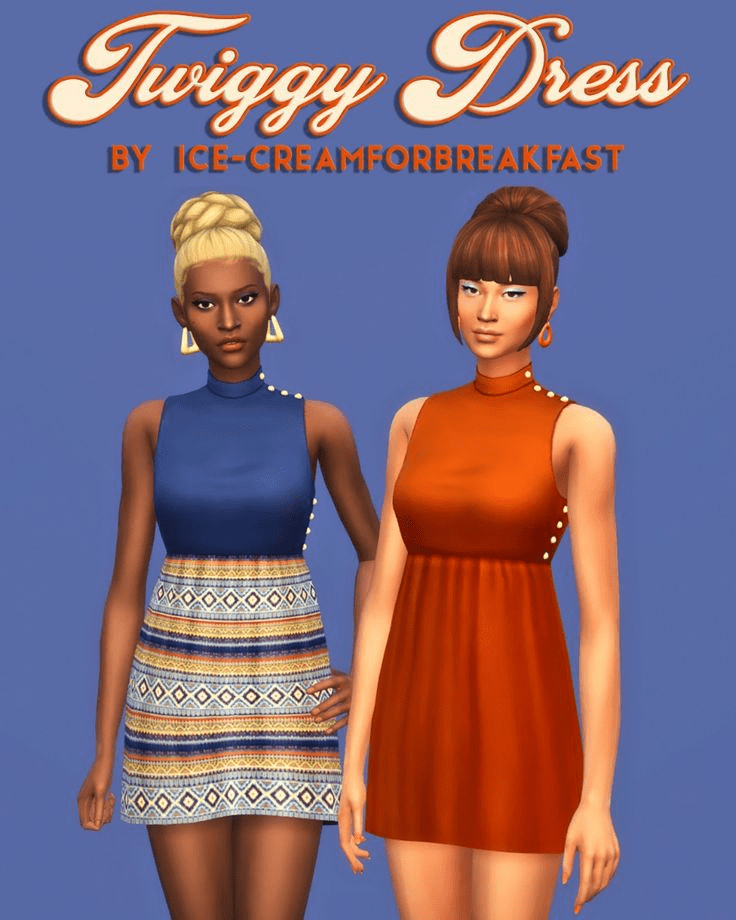
SIMS 4 MINI DRESS CC – ICE CREAM FOR BREAKFAST
The Sims 4 Mini Dress CC – Ice Cream for Breakfast offers a sweet and whimsical addition to your Sims’ wardrobe. This collection features a range of adorable mini dresses, each inspired by the playful and colorful themes of enjoying ice cream for breakfast. The dresses are crafted with high-quality textures and charming details, such as sprinkles or cute patterns, enhancing their appeal in-game. The color palette includes soft pastels and vibrant shades reminiscent of ice cream flavors, allowing players to create cheerful and delightful outfits. With its lighthearted designs, the Ice Cream for Breakfast CC pack brings a touch of joy and sweetness to your Sims’ everyday fashion choices.
WILD ONES SIMS 4 CC CLOTHES – ARETHA
The Wild Ones Sims 4 CC Clothes collection by Aretha offers a daring and adventurous selection for your Sims’ wardrobes. This pack includes a variety of edgy clothing items, from leather jackets and ripped jeans to bold accessories, designed to reflect a rebellious and free-spirited style. Each piece is meticulously crafted with high-quality textures and intricate details, ensuring a realistic and fashionable appearance in-game. The color palette features deep, rich tones like blacks, browns, and earthy greens, enhancing the rugged and adventurous theme of the collection. With its bold designs and rugged charm, the Wild Ones CC pack by Aretha allows players to create unique and defiant looks for their Sims, perfect for exploring new adventures in the virtual world.
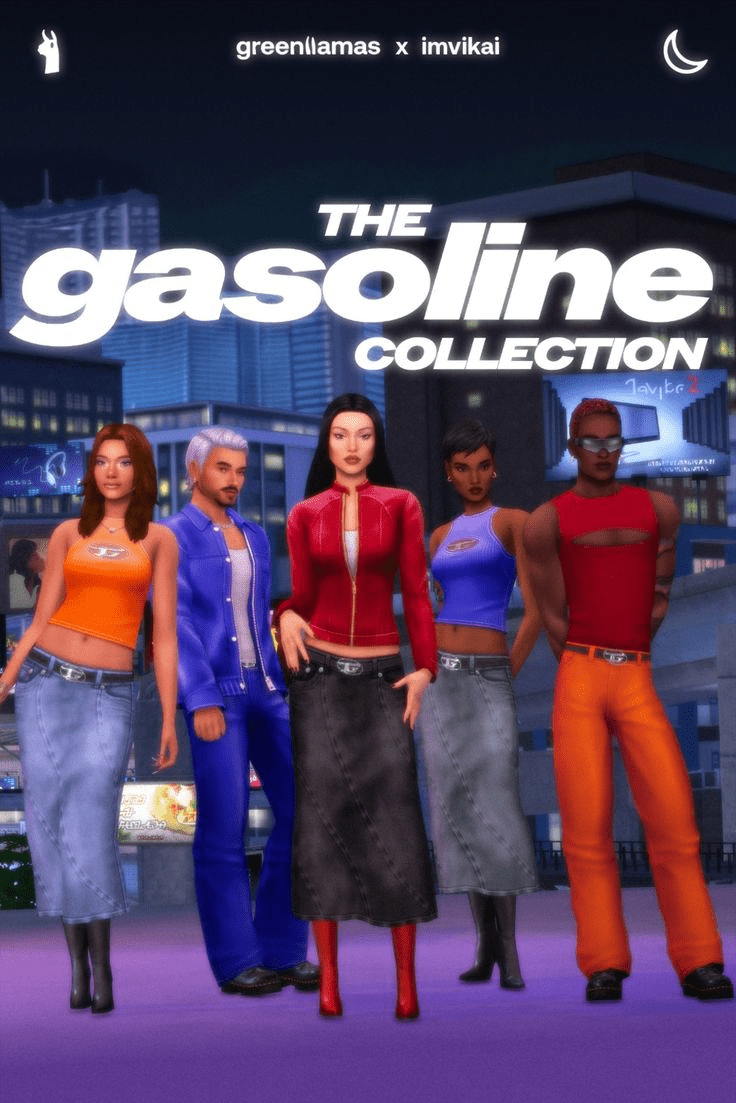
THE GASOLINE SIMS 4 CLOTHES CC COLLECTION – GREENLLAMAS X IMVIKAI
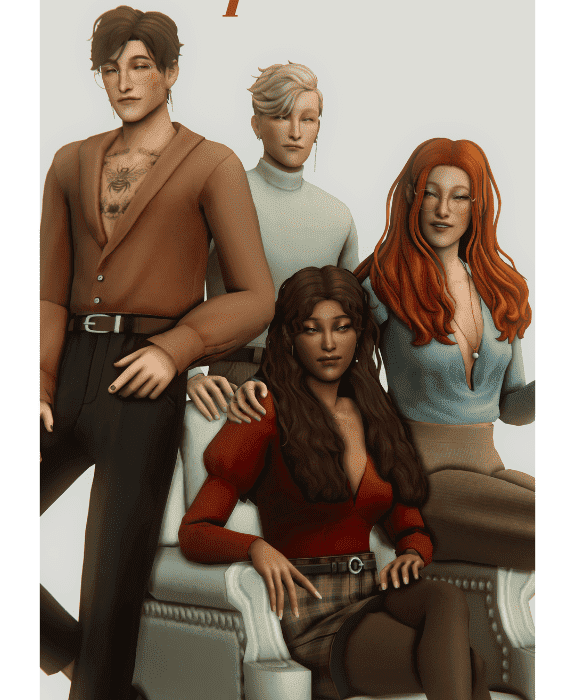
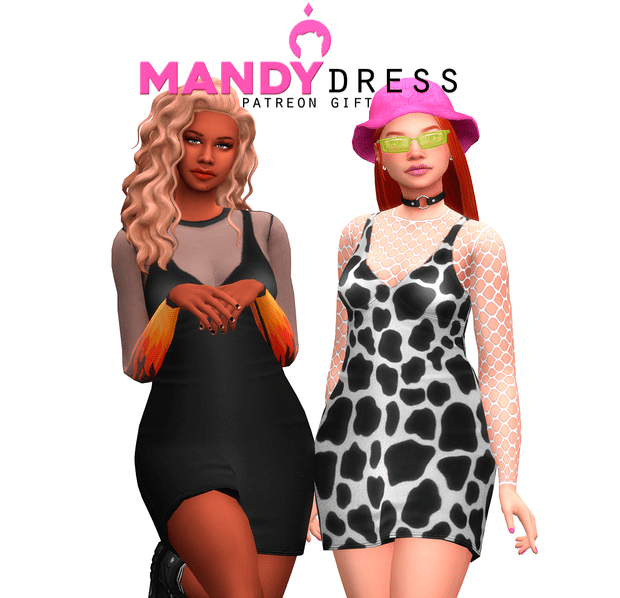
The mystery surrounds the exact contents of the Sparks Sims 4 female clothes CC set by Serenity. The name itself sparks curiosity, hinting at a collection that might infuse your Sims’ wardrobe with vibrancy or a touch of something exciting. While details are scarce, we can rely on Serenity’s reputation for quality creations. Unfortunately, pinpointing the specific style or the number of items in the Sparks set remains a challenge. To unveil the secrets this set holds, you can delve deeper by searching for “Serenity Sparks Sims 4 CC” on platforms like Patreon or The Sims Resource. These websites are frequented by creators who often share detailed descriptions of their work. But if the mystery persists, fret not! Explore Serenity’s other creations or venture out to discover collections by other talented creators.
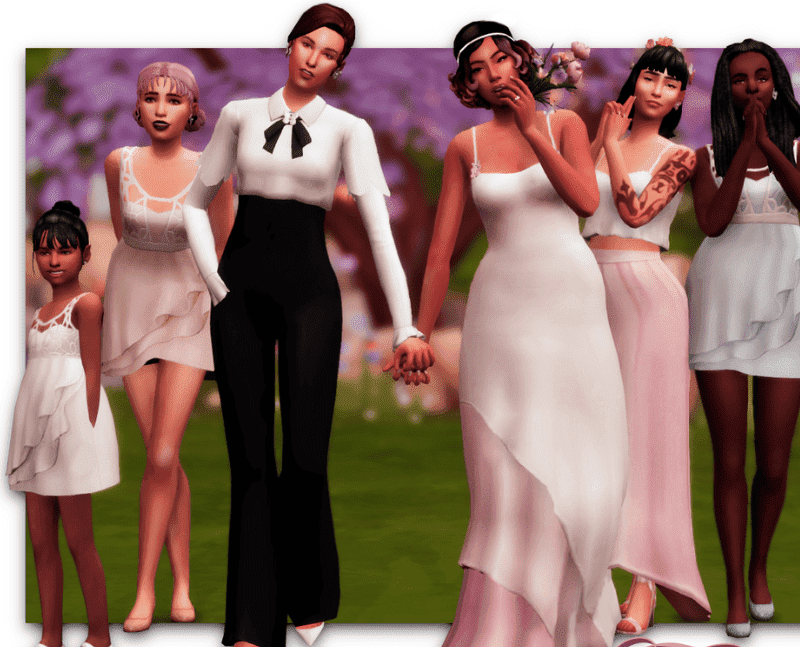
SIMS 4 WEDDING DRESS CC PACK – ZEUSSIM
Planning your Sims’ dream wedding? Look no further than the Zeussim Sims 4 CC wedding dress pack! This collection by the renowned creator Zeussim is a treasure trove of stunning wedding attire, guaranteed to make your Sim’s walk down the aisle unforgettable. Zeussim’s designs are celebrated for their elegance and variety, ensuring you’ll find the perfect dress to match your Sim’s unique wedding vision. Whether you crave a timeless, classic silhouette or a modern gown with a touch of contemporary flair, the Zeussim CC pack has something to make your Sims’ special day truly magical. So ditch the limitations of the base game and step into a world of exquisite wedding fashion – with Zeussim, your Sim’s happily ever after starts with a dress that reflects their inner radiance.
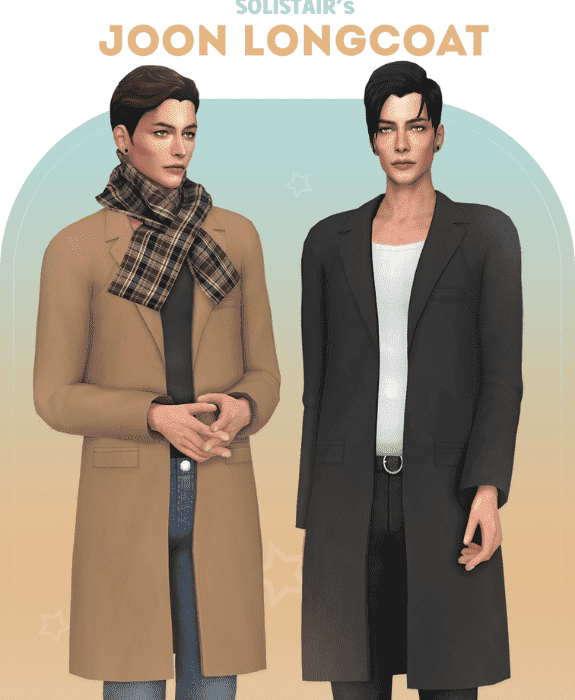
SIMS 4 LONG COAT CC CLOTHES – SOLISTAIR
Brave the elements in style with the Sims 4 long coat CC collection by Solistaire! This creator is known for their meticulous attention to detail, so you can expect top-notch quality CC that seamlessly integrates into your Sims’ wardrobe. Whether your Sim is a fashionista braving the city streets or a nature enthusiast exploring the wilderness, Solistaire’s long coat collection offers the perfect blend of form and function. Look for a variety of styles, from classic trench coats to cozy parkas, ensuring your Sims face the colder weather with both confidence and comfort. So ditch the bulky outerwear options in the base game and envelop your Sims in stylish warmth with Solistaire’s long coat CC collection.
CAMILA SIMS 4 FEMALE CC CLOTHES – OYDIS
Spruce up your Sims’ wardrobes with the Camila clothing set by Oydis for Sims 4! This collection, crafted by the creative mind behind Oydis, promises to bring a touch of something special to your female Sims’ attire. While specifics are limited, the name “Camila” itself can spark ideas of a chic and possibly versatile set. Perhaps it offers a mix-and-match ensemble or a statement outfit that injects a dose of confidence into your Sim’s look. To unveil the Camila set’s true potential, explore platforms like Patreon or The Sims Resource where creators frequently showcase their work. There, you might find detailed descriptions, images, or even videos that bring the Camila collection to life. So, if you’re looking to expand your Sims’ fashion horizons, the Camila clothing set by Oydis is definitely worth checking out!
EUPHORIA SIMS 4 CC CLOTHES – CLUMSYALIEN
Channel the edgy and dramatic style of HBO’s hit series Euphoria with the Sims 4 CC clothing collection by Clumsyalien. This creator brings the show’s bold fashion to life, offering a plethora of outfits that perfectly capture Euphoria’s unique aesthetic. Expect a mix of daring cut-out dresses, shimmering sequined ensembles, and graphic tees – all perfect for Sims who aren’t afraid to push boundaries and express themselves through fashion. Whether you want to recreate iconic looks from the show or craft your own Euphoria-inspired outfits, Clumsyalien’s CC collection provides all the tools you need. So, get ready to embrace the unconventional and transform your Sims into trendsetters with a touch of Euphoria flair!
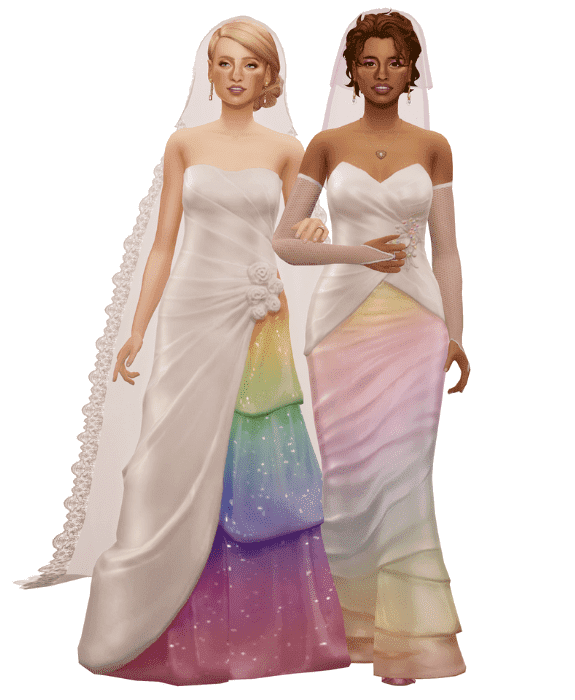
SIMS 4 RAINBOW WEDDING DRESS – ZEUSSIM
Zeussim, the creator known for their elegant and diverse wedding attire, might not have a specific “Rainbow Wedding Dress” in their collection. However, their design philosophy makes them a perfect place to look for a unique and colorful wedding gown for your Sims! Zeussim’s CC packs often boast a variety of styles, so there’s a good chance you’ll find a dress that incorporates vibrant hues or even a stunning rainbow motif. Instead of searching for a single dress, browse Zeussim’s wedding dress collections. You might unearth a whimsical gown with cascading rainbow layers, a sleek design with rainbow accents, or even a dress with a subtle ombre effect that transitions into beautiful colors. With Zeussim’s creativity, the possibilities for a show-stopping rainbow wedding dress are endless, allowing your Sim to walk down the aisle in a gown that reflects their individuality and love for color.
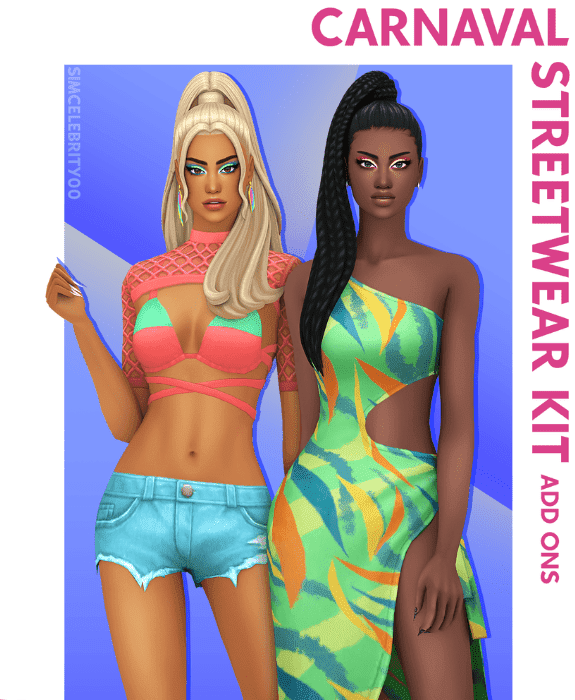
SIMS 4 CARNAVAL KIT CC PACK – SIMCELEBRITY00
The Sims 4 Carnaval Kit CC Pack by SimCelebrity00 brings the vibrant and festive spirit of carnival to your Sims’ virtual world. This pack features an array of colorful and extravagant costumes, masks, and accessories inspired by traditional carnival celebrations from around the world. Each item is meticulously designed with high-quality textures and intricate details, ensuring a realistic and immersive experience in-game. The diverse color palette includes bright purples, fiery oranges, and dazzling golds, allowing players to create eye-catching and culturally rich outfits for their Sims. With its festive designs and cultural flair, the Carnaval Kit CC Pack by SimCelebrity00 offers a unique opportunity for players to immerse their Sims in the joyous and lively atmosphere of carnival festivities.
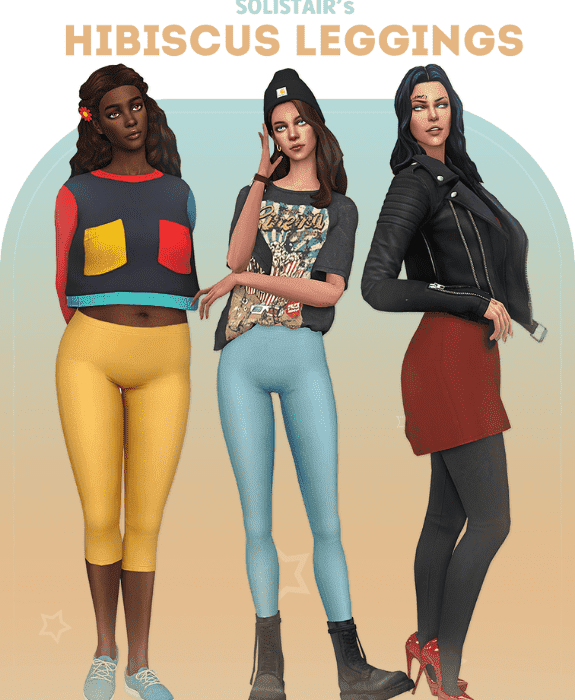
SIMS 4 HIBISCUS LEGGINGS CC – SOLISTAIR
The Sims 4 Hibiscus Leggings CC by Solistair introduces a touch of tropical elegance to your Sims’ activewear collection. This CC pack features a selection of stylish leggings adorned with vibrant hibiscus flower patterns, evoking a sense of island paradise. Each pair of leggings is crafted with meticulous attention to detail and high-quality textures, ensuring a realistic and flattering fit in-game. The color palette includes rich hues of red, pink, and green, reminiscent of lush tropical landscapes, perfect for adding a splash of color to any workout ensemble. With its blend of fashion and functionality, the Hibiscus Leggings CC pack by Solistair allows players to outfit their Sims in comfortable and eye-catching activewear, ideal for both exercising and lounging in style.
SIMS 4 ASTRA CC CLOTHES – SERENITY
The Sims 4 Astra CC Clothes by Serenity offers a celestial-inspired collection that brings a sense of mystique and elegance to your Sims’ wardrobe. This CC pack features a variety of ethereal and dreamy clothing items, including flowing dresses, celestial-themed tops, and intricate accessories, all designed to evoke the beauty of the cosmos. Each piece is meticulously crafted with high-quality textures and intricate details, ensuring a realistic and enchanting appearance in-game. The color palette includes celestial blues, deep purples, and shimmering silvers, reflecting the cosmic theme and allowing for stunning outfit combinations. With its mystical designs and celestial allure, the Astra CC Clothes pack by Serenity provides players with the opportunity to dress their Sims in celestial-inspired fashion, perfect for creating magical and otherworldly looks in the virtual world.
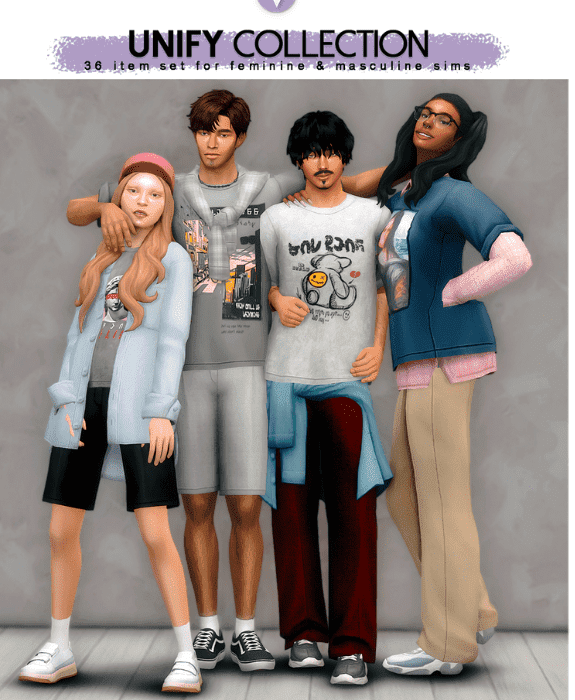
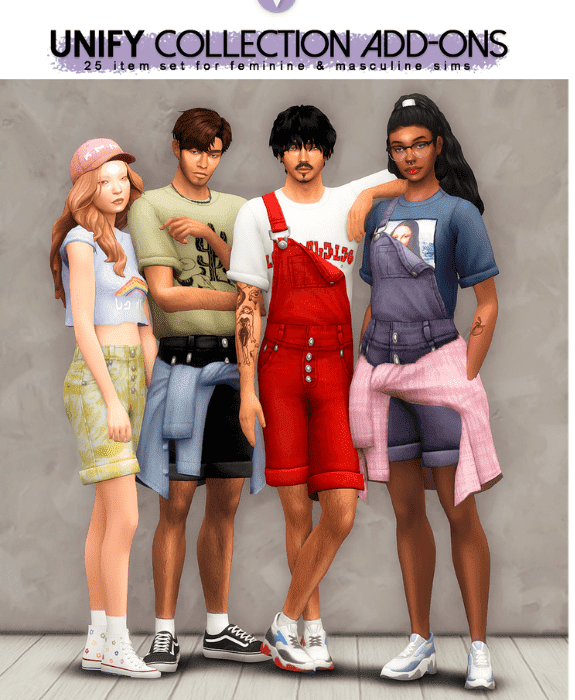
UNIFY COLLECTION SIMS 4 HIGH SCHOOL CC PACK – NUCRESTS
The Unify Collection Sims 4 High School CC Pack by Nucrests offers a comprehensive assortment of stylish and practical clothing options tailored for teenage Sims. This pack includes a diverse range of school-appropriate attire, such as casual tops, jeans, skirts, and accessories, designed to reflect contemporary high school fashion trends. Each item is meticulously crafted with high-quality textures and attention to detail, ensuring a realistic and youthful appearance in-game. The color palette features a mix of vibrant hues and classic neutrals, providing versatility for creating personalized and fashionable outfits suitable for school settings. With its blend of trendy designs and everyday comfort, the Unify Collection CC pack by Nucrests allows players to enhance their Sims’ high school experience with stylish and expressive clothing choices.
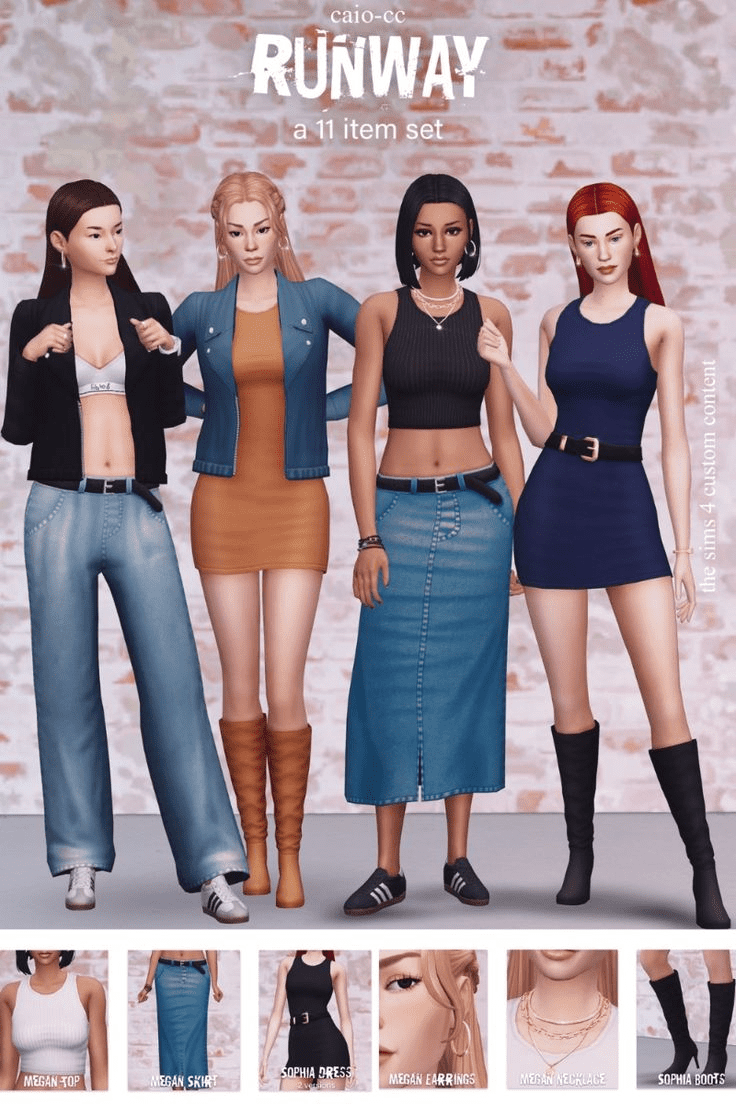
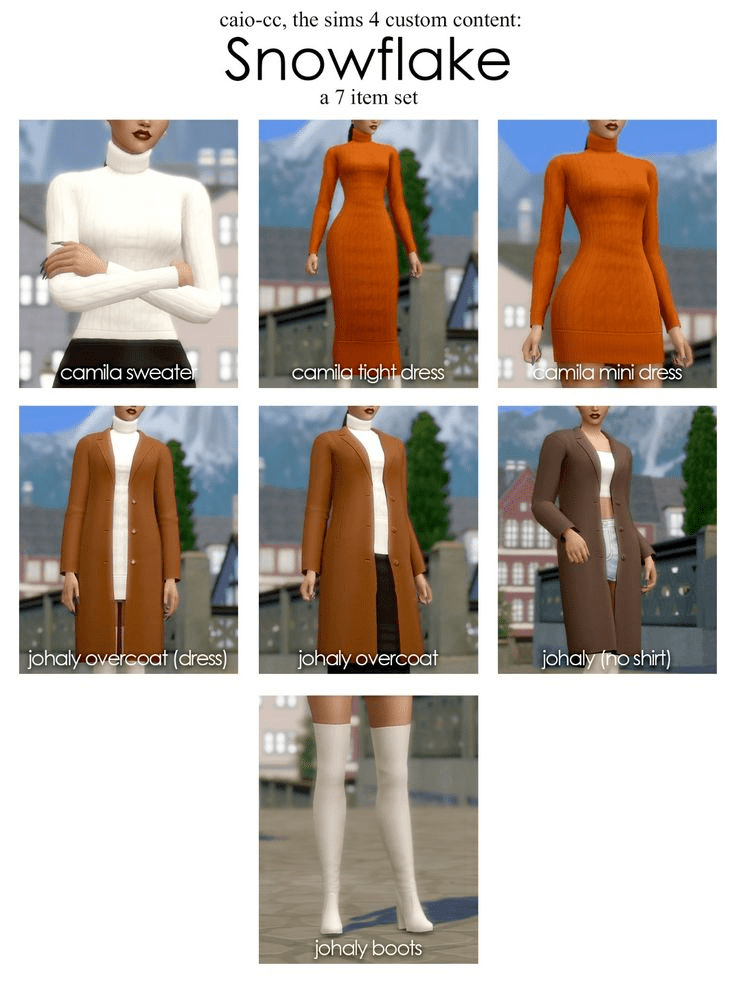
RUNWAY SIMS 4 FEMALE CC CLOTHES PACK – CAIO-CC
The Runway Sims 4 Female CC Clothes Pack by Caio-CC brings haute couture and high fashion directly to your Sims’ virtual wardrobes. This pack features a stunning array of sophisticated and glamorous clothing items, including sleek dresses, tailored suits, and statement accessories, all designed to emulate the elegance of a runway show. Each piece is meticulously crafted with impeccable textures and intricate detailing, ensuring a lifelike and luxurious appearance in-game. The color palette spans from timeless blacks and whites to bold, runway-inspired colors, offering players endless possibilities for creating striking and unforgettable looks for their Sims. With its focus on runway-ready designs and couture aesthetics, the Runway CC pack by Caio-CC allows players to elevate their Sims’ fashion choices to the pinnacle of style and sophistication.
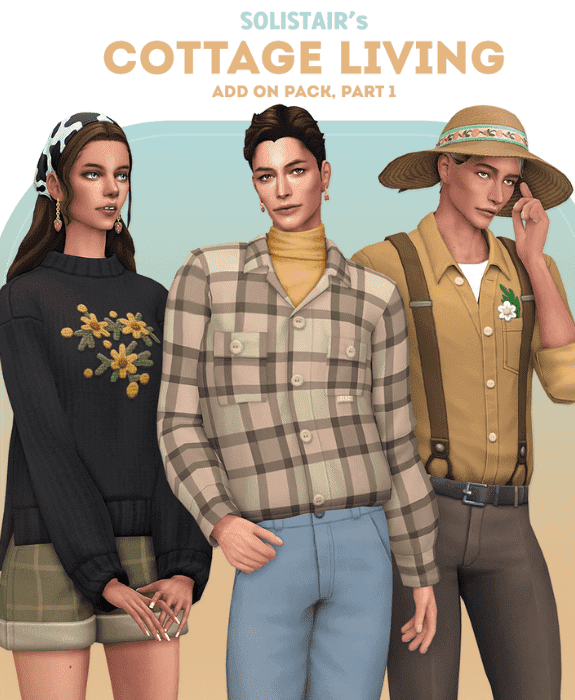
COTTAGE LIVING CC CLOTHES SIMS 4 – SOLISTAIR
The Cottage Living CC Clothes Sims 4 collection by Solistair brings a charming and rustic aesthetic to your Sims’ wardrobes, perfectly suited for a cozy countryside lifestyle. This pack includes a variety of clothing items inspired by rural living, such as cozy sweaters, denim overalls, and floral dresses, all designed to reflect a quaint and idyllic charm. Each piece is crafted with high-quality textures and thoughtful details, ensuring a realistic and inviting appearance in-game. The color palette features earthy tones, soft pastels, and classic patterns like plaids and florals, enhancing the rustic and homely feel of the collection. With its blend of comfort, simplicity, and country-inspired fashion, the Cottage Living CC Clothes pack by Solistair allows players to dress their Sims in outfits that capture the essence of peaceful countryside living in the virtual world.
PRETTY CC CLOTHES SIMS 4 – SENTATE
The Pretty CC Clothes Sims 4 collection offers a delightful assortment of stylish and feminine clothing options for your Sims. This pack includes a range of chic dresses, elegant blouses, trendy skirts, and fashionable accessories, all designed to enhance your Sims’ virtual wardrobe with sophistication and flair. Each piece is meticulously crafted with high-quality textures and attention to detail, ensuring a realistic and flattering fit in-game. The color palette features soft pastels, vibrant florals, and classic neutrals, providing versatility for creating both casual and formal looks. With its focus on elegance and contemporary fashion, the Pretty CC Clothes collection allows players to dress their Sims in outfits that exude charm and style, perfect for any occasion in the virtual world.
SIMS 4 CLOTHES MOD – ARETHA
The Sims 4 Clothes Mod by Aretha offers a diverse and eclectic range of clothing options that enhance the customization and fashion choices available to players. This mod includes a wide array of clothing items, from everyday wear to formal attire, each meticulously designed to expand upon the base game’s wardrobe. Aretha’s mod features high-quality textures, intricate details, and a variety of styles, ensuring that Sims can express their individuality with unique outfits. The mod also introduces new colors, patterns, and accessories, allowing players to create personalized looks that suit their Sims’ personalities and preferences. With its extensive catalog of clothing additions, the Aretha Sims 4 Clothes Mod enriches gameplay by offering limitless possibilities for fashion creativity and style experimentation in the virtual world.
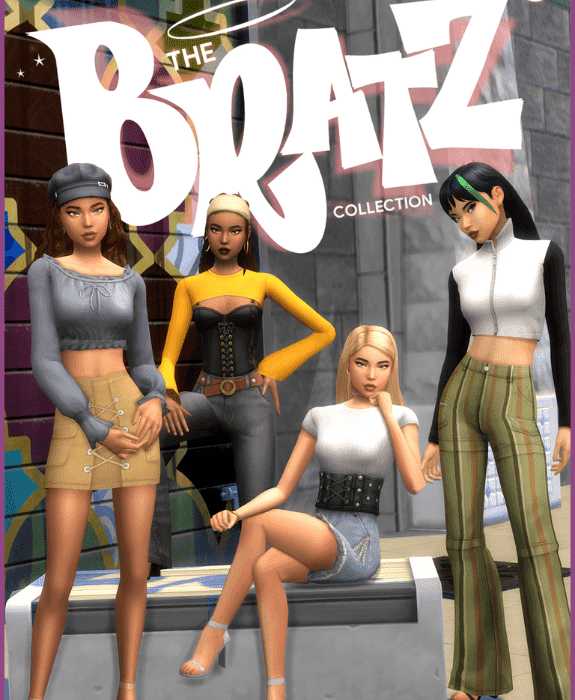
BRATZ COLLECTION SIMS 4 CC CLOTHES – GREENLLAMAS
The Bratz Collection Sims 4 CC Clothes by GreenLlamas brings a nostalgic and fashionable twist to your Sims’ virtual closets. This collection features a variety of trendy and bold clothing items inspired by the iconic Bratz dolls, including crop tops, mini skirts, platform shoes, and statement accessories. Each piece is meticulously crafted with vibrant colors, edgy designs, and high-quality textures, ensuring an authentic and stylish appearance in-game. The color palette includes vibrant neon shades, bold patterns, and metallic accents, reflecting the playful and daring fashion sense of the Bratz dolls. With its emphasis on fun and trendy designs, the Bratz Collection CC pack by GreenLlamas allows players to dress their Sims in chic and nostalgic outfits, perfect for making a bold fashion statement in the virtual world.
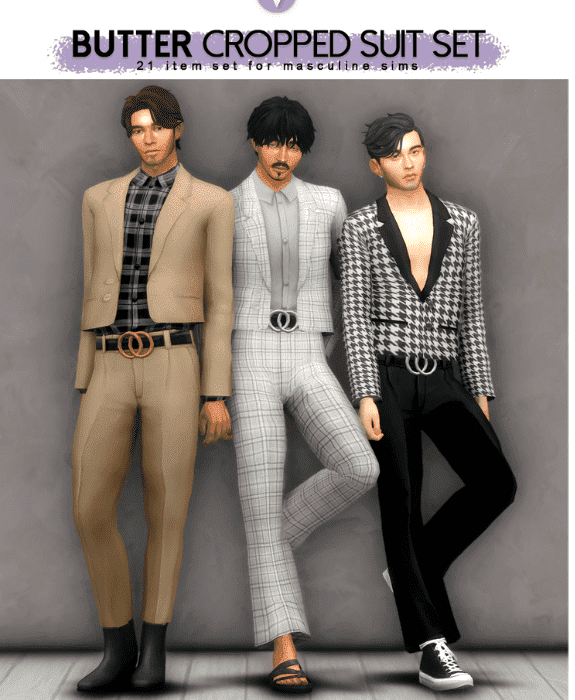
BUTTER CROPPED SIMS 4 MALE CC CLOTHES – NUCRESTS
The Butter Cropped Sims 4 Male CC Clothes by Nucrests introduces a stylish and contemporary twist to male Sims’ fashion choices. This collection features a range of fashionable cropped tops, including hoodies, t-shirts, and tank tops, designed to showcase a modern and relaxed aesthetic. Each piece is meticulously crafted with high-quality textures and detailed stitching, ensuring a realistic and flattering fit in-game. The color palette offers a mix of subdued neutrals and vibrant hues, allowing for versatile outfit combinations that suit various styles and occasions. With its focus on trendy and comfortable designs, the Butter Cropped CC pack by Nucrests enables players to enhance their Sims’ wardrobes with stylish and effortlessly cool clothing options.
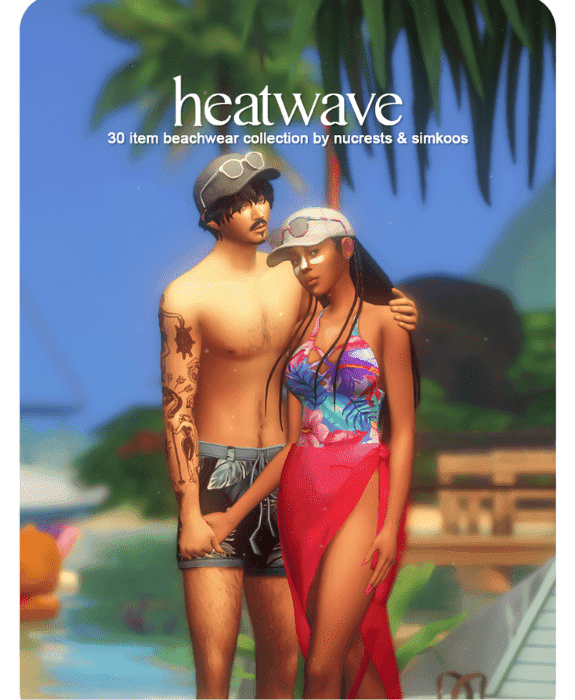
SIMS 4 BEACH CC CLOTHES – SIMKOOS
The Sims 4 Beach CC Clothes by Simkoos provides a refreshing and beach-ready wardrobe for Sims looking to soak up the sun in style. This collection features an assortment of breezy and relaxed clothing items perfect for seaside outings, including swimsuits, cover-ups, shorts, and sun hats. Each piece is crafted with high-quality textures and vibrant patterns, evoking the carefree spirit of a beach vacation. The color palette includes tropical prints, soothing blues, and sandy neutrals, capturing the essence of beachside relaxation. With its focus on comfort and coastal chic, the Beach CC Clothes pack by Simkoos allows players to dress their Sims in trendy and functional outfits suitable for enjoying sunny days by the virtual shore.
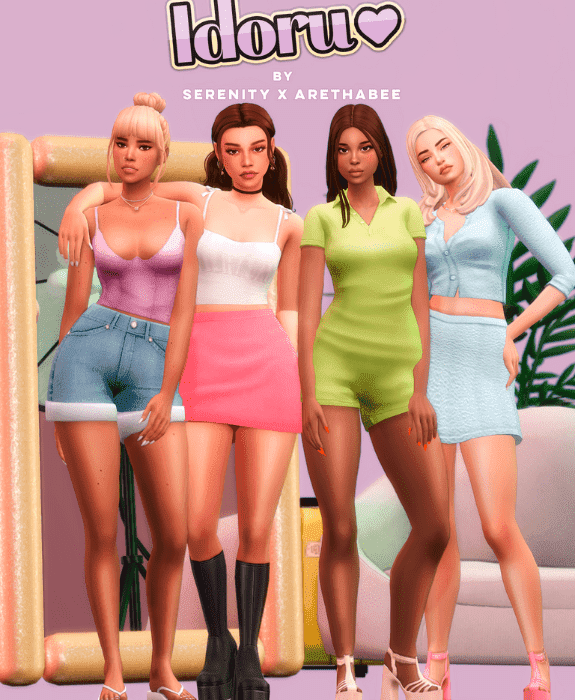
IDORU COLLECTION SIMS 4 CC CLOTHES – SERENITY X ARETHA
The Idoru Collection Sims 4 CC Clothes by Serenity x Aretha merges futuristic aesthetics with contemporary fashion, offering Sims a bold and avant-garde wardrobe. This collaborative pack features a diverse array of clothing items, including sleek bodysuits, cyberpunk-inspired jackets, and holographic accessories, all designed to embody a cutting-edge style. Each piece is meticulously crafted with high-quality textures and intricate details, ensuring a realistic and striking appearance in-game. The color palette showcases neon brights, metallics, and iridescent hues, reflecting a futuristic theme and allowing for innovative outfit combinations. With its blend of futuristic designs and urban edge, the Idoru Collection CC pack by Serenity x Aretha enables players to dress their Sims in fashion-forward and imaginative outfits, perfect for exploring new frontiers in the virtual world.
SIMS 4 FEMALE LONG SLEEVES TOPS – TRILLYKE
The Sims 4 Female Long Sleeves Tops by Trillyke offers a versatile and stylish addition to Sims’ wardrobes, perfect for layering or wearing alone in various seasons. This collection features a variety of chic and contemporary long-sleeved tops, ranging from casual turtlenecks to elegant blouses, designed to suit different occasions and styles. Each piece is meticulously crafted with high-quality textures and attention to detail, ensuring a realistic and flattering fit on Sims. The color palette includes a mix of soft pastels, classic neutrals, and vibrant hues, providing options for both understated elegance and bold statements. With its focus on fashion-forward designs and everyday versatility, the Long Sleeves Tops CC pack by Trillyke allows players to elevate their Sims’ everyday looks with sophisticated and trendy wardrobe choices.
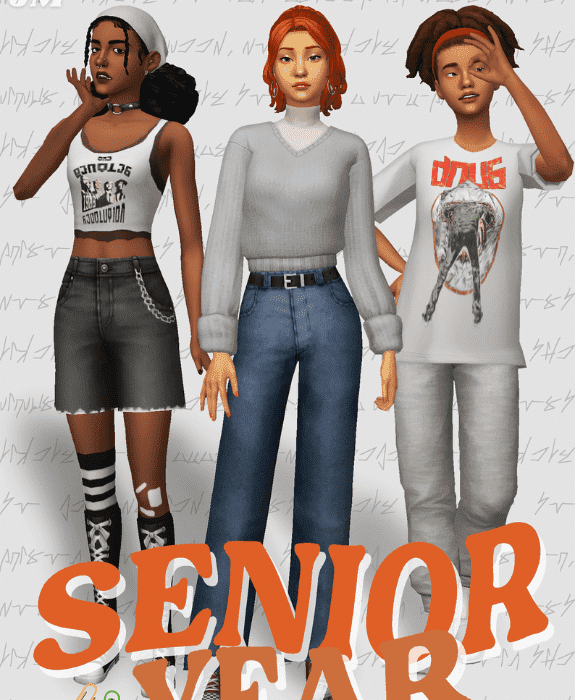
SIMS 4 CC CLOTHES SENIOR YEAR PACK – JELLYMOO
The Sims 4 CC Clothes Senior Year Pack by JellyMoo offers a nostalgic and stylish collection tailored for Sims experiencing their final year of high school. This pack includes a variety of trendy clothing items inspired by senior year fashion trends, such as letterman jackets, prom dresses, casual jeans, and accessories suitable for graduation ceremonies. Each piece is meticulously crafted with high-quality textures and attention to detail, ensuring a realistic and fashionable appearance in-game. The color palette includes classic school colors, sophisticated neutrals, and celebratory pops of color, allowing players to create memorable and personalized outfits for their Sims’ senior year milestones. With its focus on capturing the essence of senior year style and milestones, the Senior Year Pack by JellyMoo enhances gameplay by offering Sims the opportunity to celebrate their final year of high school in style and comfort.
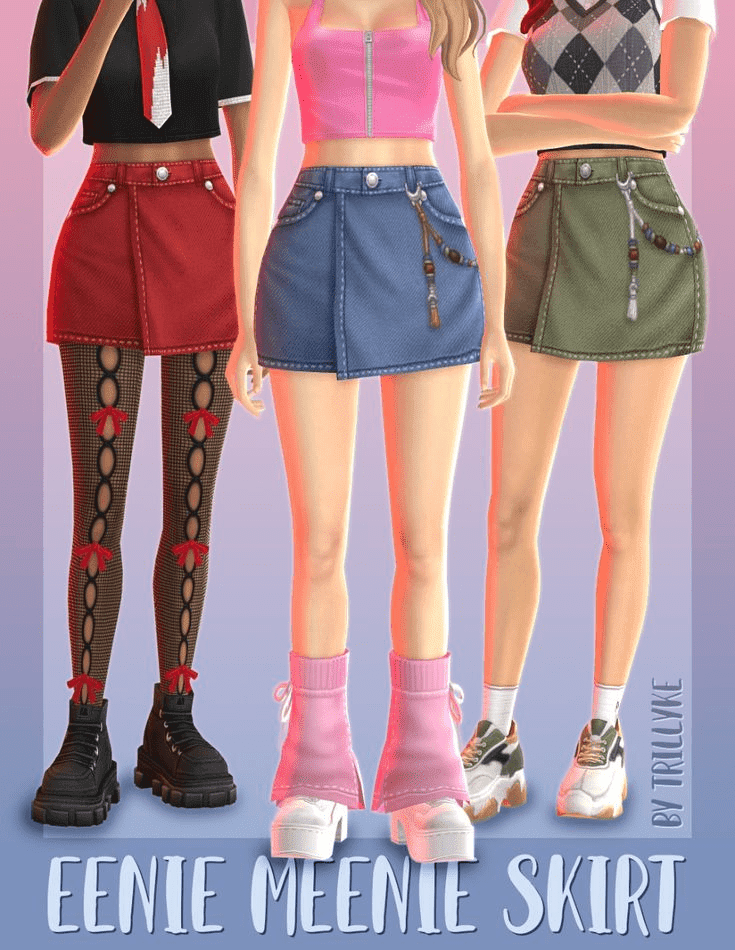
EENIE MEENIE SIMS 4 SKIRT CC – TRILLYKE
Twirl with delight! The Eenie Meenie Sims 4 skirt CC by Trillyke promises a delightful assortment of skirt styles for your Sims’ wardrobe. While specific details are scarce, Trillyke’s reputation for quality CC hints at a collection crafted with care and attention to detail. The name “Eenie Meenie” itself suggests a variety of options, possibly a mix of lengths, fabrics, and silhouettes. Imagine a collection of playful minis, breezy midis, or even elegant maxis – all designed to flatter your Sims and make them feel confident and stylish. To explore the full potential of this collection, search for “Eenie Meenie Sims 4 Skirt CC” on platforms like Patreon or The Sims Resource. There, you might find detailed descriptions, images, or even videos that showcase the variety and quality Trillyke has poured into this skirt collection.
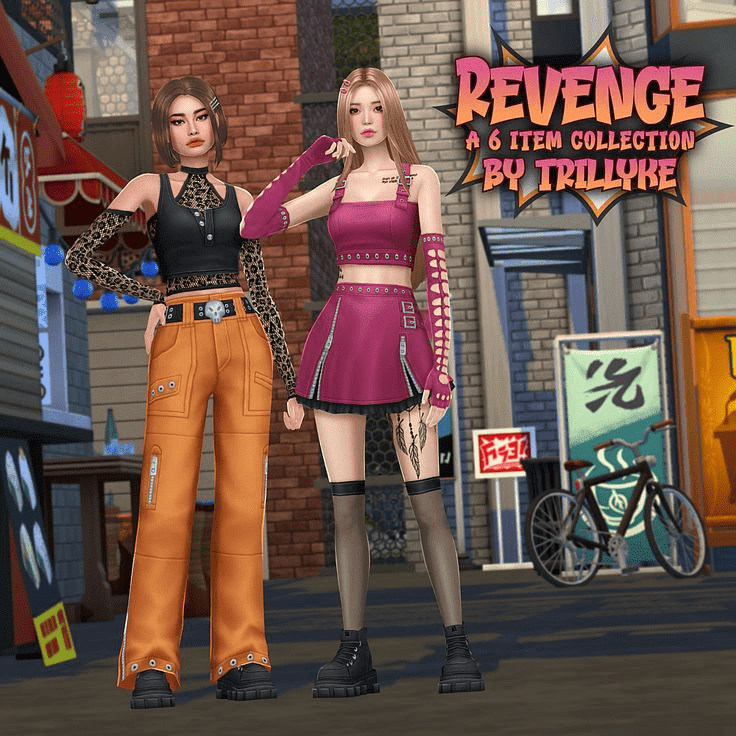
REVENGE SIMS 4 FEMALE CLOTHING CC PACK – TRILLYKE
The Revenge Sims 4 Female Clothing CC Pack by Trillyke brings a bold and empowered aesthetic to your Sims’ fashion choices. This collection features a range of fierce and edgy clothing items, including form-fitting dresses, structured blazers, and statement accessories, all designed to exude confidence and strength. Each piece is meticulously crafted with high-quality textures and intricate details, ensuring a realistic and impactful appearance in-game. The color palette includes deep blacks, rich burgundies, and daring metallics, perfect for creating powerful and unforgettable outfits. With its focus on empowering designs and fierce fashion statements, the Revenge CC Pack by Trillyke allows players to dress their Sims in outfits that command attention and embody a sense of empowerment in the virtual world.
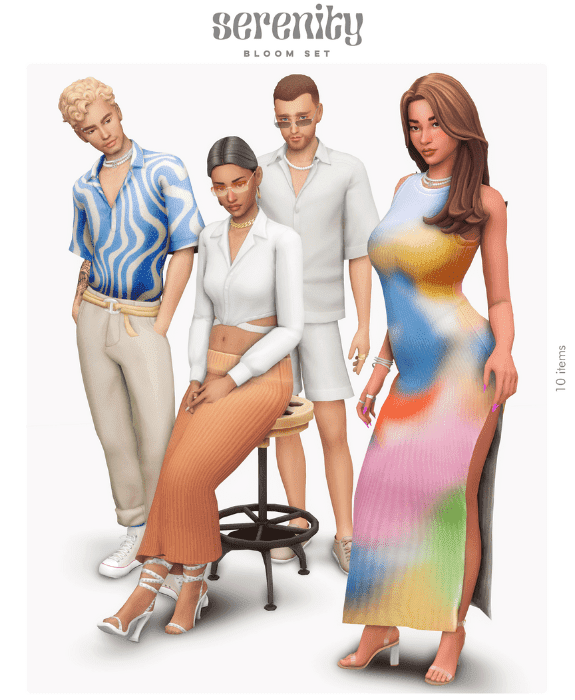
SIMS 4 CC CLOTHES BLOOM SET – SERENITY
Breathe in the fresh air of springtime fashion with the Bloom set by Serenity for Sims 4! This CC clothing collection, crafted by the talented Serenity, promises to infuse your Sims’ wardrobe with a touch of floral flair. While specifics are limited, the name “Bloom” hints at a collection brimming with vibrant colors, soft textures, and possibly even floral patterns. Imagine outfits reminiscent of a blossoming garden – think flowy dresses, cute rompers, or even playful separates adorned with delicate florals. With Serenity’s design aesthetic, you can expect high-quality CC that seamlessly blends with your existing game and flatters a variety of Sim body types. To discover the true essence of the Bloom set, search for “Serenity Bloom Sims 4 CC” on platforms like Patreon or The Sims Resource. There, you might find detailed descriptions, images, or even videos that bring this flourishing collection to life.
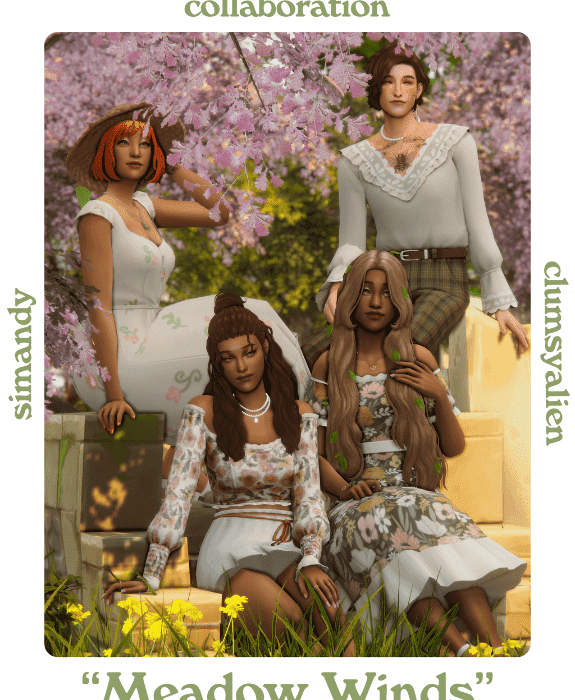
SIMS 4 MEADOW WINDS CC CLOTHES – SIMANDY & CLUMSYALIEN
This creator pairing is known for their unique styles, and “Meadow Winds” promises a breath of fresh air for your Sims’ wardrobe. While specific details are limited, the name itself evokes a sense of flowing fabrics, light and airy silhouettes, and perhaps even a touch of bohemian flair. Imagine outfits that feel perfect for a springtime picnic – think breezy maxi dresses, flowy blouses paired with cute skirts, or even comfy jumpsuits with a touch of whimsy. With Simandy and Clumsyalien’s combined talents, you can expect a collection crafted with love and attention to detail, offering a range of pieces that flatter various Sim body types. To fully explore the possibilities of “Meadow Winds,” search for it on platforms like Patreon or The Sims Resource. There, you might find detailed descriptions, images, or even videos that showcase the beauty and charm of this collaborative CC collection.
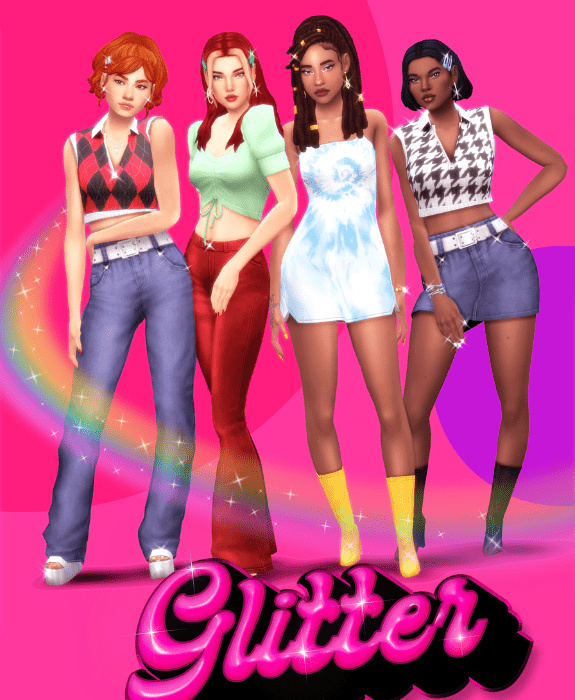
SIMS 4 GLITTER CC CLOTHES – IMVIKAI & GREENLLAMAS
Calling all fashionistas! Get ready to add some sparkle to your Sims’ lives with the Sims 4 Glitter CC clothing collection by the power duo of ImVikai and greenllamas. This collaborative effort promises to bring a dazzling array of glamorous outfits to your game. Imagine shimmering dresses that catch the light, eye-catching tops adorned with sequins, or even pants with a subtle touch of glittery flair. With ImVikai and greenllamas’ combined design sensibilities, you can expect a collection that caters to various styles, from full-on red carpet glam to a touch of everyday sparkle. So, prepare to unleash your Sims’ inner glitterati and explore the dazzling world of CC fashion!
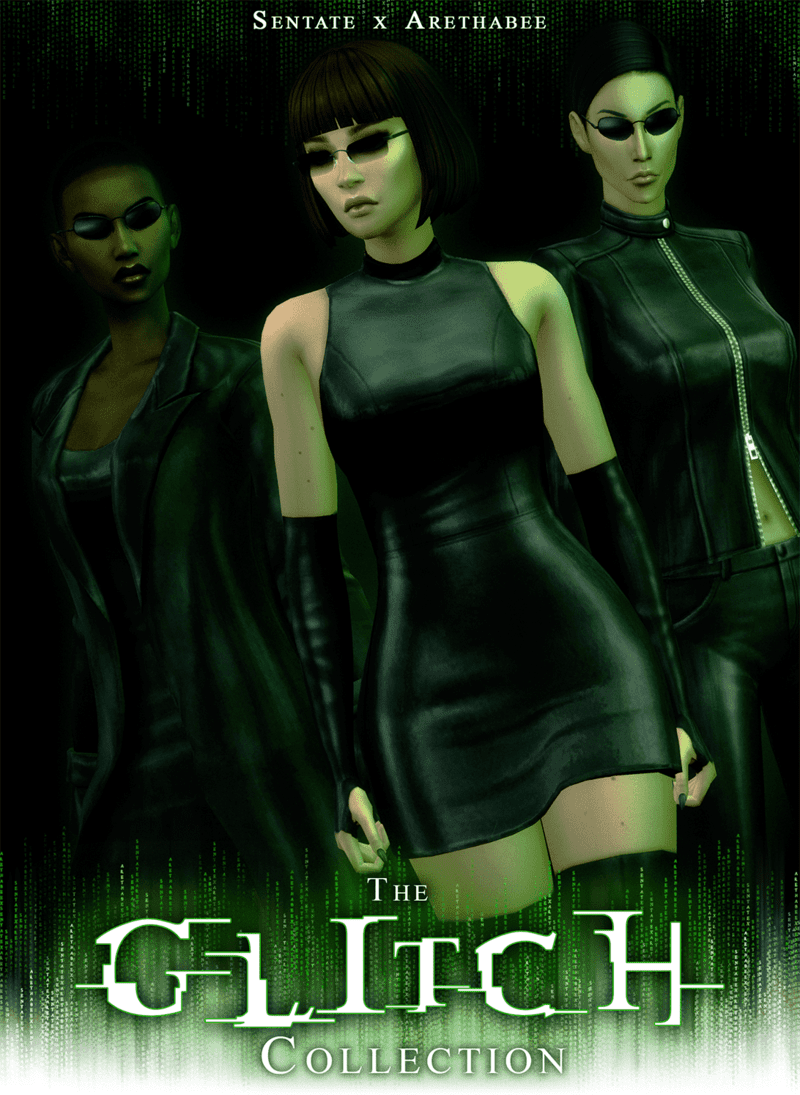
SIMS 4 GLITCH COLLECTION CC CLOTHES – SENTATE & ARETHABEE
This creative duo isn’t afraid to push boundaries, and their Glitch Collection promises a wardrobe unlike any other for your Sims. While specifics are limited, the name itself hints at a collection that plays with textures, cuts, and possibly even deconstructs traditional silhouettes. Imagine outfits with a cyberpunk aesthetic, clothing with distorted prints, or even garments that defy the laws of physics in a cool, digital way. Sentate & Arethabee are known for their high-quality creations, so you can expect CC that seamlessly integrates into your game, even with its unconventional flair. If you’re looking to give your Sims a wardrobe that’s truly unique and fashion-forward, the Glitch Collection is a must-have!
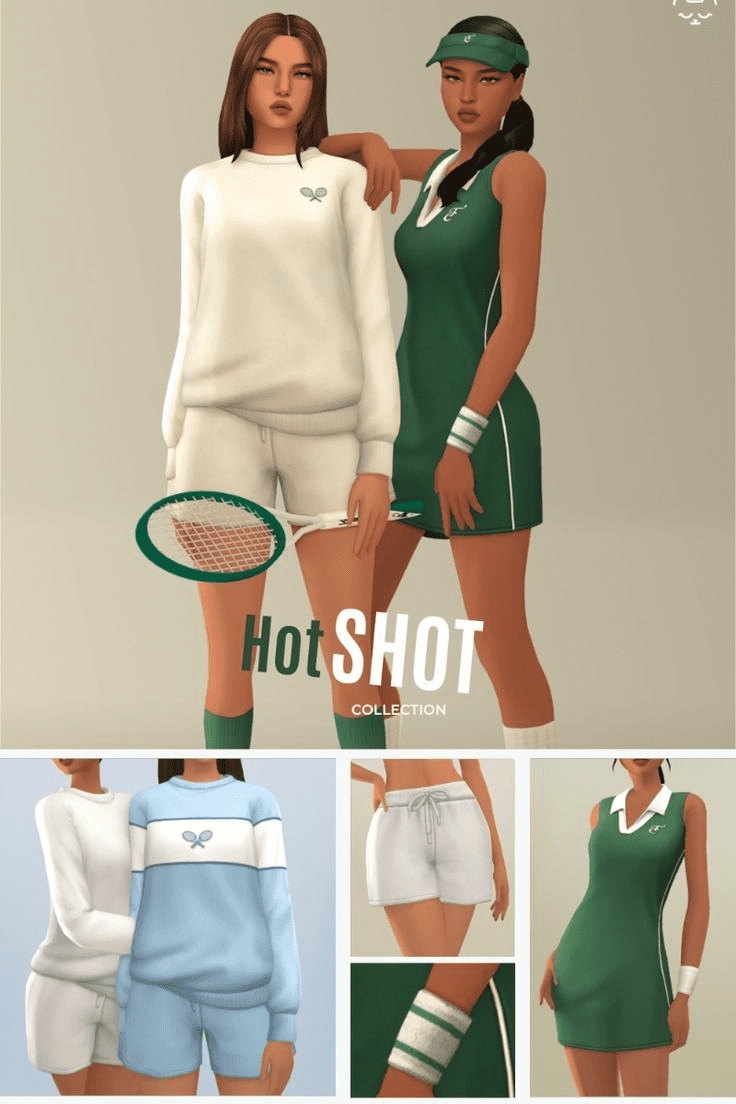
HOT SHOT SIMS 4 CLOTHES CC COLLECTION – TWISTED CAT
Turn up the heat with the Hot Shot Sims 4 clothes CC collection by TwistedCat! This collection, designed by the creative mind behind TwistedCat, promises to add some serious style and a touch of boldness to your Sims’ wardrobes. While specifics are limited, the name “Hot Shot” hints at a collection that might focus on trendsetting outfits or glamorous pieces that make a statement. Imagine a curated selection of red-carpet worthy dresses, sharp suits that exude power dressing vibes, or even trendy separates that ooze contemporary chic. TwistedCat is known for their quality CC creations, so you can expect outfits that are not only stylish but also well-crafted and integrate seamlessly into your game. So, if you’re looking to give your Sims a wardrobe that sizzles with confidence, the Hot Shot collection is definitely worth checking out!
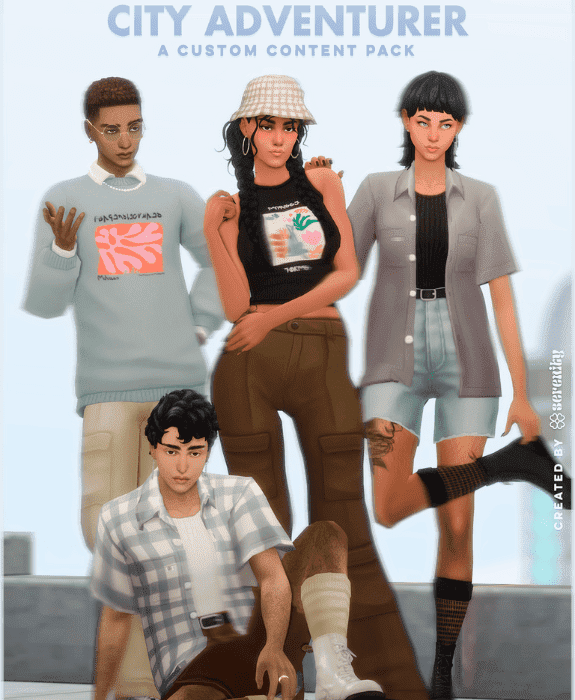
SIMS 4 CITY ADVENTURE CC PACK – SERENITY
This collection, designed by the talented Serenity, promises to equip your Sims with the perfect wardrobe for conquering the city. While details are limited, the name itself evokes a sense of practical yet stylish outfits that cater to the fast-paced city life. Imagine a mix of trendy jeans, chic jackets, comfortable yet put-together dresses, and versatile separates that allow your Sims to navigate the city streets with both confidence and style. With Serenity’s design aesthetic, you can expect high-quality CC that seamlessly blends with your existing game and offers pieces that flatter a variety of Sim body types. To discover the true potential of the City Adventure pack, search for “Serenity City Adventure Sims 4 CC” on platforms like Patreon or The Sims Resource. There, you might find detailed descriptions, images, or even videos that showcase the urban-inspired collection by Serenity.
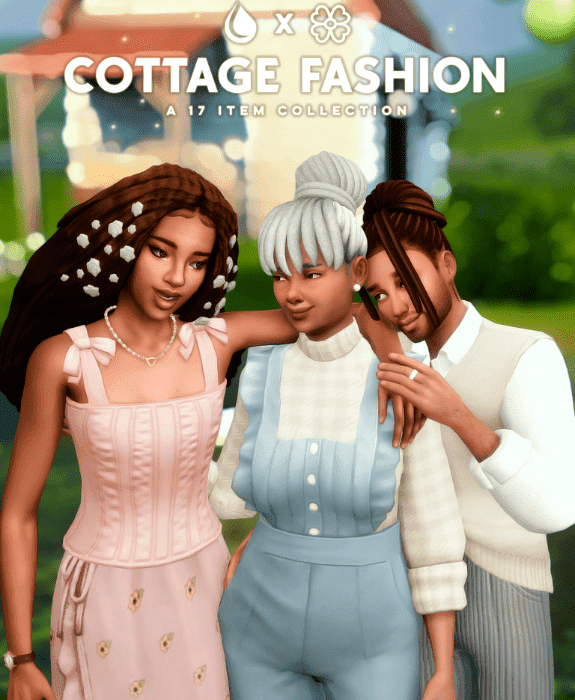
SIMS 4 COTTAGE LIVING CLOTHES SET – SERENITY
These clothes are adorable and ideal for expressing diverse Sims personalities. With their mix-and-match versatility, you can craft unique styles that suit any Sim. They’re perfect for enhancing role-playing and weaving captivating narratives within the game. Adding them to your CC collection this year is a definite recommendation for expanding your Sims’ wardrobe and enriching your gameplay experience.
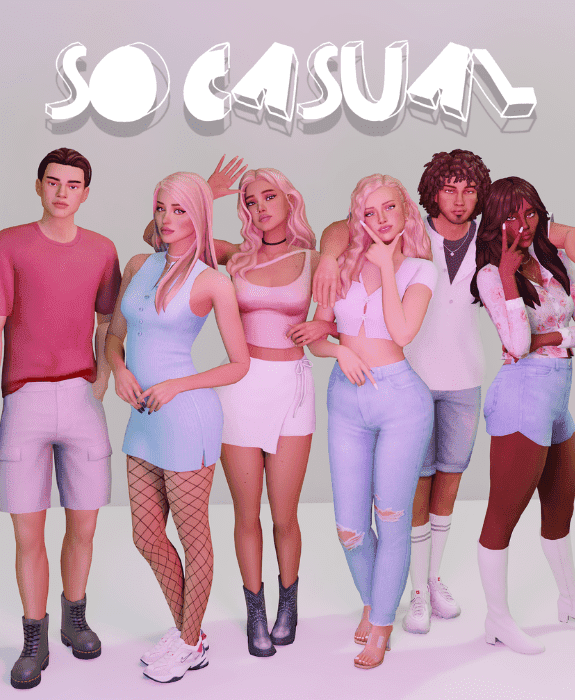
SIMS 4 CC CLOTHES CASUAL COLLECTION – ARETHA
I can’t imagine life without Sims 4 CC clothes packs—they make everything easier with their vast range of outfits conveniently in one place. Among my favorites is the “So Casual” CC clothes collection, which offers 13 new items that seamlessly integrate with the base game.
SIMS 4 CC CLOTHES FEMALE – GREENLLAMAS & SERENITY
The Sims 4 CC Clothes Female collaboration between GreenLlamas and Serenity offers a captivating blend of styles and designs. This collection showcases a diverse array of clothing items tailored to suit different tastes and preferences. With meticulous attention to detail and high-quality textures, each piece enhances the virtual wardrobe with elegance and realism. Players can expect a range of options from casual wear to sophisticated attire, perfect for styling Sims for any occasion.
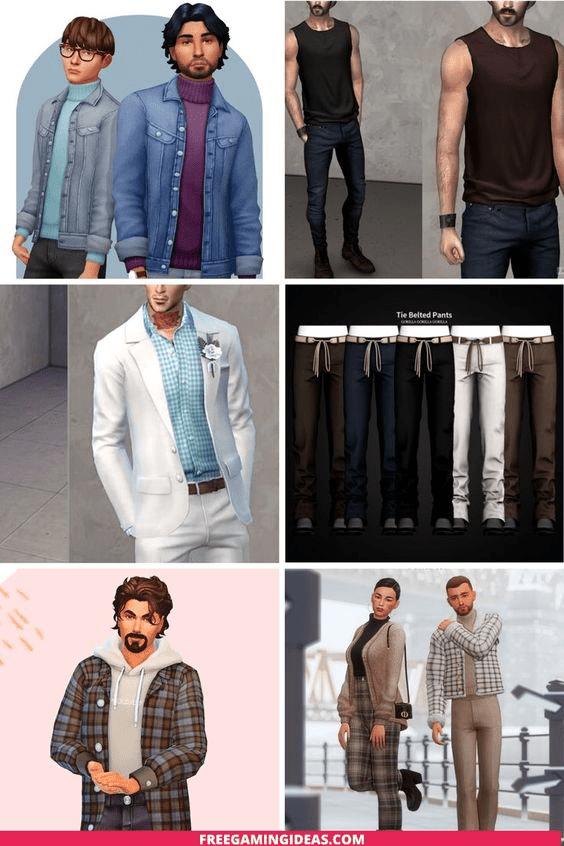
SIMS 4 CLOTHES CC PACKS
Sims 4 Clothes CC Packs are collections of new outfits and accessories that players can add to the game. They give Sims more clothing options beyond what comes with the game originally. These packs are made by different creators and often include items that reflect different styles and themes. Players can mix and match these clothes to create unique looks for their Sims.
SIMS 4 MALE CLOTHES CC
Sims 4 Male Clothes CC are add-ons that give male Sims new clothing choices. They include things like shirts, pants, jackets, and accessories. These CC packs are made by creators and can be downloaded to customize the game. Players can use them to dress their Sims in various styles and create different looks.
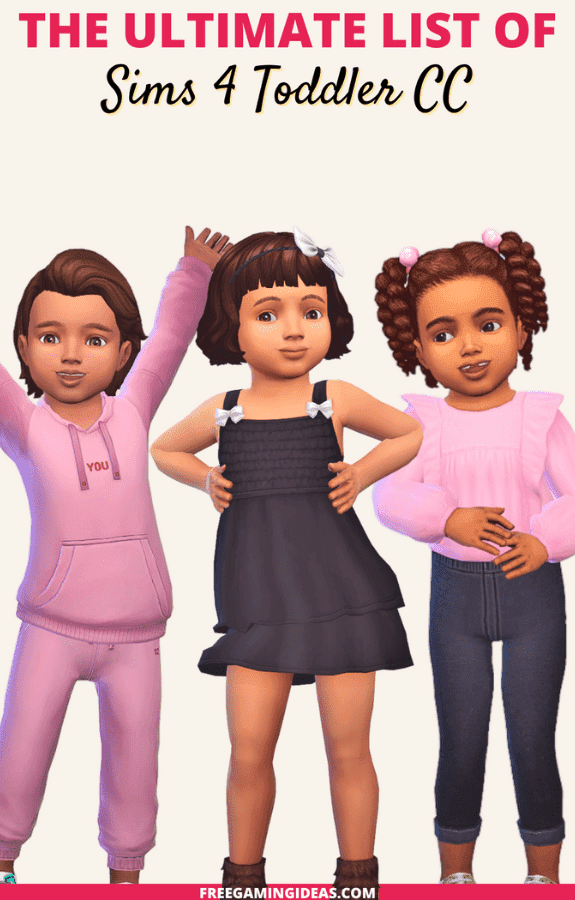
SIMS 4 TODDLER CLOTHES
Sims 4 Toddler Clothes are outfits designed for the youngest Sims in the game. They include items like onesies, dresses, pants, and cute accessories. These clothes are available in different styles and colors to dress toddlers for any occasion. Players can download custom content packs to expand their options and personalize their Sims’ wardrobes.
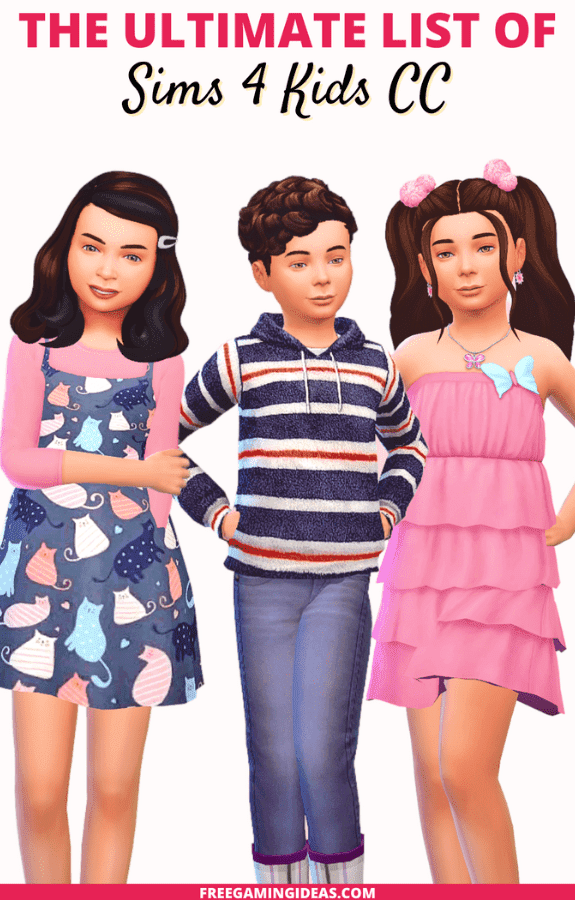
SIMS 4 KIDS CLOTHES
Sims 4 Kids Clothes are outfits made for child Sims in the game. They include things like shirts, skirts, shorts, and shoes. These clothes come in many colors and styles to suit different tastes and activities. Players can add more options by downloading custom content packs created by other players.
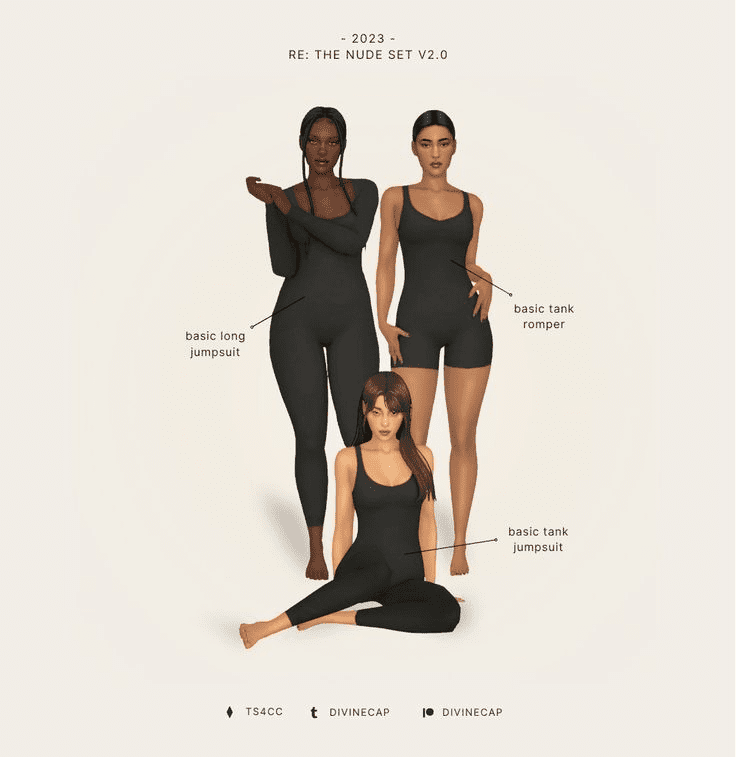
REALISTIC SIMS 4 FEMALE CC CLOTHES SET – DIVINECAP
The Realistic Sims 4 Female CC Clothes Set by DivineCap offers lifelike clothing options for Sims. This collection includes a variety of outfits designed to look natural and stylish. Each piece has detailed textures and fits well on Sims. Players can mix and match these clothes to create their own fashionable looks. It’s a great way to enhance the realism and style of Sims in the game.
SIMS 4 FEMALE CC CLOTHES PACKS – SERENITY
Serenity is a talented creator in the Sims 4 CC community, known for their high-quality custom content clothing specifically designed for female Sims. While specific details on each collection might be limited, browsing through Serenity’s work will surely unveil a treasure trove of stylish options for your Sims. From everyday essentials to statement pieces, their creations are crafted with attention to detail and cater to a range of aesthetics, ensuring you’ll find outfits that perfectly suit your Sim’s unique style.
SIMS 4 BEST FEMALE CC CLOTHES – IKARI SIMS
Ikari Sims is a well-regarded creator in the Sims 4 CC community known for their stylish and high-quality custom content clothing for female Sims. Their work offers a wide range of aesthetics, from everyday wear to glamorous evening attire. If you’re looking to add some variety and personality to your Sims’ wardrobes, Ikari Sims is a great place to start! It’s important to note that most CC clothing requires downloading the content from the creator’s website and installing it properly within the Sims 4 game. Always be sure to download CC from trusted sources.
ATHLETIC SIMS 4 FEMALE CC CLOTHES SET – NUCRESTS
Level up your Sims’ workout style with the Resilient Athletic Set by Nucrests for Sims 4. This CC clothing set focuses on stylish and functional activewear for your female Sims. Nucrests is a creator known for their high-quality custom content, so you can expect well-designed pieces that will make your Sims look and feel their best while they hit the gym or jog through the park. Unfortunately, without further details, it’s difficult to say exactly what garments are included in the set.
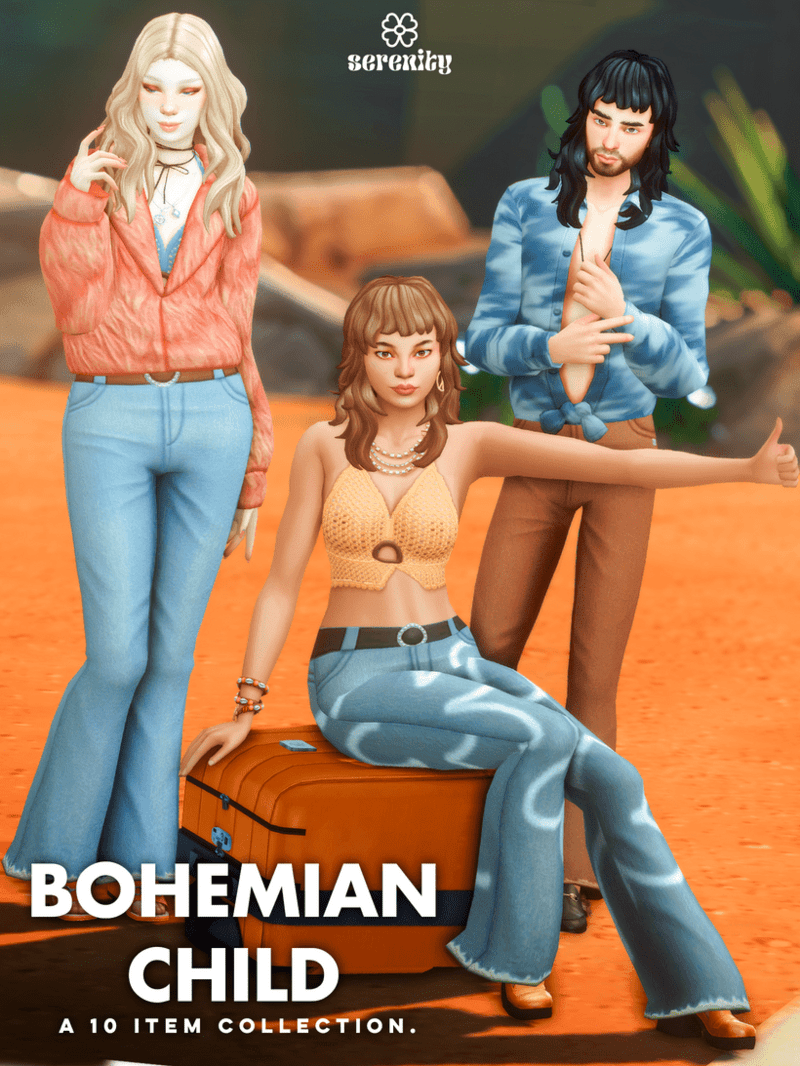
SIMS 4 BOHEMIAN CC CLOTHES – SERENITY
If you’re looking to infuse your Sims’ wardrobe with a free-spirited vibe, look no further than Serenity’s Sims 4 bohemian CC clothes! This talented creator is known for their beautiful and detailed custom content, and their bohemian collection is sure to capture that carefree, nature-inspired aesthetic. Expect flowy dresses, intricate knitwear, and earthy tones that perfectly embody the bohemian style. Whether you want to dress your Sims for a music festival or a casual stroll through the park, Serenity’s bohemian CC collection has something for every Sim with a touch of wanderlust.
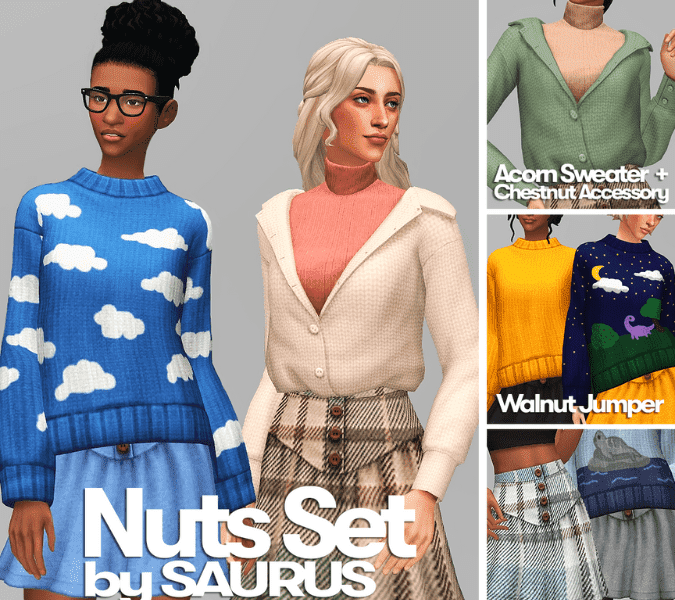
SIMS 4 CC SWEATERS AND SKIRTS – SAURUS
Cozy up your Sims’ wardrobe with the “Nuts Set” by Saurus for Sims 4! This CC clothing pack offers a delightful combination of comfy sweaters and stylish skirts, perfect for those chilly in-game autumns. Saurus is known for creating high-quality custom content with plenty of variety, and the Nuts Set boasts 6 items with multiple swatches. This means your Sims can mix and match cozy sweaters in different colors with various skirt styles, creating a range of adorable fall outfits for any occasion.
VICTORIA SIMS 4 CC FEMALE CLOTHES – SERENITY
The Victoria Sims 4 CC Female Clothes by Serenity brings elegance and sophistication to Sims’ wardrobes. This collection features a range of stylish and refined clothing items, including dresses, tops, skirts, and accessories. Each piece is meticulously designed with high-quality textures and intricate details, ensuring a realistic and fashionable appearance in-game. Players can create chic and timeless looks for their Sims with this versatile and beautifully crafted CC collection.
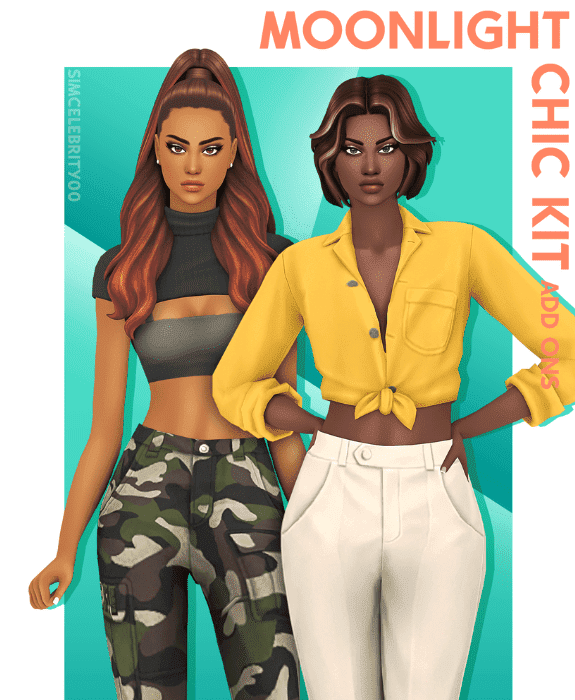
MOONLIGHT SIMS 4 CC CLOTHES – SIMCLEBRITY00
The Moonlight Sims 4 CC Clothes by SimCelebrity00 offers a collection inspired by celestial themes and nighttime elegance. This pack includes a variety of clothing items such as dresses, tops, and accessories, designed with a focus on ethereal and dreamy aesthetics. Each piece is crafted with high-quality textures and intricate details, ensuring a magical and enchanting appearance in-game. Players can dress their Sims in celestial-inspired outfits that evoke a sense of mystery and beauty under the moonlight.
SIMS 4 DENIM OVERALLS – TRILLYKE
The Sims 4 Denim Overalls by Trillyke offer a classic and versatile addition to Sims’ wardrobes. This CC pack features stylish denim overalls in various designs, perfect for casual and trendy looks. Each pair is meticulously crafted with high-quality textures and attention to detail, ensuring a realistic and flattering fit on Sims. Players can mix and match these overalls with different tops and accessories to create personalized and fashionable outfits for their Sims.
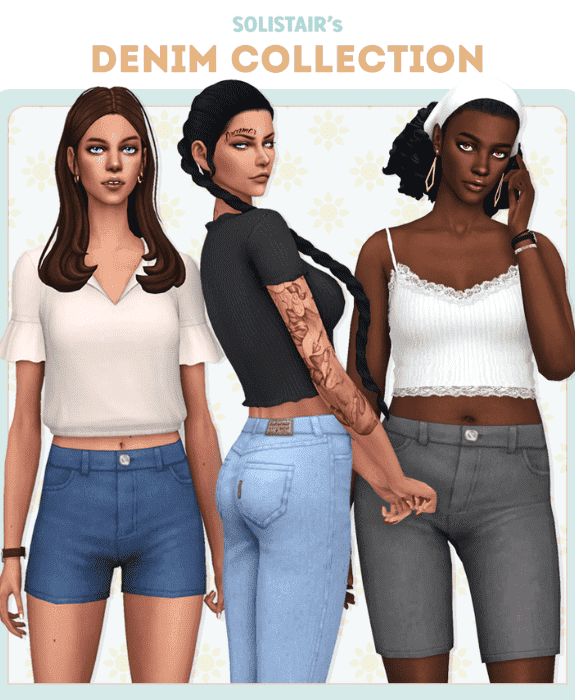
SIMS 4 CC JEANS – SOLISTAIR
Sims 4 CC Jeans by Solistair offer a wide selection of denim pants for Sims to wear. This collection includes different styles like skinny jeans, boyfriend jeans, and high-waisted designs. Each pair is made with detailed textures and fits well on Sims in the game. Players can choose from various colors and patterns to match their Sims’ style preferences.
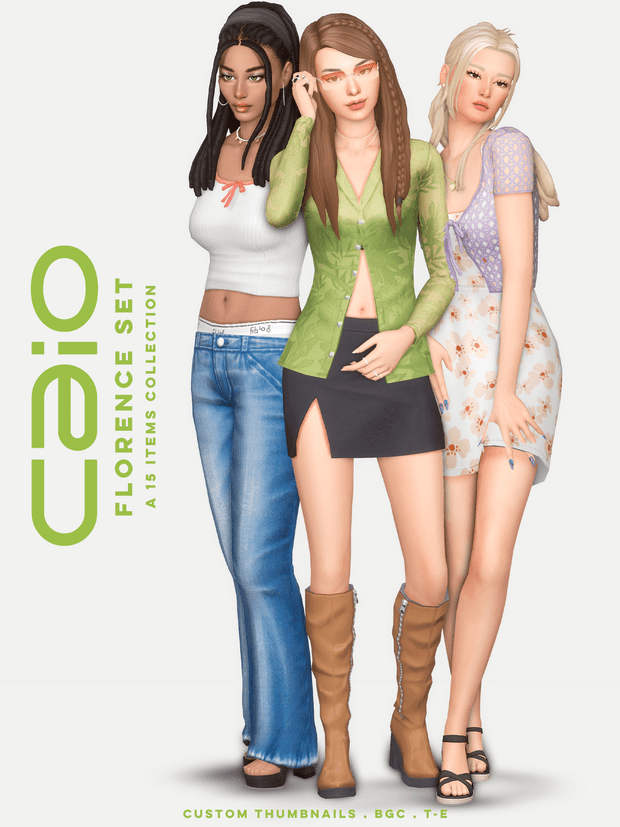
FLORENCE SIMS 4 CC FEMALE CLOTHES – CAIO
Florence Sims 4 CC Female Clothes by Caio provide a stylish and chic wardrobe option for Sims. This collection features a variety of clothing items such as dresses, tops, skirts, and accessories. Each piece is designed with detailed textures and fits nicely on Sims in the game. Players can mix and match these outfits to create fashionable looks that suit different occasions.
SIMS 4 FEMALE CASUAL CC CLOTHES – ARETHA
Sims 4 Female Casual CC Clothes by Aretha offer a range of relaxed and everyday clothing options for Sims. This collection includes items like t-shirts, jeans, sweaters, and sneakers. Each piece is designed with comfortable textures and fits well on Sims in the game. Players can dress their Sims in casual and stylish outfits perfect for everyday activities.
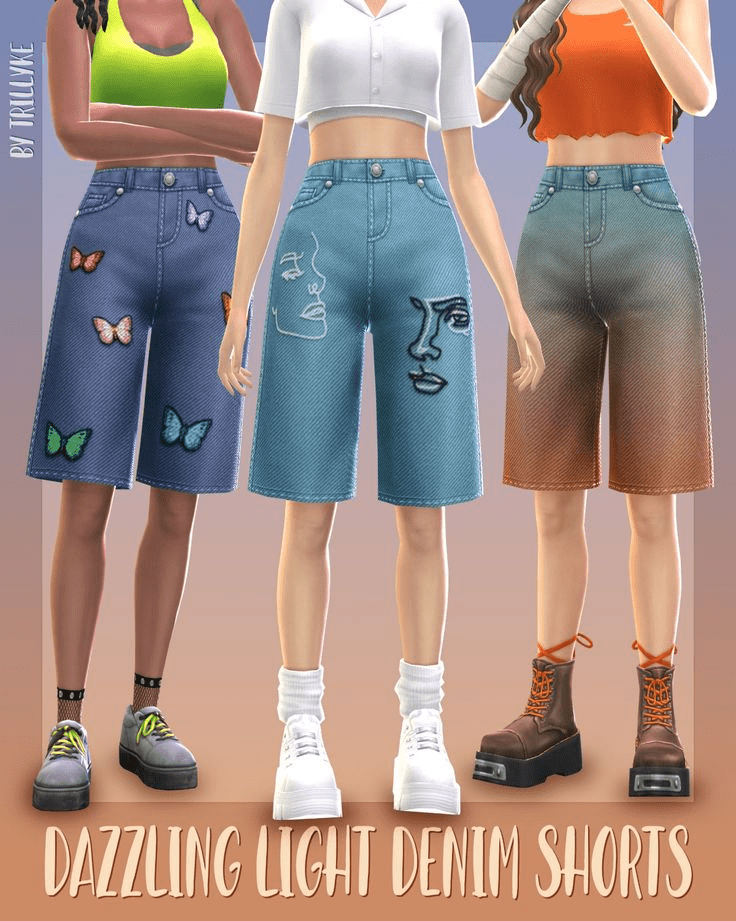
DAZZLING LIGHT SIMS 4 DENIM SHORTS – TRILLYKE
Spice up your Sims’ summer wardrobe with the Dazzling Light Denim Shorts by Trillyke for Sims 4. This CC offering from the creative Trillyke most likely features stylish and versatile denim shorts for your female Sims. While specific details are limited, Trillyke is known for their high-quality custom content clothing. Imagine a collection of trendy denim shorts in various washes, cuts, and possibly even with some embellishments. These Dazzling Light Denim Shorts are sure to become a staple in your Sims’ summer wardrobe, perfect for pairing with cute tops, tanks, or graphic tees.
SIMS 4 CC CLOTHES FOR FEMALE – ARETHA
Arethabee is a popular creator in the Sims 4 CC community known for their stylish and diverse collection of custom content clothing designed specifically for female Sims. Their work offers a wide range of aesthetics, from everyday wear to glamorous evening attire, often featuring bold prints and eye-catching details. If you’re looking to add a touch of personality and unique flair to your Sims’ wardrobes, Arethabee’s creations are definitely worth exploring!
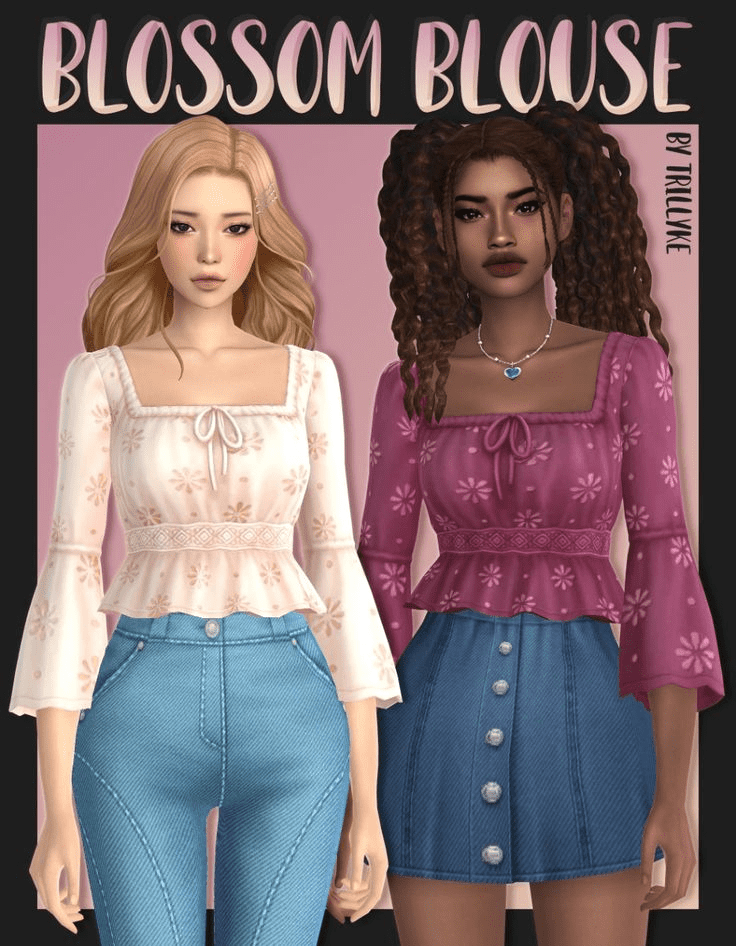
SIMS 4 BLOSSOM BLOUSE CC – TRILLYKE
Spruce up your Sims’ wardrobe with a touch of springtime charm! Trillyke’s Sims 4 Blossom Blouse CC promises a delightful piece for your female Sims. While specific details are limited, the name itself hints at a blouse adorned with floral patterns or colors reminiscent of a blooming flower. Imagine a delicate top, perfect for warmer weather, that injects a touch of sweetness and femininity into your Sims’ outfits. Search for “Trillyke Blossom Blouse Sims 4 CC” on platforms like Patreon or The Sims Resource to explore the full potential of this springtime addition to your Sims’ wardrobe. There, you might find detailed descriptions, images, or even videos showcasing this charming creation by Trillyke.
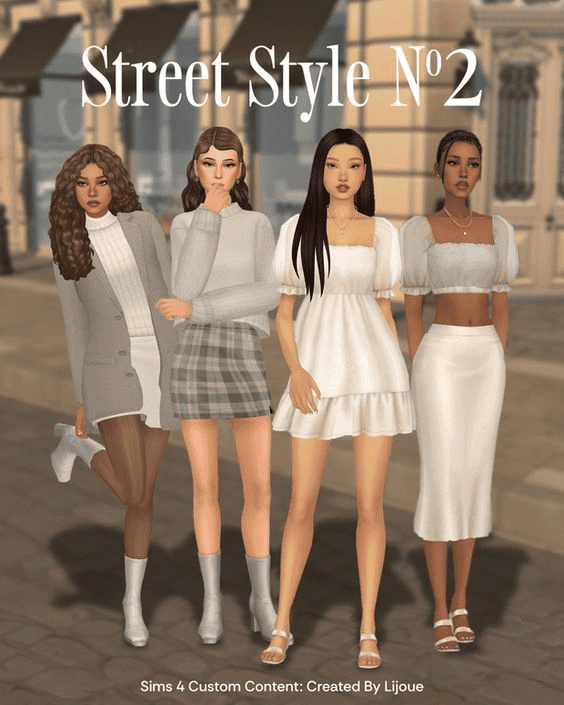
SIMS 4 STREET STYLE CC CLOTHES PACK – LIJOUE
Elevate your Sims’ street cred with the Sims 4 Street Style CC Clothes Pack by Lijoue! This collection injects a dose of contemporary, urban fashion into your game. Expect a mix of trendy and wearable pieces that reflect the vibe of modern streetwear. Think comfy joggers paired with graphic tees, stylish oversized blazers, or edgy ripped jeans. Whether your Sim craves a laid-back look or a bold statement piece, Lijoue’s Street Style pack offers something to quench their fashion thirst.
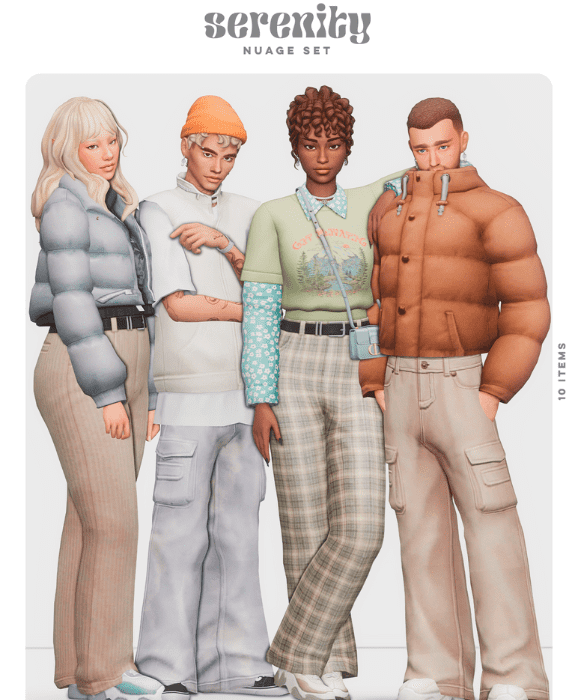
SIMS 4 CC NUAGE CLOTHES SET – SERENITY
The Sims 4 CC Nuage Clothes Set by Serenity introduces a collection inspired by ethereal and airy fashion styles. This pack includes a variety of clothing items such as flowing dresses, delicate tops, skirts, and light accessories. Each piece features soft textures and intricate details, creating a dreamy and sophisticated appearance in-game. Players can dress their Sims in outfits that evoke a sense of grace and elegance, perfect for creating enchanting and whimsical looks.
SIMS 4 90S CC CLOTHES – SENTATE
The Sims 4 90s CC Clothes by Sentate offers a nostalgic collection inspired by the fashion trends of the 1990s. This pack includes a variety of clothing items such as crop tops, baggy jeans, flannel shirts, and platform shoes. Each piece is designed with retro textures and vibrant colors, capturing the essence of the decade’s style. Players can dress their Sims in outfits that reflect the iconic and casual fashion statements of the 90s, perfect for reliving the trends of that era in the virtual world.
UNIFY COLLECTION SIMS 4 CC CLOTHES – NUCRESTS
The Unify Collection Sims 4 CC Clothes by Nucrests offers a comprehensive selection of stylish and practical clothing options for Sims. This pack includes a variety of outfits suitable for different occasions, such as casual wear, formal attire, and athletic gear. Each item is meticulously crafted with high-quality textures and attention to detail, ensuring a realistic and fashionable appearance in-game. Players can mix and match these clothes to create versatile and personalized looks that suit their Sims’ lifestyles and preferences.
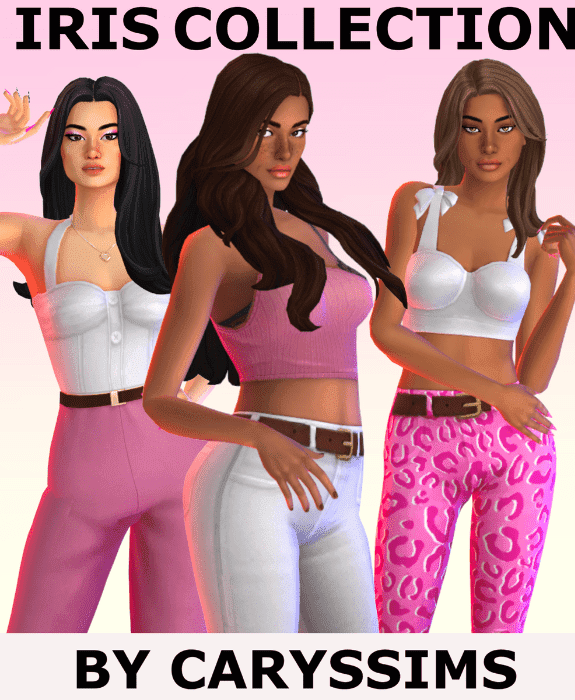
IRIS COLLECTION SIMS 4 FEMALE CC CLOTHES – CARYSSIMS
CarysSims’ Iris Collection for Sims 4 promises a delightful assortment of feminine clothing for your Sims’ wardrobe. While specifics are limited, the name “Iris” evokes a sense of elegance and possibly a touch of floral or springtime inspiration. Imagine a collection of beautifully crafted outfits that flatter a variety of Sim body types. CarysSims, known for their quality CC creations, ensures these garments will seamlessly integrate into your existing game. To fully explore the Iris Collection’s potential, search for “CarysSims Iris Collection Sims 4 CC” on platforms like Patreon or The Sims Resource.
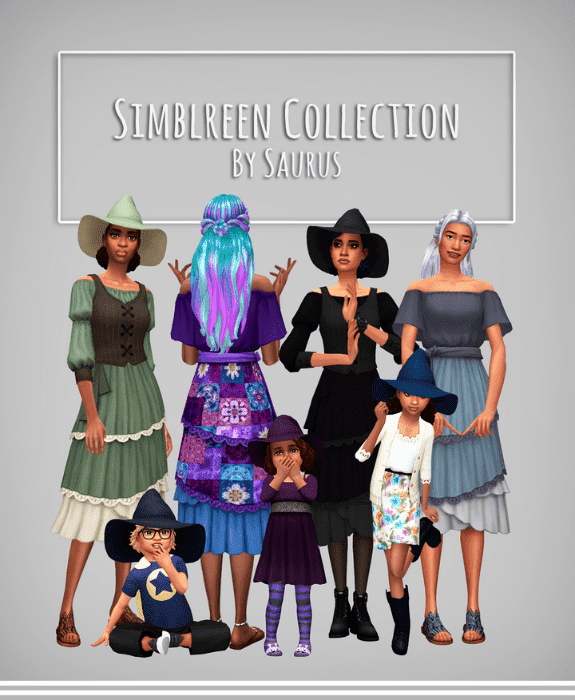
SIMBLREEN SIMS 4 CC CLOTHES – SAURUS
This seasonal custom content offering is likely brimming with hauntingly beautiful or playfully costume-esque attire for your Sims. While details are limited, Saurus is a creator known for their high-quality work and diverse styles. Imagine a collection that caters to various Simblreen preferences. Perhaps you’ll find whimsical witchy dresses, gothic-inspired ensembles, or even playfully spooky everyday outfits. With Saurus’ design expertise, you can expect CC that seamlessly integrates into your game, adding a touch of Simblreen flair to your Sims’ wardrobes.
SIMS 4 HONEY SET CC CLOTHES – SERENITY
Unwrap a touch of sweetness for your Sims’ wardrobe with the Honey Set CC clothes by Serenity for Sims 4. Though specifics are scarce, the name itself hints at a collection that might be warm, inviting, and possibly feature golden hues or bee-inspired details. Imagine a set of outfits that exude a touch of casual elegance, perfect for everyday wear or a stylish brunch date. Serenity, a creator known for their high-quality CC, ensures these garments will seamlessly integrate into your existing game and flatter a variety of Sim body types. To discover the true essence of the Honey set, search for “Serenity Honey Sims 4 CC” on platforms like Patreon or The Sims Resource.
SIMS 4 HEATWAVE CC CLOTHES PACK – CLUMSYALIEN
Beat the heat in style with the Sims 4 Heatwave CC Clothes Pack by Clumsyalien! This collection is your one-stop shop for refreshing and fashionable outfits to keep your Sims cool during those scorching in-game summer days. While specific details are limited, Clumsyalien is a creator known for their trendsetting designs, so expect a wardrobe brimming with breezy silhouettes and lightweight fabrics. Imagine flowy maxi dresses, cute rompers, or even stylish separates in cool tones and breathable materials. With Clumsyalien’s creative vision, you can ensure your Sims stay comfortable and look effortlessly chic, no matter how high the temperature soars in your Sims world.
SIMS 4 WINTER CC CLOTHES – CAIO
Caio’s Sims 4 Winter CC Clothes collection offers a stylish solution to your Sims’ cold weather woes. While specifics are limited, Caio is known for creating high-quality clothing for the game. This winter collection likely consists of a curated selection of garments designed to keep your Sims warm and fashionable. Imagine cozy knit sweaters, chic puffer jackets, or even trendy scarves and beanies. Caio’s designs are known for their elegance and variety, so you can expect a range of styles to suit different tastes. Search for “Caio Winter Sims 4 CC” on platforms like Patreon or The Sims Resource to explore the full collection and discover the perfect winter outfit for your Sims!
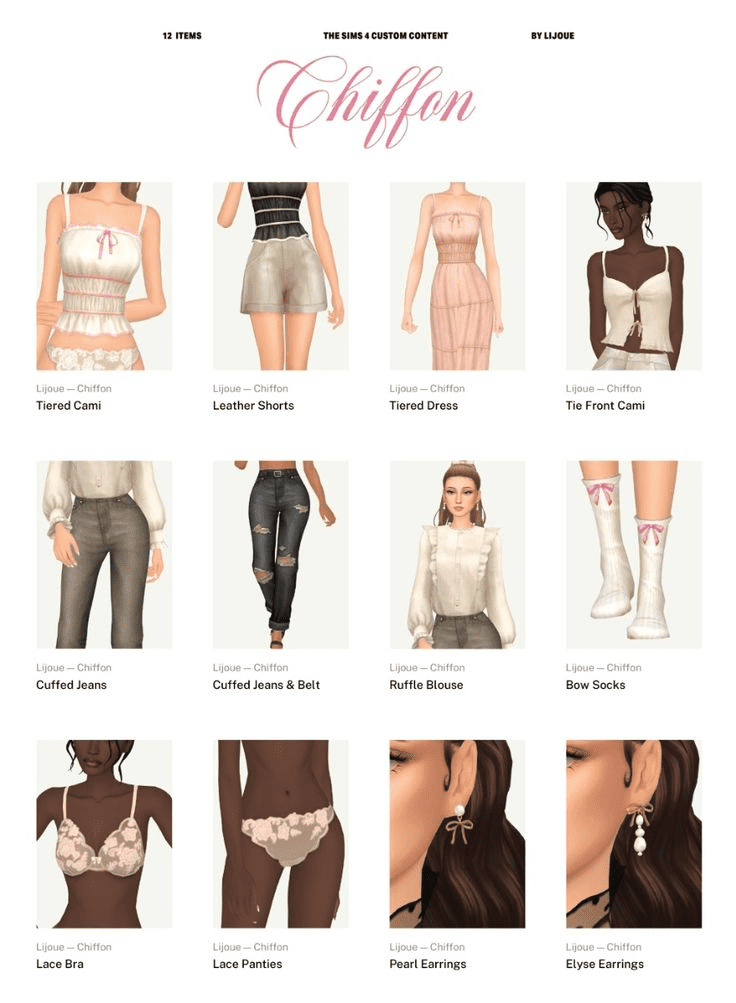
CHIFFON SIMS 4 CC CLOTHES PACK – LIJOUE
Inject a dose of ethereal elegance into your Sims’ wardrobe with the Chiffon Sims 4 CC Clothes Pack by Lijoue. This collection, crafted by the talented Lijoue, is likely to focus on garments crafted from flowing chiffon fabric. Imagine a set of breezy dresses, skirts, or even blouses that drape beautifully on your Sims’ bodies. Lijoue, a creator known for their eye for detail and quality CC, ensures these pieces will seamlessly integrate into your game and flatter various Sim body types. The Chiffon pack might offer a range of styles, from romantic and whimsical to chic and modern. To explore the full potential of this collection, search for “Lijoue Chiffon Sims 4 CC” on platforms like Patreon or The Sims Resource.
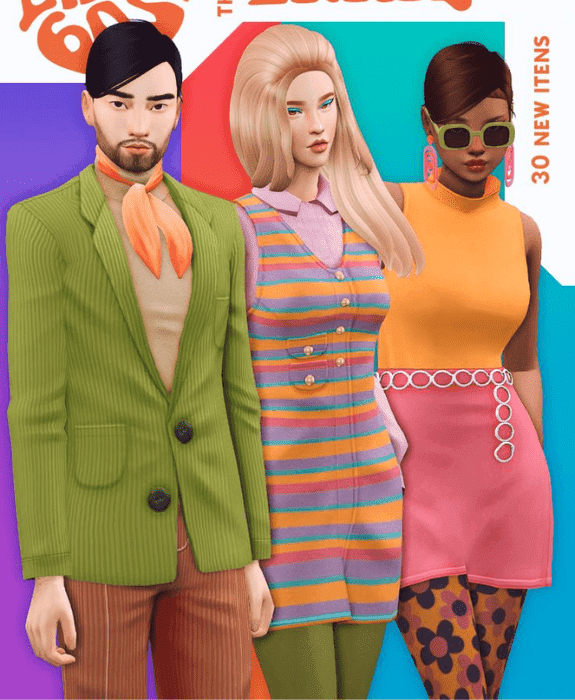
SIMS 4 CC CLOTHES 60S COLLECTION – SERENITY X ENRIQUE
Take your Sims on a groovy trip down memory lane with the Sims 4 CC Clothes: 60s Collection by the collaborative duo of Enrique and Serenity! This creative partnership promises a wardrobe bursting with retro flair, perfect for channeling iconic 1960s fashion trends. Expect a mix of mod silhouettes, bold colors, and playful patterns. Imagine chic shift dresses, trendy mini skirts paired with go-go boots, or preppy sweater vests for a touch of collegiate charm. Whether you want to dress your Sims like trendsetting mods, flower power icons, or preppy students, the 60s Collection by Enrique and Serenity offers something for every Sim with a love for vintage vibes.
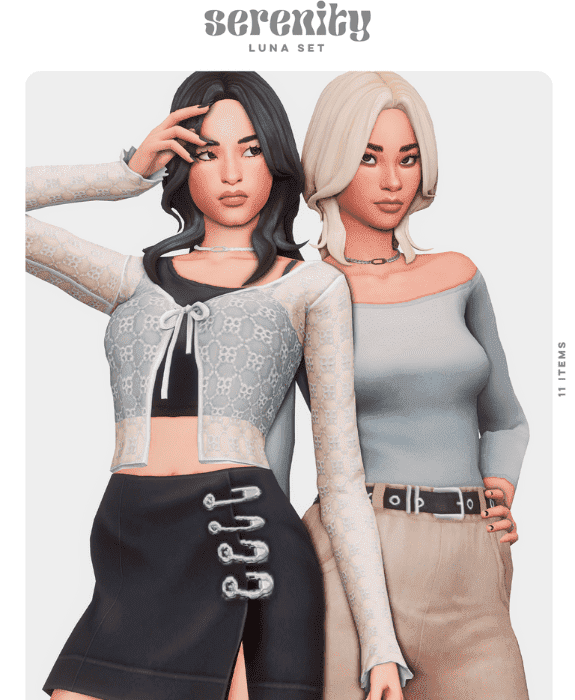
LUNA SET SIMS 4 CC CLOTHES – SERENITY
The Luna Set Sims 4 CC Clothes by Serenity offers a captivating collection that brings celestial elegance to Sims’ wardrobes. This pack features a range of celestial-themed clothing items, including flowing dresses, ethereal tops, celestial accessories, and intricate jewelry. Each piece is meticulously designed with high-quality textures and exquisite detailing, ensuring a stunning and otherworldly appearance in-game. The color palette includes shimmering blues, radiant silvers, and deep cosmic hues, reflecting the mystique and beauty of the night sky. With its focus on celestial motifs and sophisticated designs, the Luna Set CC pack by Serenity allows players to dress their Sims in outfits that evoke a sense of celestial grace and celestial beauty.
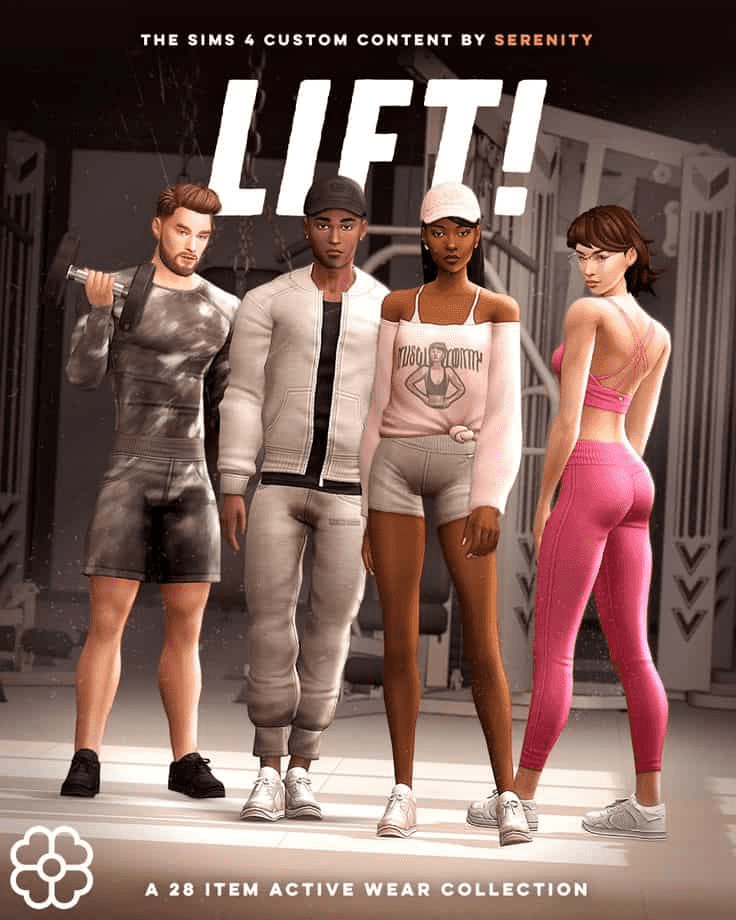
SIMS 4 ACTIVEWEAR CC CLOTHES PACKS – SERENITY
The Sims 4 Activewear CC Clothes Packs by Serenity offer a diverse array of athletic clothing options designed to keep Sims stylish and comfortable during workouts and leisure activities. This collection includes a variety of items such as sports bras, leggings, shorts, and sneakers, all crafted with high-quality textures and realistic details. Each piece is tailored to enhance Sims’ performance and reflect contemporary activewear trends. The color palette features energetic tones, sleek neutrals, and vibrant patterns, allowing players to mix and match outfits to suit their Sims’ personal style.
SIMS 4 BEST CLOTHES CC – QICC
The Sims 4 Best Clothes CC by QICC offers a standout collection of clothing options that redefine style and diversity for Sims. This pack includes a wide range of meticulously designed outfits, from casual wear to formal attire, ensuring there’s something for every occasion. Each piece boasts high-quality textures, intricate details, and a vibrant color palette, providing players with endless possibilities for customization. Whether dressing Sims for everyday life or special events, the Best Clothes CC pack by QICC allows players to create unique and fashionable looks that reflect their Sims’ personalities and preferences. With its commitment to quality and creativity, this CC collection enhances gameplay by elevating Sims’ fashion choices to new heights of sophistication and individuality.
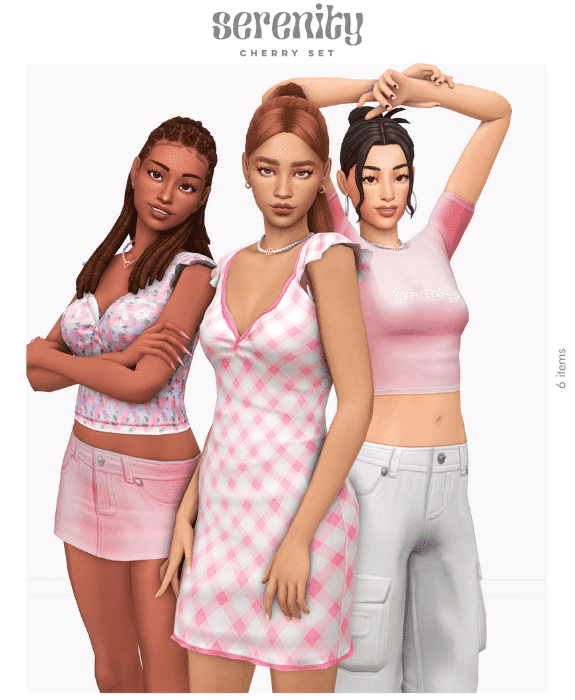
CHERRY SIMS 4 CC CLOTHES PACK – SERENITY
The Cherry Sims 4 CC Clothes Pack by Serenity offers a charming selection of clothing options for Sims. This collection includes dresses, tops, skirts, and accessories designed with a sweet and vibrant style. Each item features bright colors and detailed textures that bring a lively and playful vibe to Sims’ wardrobes. Players can mix and match these outfits to create adorable and fashionable looks for their Sims. With its focus on fun and colorful designs, the Cherry CC pack by Serenity adds a delightful touch to the virtual fashion scene in Sims 4.
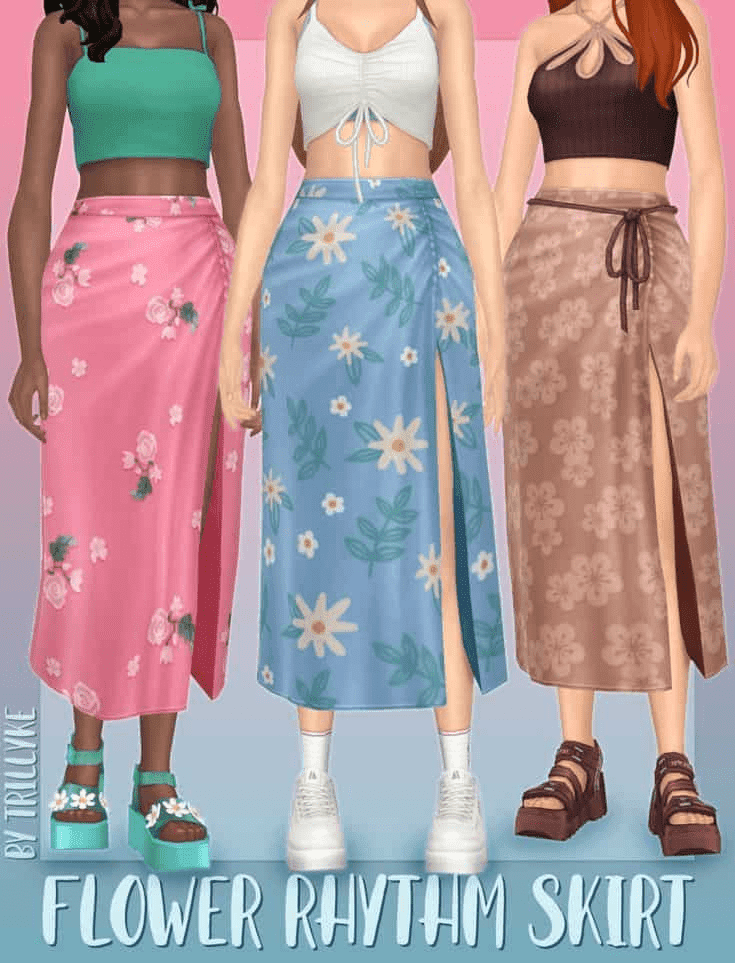
FLOWER RHYTHM SIMS 4 SKIRT CC – TRILLYKE
The Flower Rhythm Sims 4 Skirt CC by Trillyke introduces a collection of stylish skirts that add flair to Sims’ outfits. This pack includes various skirt designs adorned with floral patterns and vibrant colors, perfect for adding a touch of elegance and charm. Each skirt is meticulously crafted with high-quality textures, ensuring a realistic and flattering fit on Sims. Players can pair these skirts with different tops and accessories to create versatile and fashionable looks for any occasion. With its focus on trendy and chic designs, the Flower Rhythm CC pack by Trillyke enhances Sims’ wardrobe options with a fresh and playful aesthetic.
SIMS 4 COTTAGE LIVING CC CLOTHES – SOLISTAIR
The Sims 4 Cottage Living CC Clothes by Solistair offers a cozy and rustic wardrobe collection inspired by countryside living. This pack includes clothing items such as cozy sweaters, casual dresses, denim jeans, and comfortable shoes, all designed with textures that evoke a warm and relaxed atmosphere. Each piece is crafted with attention to detail, ensuring Sims look charming and comfortable in their rural attire. Players can dress their Sims in outfits that reflect a laid-back countryside style, perfect for enjoying the simplicity and beauty of cottage life in the virtual world. With its emphasis on comfort and casual elegance, the Cottage Living CC pack by Solistair brings a touch of rural charm to Sims’ wardrobes.
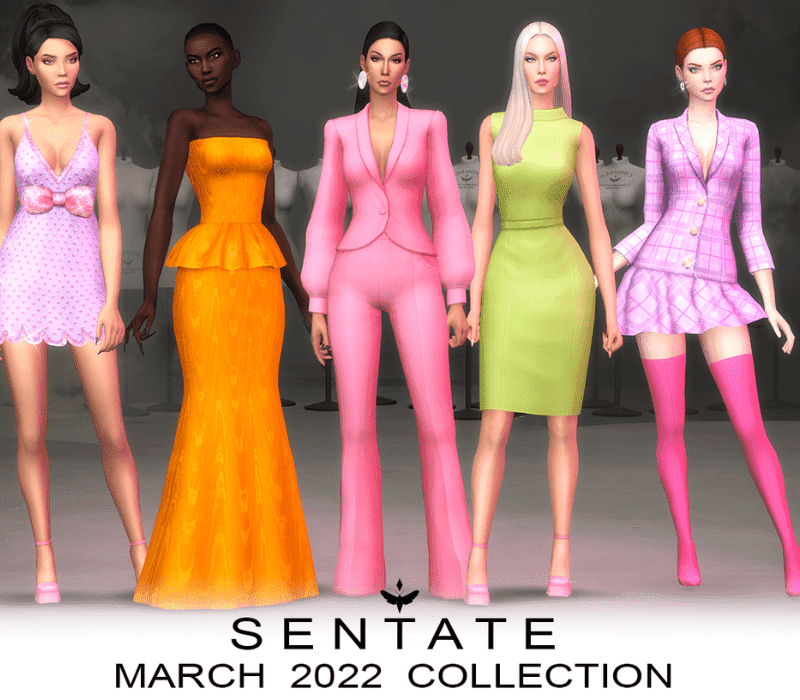
SIMS 4 SENTATE CC CLOTHES COLLECTION
The Sims 4 Sentate CC Clothes Collection offers a sophisticated array of stylish outfits for Sims. This collection includes a variety of clothing items such as elegant dresses, tailored suits, casual tops, and sleek accessories. Each piece features high-quality textures and detailed designs that enhance Sims’ appearance with modern fashion trends. Players can mix and match these outfits to create versatile looks suitable for different occasions in the virtual world. With its focus on contemporary style and versatility, the Sentate CC collection enriches Sims’ wardrobes with chic and fashionable options.
HOT SUMMER GIRL SIMS 4 CC CLOTHES PACKS – ARETHABEE
The Hot Summer Girl Sims 4 CC Clothes Packs by Arethabee bring a vibrant and summery wardrobe to Sims. This collection includes a variety of outfits such as shorts, crop tops, sundresses, and beach accessories, all designed with bright colors and playful patterns. Each item is crafted with detailed textures that capture the essence of a sunny day, ensuring Sims look stylish and ready for summer adventures. Players can mix and match these outfits to create trendy and fun looks that reflect the carefree spirit of summer. With its focus on cool and colorful designs, the Hot Summer Girl CC pack by Arethabee adds a refreshing touch to Sims’ wardrobes in the virtual world.
SIMS 4 DENIM CC CLOTHES – SOLISTAIR
The Sims 4 Denim CC Clothes by Solistair offer a versatile and timeless addition to Sims’ wardrobes. This collection includes a variety of denim clothing items such as jeans, jackets, skirts, and shorts, designed with classic styles and textures. Each piece is meticulously crafted to provide Sims with comfortable and stylish options for everyday wear. Players can mix and match these denim outfits to create casual and fashionable looks that suit various activities and moods. With its focus on enduring fashion and practicality, the Denim CC pack by Solistair enhances Sims’ attire with enduring denim styles in the virtual world.
CONCLUSION
With this curated list of 85+ stunning Sims 4 CC clothing packs, you’ve unlocked a treasure trove of fashion possibilities for your Sims! From Euphoria-inspired glam to breezy summer rompers, cozy winter knits to flowy Victorian dresses, there’s something to quench every Sim’s fashion thirst.
So unleash your inner stylist, explore the creations of talented CC creators, and let your Sims express themselves through their unique wardrobes. Remember to check out the creator’s pages for download links, installation instructions, and more detailed previews. Happy Simming!