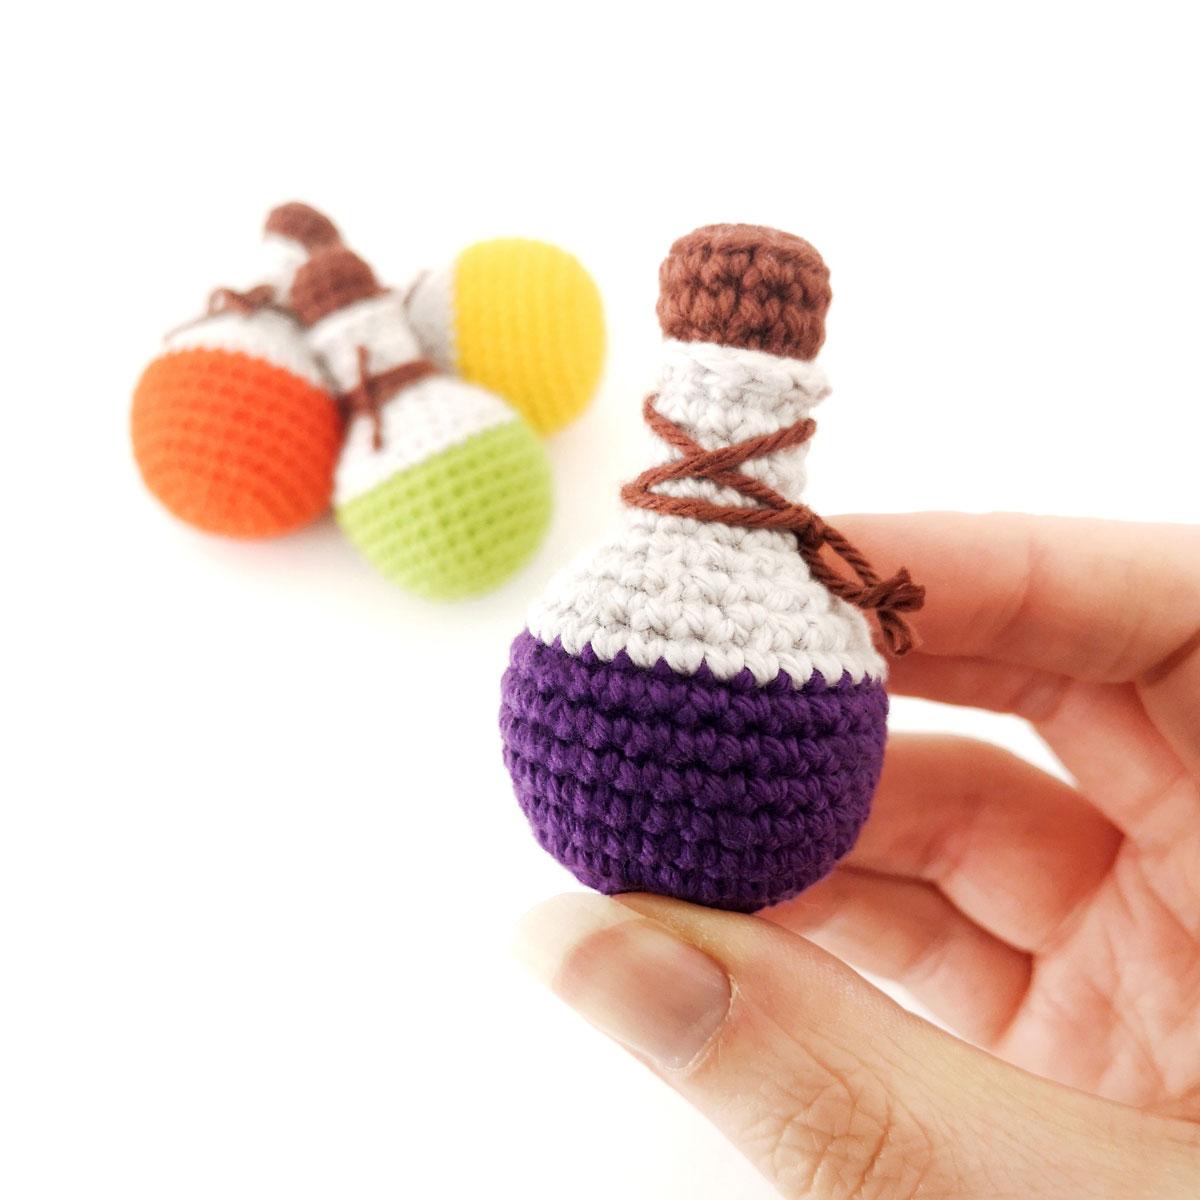
CAN I WEAR JEANS TO JURY DUTY? EXAMINING THE SUITABILITY OF WEARING DENIM IN A COURT

People like to wear cool and stylish clothes not just in everyday life but also at work. Jeans are always a popular and trendy choice for many people, even in the office. But what about jobs that need a serious and formal look, like in a court? The debate about wearing jeans to jury duty can be a topic of discussion in the world of courtroom fashion. This article explores the suitability of jeans as attire for jury duty and provides informed guidance for potential jurors.

CAN YOU WEAR JEANS TO JURY DUTY?

In most situations, it’s okay to wear jeans as long as they are clean, without holes, and paired with a nice shirt or blouse. While courts usually don’t have strict rules about what jurors should wear, they do expect people to dress comfortably and respectfully.

If you favor wearing denim, it’s recommended to opt for dark jeans, as they present a more formal vibe compared to their lighter counterparts. To elevate your style, consider pairing these jeans with a button-down shirt or a blouse for a polished appearance. In case you want an extra touch of professionalism, layering a blazer or jacket over the blouse or shirt is a great option.

In short, wearing neat jeans with appropriate clothing is generally fine for jury duty. But it’s always a good idea to check for any specific rules from the court because different courts might have different expectations or requirements.

JURY DUTY DRESS CODE

Each court ought to offer guidelines to their potential jurors. You can locate these guidelines, along with frequently asked questions, either online or in the information packet provided to you. Requirements vary; some courts insist on a jacket and tie, while others only ask for a collared shirt. Make sure you are familiar with the specific guidelines applicable to your situation. While strict dress codes are becoming less common, jury duty does have an unspoken and often enforced expectation of professionalism and respect. Remember, you’re participating in a vital civic process, and your attire should reflect that.

Whether you’re aspiring to appear as a fitting candidate or have already been chosen to serve on the jury, especially if you aim to become the jury foreman, it’s essential to present yourself in a polished manner without being overly flashy.

HOW TO DRESS FOR JURY DUTY

AVOID OBVIOUS BRANDS AND SLOGANS

During the selection process, wearing clothing with prominent brands or slogans could make you stand out during interviews. Attire expressing political, religious, or other opinions might prompt additional questions and could potentially result in being dismissed from the jury pool. Wearing clothing adorned with offensive words may lead to being asked to leave.

LEAVE BEACHWEAR AT HOME

Avoid wearing flip-flops, tank tops, short skirts, and shorts, as they are generally not considered appropriate. In certain places, you might be requested to leave and return on a different day if you’re not dressed appropriately. On exceptionally hot days, modest sleeveless shirts or dresses for women may be permitted. If your attire doesn’t fully cover your shoulders, it’s advisable to bring an additional layer just in case.

DRESS MORE CONSERVATIVELY

A courtroom is a setting where individuals of various generations gather, and most attendees dress in a manner akin to church or work attire. It’s advisable to choose more appropriate settings if you wish to express your sense of fashion.

LEAVE UNNECESSARY JEWELRY AND LOOSE CHANGE AT HOME

Many courts make jurors walk through metal detectors. Make it easier by putting all your metal stuff in your purse or bag. This saves time and avoids the hassle of being scanned with a wand every time you leave and come back for lunch or breaks.

BE AS COMFORTABLE AS POSSIBLE

Whether you’re waiting for selection, participating in courtroom proceedings, or engaged in jury deliberation, chances are you’ll be in your outfit for an extended period. Prioritize comfort by wearing season-appropriate clothing, layering as needed, and ensuring your socks and shoes don’t pinch or constrict.

WHAT TO WEAR TO JURY DUTY

For men attending jury duty, it’s advisable to opt for business casual attire. A pair of well-fitted khakis or dress pants paired with a collared shirt and a blazer is a suitable choice. Ties are optional but can add a touch of formality. Comfortable and polished shoes, such as loafers or dress shoes, complete the look. 

Women, on the other hand, can choose from a range of business casual options. A knee-length skirt or dress pants combined with a blouse or a conservative top is a suitable choice. A blazer or cardigan adds a professional touch. Closed-toe shoes or flats are recommended for comfort and appropriateness. It’s important to avoid overly casual clothing such as jeans, shorts, or overly revealing attire to maintain a respectful and professional appearance in the courtroom setting.

FAQ

1. Can you wear jeans to jury duty in GA?

The dress code for jury duty in Georgia typically requires business casual or professional attire, and jeans may not be considered appropriate. 

2. What can I bring to jury duty NYC?

When reporting for jury duty in NYC, you may bring essential items like reading materials, a snack, and personal electronic devices. However, it’s important to check the specific instructions provided by the court, as certain items may be restricted.

3. Can you bring a computer to jury duty NYC?

Phones are checked at the courthouse entrance, and wireless devices, laptops, and similar items may be prohibited in the courtroom. Please ensure these devices are turned off in the courtroom, and do not bring them to the Jury Assembly Room.

4. What are the best clothes to wear to jury duty?

Business attire is strongly recommended; ties are optional. Inappropriately dressed jurors will be dismissed and rescheduled for future jury service.

CONCLUSION

In conclusion, opting for more formal attire is advisable when attending jury duty, as it reflects a respectful and professional demeanor in the courtroom setting. While policies may vary, avoiding jeans and choosing business casual or professional clothing contributes to a positive impression and aligns with the seriousness of the judicial process.

THE ULTIMATE GUIDE TO CROCHETING AMIGURMI BALLS: CREATE SPHERES IN ANY SIZE!

Crocheting the perfect amigurumi ball or sphere in any size is incredibly useful for creating amigurumi heads, bodies, limbs, and various other components. Additionally, these versatile shapes can be used for children’s toys, decorative elements, wall hangings, jewelry, and more.

In this tutorial, I’ll share some simple rules and helpful tricks for crocheting a flawless amigurumi ball. With these techniques, you can create spheres of any size that look perfect from every angle! So, gather your yarn, hook, and stuffing, and let’s get started on crafting some adorable balls!

Essential techniques for a perfect Amigurumi Ball

Before we begin, let’s take a moment to review a few essential techniques for crocheting the perfect amigurumi ball:

  • Crochet in the Round
  • How to Single Crochet the Perfect Circle
  • Single Crochet Invisible Decrease
  • Ultimate Finish

Perfect single Crochet Circle

The foundation of any amigurumi sphere is a simple, flat circle. When you single crochet a flat circle, you can place your increases in various ways, resulting in a shape that may resemble a hexagon or one that is truly round.

For an amigurumi sphere, it’s crucial to start with a perfect circle, like the pink one depicted below. While you’ll find several pattern examples here, you can also learn more about transitioning from a hexagon to a flawless circle.

Single Crochet Invisible Decrease

If you’ve ever attempted to crochet a ball or any amigurumi, you might have noticed that while the beginning of the sphere looks neat (as shown in the photo in panel A below), the finishing can often be less appealing (see the photo in panel B below).

While the less attractive side of an amigurumi—where you make decreases—may never win any beauty contests, you can certainly enhance its appearance with the Single Crochet Invisible Decrease! Additionally, by alternating decreases in the same manner as you would for increases in a perfectly round circle, you can achieve a more polished look. We’ll explore that in more detail later!

How to Close your Amigurumi Sphere

To achieve a neat crocheted ball from every angle, it’s essential to master the technique for closing your amigurumi sphere using the ultimate finish. This method ensures that the final round of your ball lies flat and cute, rather than sticking out awkwardly.

Now that we have that covered, it’s time to crochet a ball together! But first, let’s discuss the materials you’ll need!

Materials

  • Yarn
  • Appropriate Hook Size
  • Stuffing
  • Tapestry Needle

Keep in mind that for crocheting amigurumi, it’s best to use a smaller hook size than what’s recommended on the yarn label.

For instance, I used:

  • acrylic, worsted (4, Medium) yarn with a 3.5-mm (E/4 US, 9 UK) hook;
  • or cotton, DK (3, Light) yarn with a 2.75-mm (C/2 US, 12 UK) hook.

Abbreviations (US Terms)

How to Crochet the Perfect Amigurumi Ball in Any Size – Free Tutorial

Beginning of the sphere

Let’s begin by crocheting a perfectly round circle in any size.

Here’s the pattern I used for the example shown here, but feel free to adjust the size of your circle to be as small or large as you need!

Round 1. Sc 6 in MC. (6 sts)

Round 2. Sc inc 6. (12 sts)

Round 3. (Sc inc 1, sc 1) 6 times. (18 sts)

Round 4. Sc 1, (sc inc 1, sc 2) 5 times, sc inc 1, sc 1. (24 sts)

Round 5. (Sc inc 1, sc 3) 6 times. (30 sts)

Round 6. Sc 2, (sc inc 1, sc 4) 5 times, sc inc 1, sc 2. (36 sts)

Round 7(Sc inc 1, sc 5) 6 times. (42 sts)

Body of the Amigurumi Ball

Once you’re satisfied with the diameter of your circle, it’s time to crochet the body of the sphere.

To achieve a perfect sphere, there’s a straightforward rule for determining how many rounds to work for the body: simply add one to the number of rounds in your flat circle!

In our example, we crocheted a flat circle with 7 rounds, so we’ll need to crochet a total of 7 + 1 = 8 rounds for the body.

Here is the pattern:

Rounds 8-15. Sc around. (42 sts)

Decreases

Once the body is complete, it’s time to decrease the number of stitches.

It’s important to alternate the position of the decreases in each round to avoid having them stacked in the same six points. This follows the same principle as creating a hexagon versus a perfect circle!

For a tidy finish, be sure to use the invisible decrease technique.

For our Amigurumi ball, the pattern for the decreases will be as follows:

Round 16. (Inv dec 1, sc 5) 6 times. (36 sts)

Round 17. Sc 2, (inv dec 1, sc 4) 5 times, inv dec 1, sc 2. (30 sts)

Round 18. (Inv dec 1, sc 3) 6 times. (24 sts)

Round 19. Sc 1, (inv dec 1, sc 2) 5 times, inv dec 1, sc 1. (18 sts)

Stuffing

At this stage, before making any further decreases, it’s a good idea to stuff the amigurumi ball with polyfill or any filling material you typically use.

Complete the decreases

Continue decreasing your stitches in each round, adding more filling material as needed.

For our example, the pattern looks like this:

Round 20. (Inv dec 1, sc 1) 6 times. (12 sts)

Round 21. Inv dec 6. (6 sts)

Fasten off leaving a long tail.

Close the top hole of the Amigurumi ball

Close the top of your sphere using the ultimate finish technique.

Weave in your ends

Finally, weave in all of your ends.

CONCLUSION

I hope you enjoyed this free tutorial! I’d love to see all your creations using amigurumi balls. Please share a picture of your work on Facebook and Instagram