How to Clean a Leather Purse – quickly and easily

Leather purses are a stylish and timeless accessory that can elevate any outfit, but they also require proper care to maintain their beauty and longevity. Over time, dirt, oil, and other impurities can accumulate on your leather purse, causing it to lose its shine and luster. Fortunately, cleaning your leather purse is a relatively simple process that can be done at home with the right tools and techniques.

In this article, we’ll outline step-by-step instructions for how to clean your leather purse effectively. What’s more? There are some tips and tricks to help you keep your purse looking as good as new for years to come.

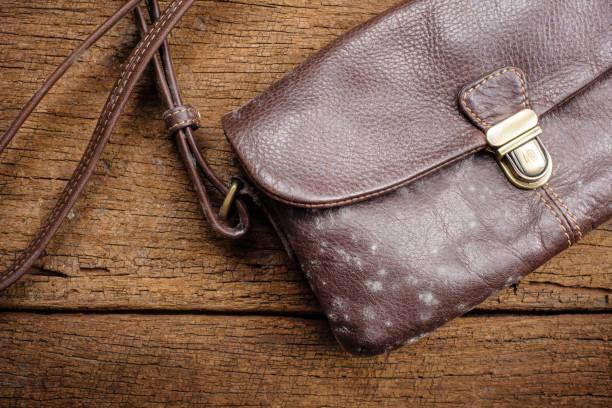
how to clean leather purse at home

Step 1: Gather Your Cleaning Supplies

Before you start cleaning your leather purse, you’ll need to gather the necessary supplies. Here’s what you’ll need:

  • Soft-bristled brush or microfiber cloth
  • Mild soap or leather cleaner
  • Distilled water
  • Leather conditioner
  • Soft, clean towel

Step 2: Remove Surface Dirt and Debris

The first step in cleaning your leather purse is to remove any surface dirt and debris. To do this, use a soft-bristled brush or microfiber cloth to gently brush off any loose dirt or dust. Be sure to pay attention to any crevices or seams where dirt may have accumulated.

If there are any stains or spots on your purse, you can try using a damp cloth to gently rub them out. Be careful not to scrub too hard or use too much water, as this can damage the leather.

Step 3: Clean the Leather

Once you’ve removed any surface dirt and debris, it’s time to clean the leather itself. For this step, you’ll need a mild soap or specialized leather cleaner.

To clean your leather purse, mix a small amount of soap or cleaner with distilled water in a bowl. Dip a soft cloth into the solution, wring it out so it’s damp but not soaking wet, and gently wipe down the leather surface of your purse. Again, be careful not to use too much water or apply too much pressure.

After you’ve cleaned the entire purse, use a clean, damp cloth to remove any remaining soap or cleaner residue. Then, use a soft towel to dry the purse thoroughly.

Step 4: Condition the Leather

Cleaning your leather purse can strip away some of its natural oils, leaving it prone to drying out and cracking. To prevent this, it’s important to condition the leather after cleaning.

To condition your leather purse, apply a small amount of leather conditioner to a soft cloth and rub it into the leather using circular motions. Be sure to cover the entire surface of the purse, including any straps or handles.

After you’ve applied the conditioner, let it sit for a few minutes to allow the leather to absorb it fully. Then, use a clean towel to buff the purse and remove any excess conditioner.

Cleaning Stains on a Leather Purse

Here are a few examples of common stains or spots you may encounter on your leather purse and how to clean them:

  • Ink stains: Dab a small amount of rubbing alcohol onto the stain using a clean cloth, then wipe it away with a damp cloth.
  • Oil or grease stains: Sprinkle cornstarch or baking soda onto the stain and let it sit for a few hours to absorb the oil. Then, gently brush the powder away with a soft-bristled brush.
  • Water stains: Dampen a soft cloth with distilled water and gently rub the stain until it disappears. Then, dry the area thoroughly with a towel.
  • Mold or mildew: Mix equal parts white vinegar and distilled water in a bowl and use a soft cloth to wipe down the affected area. Let the vinegar solution sit for a few minutes before wiping it away with a clean, damp cloth.

How often should I clean my leather purse?

The frequency of cleaning leather purses will depend on a few factors, including how often you use it, the type of leather it is made from, and the environment you live in. In general, it is a good idea to clean your leather purse at least once a month, with a clean, damp cloth and a mild leather cleaner to remove surface dust and maintain its lust or more often if you use it every day or if it gets dirty easily.

For deeper cleaning, consider a more thorough treatment every 6-12 months, which may involve using a leather conditioner to keep the leather supple and prevent it from drying out or developing cracks. However, if your purse is exposed to particularly harsh conditions or spills, address the issue promptly to prevent permanent damage, and always follow the manufacturer’s care instructions if provided.

tips for keeping your leather purse looking its best

  • Don’t over-clean your leather purse. Excessive cleaning can strip away the natural oils in the leather and cause it to dry out.
  • Avoid exposing your leather purse to direct sunlight or heat, as this can cause the leather to fade or crack.
  • If your leather purse gets wet, let it dry naturally rather than using heat to speed up the process.
  • Use a soft-bristled brush to gently buff any scuffs or scratches on your leather purse, rather than trying to rub them out with too much pressure.

FAQs

  1. Can I use regular soap to clean my leather purse? While you can use regular soap to clean your leather purse, it’s best to use a mild soap or specialized leather cleaner to avoid damaging the leather.
  2. What should I do if I spill something on my leather purse? If you spill something on your leather purse, use a damp cloth to gently blot the stain and remove as much of the liquid as possible. Then, follow the appropriate cleaning method for the specific type of stain.
  3. Can I use a hairdryer to dry my leather purse if it gets wet? No, you should avoid using heat to dry your leather purse if it gets wet. Instead, let it dry naturally at room temperature.
  4. What’s the best way to store my leather purse? Store your leather purse in a cool, dry place away from direct sunlight and heat. You can also stuff it with tissue paper or a soft cloth to help it retain its shape.

Final Takeaway

Cleaning your leather purse may seem daunting at first, but with the proper tools and techniques, it’s a simple process that can help keep your purse looking beautiful and new for years to come. With just a bit of care, your leather purse will continue to be your trusty companion, adding a touch of sophistication to every outfit. So, keep those wipes and conditioner handy, and let your purse shine bright. Happy purse pampering!

How to Use a Diffuser – A Beginner’s Guide

If you’re looking for ways to improve your indoor air quality and create a more relaxing environment, using a diffuser is a great option. Diffusers are small devices that disperse essential oils into the air, providing numerous benefits such as improving respiratory function, reducing stress, and promoting better sleep.

In this article, we’ll go over everything you need to know about how to use a diffuser and more.

What is a hair diffuser?

A hair diffuser is an attachment for a blow dryer that helps to evenly disperse the air over a larger area of your hair. It is round and covered with “spikes” that help to keep your curls separated while creating more lift at the root.

Hair diffusers are especially beneficial for people with curly or wavy hair, as they can help to prevent frizz and define curls. They can also be used to add volume to straight hair and to dry hair more quickly and evenly.

To use a hair diffuser, simply attach it to the nozzle of your blow dryer and turn on the dryer on a low setting. Place the diffuser over a section of hair and move it in a circular motion. Be sure to keep the diffuser close to your scalp at the roots and then move it further away from your scalp as you dry the ends of your hair.

Benefits of using hair diffuser

Enhances Natural Curl Definition

The diffuser helps preserve and enhance the natural curl pattern of your hair. It disperses air evenly, reducing frizz and preventing the disruption of curls.

Reduces Frizz

By diffusing the airflow, you reduce the intensity of heat and airflow on your hair, which can help minimize frizz, flyaways, and static.

Gentle Drying

Traditional hair dryers can be harsh on curly hair, causing it to become dry and lose its natural bounce. A diffuser distributes heat more evenly and gently, preventing excessive drying and damage.

Prevents Heat Damage

Heat damage is a common concern when using high-temperature settings on hairdryers. A diffuser helps maintain a lower, more manageable heat level, reducing the risk of heat-related damage.

Adds Volume

The diffuser can also add volume to your hair, particularly at the roots. By lifting the hair and dispersing air around it, it creates a fuller look.

Speeds Up Drying Time

While a diffuser doesn’t work as quickly as a concentrated nozzle attachment, it can still speed up the drying process compared to air drying, making it a more convenient option for those with curly hair.

How to use diffuser: 3 different types of hair

Curly Hair

  • Start by washing and conditioning your hair with products suitable for your curl type. Apply a leave-in conditioner or curl-enhancing product if desired.
  • After washing, gently squeeze excess water from your hair with a microfiber towel. Avoid rubbing, as this can cause frizz.
  • Apply a curl-defining or anti-frizz styling product evenly through your hair, ensuring it’s distributed from roots to ends.
  • Attach the diffuser nozzle to your hair dryer. It’s important to use a diffuser designed for your specific hair dryer model.
  • Set your hair dryer to the lowest heat and lowest airflow settings to avoid damaging your hair and causing frizz.
  • Gather a section of your hair in the diffuser bowl, cupping your curls into the diffuser. Lift the diffuser towards your scalp without disturbing the curls too much.
  • Turn on the hair dryer and start diffusing, moving the diffuser in a circular or scrunching motion. Keep the diffuser moving to evenly distribute heat.
  • Work in sections until your hair is about 80-90% dry. Avoid touching your hair too much to prevent frizz.
  • Finish with a cool shot of air to set your curls.

Wavy Hair

  • Follow the same steps as for curly hair regarding washing, conditioning, and applying styling products suitable for wavy hair.
  • Gently towel dry your hair, removing excess moisture.
  • Attach the diffuser to your hair dryer, making sure it’s suitable for your hair dryer model.
  • Set your hair dryer to a medium heat and medium airflow setting.
  • Start diffusing your hair by cupping sections into the diffuser and scrunching upwards. This helps create volume and enhance your waves.
  • Continue diffusing your hair section by section until it’s mostly dry. Avoid over-drying to prevent frizz.
  • Finish with a cool shot of air to set your waves and reduce any residual frizz.

Straight Hair (Adding Volume)

  • Start with clean, towel-dried hair. Apply a volumizing mousse or spray to your roots for added lift.
  • Attach the diffuser to your hair dryer, ensuring it’s compatible with your hair dryer model.
  • Set your hair dryer to the lowest heat and highest airflow settings.
  • Flip your head upside down to maximize volume.
  • Use the diffuser to scrunch and lift your hair at the roots while blow-drying. Continue until your hair is completely dry.
  • Finish with a cool shot of air to set the volume.

FAQs

  1. Are diffusers suitable for all hair types? Hair diffusers are most effective for curly, wavy, or textured hair types. They may not provide significant benefits for very straight hair.
  2. Do I need a special hair dryer for a diffuser attachment? Some diffusers are designed to fit specific hair dryer models, while others have universal attachments. Check the compatibility of your diffuser with your hair dryer or purchase a diffuser specifically designed for your dryer model.
  3. What products should I use with a diffuser? Use products that enhance your hair’s natural texture, such as curl-defining creams, mousse, or leave-in conditioners. Apply these products to damp hair before diffusing.
  4. Can I use a hair diffuser daily? Using a diffuser daily can be safe as long as you use it correctly and avoid excessive heat. Be mindful of not overdrying your hair, as frequent heat styling can lead to damage.
  5. How do I clean a hair diffuser attachment? Most diffuser attachments can be removed and cleaned by wiping them with a damp cloth or rinsing them under running water. Make sure to let them dry thoroughly before using them again

Final Takeaway

Using a diffuser is a simple and effective way to improve your indoor air quality and create a more relaxing environment. By choosing the right type of diffuser and experimenting with different essential oils, you can enjoy numerous health benefits and create a space that promotes relaxation and well-being. Just be sure to follow the manufacturer’s instructions and keep safety in mind when using your diffuser.