EVERYTHING YOU SHOULD KNOW ABOUT SOFT SUMMER

The “Soft Summer” is one of the twelve color seasons within the seasonal color analysis system, a tool used to determine which colors best harmonize with an individual’s natural coloring. It’s a palette of subtle, muted, and cool tones, designed to enhance the delicate beauty of those who fall within this category.  Unlike the vibrant hues of spring or the deep richness of winter, Soft Summer embraces a gentle, blended look.  If you’ve ever felt overwhelmed by bright colors and found yourself drawn to dusty, diffused shades, you might just be a Soft Summer. This guide will delve into every aspect of this captivating season, from its defining characteristics and ideal color palette to makeup, hair, and wardrobe recommendations, helping you understand and embrace your natural Soft Summer beauty.  

CHARACTERISTICS

When determining if you are a Soft Summer, focus on your overall appearance rather than individual features. The key traits of this season are muted, cool-toned coloring with a soft, blended look.

HOW TO IDENTIFY A SOFT SUMMER

  • Primary Aspect: Muted – your coloring appears soft and toned down rather than bright or vibrant.
  • Secondary Aspect: Cool – cooler shades complement your complexion better than warm ones.
  • Overall Look: Your skin, eyes, and hair blend harmoniously, creating a low to medium contrast appearance.
  • Jewelry Preference: Silver flatters your skin more than gold.

SOFT SUMMER FEATURES

Eyes

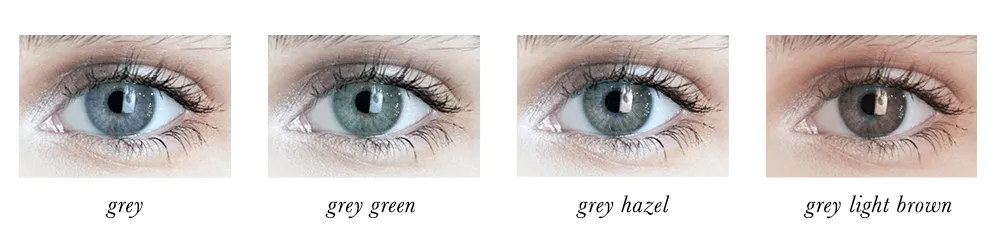
Soft Summer eyes are always softly greyed, regardless of their color. They can be:

  • Grey, grey-blue, grey-green, or grey-hazel
  • Muted brown in deeper complexions
  • Often feature a crackled glass pattern typical of Summer eyes

Skin

Soft Summer skin has cool undertones with a soft, muted appearance. It may be:

  • Neutral, olive, or neutral-cool with ashy undertones
  • Fair to tan, always toned down rather than vibrant
  • Occasionally freckled

Hair

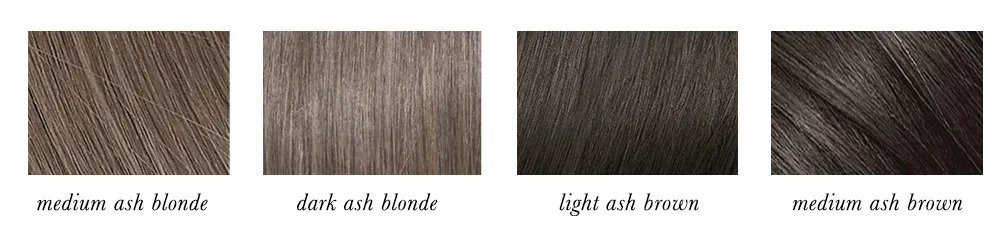
Soft Summer hair is muted and ashy, never bright or golden. It ranges from:

  • Medium ash blonde to light/medium ash brown
  • Often develops ash-blonde highlights in sunlight

CONTRAST LEVEL

Soft Summers have a low to medium contrast between their skin, eyes, and hair. The overall effect is blended and harmonious, without stark light or dark elements.

SOFT SUMMER VS. SOFT AUTUMN

Both Soft Summer and Soft Autumn are muted seasons, but the key difference lies in their undertones:

  • Soft Summer leans cool, with grey and olive tones.
  • Soft Autumn leans warm, with walnut and honey tones.

SIMPLE TEST

To determine whether you are a Soft Summer or Soft Autumn, hold a grey fabric near your face in natural light:

  • If your eyes appear more greyish (even if they contain hints of green or brown), you are likely a Soft Summer.
  • If your eyes remain green, hazel, or olive, you likely lean towards Soft Autumn.

This high concentration of grey pigments is what gives Soft Summers their signature cool and muted look.
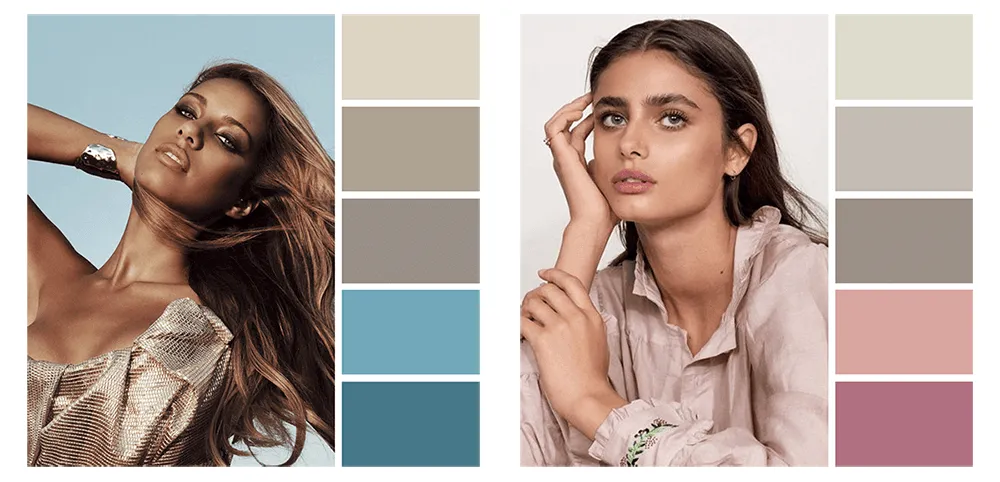
The Colour Palette

Soft Summer is a season of soft, misty hues, reminiscent of cool summer rains and the gentle transition into autumn. Its colours are delicate and layered, blending both cool and warm tones into a harmonious, almost chameleon-like effect.

SOFT SUMMER COLOURS

True to its muted and cool nature, Soft Summer’s palette consists of desaturated, low-contrast shades that align with the season’s natural softness. The dominant colours are greys, pinks, purples, blues, and greens—each subtle and complex rather than bright or clear. Sitting on the border between Summer and Autumn, this palette is the deepest of the Summer family, with a slight brownish depth from Autumn’s influence.

COLOUR DIMENSIONS

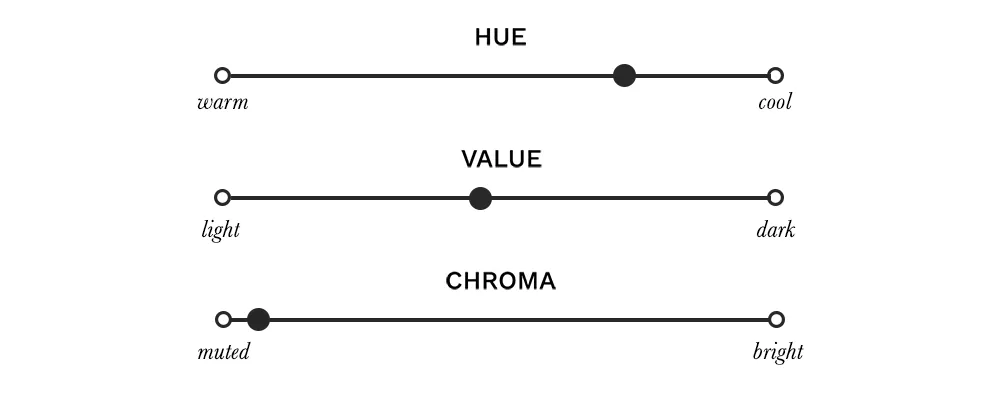
  • Hue: Slightly cool—while not as icy as True Summer, Soft Summer’s colours contain more blue than yellow undertones, resulting in cooler pinks, blues, and greys with minimal yellow shades.
  • Value: Medium—neither overly light nor dark, the palette consists mostly of mid-range tones.
  • Chroma: Low—the colours are highly desaturated and muted, with a distinctive greyed-out softness.

SISTER PALETTES

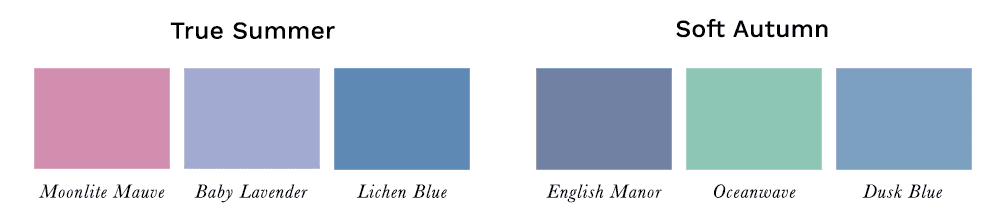
Soft Summer is positioned between True Summer and Soft Autumn on the seasonal spectrum. While all three share a muted quality, the differences lie in temperature and depth:

  • Compared to True Summer, Soft Summer’s colours are warmer, slightly darker, and more subdued.
  • Compared to Soft Autumn, Soft Summer’s colours are cooler and more grey-toned, while both remain medium in value and muted.
  • Compared to Light Summer, the colours are deeper and more toned down, though both share a cool-neutral balance.

If you lean towards True Summer, you may borrow its softer shades, like Moonlite Mauve or Lichen Blue. If you have hints of Soft Autumn, you can incorporate its cooler hues, such as English Manor or Dusk Blue.

Styling for Soft Summer

NEUTRALS

Soft Summer’s muted and desaturated nature makes traditional black and white too harsh. Instead, opt for dark greyish browns as your dark neutrals and soft greys, muted sand tones, and gentle browns as light neutrals. These shades complement your natural softness without overpowering your features.
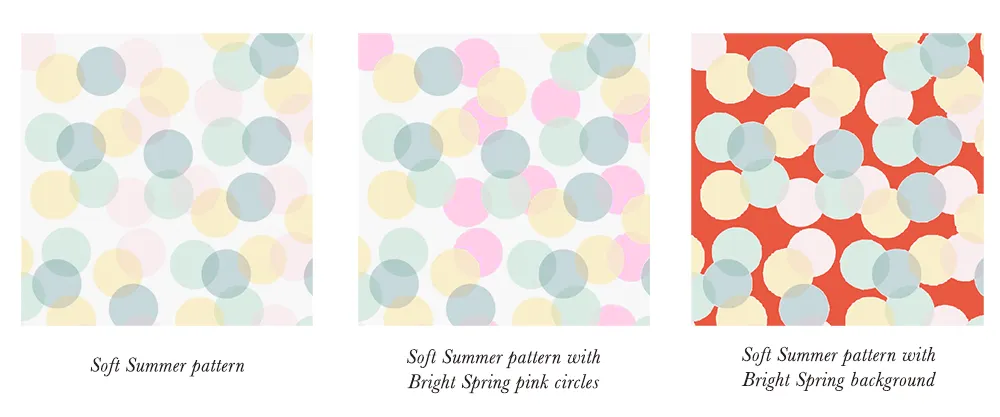
COLOURS TO AVOID

Since Soft Summer thrives on cool, muted tones, avoid bright and overly warm colours. Vibrant pinks, blues, and rich earthy hues, such as orange-based reds and warm browns, will clash with your soft colouring. Highly saturated shades can overwhelm your delicate balance.

COLOUR COMBINATIONS

Soft Summer is best suited to low-contrast, blended colour pairings that mirror its naturally soft appearance. The most flattering combinations include:

  • Monochromatic looks – Pairing different shades of the same hue, such as light and dark green, creates a cohesive and seamless effect.
  • Analogous hues – Colours close to each other on the spectrum, like lavender and soft blue, maintain a harmonious and balanced look.
  • Soft neutrals with accents – Combining a muted beige with a similarly toned soft yellow ensures a gentle, natural flow.

Avoid high-contrast combinations, especially complementary colours like blue and orange, as they create too much visual tension.

PATTERNS & PRINTS

Soft, delicate patterns best suit this season’s understated elegance. Consider:

✔ Watercolour textures, delicate floral prints, and natural elements like feathers and birds.
✔ Small, loosely arranged designs that blend rather than stand out.

✖ Avoid large, bold patterns, geometric shapes, and high-contrast prints, as they will feel too harsh and structured.

METALS & ACCESSORIES

Soft Summer can wear both warm and cool metals, but silver is the most flattering. If choosing gold, opt for soft, muted versions like light rose gold or brushed gold rather than deep, rich yellows.

The best finishes are matte, brushed, satin, or lightly hammered to complement Soft Summer’s subtlety. Bright and shiny metals can appear too stark. Pearls are a great choice, especially those with layered, soft colouring rather than stark white.

HOW TO MAKE CINNAMON ORNAMENTS WITH JUST 3 INGREDIENTS

You know that irresistible Christmas baking smell? The one that fills the air with a sense of warmth and holiday cheer? That’s exactly how these cinnamon ornaments smell! The entire house was enveloped in the sweet, cozy scent of cinnamon—absolutely heavenly!

It’s so good, it’s almost too much to handle (in the best way possible). The only downside? You can’t actually eat these ornaments, no matter how tempting the smell is. My kids came home from school yesterday, took one sniff, and were pretty disappointed they couldn’t snack on them. I think I might need to whip up some gingerbread cookies next to satisfy that craving!

Even last night, when my little one woke me up for his usual middle-of-the-night “let’s go see mommy” routine, the sweet cinnamon scent was still hanging in the air as we walked down the hallway. No one likes being woken up in the middle of the night, but if you’re going to be up, you might as well enjoy the magical holiday aroma. It brought a smile to my face as I sleepily held his hand and tucked him back into bed.

This was my second attempt at making cinnamon ornaments. The first time, I tried to save a bit of money and didn’t want to use a whole cup of my brand-new ground cinnamon. So, I went with a cinnamon salt dough recipe, which only calls for 1/4 cup of cinnamon. While the cinnamon salt dough is easier to work with—especially when making these with kids—it doesn’t smell nearly as amazing as this batch! (Stay tuned for that recipe coming soon!)

My advice? Just buy the cheapest ground cinnamon you can find. Check Walmart or the dollar store—you won’t be eating the ornaments, so the quality doesn’t matter much. You’ll need a full cup of cinnamon, so make sure to shop around for the best price!

How to Make Cinnamon Ornaments

You only need three simple ingredients to make these cinnamon ornaments! Here’s a list of affiliate links to products on Amazon that are similar to what I used:

  • 3/4 cup applesauce
  • 1 cup ground cinnamon
  • 2 tablespoons white glue

When I first saw that this recipe called for applesauce, I thought, “What?! That’s crazy!” But trust me, it works. It’s a bit of an odd combination, but it comes together perfectly!

I was able to find both applesauce and glue at the dollar store. Score!

Mix the ingredients together until they form a dough ball. If the dough feels too dry, add a little more applesauce. If it’s too wet, just sprinkle in some more cinnamon until it reaches the right consistency.

Once it becomes too difficult to stir with a spoon, switch to using your hands to knead the mixture into a smooth dough ball. This will help bring it all together!

The dough should be soft, slightly wet, and a bit crumbly, but it should still be manageable.

To roll it out, you’ll need both your hands and a rolling pin. Start by pressing it flat with your hands, then reshape the crumbly edges. After that, use a rolling pin to flatten the dough further. You’ll need to alternate between using your hands and the rolling pin to keep it from falling apart. The rolling pin alone won’t do the trick—your hands are essential to make sure it holds together!

Keep in mind that any cracks in the dough will remain after baking, so it’s important to smooth them out as much as possible. Use the palm of your hand to press and seal the cracks together before rolling it out. This will help minimize the visible cracks once the ornaments are done baking!

Next, use your favorite cookie cutters to cut out the shapes for your ornaments. Press the cutters firmly into the dough to get clean, defined shapes. You can make whatever designs you like—stars, hearts, or even festive shapes like trees and stockings!

I rolled my dough to a thickness between 1/4″ and 1/2″ and ended up with 11 shapes from this recipe.

Once you’ve cut out your shapes, carefully place them onto a parchment-lined baking sheet. This will help prevent sticking and make cleanup easier!

If your shapes look a bit messy after coming out of the cookie cutters, don’t worry—you can clean up the edges! Use a butter knife to gently tuck in any rough crumbs and press along the edges until you’re happy with how they look. Keep in mind that if they look messy before baking, they’ll likely look just as messy afterward.

Also, don’t forget to make a hole in each ornament for hanging later! Use a drinking straw to punch a hole at the top of each shape so you can thread string through them once they’re done.

Bake your cinnamon ornaments at 225°F for 2 to 3 hours, flipping them twice, until they are completely solid and dried out.

I flipped mine after the first hour. Then, when I checked on them an hour later, the edges had curled up a bit, so I flipped them again. After another half hour in the oven, they mostly flattened out. Just keep an eye on them and flip as needed to ensure they dry evenly!

Once your ornaments are fully baked and cooled, thread some string through the holes, and you’re all done! Hang them up on your tree or around the house to enjoy that wonderful cinnamon scent all season long!

If you want to add a little extra fun, try painting the shapes with puffy paint! You can give your gingerbread man a cute face or decorate the Christmas tree shape with colorful ornaments. It’s a fun way to personalize your ornaments and make them even more festive!

Ingredients:

  • 1 cup ground cinnamon
  • 3/4 cup applesauce
  • 2 tablespoons white glue

Instructions:

  1. Combine all the ingredients in a bowl and stir with a spoon. If the dough feels too dry, add more applesauce. If it’s too wet, add more cinnamon.
  2. Once it becomes difficult to stir, use your hands to knead the dough into a ball.
  3. Press the dough onto the counter with your hands to flatten it. Use a rolling pin to smooth out the surface, and reshape the edges with your hands if necessary.
  4. Continue flattening and rolling until the dough is about 1/4″ to 1/2″ thick.
  5. Use cookie cutters to cut out shapes, then place them on a parchment-lined baking sheet.
  6. Use a drinking straw to punch a hole in each shape for hanging later.
  7. Bake at 225°F for 2 to 3 hours until the ornaments are solid and dry, flipping halfway through. If the edges curl up, flip the shapes a second time and continue baking for another 20 to 30 minutes to ensure they flatten out.

Notes:

  • If you want to add more flair, you can decorate your ornaments with puffy paint once they’re baked and cooled. Add fun details like faces or festive decorations!

These cinnamon ornaments smell SO GOOD and are super easy to make! With just 3 ingredients, they fill your home with that wonderful Christmas baking scent. You can hang them on the tree as they are, or get creative and decorate them with puffy paint. Either way, the smell is amazing!

If you’re looking for a more budget-friendly option that uses less cinnamon, be sure to check out our cinnamon salt dough recipe! It only uses 1/4 of the cinnamon and creates a kid-friendly dough that’s super easy to work with. (I haven’t posted it yet, but I’ll update this link when I do! Here’s a sneak peek…)

For even more fun craft ideas, check out our new book Low-Mess Crafts for Kids! It’s packed with 72 creative and simple craft ideas that are perfect for kids. The best part? They’re low-mess, making cleanup a breeze! This book makes a fantastic holiday gift for the little crafters in your life!

CONCLUSION

In conclusion, these cinnamon ornaments are a simple, fun, and fragrant way to bring holiday cheer to your home. With just three ingredients, they’re easy to make and perfect for decorating your tree or gifting to loved ones. Plus, you can add extra creativity by decorating with puffy paint! For more craft inspiration, don’t forget to check out Low-Mess Crafts for Kids—a fantastic resource for easy and fun projects with minimal cleanup. Whether you’re looking to fill your home with holiday scents or keep little hands busy, these ideas are sure to bring joy to the season!