IPL BEFORE AND AFTER 1 TREATMENT: WHAT TO EXPECT

Considering an IPL treatment to address sun damage, uneven skin tone, or unwanted hair? While results can be impressive, it’s important to manage expectations. Let’s delve into what you can experience  before, during, and after just one IPL treatment. We’ll explore how your skin might react, the potential improvements you might see, and what to do to maximize the benefits.

WHAT IS IPL?

IPL stands for Intense Pulsed Light. It’s a non-surgical treatment that uses pulses of light to target various skin concerns. Unlike lasers that focus on one specific wavelength, IPL delivers a broad spectrum of light. This allows it to address a wider range of issues, such as:

  • Uneven skin tone and sun damage
  • Age spots and freckles
  • Fine lines and wrinkles
  • Visible blood vessels
  • Unwanted hair growth

KEY BENEFITS OF IPL

IMPROVES SKIN TONE AND TEXTURE

IPL can be used to address a variety of skin concerns, such as sun damage, age spots, freckles, rosacea, and uneven skin tone. The light pulses target melanin, the pigment that gives skin its color, and break it down. This can help to reduce the appearance of brown spots and other discolorations, and leave the skin looking brighter and more even-toned.

REDUCES WRINKLES AND FINE LINES

IPL can also stimulate the production of collagen, a protein that gives skin its structure and elasticity. This can help to reduce the appearance of wrinkles and fine lines, and give the skin a more youthful appearance.

REDUCES UNWANTED HAIR

IPL is a popular option for hair removal. The light pulses target the pigment in hair follicles, which damages the follicle and inhibits hair growth. IPL can be used to remove hair from almost any area of the body, including the face, legs, arms, underarms, and bikini line.

MINIMIZES PORES

IPL can also help to minimize the appearance of enlarged pores. The light pulses stimulate collagen production, which can help to tighten the skin and reduce the appearance of pores.

REDUCES ACNE

IPL can be used to treat acne by targeting the bacteria that cause breakouts. The light pulses also help to reduce inflammation and redness.

BEFORE YOUR TREATMENT

Before undergoing IPL treatment, a consultation with a qualified professional is crucial to ensure optimal results and minimize risks. This initial discussion is vital to set realistic expectations and align your goals with the treatment’s capabilities. The professional will assess your skin type, underlying conditions, and desired outcome to determine if IPL is suitable for you.

In preparation for the treatment itself, the consultation will also address important pre-treatment steps. Sun protection becomes paramount, as tanned skin can react poorly to the light pulses. Tanning beds should be avoided for several weeks beforehand.  Certain medications, particularly blood thinners, may also need to be discontinued for a period of time to minimize potential complications during the procedure. By following these pre-treatment measures and openly discussing your goals with a qualified professional, you can ensure a smoother and more successful IPL experience.

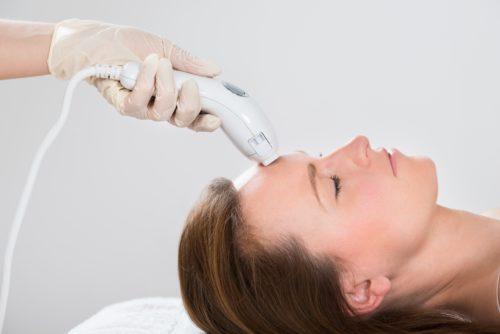
DURING YOUR TREATMENT

During the IPL procedure, your safety and comfort are top priorities.  Your eyes will be shielded from the light pulses with protective eyewear, similar to what you might wear during a laser treatment. The healthcare professional will then apply a cool gel to the treatment area to numb the skin and act as a protective barrier.

The IPL device itself delivers targeted bursts of light to your skin. While most people tolerate the treatment well, it’s important to acknowledge that you might experience some mild discomfort. This can feel like a snapping sensation or a warm prickling with each light pulse. The intensity can vary depending on your individual skin sensitivity and the settings used during the treatment. However, the discomfort is usually manageable and shouldn’t deter you from the procedure.

AFTER YOUR TREATMENT

Following your IPL treatment, it’s normal to experience some temporary side effects. The treated area may show redness and swelling, similar to a mild sunburn. This discomfort should subside within a few hours or days and can be soothed with cool compresses. You might also feel a temporary sunburned sensation.

While these initial effects may seem concerning, the treatment can also trigger desired long-term changes. Treated spots, like sun damage or freckles, may actually darken temporarily before they flake off and reveal the improved underlying skin. This is a normal part of the process and signifies the treatment is working.

To optimize healing and maximize the benefits of IPL, proper aftercare is essential. Sun protection remains paramount. Apply a broad-spectrum sunscreen with SPF 30 or higher daily, even on cloudy days. Stick to a gentle skincare routine, avoiding harsh soaps or scrubs that could irritate the treated area. Hot showers or baths are also best avoided for at least 24 hours, as they can further aggravate the skin. By following these aftercare tips, you can help your skin heal comfortably and achieve the best possible outcome from your IPL treatment.

IPL RESULTS: BEFORE AND AFTER 1 TREATMENT

IMMEDIATE AFTER-EFFECTS OF IPL TREATMENT

After your first IPL treatment, your skin might feel like you’ve got a sunburn. This feeling should go away in a few hours, but your skin might stay red for a few days. Don’t worry if dark spots look darker right after the treatment—that’s normal and they’ll peel off gently within a few weeks, showing lighter and more even-toned skin underneath.

CHANGES IN SKIN PIGMENTATION AFTER 1 IPL TREATMENT

Your skin might look lighter after just one IPL session, especially dark spots and pigmentation. Big freckles and brown spots might seem lighter right away. But for the best results, it’s usually recommended to have three or more treatments spread out over a few weeks.

CHANGES IN BROKEN CAPILLARIES AFTER 1 IPL TREATMENT

IPL can also help with broken capillaries and rosacea, making redness and flushing less noticeable. After one treatment, you might see fewer broken capillaries, which can give your skin a more even look.

CHANGES IN SKIN TEXTURE AND FINE LINES AFTER 1 IPL TREATMENT

IPL isn’t only about fixing colors—it can also make your skin smoother and reduce fine lines. After your first session, your skin might feel smoother and look more radiant. Fine lines might not be as obvious because IPL helps your skin make more collagen, which keeps it elastic and youthful.

Even though you might notice some good changes after the first treatment, the best results usually come after several treatments. If you have a lot of sun damage, it might take longer and need more than three treatments at first.

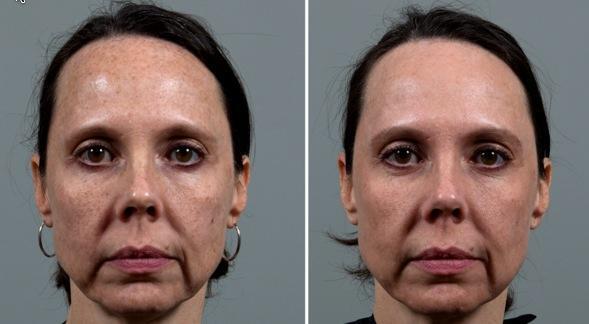
Before & After Results from (One) IPL Treatment

FAQ

1. How many treatments will I need? 

Multiple treatments are typically needed (often 4-6 sessions) for optimal results, spaced several weeks apart.

2. How long does a treatment take?

Treatment times vary depending on the treated area, but typically range from 15 minutes to an hour.

3. Does IPL hurt? 

You might feel a slight tingling or pinching sensation during the treatment, but most clinics offer topical numbing cream to minimize discomfort.

4. When will I see results? 

You might see some improvement in skin tone and texture within a few weeks, with full results taking several sessions.

5. How long do IPL results last?

Results can vary, but with proper sun protection, they can last for months or even years.

CONCLUSION

Even strong creams like retinol with vitamin C or tretinoin can’t always fix everything. IPL is a treatment that can help improve your skin’s look in a big way. To get the best results and feel as comfortable as possible during your first IPL session, there are some things to know beforehand. Everyone’s skin is different, so talking to a qualified doctor or healthcare provider who knows about IPL is important. They can help you decide if it’s right for you and create a plan to get the best outcome.

HOW TO GET RID OF RAZOR BUMPS: CAUSES, TREATMENTS AND MORE

Navigating the challenges of the shaving battlefield, you may encounter the unwelcome foe of razor bumps, leaving your once-smooth skin feeling rough and irritated. Before conceding defeat in your shaving routine, pay attention! This guide serves as your arsenal against razor bumps, offering insights into their causes, effective banishment strategies, and long-term prevention tips. Whether you’re a seasoned shaver or a curious newbie, this comprehensive resource is your go-to for conquering razor bumps, including valuable advice on how to treat razor bumps on the pubic area.

WHAT ARE RAZOR BUMPS?

Razor bumps manifest as tiny, red, and swollen protrusions on the skin’s surface, commonly occurring in regions that have recently undergone shaving, like the beard area for men or the legs and bikini line for women. The formation of razor bumps is frequently attributed to ingrown hairs that twist back into the skin, leading to irritation. Individuals with curly or coarse hair are particularly susceptible to the development of razor bumps.

THE DIFFERENCE BETWEEN RAZOR BUMPS VS RAZOR BURNS

Razor bumps and razor burns are distinct skin issues that can arise after shaving, each with its own characteristics and causes. Razor bumps, also known as pseudofolliculitis barbae, appear as small, red, and inflamed bumps on the skin’s surface. They are typically caused by ingrown hairs, which curl back into the skin and trigger irritation. People with curly or coarse hair are more prone to developing razor bumps, especially in areas recently shaved, such as the beard area for men or the legs and bikini line for women.

On the other hand, razor burns are characterized by redness and irritation on the skin, often accompanied by a burning or stinging sensation. Razor burns result from friction and pressure during shaving, leading to skin irritation and inflammation. Unlike razor bumps, which involve ingrown hairs, razor burns are more closely associated with the mechanical aspects of shaving, such as using a dull blade, applying excessive pressure, or shaving without proper lubrication.

HOW TO TREAT RAZOR BUMPS ON PUBIC AREA

Eliminating razor bumps involves a mix of preventative steps, home remedies, and, when necessary, medical interventions. Consider the following suggestions to effectively address and alleviate razor bumps:

EXFOLIATION

Gently exfoliate the affected area with a mild exfoliating scrub or a soft brush to help remove dead skin cells that may be trapping hairs. To effectively combat razor bumps, incorporating a thorough exfoliation routine is also crucial. Begin by gently exfoliating the affected area using a mild exfoliating scrub or a soft brush. This process aids in removing dead skin cells that may be trapping hairs and contributing to the development of razor bumps. Choose an exfoliating scrub with fine particles to avoid causing further irritation. Applying the scrub in circular motions helps lift away dead skin, promoting a smoother skin surface. Additionally, using a soft-bristle brush can assist in loosening trapped hairs without causing excessive friction.

WARM COMPRESS

Applying a warm compress to the affected area before shaving can help open up the hair follicles, making it easier to shave without causing irritation. Before shaving, apply a warm compress to the affected area to capitalize on its ability to open up the hair follicles, creating an environment conducive to a smoother shave without causing irritation.

The warm compress helps to dilate the blood vessels, increasing blood flow to the skin. This improved circulation promotes a healthier skin tone and facilitates the movement of nutrients to the hair follicles. Additionally, open hair follicles are less prone to trapping hairs beneath the surface, reducing the likelihood of razor bumps.

To create a warm compress, soak a clean cloth or towel in comfortably hot water. Wring out excess water and gently place the warm compress on the area where you plan to shave. Allow the warmth to permeate the skin for several minutes. This process serves to soften both the hair and the skin, making the shaving process more manageable.

MOISTURISING

Apply a moisturizing lotion or aftershave to the area after shaving to soothe the skin. Look for products that contain ingredients like Chamomile, Vitamin E or Aloe Vera, as they have anti-inflammatory properties. 

Ensuring adequate moisture is a pivotal aspect of a post-shaving regimen to alleviate and prevent razor bumps. Following shaving, apply a moisturizing lotion or aftershave to the treated area to soothe the skin and promote healing. Opt for products enriched with ingredients such as Chamomile, Vitamin E, or Aloe Vera, renowned for their anti-inflammatory properties.

Chamomile, a natural anti-inflammatory agent, helps calm irritated skin and reduce redness. Vitamin E, known for its antioxidant properties, aids in skin repair by protecting against free radicals and promoting cell regeneration. Aloe Vera, with its soothing and hydrating qualities, provides relief to freshly shaved skin, reducing the risk of irritation.

Choose a moisturizer specifically designed for sensitive skin, as it is less likely to contain harsh chemicals that could exacerbate razor bumps. Applying the moisturizer immediately after shaving helps seal in moisture, preventing the skin from drying out and reducing the likelihood of razor bumps forming.

AVOID TIGHT CLOTHING

The choice of clothing plays a crucial role in managing and preventing further irritation in the affected area after shaving. Tight clothing can exacerbate friction and irritation, hindering the healing process and potentially leading to more discomfort. To foster optimal recovery, it is advisable to opt for loose-fitting clothing until the razor bumps have completely healed.

Wearing loose-fitting garments helps minimize direct contact between the fabric and the irritated skin, reducing friction and preventing additional irritation. The breathable nature of loose clothing also facilitates better air circulation, creating a more conducive environment for the skin to recover. Consider choosing fabrics that are gentle on the skin, such as cotton, which is soft and breathable. Avoid materials that may cause further irritation, such as rough or synthetic fabrics.

TOPICAL TREATMENTS

Incorporating over-the-counter products with targeted ingredients can be an effective strategy for managing razor bumps. Products containing Salicylic Acid or Benzoyl Peroxide, both known for their exfoliating and anti-inflammatory properties, can aid in reducing irritation and promoting smoother skin. When using these products, it’s crucial to follow the instructions provided on the product label for optimal results.

SALICYLIC ACID

  • Salicylic Acid is a beta-hydroxy acid known for its ability to exfoliate the skin gently. It works by penetrating the pores and helping to remove excess oil, dead skin cells, and debris.
  • Choose an over-the-counter product, such as a gel or lotion, containing a suitable concentration of Salicylic Acid. Applying it directly to the affected area can help unclog pores and prevent the formation of ingrown hairs.
  • Start with a patch test to ensure your skin tolerates the product well, and then follow the recommended application frequency on the product label.

BENZOYL PEROXIDE

  • Benzoyl Peroxide is an antimicrobial agent that helps reduce bacteria on the skin’s surface. It also has mild exfoliating properties.
  • Select an over-the-counter product with a concentration suitable for your skin type. Benzoyl Peroxide is available in various forms, such as creams, gels, and spot treatments.
  • Apply the product as directed on the label, usually after cleansing and before moisturizing. Start with a lower concentration to minimize the risk of excessive dryness or irritation.
  • Consistency is key when using these products. Incorporate them into your skincare routine gradually, allowing your skin to adjust. If you experience any irritation or adverse reactions, discontinue use and consult with a dermatologist.

Remember to pair the use of these products with other preventive measures, such as gentle exfoliation, moisturizing, and wearing loose-fitting clothing, to create a comprehensive approach to managing and preventing razor bumps.

TAKE A BREAK FROM SHAVING FOR A BIT

If you’re experiencing significant discomfort or pain from razor bumps, it might be beneficial to refrain from shaving for a few days. Allowing your hair to grow during this time can help alleviate the inflammation associated with razor bumps. This break from shaving gives your skin the opportunity to recover and reduces the likelihood of further irritation. In addition to promoting healing, it allows the affected areas to rest, ultimately contributing to a smoother and more comfortable shaving experience when you decide to resume. Taking this short hiatus from shaving can be a simple yet effective measure in managing and preventing the discomfort associated with severe razor bumps.

PRESCRIPTION TREATMENTS

If you find yourself grappling with persistent or severe razor bumps, it’s advisable to seek professional guidance by consulting a dermatologist. A dermatologist possesses the expertise to assess your specific situation and recommend tailored solutions. In cases of chronic razor bumps, they may prescribe specialized topical treatments designed to alleviate inflammation, reduce redness, and promote skin healing. Additionally, oral medications might be suggested to address the issue from within, targeting the root causes of the razor bumps. Seeking the expertise of a dermatologist ensures that you receive personalized care, enabling you to effectively manage and alleviate the discomfort associated with severe razor bumps. Don’t hesitate to reach out to a skincare professional who can provide you with a comprehensive and targeted approach to address your specific concerns.

LASER HAIR REMOVAL

In situations where recurrent razor bumps pose an ongoing challenge, exploring enduring solutions like laser hair removal emerges as a compelling consideration. Laser hair removal is a cosmetic procedure designed to tackle persistent hair-related issues by employing concentrated beams of light to target and disable hair follicles. The process is particularly beneficial for individuals grappling with chronic razor bumps, as it offers a potentially permanent reduction in hair growth within the treated area.

Before embarking on this path, it is advisable to consult with a qualified dermatologist or practitioner to evaluate the suitability of the procedure based on individual skin type and hair characteristics. Laser hair removal typically entails multiple sessions, strategically spaced over weeks or months to align with the hair growth cycle. While it may not guarantee absolute hair removal, many individuals experience a substantial, long-term decrease in hair growth, leading to a significant alleviation of razor bumps and related issues. 

IS IT POSSIBLE TO PREVENT RAZOR BUMPS WHEN SHAVING?

Doing some things before shaving can help make it less likely to get razor bumps.

Begin by cleansing the skin using a non comedogenic product, as these are specifically designed to clear pores and eliminate excess skin cells without causing pore blockage. Noncomedogenic products are formulated to prevent pore-clogging.

For an optimal shaving experience, make sure to shave when the skin is thoroughly wet, either during or immediately after a shower. Alternatively, you can place a warm, wet towel on the targeted area for about 5 minutes before shaving to soften the hair and prepare the skin.

Prior to shaving, apply a moisturizing shaving cream or gel and let it sit for 1–2 minutes. It’s essential to ensure the shaving cream remains wet during the shaving process. If needed, rinse the skin and reapply the shaving cream generously.

Be cautious of skincare products containing irritating ingredients, such as artificial fragrances, which may exacerbate inflammation. To minimize the risk of irritation, steer clear of products with such ingredients and prioritize those that are gentle on the skin.

Changing how you shave can also stop razor bumps. You might find it helpful to:

  • Don’t shave too close. Leave the hair about 0.5–3 millimeters long.
  • Use a single-blade razor or an electric razor that can cut longer.
  • Take your time while shaving and go in the direction your hair grows.
  • Don’t pull your skin tight when shaving.
  • Don’t go over the same spot too many times or press the razor too hard against your skin.

It’s crucial to look after your skin post-shaving. Here are some steps that can help:

  • Wash away any remaining shaving cream with warm water to lessen the chance of irritation.
  • Put a cool compress on your skin for 5 minutes.
  • Use an aftershave designed to prevent razor bumps.
  • Clean and dry your razor and keep it in a dry place.
  • Replace the blade on a disposable razor every 5–7 shaves.

HOW DO DOCTORS DIAGNOSE RAZOR BURNS?

Diagnosing razor burns typically involves a visual examination by a healthcare professional, such as a dermatologist. Doctors assess the affected areas, looking for signs of irritation, redness, and the characteristic appearance of razor bumps. They may inquire about the individual’s shaving habits, skincare routine, and any recent changes in grooming practices. In some cases, a medical history review may be conducted to identify any underlying skin conditions or factors contributing to the development of razor burns. 

Additionally, doctors may consider the presence of infection or ingrown hairs as part of the diagnostic process. While laboratory tests are not typically required for diagnosing razor burns, in more complex cases or if there is uncertainty about the condition, a healthcare professional may conduct further investigations to rule out other skin disorders. 

The diagnosis helps guide the development of an appropriate treatment plan, which may include lifestyle and grooming adjustments, topical medications, or other interventions to alleviate symptoms and prevent future occurrences of razor burns.

FAQ

1. Where do razor bumps commonly occur?

Areas frequently subjected to shaving, including the face (in men), legs, bikini line (in women), neck, and underarms, are commonly prone to razor bumps.

2. How long does it take for razor bumps to heal?

The duration required for razor bumps to heal can vary based on their severity and the chosen treatment. Complete healing may range from a few days to several weeks.

3. Is it better to shave or wax?

The choice between shaving and waxing depends on personal preference, with shaving being a quicker and less painful option, while waxing provides longer-lasting results but involves more discomfort.

4. Does Vaseline help razor bumps?

Yes, Vaseline can help with razor bumps. Vaseline aids in alleviating razor bumps by moisturizing the skin, reducing redness, and creating a protective barrier against further irritation.

CONCLUSION

In summary, understanding the cause and applying the appropriate treatment methods is important in effectively resolving razor bumps. By taking steps like moisturizing, using non-comedogenic products, and considering treatments like Vaseline, individuals can proactively control and reduce razor bumps. If you have hypersensitive skin, consider choosing razors designed for sensitive skin. Remember, what helps razor bumps often involves a combination of preventative measures and targeted treatments for optimal results.