DIY FAUX LEATHER PAPER BASKET WEAVING

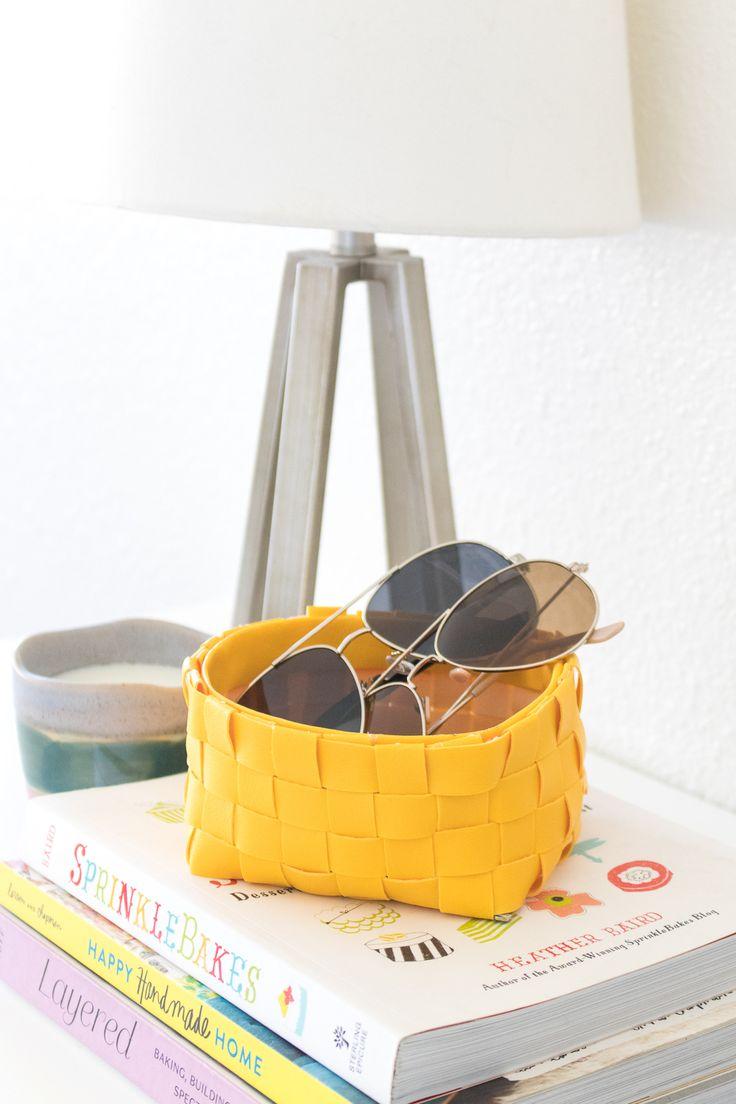
Looking for creative ways to upcycle paper bags? Turn them into a stunning woven basket that mimics the look of leather! Inspired by high-end farmhouse-style storage baskets from stores like Anthropologie and West Elm (which can cost $100 to $200+), this DIY project lets you create your own for almost nothing. With a simple trick to transform paper into a leather-like texture, you’ll have a stylish, budget-friendly basket perfect for boho farmhouse décor and functional storage.

MATERIALS & TOOLS FOR A FAUX LEATHER PAPER BASKET

  • Recycled brown paper bags – I used four grocery store paper bags to weave an 8″ x 11″ x 4.5″ basket, but you can use any sturdy recycled paper like Kraft paper.
  • Craft glue – Elmer’s glue or any strong adhesive works well.
  • Scissors or paper cutter – For making clean, straight cuts.
  • Brown acrylic paint – A paint set with yellow ochre and various shades of brown is ideal.
  • Gloss Mod Podge – The secret ingredient to give paper a leather-like finish!

INSTRUCTION

STEP 1: PREPARE THE PAPER STRIPS FOR WEAVING

  • Open the paper bags by cutting along the seams and flattening them. Remove any handles.
  • Measure and cut strips based on the basket size. For a sturdy look, I used 1.5″ wide strips, folded into three layers for thickness. If making a smaller basket, single-layer strips work well.
  • Create clean edges by folding the strips. Use a straight edge (like a piece of cardboard or a ruler) to help fold neatly. Secure the folds with small dabs of glue if needed.
  • You’ll need about 16 strips, each 38″ long, for a larger basket. Adjust as needed for different sizes.

STEP 2: WEAVE THE BASKET BASE

  • Start with five strips laid parallel, finding their midpoints and securing them with weights.
  • Take another strip and weave it over and under through the five base strips at a 90-degree angle, centering it in the middle.
  • Add three more strips to each side, maintaining an interlocking lattice pattern.
  • Use a triangle ruler or book to keep the weave square. Apply a dab of glue at key spots to help secure the base.

STEP 3: WEAVE THE BASKET SIDES

  • Fold the strips upward along the base edge to create creases for the sides.
  • Take a new strip and weave it around all four sides in an over-and-under pattern, opposite to the last row of the base.
  • Secure corners with paper clips or glue to keep the shape structured.
  • Continue weaving two more rows, following the same alternating pattern for a tight, interlocked weave.

STEP 4: FINISH THE BASKET’S TOP EDGE

  • Trim the vertical strips to about 1.5″ above the basket edge.
  • Fold the outer strips inward over the top edge and glue them down for a polished look.
  • Glue another horizontal strip inside the basket to reinforce the top edge.
  • Fold and glue any remaining vertical strips inside the basket.

Now your woven paper basket is complete! You can keep it as is or transform it into a stunning faux leather basket in the next step.

STEP 5: MAKE THE PAPER LOOK LIKE LEATHER

  • Mix your leather tones – Use brown acrylic paint, adjusting the shade with yellow ochre, burnt sienna, or white for a lighter leather effect.
  • Paint the entire basket – Use a brush to cover all visible surfaces and crevices. The paint dries quickly!
  • Apply gloss Mod Podge – This adds shine, enhances durability, and makes the paper water-resistant, mimicking the smooth finish of real leather.

FINAL TOUCHES & DECOR IDEAS

Your faux leather basket is now ready to use! It’s perfect for storing craft supplies, accessories, or home décor items. The smaller version even works beautifully as a vase cover.

This easy and budget-friendly upcycling project helps repurpose the paper grocery bags many of us have accumulated—especially since reusable shopping bags have been harder to use in recent times. Now, instead of tossing them, turn them into stylish storage solutions with a high-end leather look!

VIDEO

PEPPERMINT KISS ROSE LIP BALM

Today, we’re transforming roses into a delightful lip balm!

To get started, you’ll need rose petals. You can either collect fresh petals from roses in your garden (ensure they’re pesticide-free) or purchase dried, organic petals online from sources like Mountain Rose Herbs.

If you’re using fresh roses, start by spreading the petals in a single layer on a paper towel or brown paper bag. Let them air dry for a few days to remove any moisture. This step helps prevent excess water, which could cause the oil to spoil more quickly.

Once the petals are fully dried, we’ll create a rose-infused oil, just like we did for the Rose Petal Salve a few weeks ago.

Make the Rose Infused Oil

Fill a jar with dried rose petals, aiming to fill it about halfway to three-quarters full. The size of the jar you use will depend on how many petals you have. For a small batch, use a smaller jar; for a larger amount, opt for a bigger one.

Exact measurements aren’t crucial here—you just want to fill the jar with dried petals and then cover them with oil.

As for the oil, the choice is yours! I personally prefer Olive Oil or Sunflower Oil for lip balms, but other oils like Avocado Oil, Sweet Almond Oil, or Apricot Kernel Oil will also work beautifully.

Choose the Slow Method or Quick Method

For the slow method, cover the top of your jar with a few layers of cheesecloth and secure it with a rubber band. Place the jar in a dark cabinet and let it sit for 3 to 4 weeks to infuse.

For the fast method, gently set the jar into a pan with a few inches of warm water. Heat it slowly over medium-low heat, keeping the burner on for 1 to 2 hours. Afterward, remove the jar and let it cool.

Once your oil has infused, you can strain it and use it for your lip balm, or you can let it continue to infuse for several more days in a dark cabinet.

If you want a stronger infusion, you can strain the oil and then repeat the process with a fresh batch of rose petals, using the same oil. This technique is called a double infusion.

Your strained rose-infused oil will have a shelf life of about a year. For best results, store it in a cool, dark place.

Peppermint Rose Lip Balm Recipe

  • 1 tablespoon shea butter (.5 oz by weight)
  • 2.5 tablespoons (1 oz by weight) rose infused oil (use about 1 tablespoon more for tins)
  • 1/2 tablespoon castor oil
  • 1 tablespoon beeswax (.4 oz by weight)
  • powdered alkanet root (for natural color)
  • 15 or so drops of peppermint essential oil

Pour a small amount of the rose-infused oil into a bowl or cup and gradually mix in alkanet powder, adding it a little at a time until you form a thick, dark red paste. Set this aside; it will provide a natural color for your lip balm.

Next, place the remaining oils, wax, and shea butter into a heatproof jar or measuring cup. Set the container into a pan with a few inches of water and heat it over low heat, just below a simmer, until the wax and shea butter have melted.

Remove the jar from the heat and slowly stir in the alkanet paste, adding tiny dabs at a time until you achieve the desired color (less for a pink hue, more for a deeper red).

Finally, add a few drops of peppermint essential oil for a refreshing scent. Once everything is well mixed, pour the mixture into lip balm tubes, tins, or sliders and let it set. Enjoy your homemade peppermint rose lip balm!

Notes:

This ratio of oils and beeswax provides a good consistency for lip balm tubes. If you’re using tins, you might want to add up to another tablespoon of oil to make it easier to use.

For a vegan version, substitute candelilla wax for the beeswax. In this recipe, use about 1/2 tablespoon of candelilla wax in place of the 1 tablespoon of beeswax.

Castor oil is a key ingredient that gives your lip balm a glossy, smooth finish, so try to include it if possible.

You can also swap the shea butter for other butters like mango or cocoa butter if you prefer.

If you don’t have peppermint essential oil or don’t want to use it, you can either omit it or replace it with other flavors like spearmint or sweet orange.

If you’re not a fan of roses, feel free to substitute with another edible flower or herb, such as violet leaves, lemon balm, mint leaves, or calendula.

For more ideas on customizing your lip balm recipes, check out my post: How to Create Custom Lip Balms.

Please note: If you’re pregnant, alkanet root may be contraindicated for you. Always consult with a qualified healthcare provider for professional advice.

conclusion

In conclusion, making your own rose-infused lip balm is a fun and customizable way to create a natural, nourishing product for your lips. Whether you choose the slow or fast infusion method for your rose oil, the possibilities for customization are endless. You can experiment with different oils, waxes, butters, and scents to create a lip balm that perfectly suits your preferences. Remember, if you’re pregnant, it’s important to check with a healthcare provider before using certain ingredients like alkanet root. Enjoy the process and the smooth, moisturizing results of your homemade lip balm!