TYPES OF EYELASH EXTENSIONS: THE COMPLETE GUIDE!

Lash extensions offer a convenient way to instantly elevate your eyes and achieve stunning lashes without relying on mascara. With various options available, you can customize your lash extensions to achieve your desired look by selecting the curl, length, and thickness of the lashes. Understanding the different types of lash extensions is essential for choosing the perfect style to complement your preferences. There are many different types of eyelash extensions, and each style is suitable for each individual eye shape. In this guide, we’ll explore the main types of lash extensions, highlighting their unique features and differences. Additionally, we’ll provide insights into your options for curl, volume, and thickness to help you achieve your desired lash look.

WHAT ARE EYELASH EXTENSIONS?

Eyelash extensions are synthetic fibers or natural materials that are attached to your natural eyelashes using adhesive. They are used to enhance the length, thickness, and curl of your natural lashes, providing a fuller and more voluminous appearance. Eyelash extensions can be customized to achieve different looks, ranging from a natural and subtle enhancement to a dramatic and glamorous effect. They are a popular beauty treatment for those seeking longer-lasting results compared to mascara or false eyelashes.

BENEFITS OF EYELASH EXTENSIONS

Eyelash extensions offer a plethora of benefits that contribute to enhancing one’s overall appearance and simplifying their beauty routine. Firstly, they provide instant length, thickness, and curl to natural lashes, eliminating the need for daily application of mascara. This not only saves time but also prevents clumping, smudging, and flaking often associated with mascara use.

Moreover, eyelash extensions enhance the eyes by adding volume and definition, resulting in a more awake and youthful appearance. They can help to open up the eyes, making them appear larger and more prominent. This can be particularly beneficial for individuals with sparse or short natural lashes, as extensions can fill in gaps and create a more uniform lash line.

Additionally, eyelash extensions offer long-lasting results, typically lasting several weeks with proper care and maintenance. This longevity means that individuals can enjoy beautiful lashes without the hassle of frequent touch-ups or replacements. This makes them an ideal option for special occasions such as weddings or vacations, where long-lasting beauty enhancements are desired.

Furthermore, eyelash extensions provide versatility in terms of customization. Clients can choose from various lengths, thicknesses, curls, and materials to achieve their desired look, whether it be a subtle and natural enhancement or a bold and dramatic effect. This customization ensures that each set of eyelash extensions is tailored to suit the individual’s unique preferences and facial features.

Overall, the benefits of eyelash extensions extend beyond aesthetics, offering convenience, longevity, and versatility to enhance one’s natural beauty effortlessly.

TYPES OF EYELASH EXTENSIONS STYLES

CLASSIC INDIVIDUAL EYELASH EXTENSIONS

One of the most favored types of lash extensions is the classic individual eyelash extensions, known for their natural appearance. These extensions involve the application of individual lashes onto your own natural eyelashes, with a synthetic lash applied to each natural lash. Like other types of lash extensions, classic individual extensions can be tailored to fit your desired curl, thickness, and length preferences, offering versatility in customization.

These extensions are highly popular due to their ability to achieve a natural look that can be adjusted according to individual preferences. They provide the effect of wearing mascara without the need for makeup application, offering a subtle enhancement to the lashes. Whether you prefer a more subdued or enhanced appearance, classic individual eyelash extensions offer a customizable solution for all preferences.

ELLIPSE EYELASH EXTENSIONS

Ellipse eyelash extensions are distinguished by the oval shape of their base, a departure from the round base of classic extensions. The flattened and elongated shape of the ellipse lash base results in a wider lash without increasing the weight of each individual lash. As a result, ellipse extensions create the illusion of thicker and fuller lashes with a darker appearance, enhancing the overall depth and dimension of the eyes. 

This unique shape offers a subtle yet impactful enhancement to the lashes, providing a more voluminous and dramatic look without compromising comfort or natural aesthetics.

INFILL LASH EXTENSIONS

Infill lash extensions involve the application of individual lashes or fans to fill in any gaps in your existing lash extensions, whether they are classic, hybrid, or volume lashes. Typically done around two to three weeks after the initial extension application, infills help maintain the fullness and continuity of your lash look as your natural lashes shed and regrow.

The frequency of infill appointments depends on the growth rate of your natural lashes, which varies from person to person. While some individuals may require infills every two weeks, others may go three to four weeks before needing a touch-up.

With infill lash extensions, new individual lashes are strategically applied to the areas where natural lashes have regrown, restoring uniformity and enhancing the overall lushness of your lashes. 

HYBRID LASHES

Hybrid lashes blend the classic lash extension technique with the Russian Volume lash extension method. This involves applying individual lashes to some natural lashes while using the fan technique to add multiple lashes to others.

The customization of hybrid lashes is crucial, as it allows the technician to enhance your natural beauty. This personalized approach results in a stunning and individualized lash style that offers more versatility than using either technique alone.

Typically, hybrid lashes start by using individual lashes to establish the foundation of the look. Russian Volume lashes are then incorporated to fill in any natural gaps and create a feathery, denser appearance. What sets hybrid lash extensions apart is their flexibility. 

RUSSIAN VOLUME EYELASH EXTENSIONS

Russian Volume eyelash extensions are a popular choice for those seeking a dramatic and voluminous lash look. Unlike classic lash extensions, which involve applying one extension to each natural lash, Russian Volume extensions utilize a technique that involves creating handmade fans of multiple ultra-fine extensions and placing them on each natural lash. 

One of the key benefits of Russian Volume extensions is their versatility. The technique allows lash technicians to customize the volume and density of the lashes according to the client’s preferences and natural lash condition. 

In addition to their volumizing effect, Russian Volume extensions are also prized for their long-lasting results. When properly applied and maintained, these extensions can last for several weeks before needing a touch-up, making them an ideal choice for those seeking low-maintenance beauty solutions. 

EYELASH CURL, THICKNESS AND LENGTH

When it comes to eyelash extensions, there are three key factors to consider: curl, thickness, and length. These elements play a crucial role in determining the overall look and effect of the extensions, allowing for customization to achieve the desired aesthetic.

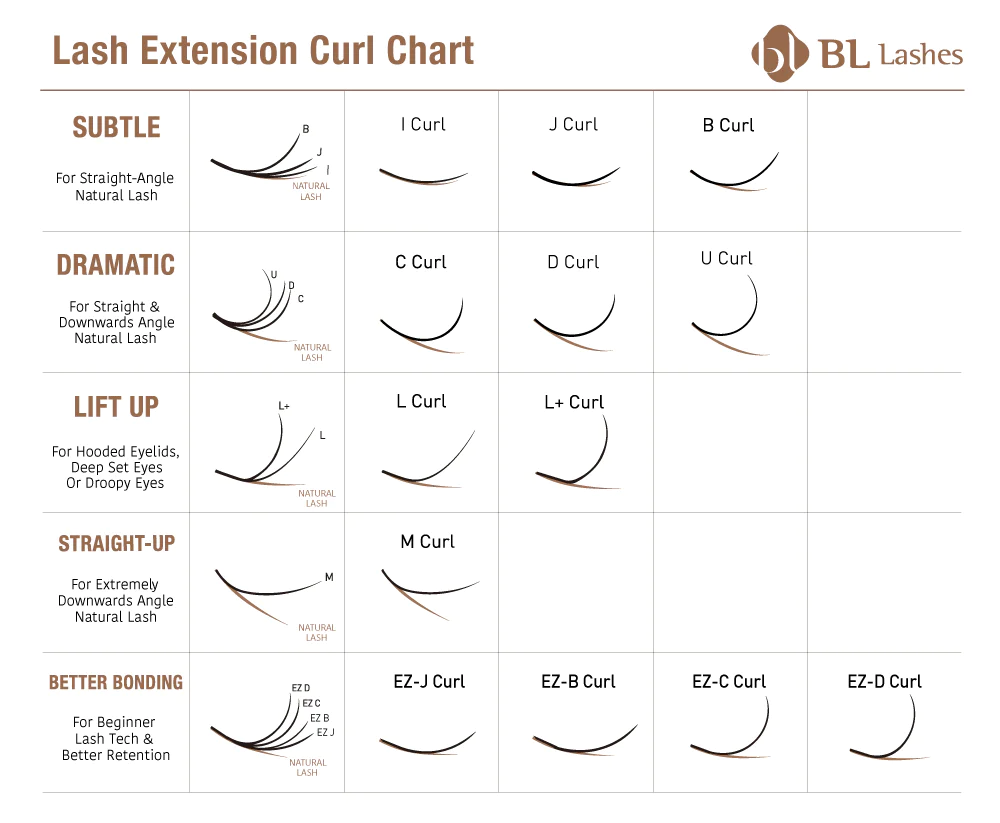
Firstly, eyelash curl refers to the degree of curvature in the extensions. Curls can range from subtle to dramatic, with options such as J curl, B curl, C curl, and D curl. The choice of curl depends on the client’s natural lash curl and the desired outcome. A more curled extension can help to open up the eyes and create a more lifted appearance, while a subtle curl can provide a more natural look.

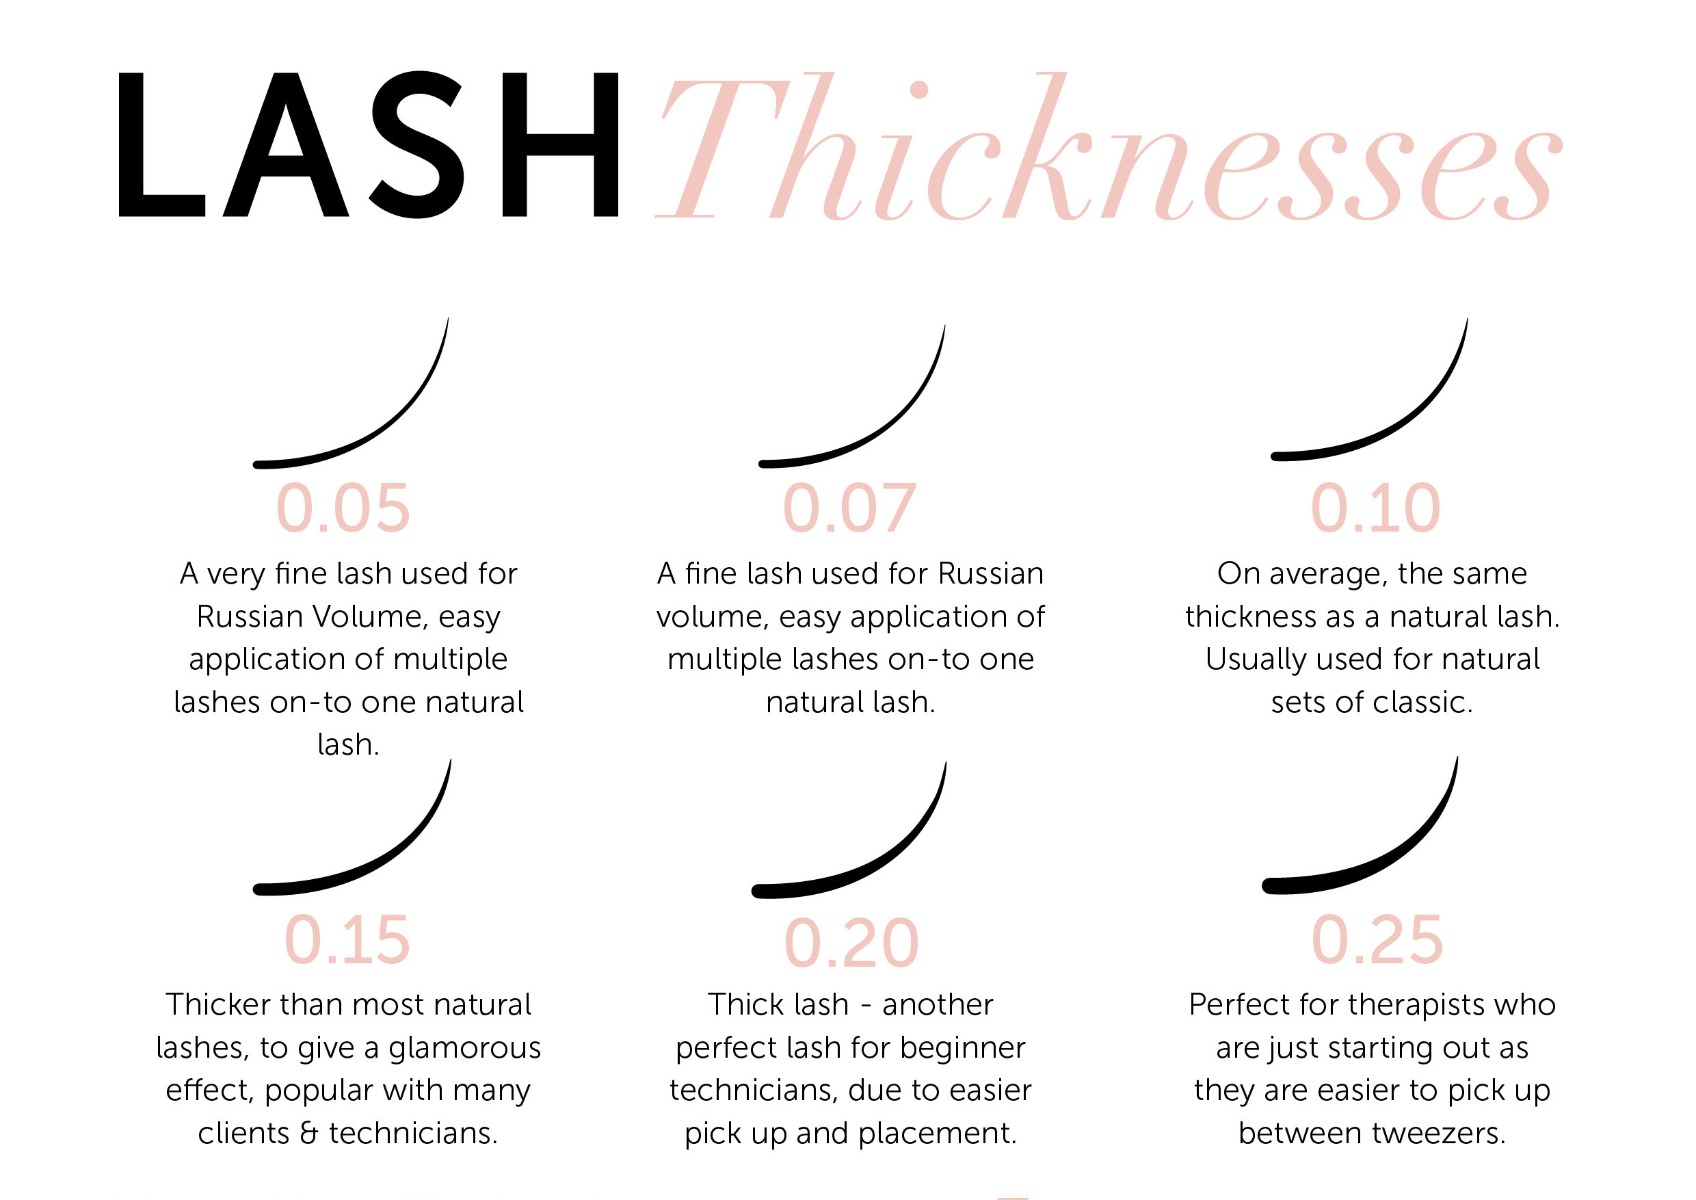
Secondly, thickness refers to the diameter or width of the eyelash extensions. Thickness options typically range from 0.03mm to 0.25mm, with thinner extensions providing a more natural look and thicker extensions offering a more dramatic effect. The choice of thickness depends on factors such as the client’s natural lash thickness, desired volume, and personal preference.

Lastly, length refers to the overall length of the eyelash extensions. Length options can vary from short and natural-looking extensions to long and dramatic ones. The choice of length depends on factors such as the client’s eye shape, facial features, and desired level of impact. Longer extensions can help to elongate the eyes and create a more glamorous look, while shorter extensions can provide a more subtle enhancement.

Overall, the curl, thickness, and length of eyelash extensions can be customized to suit each individual’s unique preferences and desired outcome. By carefully considering these factors, lash technicians can create a customized look that enhances the eyes and complements the client’s natural beauty.

COST OF EYELASH EXTENSIONS

The cost of eyelash extensions can vary depending on various factors such as the type of extensions, the salon or technician performing the service, the location, and the quality of the materials used. On average, prices can range from $100 to $300 for a full set of eyelash extensions. However, this cost can be higher or lower depending on the factors mentioned above. It’s essential to research and consult with a reputable salon or technician to get an accurate quote based on your specific needs and preferences.

HOW TO TAKE CARE OF EYELASH EXTENSIONS

Taking care of your eyelash extensions is essential to ensure they stay looking beautiful and last longer. First, avoid getting them wet for the first 24 to 48 hours after application, as water can weaken the adhesive. Be gentle when washing your face and avoid rubbing your eyes. Instead, use a gentle cleanser and pat your face dry with a towel.

It’s also important to brush your lashes daily using a clean mascara wand or spoolie brush to keep them looking neat and prevent them from tangling. Avoid using oil-based makeup or makeup removers, as these can break down the adhesive and cause the extensions to fall out prematurely. Opt for oil-free products instead.

Try to avoid sleeping on your face to prevent your lashes from getting crushed or bent out of shape. If you’re a side sleeper, consider using a silk or satin pillowcase, as these are gentler on your lashes.

Finally, schedule regular touch-up appointments every two to three weeks to maintain your lash extensions and keep them looking full and fresh. Following these simple care tips will help you enjoy your eyelash extensions for as long as possible.

FAQ

1. Do eyelash extensions damage your natural lashes?

No. When applied correctly, eyelash extensions don’t harm your natural lashes.

2. Does the type of lash affect how long it lasts?

No. Choosing longer and thicker lashes adds more weight to your natural lashes but doesn’t necessarily affect how long they last.

3. Who is not suitable for eyelash extensions?

Clients with conditions like alopecia or those who lost lashes due to chemotherapy may not have sufficient natural lashes for successful extension application.

CONCLUSION

Now armed with the knowledge of different types, materials, curls, thicknesses, and thicknesses, you’re ready to create the lashes of your dreams. Eyelash extensions or eyebrow lamination are both simple facial procedures, but you must consider carefully before doing them. Effectively communicate your wishes, discuss your eye shape and preferences, and trust their expertise to guide you.

HOW TO DO MAKEUP FOR BRIDE: A STEP-BY-STEP GUIDE TO DIY WEDDING MAKEUP

A wedding day is a moment people daydream about and meticulously plan well in advance before meeting the person they will eventually marry. When the moment finally arrives, numerous aspects need careful consideration and execution, including selecting the ideal make up for bride. This process involves various steps, such as preparing the skin for a radiant appearance, deciding on the makeup artist, and scheduling time for a trial-run application (or two). It also entails mastering the art of applying makeup that complements the desired look for the bride on her wedding day.

DO A RESEARCH

The internet is brimming with beauty inspiration for your wedding day. If you’re uncertain about the kind of look you want, initiate some research. Explore your favorite celebrity’s latest red carpet appearances through a search engine or visit a professional makeup artist’s Instagram page to peruse photos of their clients.

You can also turn to TikTok or YouTube for comprehensive tutorials that you can recreate. Kim suggests identifying someone with similar facial features for a more personalized guide. Following makeup trends that don’t compliment your face may result in an awkward appearance. Don’t replicate a look just because it’s trending online. Instead, ensure that you genuinely like the chosen style.

CONSIDER YOUR THEME

Your final appearance will be significantly shaped by your overall aesthetic. Prior to applying your makeup, it’s crucial to decide whether a natural, sun-kissed glow, or a blend of both aligns better with you and your event. Taking into account your color scheme, floral decorations, venue, and ambiance. Aligning your makeup with the overarching theme enhances the harmonious and elegant atmosphere of your wedding day.

DETERMINE THE RIGHT SHADES

To achieve a smoother end result, it’s essential to determine which color will best complement your skin tone, whether it’s a warm bronze tone or a cool blue tone. Attention should be paid to the importance of finding the right shade for your skin, suggesting the possibility of mixing different shades to create the perfect combination. Instead of relying on guesswork, consider seeking advice from a professional who can determine the color that best suits your skin tone.

STAY OUT OF THE SUN

In the countdown to your wedding day, one crucial piece of beauty advice is to stay out of the sun. Prolonged exposure to sunlight can lead to skin damage, including sunburn, premature aging, and uneven skin tones, all of which might affect your desired wedding day look. To maintain a radiant and flawless complexion, it’s advisable to minimize sun exposure in the weeks leading up to the big day. Consider using sunscreen with a high SPF, wearing protective clothing, and seeking shade whenever possible. By taking these precautions, you can help ensure that your skin looks its best and remains picture-perfect for your wedding, allowing you to confidently showcase your natural beauty on this special occasion.

PRACTICE MAKEUP FREQUENTLY

In the buildup to your wedding, one valuable beauty tip is to practice your makeup frequently. Regularly experimenting with different looks allows you to refine and perfect the ideal style that enhances your features and complements your wedding theme. Schedule trial runs to familiarize yourself with the application process, ensuring that your chosen makeup look not only suits your preferences but also stands up to the demands of the long-awaited day.

Frequent practice not only builds your confidence in achieving the desired outcome but also enables you to identify any potential challenges and address them well in advance. With each practice session, you’ll gain valuable insights into the products and techniques that work best for you, ensuring that you step into your wedding day with the expertise to create a stunning and long-lasting makeup look.

BOOK A VIRTUAL APPOINTMENT

In the modern landscape of wedding preparations, booking a virtual appointment has become an invaluable step, especially in the era of convenience and technology. Prior to your wedding, consider scheduling virtual appointments with key vendors, such as your wedding planner, photographer, or even beauty professionals. These virtual consultations provide a convenient and efficient way to discuss details, share ideas, and make crucial decisions without the need for in-person meetings. 

Whether it’s finalizing the event timeline, reviewing photography preferences, or discussing your desired bridal look, virtual appointments allow for seamless communication from the comfort of your own space. Embracing this digital approach not only streamlines the planning process but also accommodates busy schedules, ensuring that every detail is meticulously addressed, and your vision for the perfect wedding day is brought to life.

PREP YOUR SKIN

On your wedding day, stick with your tried-and-true skincare routine! A clean, familiar canvas is key to achieving natural, beautiful makeup. Skip experimenting with new products and simply cleanse, moisturize (lightly!), and gently exfoliate (if you normally do). Leave any blemishes alone unless you have a trusted spot treatment, and you’re all set for a picture-perfect complexion.

CHOOSE FAMILIAR PRODUCT

When it comes to your wedding day, selecting familiar makeup products is key. The familiarity of these products offers a sense of comfort and confidence since you already know how they perform on your skin. Opting for tried-and-true makeup items ensures that you avoid any potential surprises or adverse reactions that could occur from experimenting with new products. By sticking with the cosmetics you are familiar with, you can trust that they will provide the desired results and enhance your natural beauty. It’s essential to feel at ease and radiate confidence on your special day, and relying on familiar makeup products plays a significant role in achieving that peace of mind.

HOW TO DIY YOUR OWN BRIDAL MAKEUP

STEP 1: PREP YOUR SKIN

Whether you’re applying your makeup on your own or relying on a professional, on your wedding day, start by washing your face and applying a light moisturizer. Stick to your regular skincare routine; now is not the moment for drastic changes. If you usually exfoliate, choose a gentle exfoliating cleanser instead of a harsh scrub. Address any blemishes by lightly dabbing on an appropriate product like Visine, but avoid unnecessary interventions. The goal is to have a clean and soft canvas, providing the perfect base for achieving naturally beautiful skin with your makeup.

Consider your skin’s undertones, whether they lean towards cool or warm, when selecting colors that both match and complement. To identify your undertone, try a simple trick. Place a piece of silver and a piece of gold jewelry on the back of your hand. If the gold appears to blend seamlessly, you likely have warm undertones. Conversely, if the silver seems to harmonize better, you probably have cool undertones.

STEP 2: KNOW THAT PRIMER IS REQUIRED

From the moment you start applying your makeup until you bid farewell to your guests, a multitude of events will unfold. To make sure your makeup withstands the ceremony, dancing, tears, and toasts, consider incorporating a primer into your routine. While occasional touch-ups may still be necessary, they will be significantly reduced. Moreover, a primer serves to even out fine lines, and wrinkles, and conceal open pores. Apply a small amount after moisturizing, but before your foundation, ensuring even coverage across your face and eyelids. This sets the stage for a flawless base for all that follows.

STEP 3: APPLY FOUNDATION

For those with a cool undertone, seek out foundations with a rosier, redder, or blue base. If your undertone leans warm, opt for a foundation with a yellow or golden base. To verify if the shade is suitable, apply a small amount on the center of your lower jawline using a Q-tip. If it seamlessly blends in, you’ve found the right match.

Apply your foundation in thin layers, starting from the center of your face and blending outward with a foundation brush. Ensure a seamless finish, paying particular attention to blending beneath your jaw and along your neck to avoid visible lines. Avoid caking on the foundation, as it can give an overdone appearance and may lead to smearing or streaking.

STEP 4: ADD CONCEALER 

Applying concealer before the foundation can lead to much of it rubbing away during the foundation blending process. To address red areas or dark circles, use a concealer brush to apply a liquid concealer, matching your skin tone or going one shade lighter, to problematic areas. Dot the concealer and gently pat the brush against your skin to spread it. If needed, use a makeup sponge dampened with water to blend the concealer further.

For concealing blemishes, start by applying foundation, followed by concealer, and set it with powder. If the blemish is still visible, add more concealer and powder. Ensure you pat the concealer onto the blemish rather than rubbing to achieve a seamless finish.

STEP 5: APPLY HIGHLIGHTER

Highlighter might not be a staple in everyone’s makeup collection, but its purpose is to enhance specific facial features, making eyes appear larger and adding a radiant, youthful dewy look. However, using too much or a formulation with sparkle or glitter can lead to photo disasters, so apply it with a light touch. Highlighters are available in both liquid and powder forms.

When using a liquid highlighter, apply it with a brush after your foundation, forming a check mark shape. Begin near your inner eye, angle down toward your nostril, and then move up your cheekbone, blending toward your temple. Repeat the process above your brows, down the center of your nose, on the center of your forehead, and on your chin.

For powder highlighter, apply it after powdering and brush it under your brows, lightly in the corner of your eyes, and on the tops of your cheekbones. Avoid using powder highlighter under your eyes or over your mouth to prevent a sweaty appearance in photos.

STEP 6: SET YOUR BASE

Now, you face a decision. You can either opt for a cream blush instead of a powder blush or set your base with powder. If you choose the latter, begin by using a translucent powder to set your base and manage any shine. When it comes to powder, remember that less is more; aim for a luminous look rather than a heavy one. With a medium-sized brush, lightly dust over your forehead, the sides of your nose, and on your chin.

Following this, apply a powder bronzer that’s a shade or two darker than your foundation. Brush it in the shape of a 3 on both sides of your face. Begin at your hairline, move down the side of your face, then under your cheekbone, back to the side of your face, and finally below your jaw.

Keep pressed powder handy for those moments when certain areas shine and need a quick dab before a photo or while in the restroom.

STEP 7: BRING COLOR TO YOUR EYES

Wedding experts typically advise against a heavily dramatic eye, suggesting instead the use of eyeliners in shades other than black, along with paler or muted eye shadows that complement your eye color. Highlighters can also be applied to create the illusion of larger eyes. Experiment with brown, grey, and green eyeliners, applying them to both your upper and lower eyelids to enhance your eyes. For a longer-lasting effect, use a cream eye shadow on your eyelids, reserving powder for the crease of your eye. Apply a powder highlighter in the corners of your eyes and under your brow.

Consider the following color recommendations based on your eye color: bronze shades for green eyes, mocha for hazel eyes, navy and dark brown for blue eyes, and purples and grays for brown eyes. If you want to line your eyes with eye shadow, dampen an eyeliner brush with water and brush it into the eye shadow for a defined look.

STEP 8: ADD MASCARA

Given that tears are likely, it’s essential to use waterproof mascara for your wedding day. If you’re not accustomed to wearing false eyelashes regularly, your wedding day is not the ideal time to start. Instead, ensure you have a reliable eyelash curler, a volumizing mascara, and a lengthening mascara. Prior to applying mascara, curl your lashes for added lift. When applying mascara, begin at the root of your eyelashes and wiggle the wand from side to side as you move up to the top. Opt for black mascara, as it complements everyone.

Complete your eye makeup by framing your face with a brow powder slightly darker than your natural color. Brush it along the natural line of your eyebrows, working outward toward the end of your eyes. This final touch will enhance your overall look on your special day.

STEP 9: CREAT LIPS

Much like your facial skin, well-moisturized lips are crucial before applying makeup to prevent dryness or cracks that may emphasize lines once color is added. To achieve this, use a lip hydrator, allowing it to absorb for a couple of minutes before applying color. Select a shade that complements your blush and consider the following tips. While many lipsticks claim lasting hours, opting for a lip stain is a more reliable choice on your wedding day.

For fair skin with cool undertones, consider nude, light mocha, and light mauve. If you have warm undertones, explore sand, nude peach, or shell, steering clear of bright pinks, dark bronzes, and deep mochas. If your skin tone is medium with cool undertones, opt for rosy pink, pomegranate, or cranberry; for warm undertones, go with bronze, copper, and cinnamon, avoiding nudes. Deep skin with cool undertones can experiment with raisin, wine, or ruby red, while warm undertones may prefer honey, ginger, or a coppery bronze, avoiding shades close to orange.

CONCLUSION

In conclusion, mastering the art of bridal makeup involves careful consideration and skill. These 8 tips provide valuable insights to help you become the most beautiful bride on your special day. Remember, when it comes to achieving a flawless finish, exploring techniques like air brush make up can elevate your bridal look to new heights. With attention to detail and a touch of creativity, you’re sure to radiate confidence and beauty as you walk down the aisle on your unforgettable day.