Why you should try the Bowl Method for Wavy Hair

If your curls are craving moisture and you’re in a constant battle with frizz, it’s time to explore the transformative world of the bowl method. In the following article, we’ll demystify the bowl method for wavy hair, providing you with a step-by-step guide to this game-changing hair care technique. Get ready to embrace the ultimate solution for hydrated, frizz-free curls that are easier to achieve than you might think!

What Is the Bowl Method for Wavy Hair?

The bowl method offers a straightforward approach to washing curly hair while making the most of your shower’s water and conditioner. Through multiple dips into this mixture, your curls enjoy increased hydration, leading to the emergence of tighter, well-defined curls.

The bowl method proves versatile, catering to all curly and wavy hair types. Think of it as a DIY hair mask with a twist. Instead of letting your precious conditioner and products go to waste due to poor absorption, the bowl method offers a deep conditioning ritual that you can easily perform in the comfort of your own home.

How do I do the bowl method for wavy hair?

Prepare Your Hair: Begin by washing your hair with your regular shampoo and conditioner. This provides a clean canvas for the bowl method.

Apply Leave-In Conditioner or Curl Cream: After washing and conditioning, apply a generous amount of leave-in conditioner or curl cream to your damp hair. This helps to prime your hair for the treatment.

Prepare the Bowl: Fill a bowl with cool or lukewarm water. The water temperature should be comfortable for your skin.

Dunk and Squeeze: Take a section of your hair and gently dip the ends into the bowl of water. As you lift your hair out of the bowl, squeeze it to release any excess product. This process helps saturate your hair with water and distribute the product evenly.

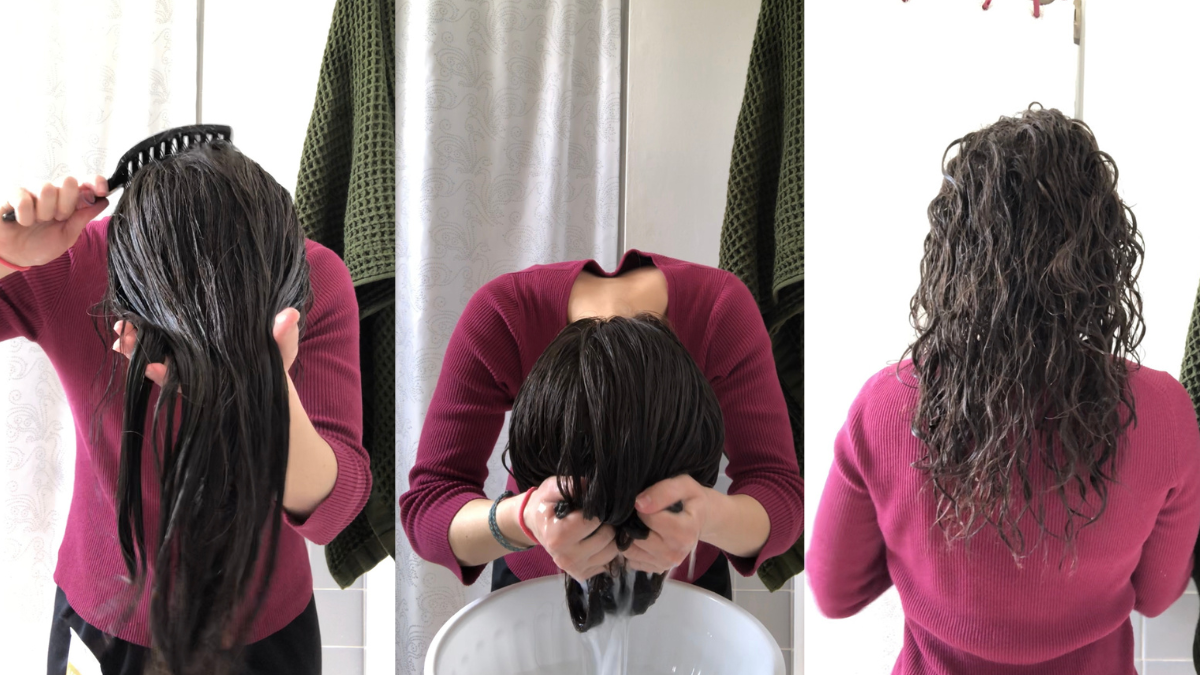
Repeat the Process: Repeat the dunk and squeeze process several times, covering different sections of your hair. Ensure that your hair is thoroughly saturated but not dripping wet.

Scrunch Your Hair: To enhance the definition of your waves, gently scrunch your hair with your hands. This encourages your natural wave pattern to form.

Apply Styling Product: If desired, apply a styling product such as a hair gel or mousse to help hold your waves in place and reduce frizz.

Choose Your Drying Method: You can choose to air dry your hair or use a diffuser attachment on your hair dryer. If you prefer air drying, let your hair dry naturally. If using a diffuser, use it on a low heat setting and scrunch your hair as you dry to maintain the wave pattern.

Does the bowl method for curly hair really work?

Dipping your head into a bowl of water for the sake of stunning curls might seem like an age-old secret, but the science behind this curly hair hack is far from mysterious. The bowl method’s effectiveness lies in its ability to boost moisture absorption, making it a game-changer, especially for those with low porosity hair that struggles to soak in moisture and products. Experts have pinpointed the dilution step as the secret sauce in enhancing volume and curl definition. By diluting the product, the bowl method ensures even distribution, a crucial factor, particularly for individuals with thick, dense curls.

Beyond elevating volume and shine, keeping your hair wet for an extended period post-shower is the ultimate defense against post-shower frizz. The bowl method provides your curls with prolonged contact time with products, allowing the hair shaft to lock in those coveted nutrients. If you’ve been piling on products to maintain your luscious curls, giving the bowl method a whirl is definitely worth considering.

Benefits of the Bowl Method 

Say Goodbye to Frizz and Flyaways

The verdict is in, and the bowl method for curly hair is a star player in the fight against unruly frizz and pesky flyaways. What’s even better? It achieves this without the need for heat styling or chemical treatments, making it the perfect companion for those who prefer a low-heat lifestyle.

Boosts Your Hair’s Wow Factor

But that’s not all—this technique isn’t just about taming frizz. It’s a multi-talented marvel that also delivers a healthy dose of shine and volume to your locks. Whether you’re sculpting, styling, or simply enhancing your natural curls, the bowl method has got you covered.

Simplicity at Its Finest

No need to be a beauty guru to hop on this trend. The bowl method is delightfully straightforward, and there’s minimal risk of any mishap wreaking havoc on your hair.

For All Types of Curls

No matter your curl pattern, the bowl method can work its magic.

Safe for Colored Tresses

Concerned about your color-treated hair? Worry not—the bowl method for curly hair is color-friendly.

Extensions Welcome

Extend the love to your extensions! This gentle technique can be used on locs, braids, twists, and more.

Seasonal Hair Care Companion

Tackling winter dryness or other seasonal hair woes? The bowl method has your back. You can easily tailor the number of cycles to suit the season—think two dips in the summer and four in the winter—to maximize shine and minimize excess oil buildup.

FAQs

  1. What kind of bowl should I use for the bowl method? Any kind of bowl will work for the bowl method, but a deep bowl will make it easier to dip your hair into the water. A glass bowl is also a good option, as it will not react with the product.
  1. How often should I do the bowl method?You can do the bowl method as often as you wash your hair. However, if you have dry or damaged hair, you may want to do it less often.
  1. Is the bowl method better than other hair washing methods for wavy hair? The bowl method is not necessarily better than other hair washing methods for wavy hair. However, it can be a good option for people who have trouble getting their hair to absorb moisture. 
  2. What are some tips for doing the bowl method?
  • Use cold or lukewarm water. Hot water can dry out your hair.
  • Don’t over-wet your hair. You want your hair to be damp, not dripping wet.
  • Scrunch your hair as you dip it into the water. This will help to define the curls.
  • Apply a styling product to help hold the curls in place.
  • Let your hair air dry or diffuse it.

Locs Styles, Tips, and Maintenance

Dreadlocks, or locs, are a well-liked hairstyle that have been around for generations. Although locs have historically been worn by persons of African heritage, they are now worn by people of all ages and genders. This tutorial is for you if you’re considering obtaining locs or searching for different ways to style them. This page will provide numerous short loc styling options, maintenance advice, and other useful details.

Styles for Short Locs

Dreadlocks, sometimes referred to as locs, are a lengthy, rope-like hairstyle that includes twisting and matting the hair. On the other hand, short loc styles include twisting and knotting shorter lengths of hair into manageable portions.

From closely cropped “starter locs” to shoulder-length “medium length” locs, short loc styles may be found. For people who wish to wear natural hairstyles but don’t want to continually style or alter their hair, these hairstyles provide a low-maintenance choice.

Short locs are made by dividing up small sections of hair and twisting them into tiny knots. The knots become tighter and more distinct as the hair grows, maturing into adult locs.

Short locs are adaptable and may be worn in a variety of ways. They may be accessorized with headbands, wraps, and beads to give the outfit some flare and individuality. The “faux hawk,” in which the hair is shaped into a high peak at the crown of the head, and “bob locs,” which are locs that have been trimmed into a bob shape, are two examples of popular short loc fashions.

The protection that short loc styles provide for natural hair is one of its advantages. The hair is held in place by the tight twists and knots and is shielded from damaging environmental elements like wind and sunlight.

Short loc styles may serve as a kind of protection as well as a statement of cultural and personal identity. Many individuals decide to sport locs as a means to connect with their African origin and roots.

All things considered, short loc hairstyles are an excellent choice for anybody searching for a protective, low-maintenance hairstyle that can be done in a variety of ways. Short locs may create a distinctive and fashionable style while lasting for many years with the right care and upkeep.

Simple updos to elaborate braids may all be used to dress short locs. Here are a few prevalent looks:

Twists using two cords

Short locs look wonderful in two-strand twists because they give the hair structure and volume. The hair should be divided into tiny portions, and two strands of hair should be twisted together to create this style. You may tie a little elastic band around the ends or let them hanging free.

Bantu Knots 

Short locs may be styled in a fun and simple fashion using bantu knots. Simply divide the hair into sections, then twist each segment into a knot at the scalp’s root. For a lovely, textured appearance, you may tie the knots in the evening and untie them in the morning.

Half-Up, Half-Down

For individuals who want to keep their locs out of their faces while still showcasing their length, this style is ideal. You only need to pull back the top half of your locs and fasten them with a hair tie or clip.

Comb Coils to Locs

Short hair locs are often started with comb coils. This is how you do it:

  • Your hair should be somewhat moist after washing and air drying.
  • Cut your hair into manageable pieces.
  • Using a comb, coil a tiny part of hair around itself from the root to the tip.
  • Continue coiling the hair in parts as necessary.
  • Allow hair to air dry or dry entirely under a hooded dryer.
  • Use a little oil to hydrate the scalp and locs once the hair has dried.

Real Locs in a Bob

Consider a bob if you want a shorter loc style. Here’s how to style a bob with actual locs:

  • Section your hair cleanly to begin.
  • Starter locs may be made using the comb coil technique.
  • Trim the ends of the locs as they become longer to start shaping them into a bob.
  • As your locs develop, continue to maintain and care for them.

Palm Roll Starter Locs

The practice of palm rolling is common for keeping locs in place. How to palm roll starting locs is as follows:

  • A tiny portion of hair should be taken and rolled between your hands clockwise.
  • On each loc, repeat this procedure.
  • Avoid rolling your palms too much since this might thin and break your palm.

Medium Size Starter Locs

When deciding between huge and little locs, many people choose medium-sized starting locs. Here’s how to get beginning locs that are around medium size:

  • Hair sectioning and washing.
  • To make tiny coils, use the comb coil technique.
  • Allow the coils to develop into locs of a medium size.
  • Keep up with and take care of your locs as they develop.

Starting Locs with Extensions

Starting locks using extensions—also referred to as fake locs—is a well-liked method for making lovely and fashionable dreadlocks without having to wait for natural hair to lock up. In order to provide the look of matured locks, this technique entails adding synthetic or human hair extensions to the natural hair strands.

Choosing the right hair extensions is the first step in beginning locks with extensions. Usually, pre-made crochet or braided hair in lengths that correspond to the required length of the imitation locks are the greatest possibilities. To create a flawless blend, it’s essential to choose high-quality hair extensions that closely match the structure and curl pattern of your original hair.

Using a rattail comb, the natural hair is then divided into the appropriate length and form of the locks. To maintain the sections tidy and smooth, a tiny bit of gel or edge control may be applied to the roots. The next step is to split each segment into two equal pieces, then thread one end of the extension hair in the center to create a loop.

The extension hair is then wrapped over the natural hair and looped, and the two pieces are twisted with the natural hair until the area is completely twisted. The end of the extension hair is wrapped back over the twisted hair and fastened with a rubber band or crochet hook after the portion has been completely twisted.

Up until all of the natural hair’s parts have been wrapped with extensions, this procedure is repeated. Depending on the required thickness and size of the locks, the number of parts will change. Using perm rods or flexi-rods, the locks may be curled or left straight to give them a wavy or curly appearance.

For individuals who desire the advantages of dreadlocks without the lengthy waiting time associated with natural locking, starting locks with extensions is a fantastic choice. To prevent harm to real hair, it’s crucial to remember that fake locks need to be properly maintained. Regular washing and moisturizing of the locks is advised. Excessive tugging or stress on the roots should be avoided. With the right maintenance, commencing locks with extensions may be an excellent method to have a distinctive and fashionable dreadlocked appearance.

Short locs may be given length and volume using extensions. How to start locs with extensions is as follows:

  • Utilizing fake hair extensions, braid your hair.
  • Create beginning locs at the braid’s base using the comb coil technique.
  • As your locs develop, continue to maintain and care for them.

Braids over Starter Locs

For beginner locs, braids may be a chic method to add length and texture. How to braid over beginning locs is described here:

  • Your locs into sections.
  • At the roots of each part, braid the stray hair.
  • To hold the braid’s end in place, use a little elastic band.
  • As your locs develop, continue to maintain and care for them.

Dry Shampoo on Locs

You may revitalize your locs without over-washing them by using dry shampoo. How to apply dry shampoo on locs is as follows:

  • Pick a dry shampoo that is made especially for locs.
  • Directly massage the dry shampoo into your scalp and loc roots.
  • Your scalp and locs should be given a dry shampoo massage.
  • Use a soft-bristled brush to remove any extra powder.

Conclusion

There are several styles and upkeep advice to keep you looking your best whether you’re new to the world of locs or a seasoned veteran. With this adaptable hairdo, there are many ways to express oneself, from comb coils to braids over beginning locs. Keep in mind to take excellent care of your locs by moisturizing them, refraining from over-manipulating them, and covering them while you sleep.

FAQs

  1. How often ought I to wash my locs? Your locs should be kept clean, but washing them too often might make them to unravel. Depending on your hair type and lifestyle, try to wash your locs every one to two weeks.
  2. Could I dye my locs? Yes, you may colour your locs, but you must use a mild, ammonia-free dye and take care not to overprocess your hair.
  3. When will my locs be fully grown? Depending on your hair type and how rapidly your hair grows, it might take a while to develop locs. Starter locs often take several months to a year to develop into full-length locs.
  4. Swimmable with locs? Yes, it is possible to swim with locs, but care must be taken to keep them away from chlorine and seawater. Before swimming, think about donning a swim hat or rubbing on a protective oil.
  5. How can I keep my locs healthy? Keep your locs moisturized, abstain from over-manipulating them, and cover them while you sleep to preserve their condition. Retwist or palm roll your locs often to keep them appearing clean.