Bikaner is arguably one of the most overlooked cities in Rajasthan. Unlike the more famous neighboring destinations like Jaipur, Udaipur, Jodhpur, and Jaisalmer, it doesn’t receive as many visitors or as much attention. Often, it’s merely considered a convenient stopover on the way to Jaisalmer or Jodhpur. However, in truth, Bikaner offers far more than just its renowned namkeens and sweets.
With its abundance of ancient structures, architectural wonders, and charming streets full of Instagram-worthy scenes, Bikaner is truly a photographer’s haven. The city is filled with intricate havelis, opulent palaces, captivating forts, and a rich history, all set against the backdrop of the Thar Desert. From visiting stunning temples to admiring scenic sand dunes and cenotaphs, you’ll be amazed at just how much Bikaner has to offer.
If you’re in search of a city in Rajasthan that embodies princely grandeur and charm without the heavy crowds, Bikaner is the ideal destination. In this article, I’ve put together a list of the 11 most Instagrammable spots in Bikaner that I absolutely loved. All that’s left for you to do is visit and explore!
BIKAJI KI TEKRI
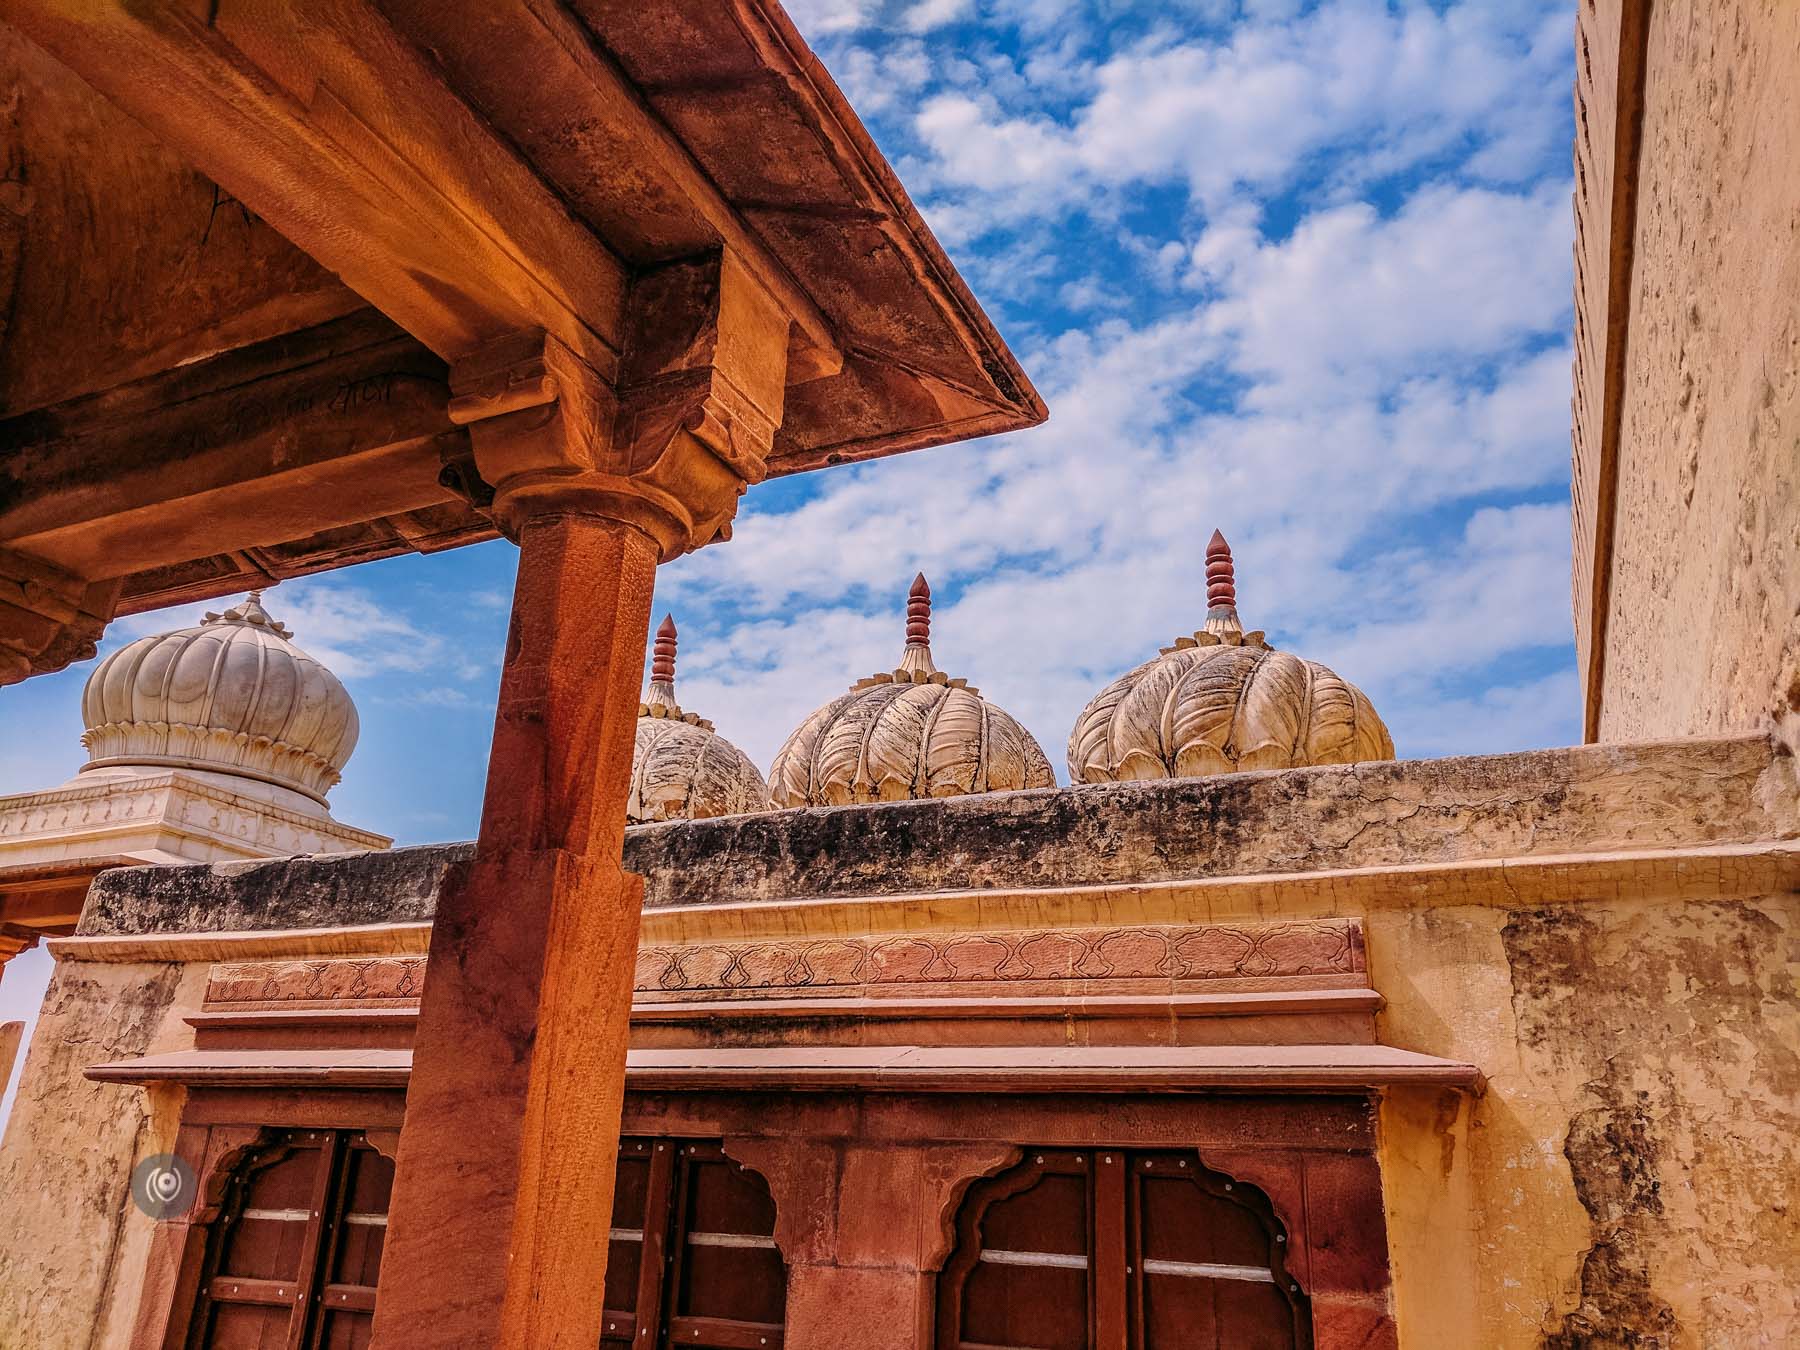
Bikaji Ki Tekri, built by Rao Bika, the founder of Bikaner, is actually the city’s first fort. Constructed approximately 500 years ago, it holds the title of the oldest standing structure in the region.
For those who enjoy exploring off-the-beaten-path landmarks, this is a must-visit spot. While the fort may not boast extravagant architecture, its historical significance makes it well worth a visit. You’ll also find the chhatris (cenotaphs) of Rao Bika and several other rulers at Bikaji Ki Tekri.
Tip: If the front entrance appears closed or locked from the inside, simply knock and wait for the guard to open the door and let you in.
How to get there: Bikaji Ki Tekri is situated in Hammalon Ki Bari, near Seth Bhandasar Jain Temple. Since the roads in this area are narrow, it’s best to visit by auto-rickshaw, two-wheeler, or on foot. You can hire an auto-rickshaw for a few hours and visit all the nearby spots in one go.
Opening times: 10 AM – 6 PM
Best time to visit: As it’s not a heavily visited landmark in Bikaner, you can enjoy a quiet visit at any time during opening hours. If you’re exploring the walled city area in the morning, it’s convenient to head here once the fort opens.
Entrance Fee: Free
NARENDRA BHAWAN
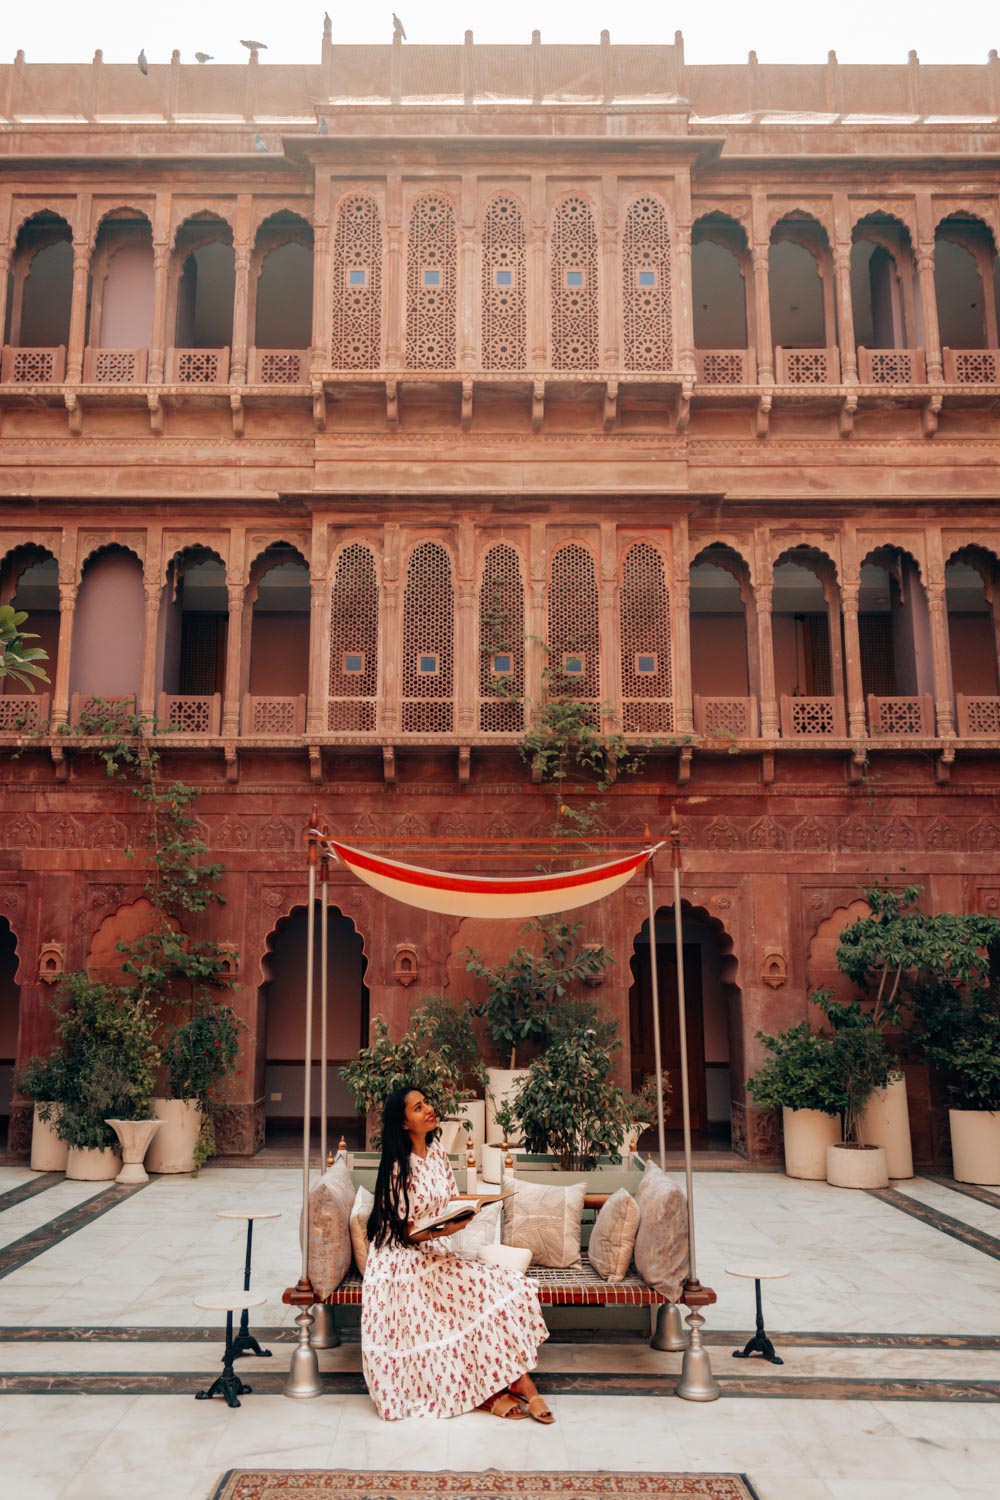
Showcasing the rich history of Bikaner’s last reigning king, Maharaja Narendra Singh Ji, Narendra Bhawan is a boutique heritage hotel and a top Instagrammable spot in the city.
With its artistic interiors, modern décor, enchanting façade, and beautiful courtyard, every corner of Narendra Bhawan feels thoughtfully designed and picture-perfect. During the two nights my family and I stayed there, I found myself reaching for my camera constantly. To top it all off, the hotel features a rooftop pool offering stunning views of the city.
If I were to recommend just one place to stay in Bikaner, it would undoubtedly be this aesthetic gem. While I didn’t get the chance to try all their experiences, the Merchant Trail, which guides you through the havelis of Bikaner’s Old City, is ideal for those seeking an immersive cultural exploration.
How to get there: Narendra Bhawan is located in Samta Nagar, not far from Laxmi Niwas Palace. You can easily reach it by taxi or auto-rickshaw. For your return journey, the hotel can arrange transportation, though auto-rickshaws are often available right outside.
Opening times: All day
Best time to visit: Narendra Bhawan shines beautifully during sunrise and sunset, with soft light reflecting off the building. For interior shots, any time of day works perfectly.
Entrance Fee: Free for guests or those visiting for a meal. For overnight stays, check prices and availability for Narendra Bhawan.
GAJNER PALACE AND GAJNER WILDLIFE SANCTUARY
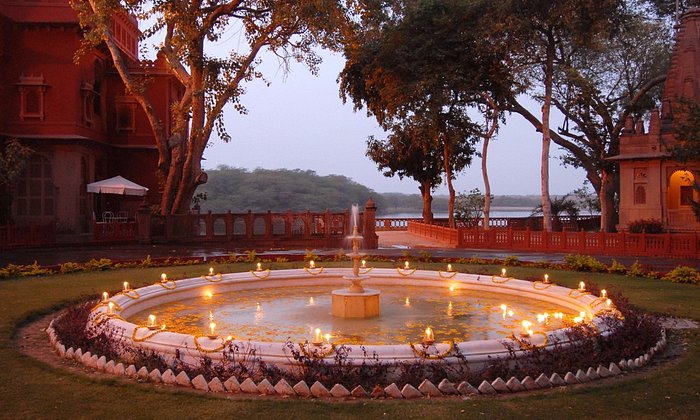
Nestled along the shores of the serene Gajner Lake, Gajner Palace is a luxury heritage hotel surrounded by lush green forests. Once a royal hunting lodge for the rulers of Bikaner, the palace now offers guests a tranquil escape just steps away from the Gajner Wildlife Sanctuary.
With its striking red sandstone pillars, domes, and charming terraces and balconies overlooking the lake, Gajner Palace is the perfect retreat for nature lovers. You can arrange a private jeep safari in the nearby sanctuary or enjoy a boat ride on the lake to fully absorb the beautiful surroundings.
The peaceful ambiance of Gajner Palace is truly remarkable, and the best part is that you can visit even if you’re not staying overnight. However, if you have the opportunity, I highly recommend spending at least one or two nights. Early mornings, before day visitors arrive, are especially serene with only birds and peacocks around.
How to get there: Gajner Palace is about 33 km from Bikaner, and the most convenient way to reach it is by taxi, which takes roughly 30 minutes depending on traffic. Buses also depart from Bikaner Junction to Gajner, but this can be a tiring option if you plan to return the same day.
Opening times: The hotel is open to guests all day, while the Gajner Wildlife Sanctuary is open from 10 AM to 5 PM.
Best time to visit: The ideal times to explore Gajner Palace, Lake, and Wildlife Sanctuary are in the morning or evening. Rajasthan’s afternoons can be uncomfortably hot, especially in Bikaner, due to its proximity to the desert. Plus, the soft light at sunrise and sunset beautifully reflects on the lake, making it perfect for photos.
Entrance Fee: INR 100 for day visitors.
DEVI KUND SAGAR
Devi Kund Sagar, also known as the Bikaner Royal Cenotaphs, is one of Bikaner’s must-visit landmarks. This royal cremation ground features hundreds of stunning cenotaphs (chhatris) built in honor of the Bikaner royal family. The site is renowned for its striking blend of Rajputana and Mughal architecture.
The older cenotaphs are crafted from red and pink sandstone, a signature feature throughout Bikaner, while the newer ones are made from white marble, equally captivating and photogenic. The most recent addition is the cenotaph of Maharaja Narendra Singh Ji, the last reigning king of Bikaner, who passed away in 2003.
When visiting the Royal Cenotaphs, be mindful of their sacred significance. Avoid climbing on the structures, as this is not permitted. While some Instagram posts show people standing on the chhatris, it’s important to respect the cultural and spiritual importance of the site. Rest assured, photos and videos taken from the ground are just as beautiful and Instagram-worthy!
Tip: You’ll need to remove your shoes before entering. Since the ground can be a bit dirty, it’s a good idea to bring along some wipes to clean your feet afterward.
How to get there: Devi Kund Sagar is about 9 km from Bikaner’s city center. I recommend hiring a taxi or auto-rickshaw for a few hours to visit the cenotaphs. The area can feel a bit isolated, so it’s best to arrange for the same transport to take you back to the main city.
Opening times: 9 AM – 5 PM
Best time to visit: As a hidden gem in Bikaner, Devi Kund Sagar doesn’t attract large crowds. We visited near closing time to avoid the harsh midday sun and were mesmerized by how magnificent the chhatris looked during the golden hour. The lighting was perfect for photos, and only a few people were around. I recommend avoiding an afternoon visit, as the floor can get extremely hot to walk on.
Entrance Fee: INR 5 for Indian tourists and INR 10 for foreigners.
THE THAR DESERT
Much like the golden city of Jaisalmer, Bikaner is also nestled within the vast Thar Desert. If Jaisalmer isn’t on your itinerary, make sure to at least explore the sand dunes of Bikaner for a taste of the desert landscape and to capture some stunning desert photography while in Rajasthan. While the dunes in Bikaner may be a bit more understated compared to Jaisalmer, they still offer an enchanting experience.
There are a variety of activities to make your desert trip unforgettable. Whether it’s enjoying a sunset camel safari, spending the night in a desert camp, or dining under the stars, the possibilities are almost endless. No matter which option you choose, the desert and its dunes will provide a perfect Instagram backdrop.
The Bikaner Camel Festival is another major attraction, drawing both local and international visitors every January. It’s a vibrant celebration where you can experience local culture firsthand. For those interested in learning more about camels, a visit to the ICAR-National Research Centre on Camel is highly recommended. Camels are, after all, Rajasthan’s state animal!
How to get there: Many safari companies in Bikaner offer pickup and drop-off services from your accommodation. Alternatively, you can hire a private taxi or auto-rickshaw to reach the desert on your own.
Opening times: All day
Best time to visit: The ideal time to explore the Thar Desert is at sunset. The dunes can become extremely hot during the afternoon, so it’s better to wait until the evening when the desert is at its most magical, especially as the sun sets.
Entrance Fee: Costs vary depending on the experience you choose.
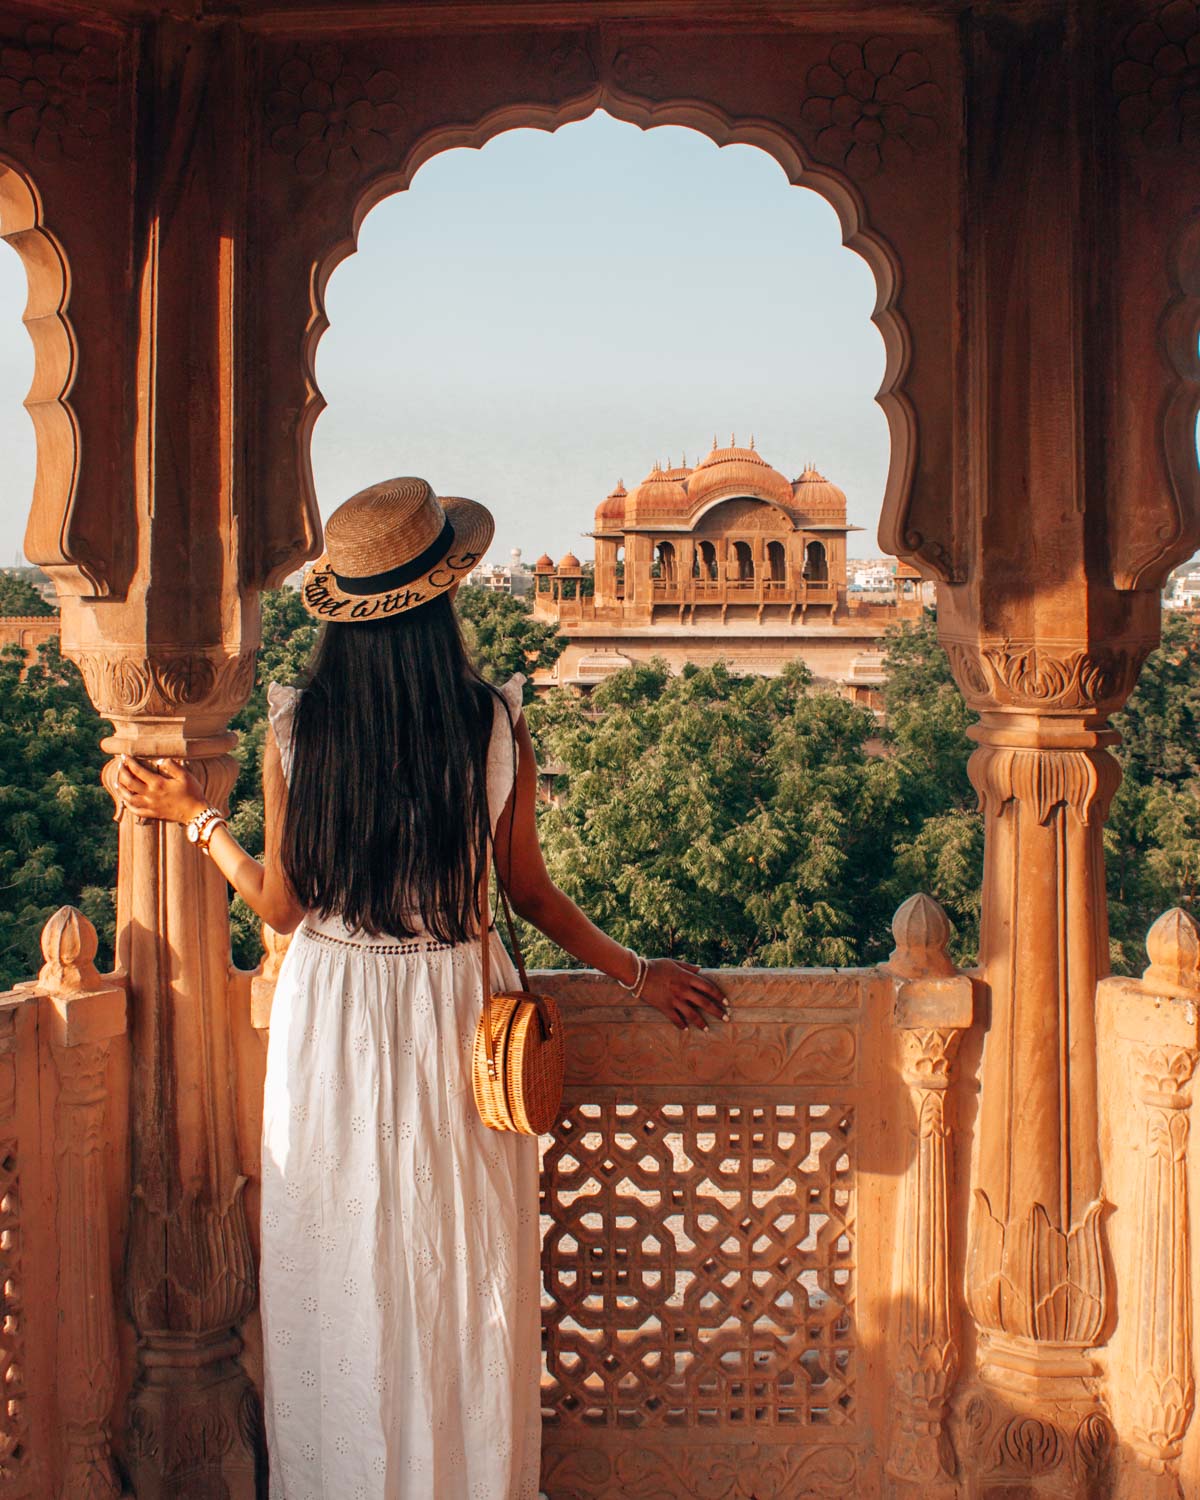
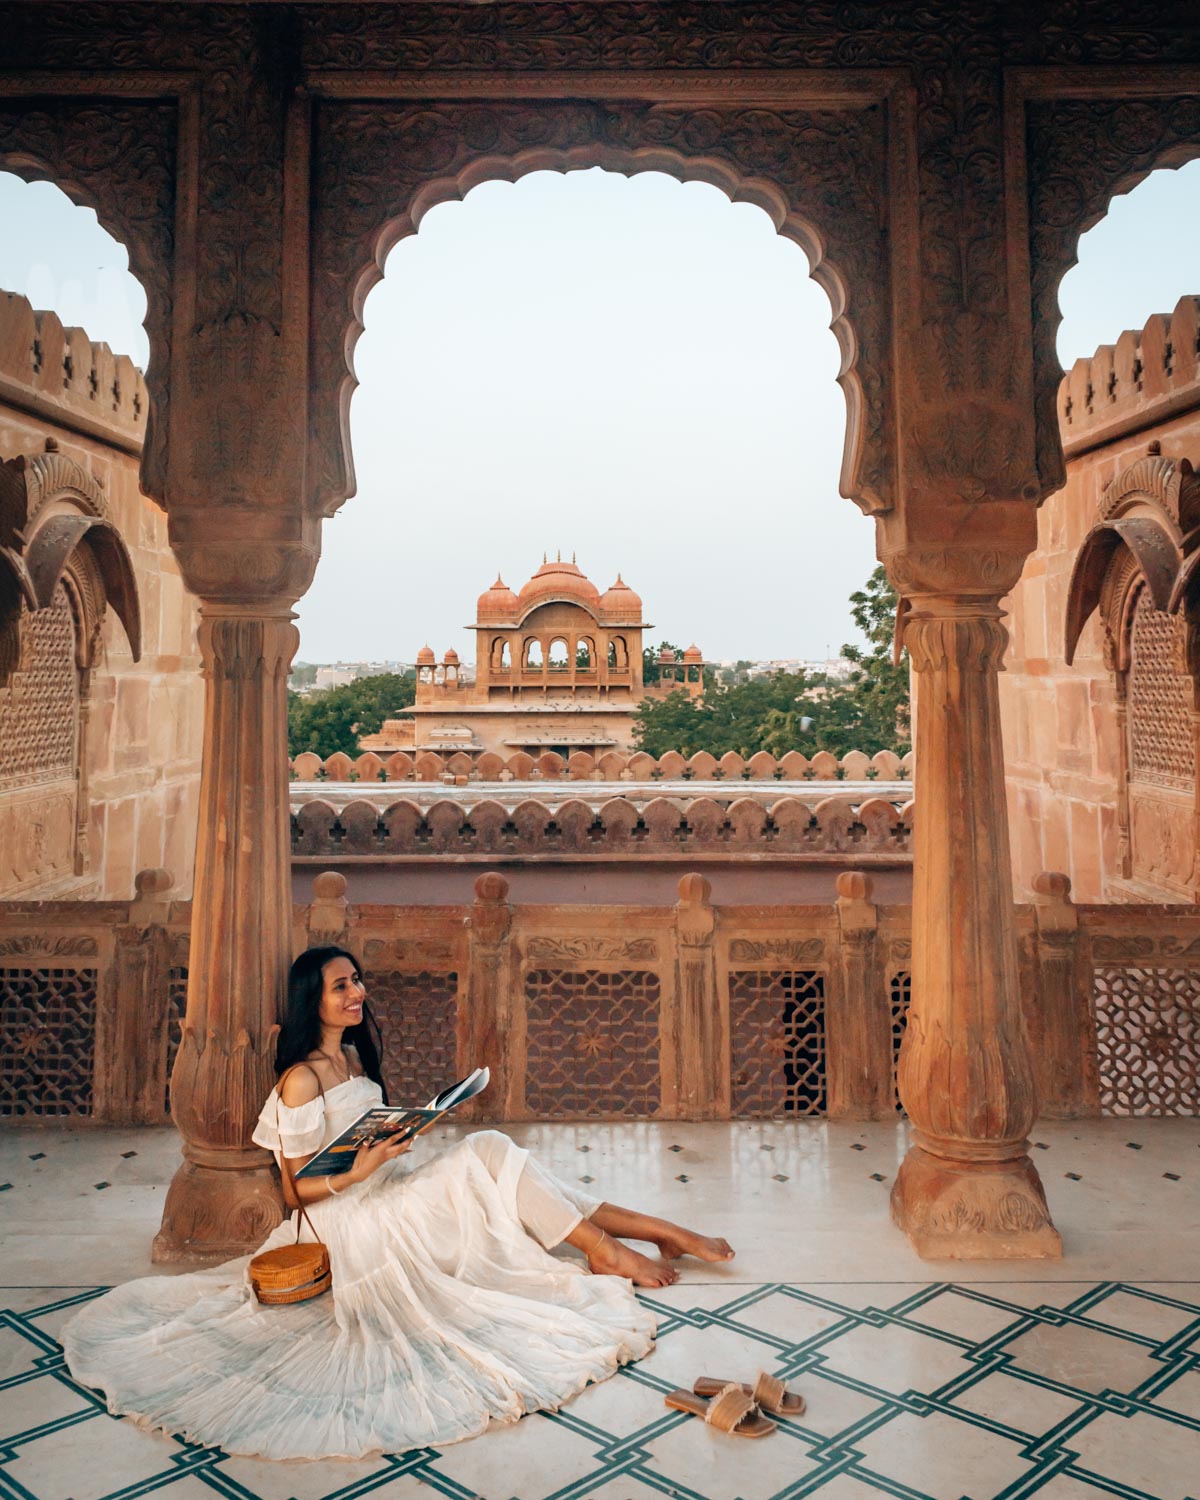
LALLGARH PALACE
Lallgarh Palace is yet another luxurious palace in Bikaner, located within the same complex as Laxmi Niwas Palace. Originally the residence of Maharaja Ganga Singh Ji, the palace still houses the Bikaner royal family in a private wing. The remaining sections have been transformed into a heritage hotel, managed by the emperor’s trust.
Constructed from the same red sandstone found in the Thar Desert, Lallgarh Palace is adorned with intricate stone carvings. For those interested in royal history and treasures, the Sadul Niwas wing of the palace features a museum dedicated to royal artifacts. However, note that visitors to the museum alone do not have access to the hotel areas unless they have a reservation or booking.
Although I didn’t have the opportunity to explore the palace’s interiors, I’ve seen stunning photos of its charming decor, particularly its indoor swimming pool, which looks like something straight out of a Wes Anderson film. If you’re staying at or visiting Laxmi Niwas Palace, you can enjoy a panoramic view of Lallgarh Palace from the roof—a breathtaking sight, especially at sunset.
How to get there: Lallgarh Palace is located next to Laxmi Niwas Palace, so you can easily walk between the two. If you’re staying at either property, visiting the other is simple and convenient. For those staying elsewhere, a private vehicle or taxi will get you to the palace complex.
Opening times: The hotel is open all day, while the Sri Sadul Museum operates from 10 am to 5 pm, every day except Sunday.
Best time to visit: Lallgarh Palace isn’t typically crowded, so you can visit at your convenience. It’s best to combine your visit with Laxmi Niwas Palace to make the most of your time.
Entrance Fee: INR 10 for the museum. For overnight stays, you should check the current rate and availability.
LAXMI NIWAS PALACE
Laxmi Niwas Palace is undoubtedly the most grandiose of all the palaces in Bikaner. Completed in 1902, it once served as the residence of Maharaja Ganga Singh Ji. Today, this stunning property has been transformed into a luxury heritage hotel that captivates visitors with its enchanting beauty.
The exterior of this palace-turned-hotel is monumental, offering numerous picturesque spots to admire and photograph. Even if you’re not staying at Laxmi Niwas Palace, I highly recommend a visit to tour the property and enjoy a meal in their royal dining room. The Rajasthani Thali I had there was one of the finest I’ve ever tasted, and as a Rajasthan resident, that’s saying something!
Built from Bikaner’s iconic Dulmera sandstone, the palace showcases intricate carvings and is designed in the Indo-Saracenic architectural style. There are countless scenic spots perfect for photography, including the large front garden, which provides a fantastic vantage point to capture the entire palace. The swimming pool area with its charming turquoise windows and the rooftop adorned with chhatris and arches are equally breathtaking.
How to get there: Laxmi Niwas Palace is situated on Dr. Karni Singhji Road. You can drive yourself or hire a taxi to get there. Upon arrival, the guard will ask about the purpose of your visit, so it’s best to have a reservation for lunch, dinner, or a hotel booking in advance.
Opening times: The hotel is open all day.
Best time to visit: Arrive before sunset to capture the best photos. Since it’s a luxury hotel, the property isn’t usually crowded, allowing you to take photos without interruption. Don’t miss the stunning sunset views from the rooftop—just be sure to explore the ground level first before heading upstairs. Afterward, you can enjoy an early dinner in the main courtyard to wrap up your visit.
Entrance Fee: INR 500 for non-hotel guests, which is redeemable against your dining bill.
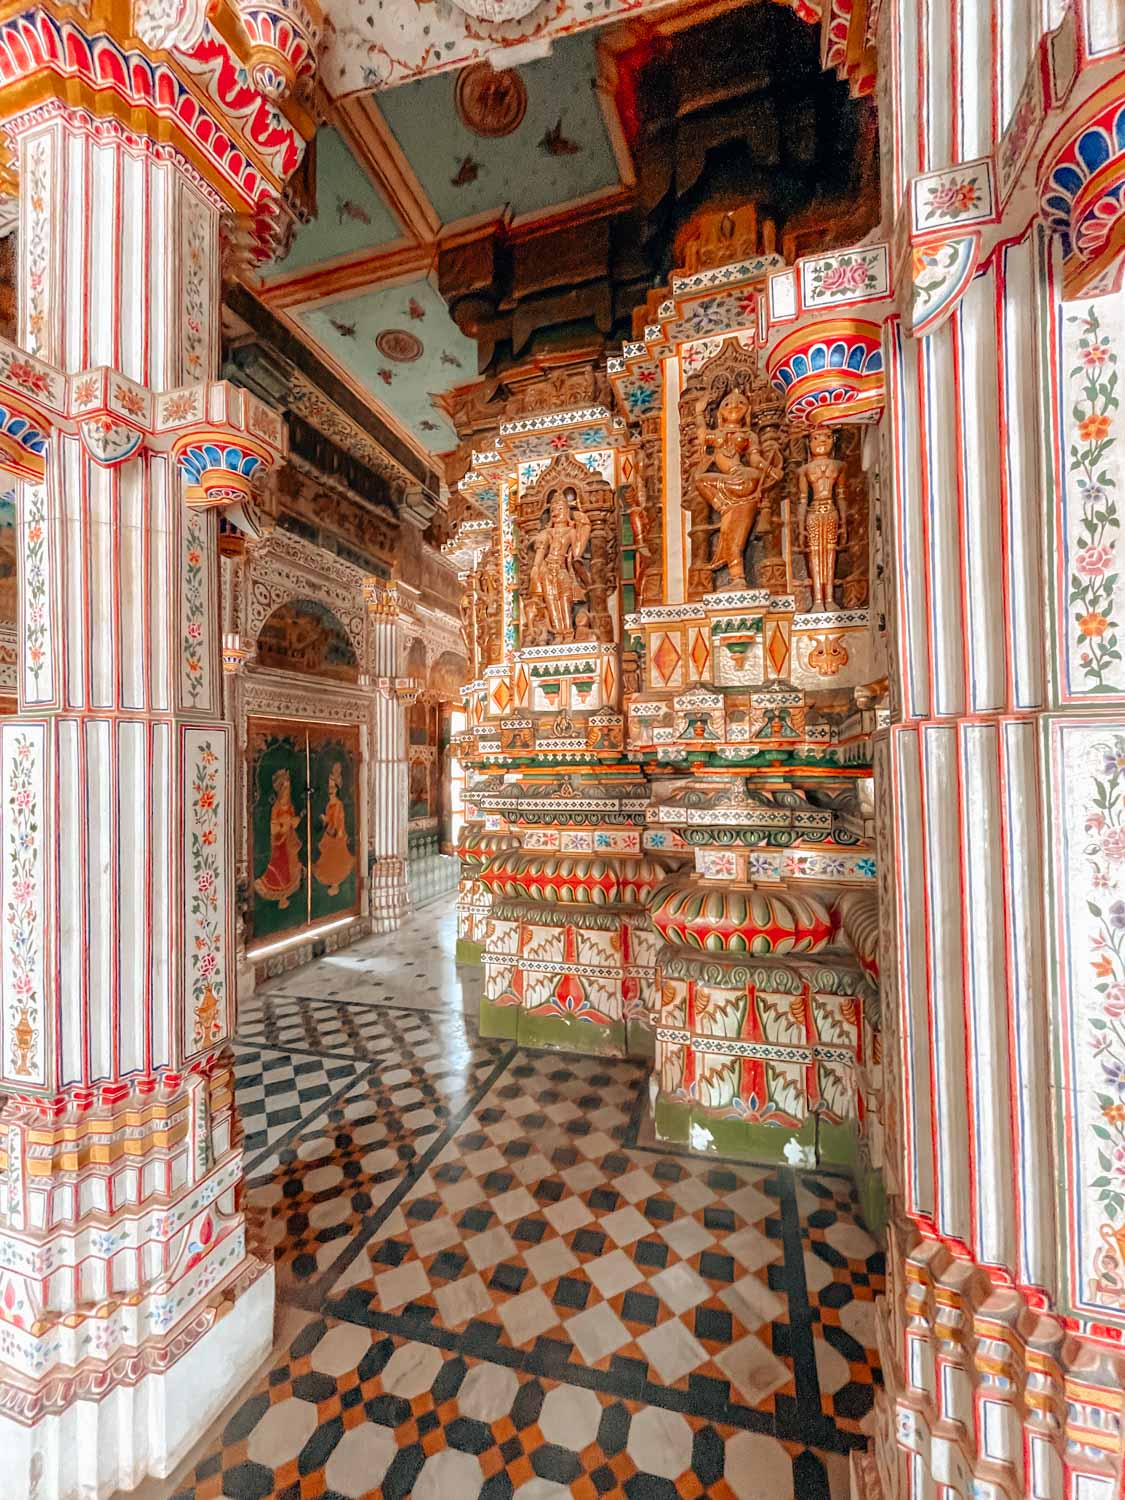
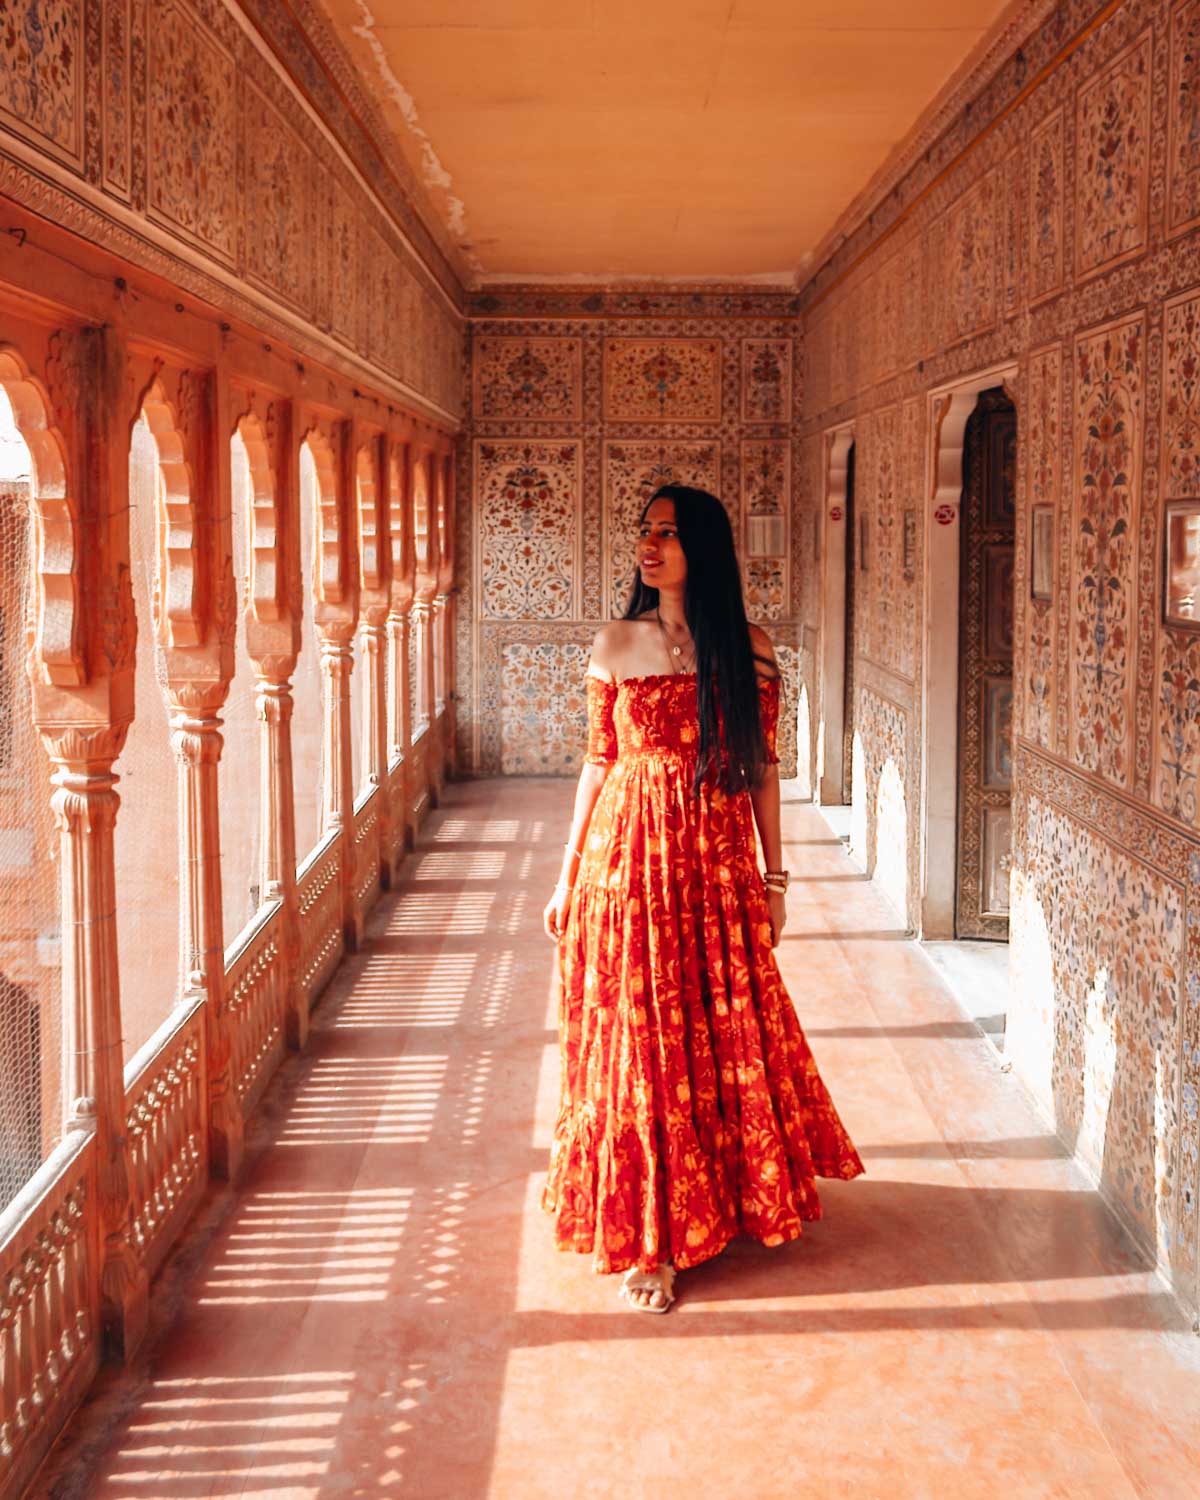
SETH BHANDASAR JAIN TEMPLE
Among the many temples in Bikaner, the Seth Bhandasar Jain Temple stands out as the most beautiful. Dedicated to Sumatinatha, the 5th Tirthankara, this three-story religious landmark enchants visitors with its stunning interiors. From intricate leaf paintings and vibrant frescoes to patterned mirror work and detailed stone carvings, every corner is a photographer’s delight.
Constructed in the mid-15th century, the temple has a captivating story behind its building. Legend has it that 40,000 kg of ghee (clarified butter) was used in the mortar instead of water to address the region’s water scarcity. The priest mentioned that visitors could witness the ghee melting and rising in the summer months, and I did notice some slippery spots during my visit!
Tip: When visiting this temple, you’ll need to remove your shoes. The floor was exceptionally clean when I went, but if you’re visiting in the afternoon, be cautious as the outdoor floor can get extremely hot. Also, please note that leather products are not allowed inside the temple.
How to get there: The roads leading to the temple are narrow and not suitable for four-wheelers. I recommend taking an auto-rickshaw or walking for a more seamless experience. The Jain Temple is only a few minutes from Rampuria Haveli, so you can easily combine your visit to both sites along with other attractions in the walled city.
Opening times: The temple is open in the morning and evening, closing for a few hours in the afternoon before reopening at 4 PM.
Best time to visit: Seth Bhandasar Jain Temple is a hidden gem in Bikaner, typically free of tourists. However, locals often pray during the morning, so the best time to visit is after it reopens at 4 PM for excellent photo opportunities. You can capture beautiful shots inside the temple and then head to the rooftop for a stunning sunset view over the old city. Just be mindful not to arrive too late, as it tends to get busy again for the evening aarti (prayer).
Entrance Fee: Free, though there is a charge of INR 25 for video recording.
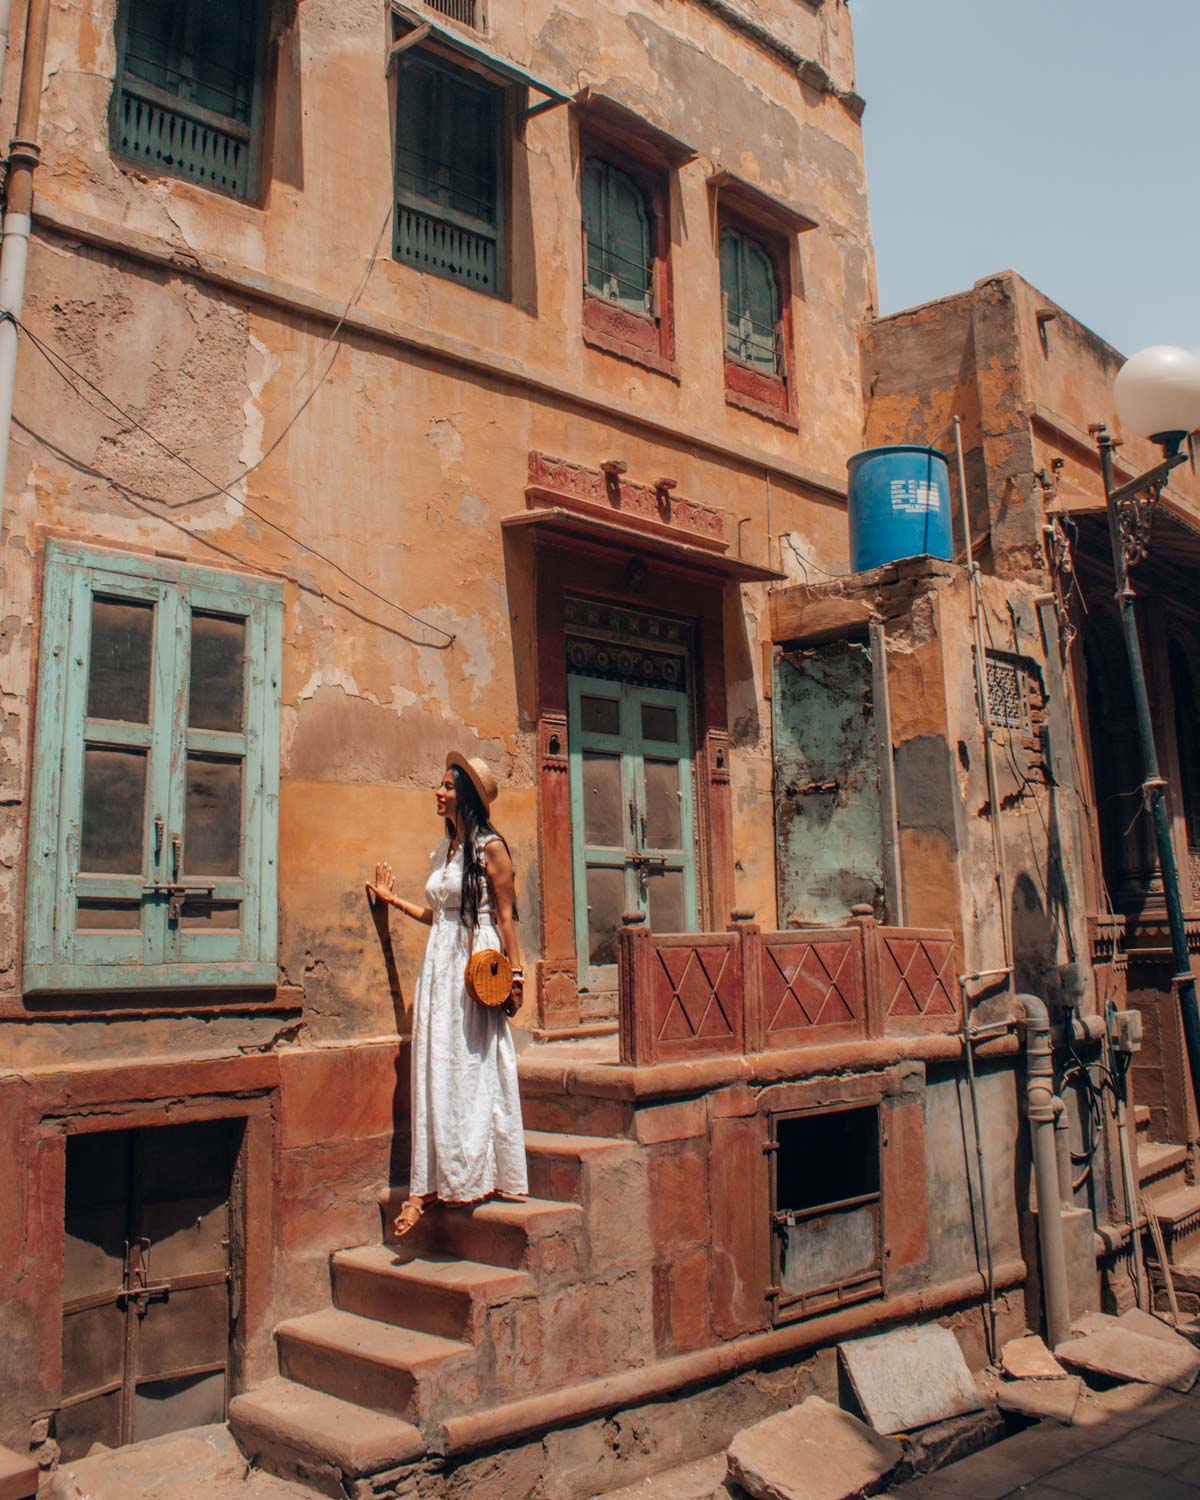
THE WALLED CITY OF BIKANER
While the Rampuria Havelis are the most iconic and photographed part of Bikaner’s walled city, there’s much more to explore and capture in this charming area. We spent a delightful few hours wandering through the narrow lanes, uncovering a wealth of beautiful havelis, Instagrammable doors, and hidden temples along the way.
Like many other places in Rajasthan, Bikaner’s old city was fortified with a large wall. Be sure to stop at the grand Kote Gate when entering or leaving; it’s a famous landmark that has stood the test of time for over 500 years. The local shops and eateries lining the Kote Gate are also worth checking out, offering a taste of the local culture.
If you enjoy meandering without a set plan, set aside an hour or two to explore the Old Town streets and discover historic gems. The Bhanwar Niwas Palace, located in this part of Bikaner, belongs to the same merchant family as the Rampuria Havelis. Constructed in 1927 for Bhanwarlalji Rampuria, it now operates as a heritage hotel. You can wander through its picturesque courtyard or enjoy a meal and tea on-site.
Tip: The Bhanwar Niwas Palace was closed during my visit, so it’s wise to call ahead and confirm their hours before planning your trip.
How to get there: The roads leading to Kote Gate are relatively spacious, allowing for easy access by car. You can park behind the Ratan Bihari Temple and then explore the area on foot or by hiring an auto-rickshaw.
Opening times: Open all day.
Best time to go: Early morning is ideal for exploring the walled city, especially since Bikaner can get quite hot during the day. Start your visit at the Rampuria Haveli, then continue along the same street to discover more architectural gems. On your way back, stop by Kote Gate to explore the colorful bazaar and indulge in the city’s famous sweets and snacks while shopping for souvenirs.
Entrance Fee: Free.
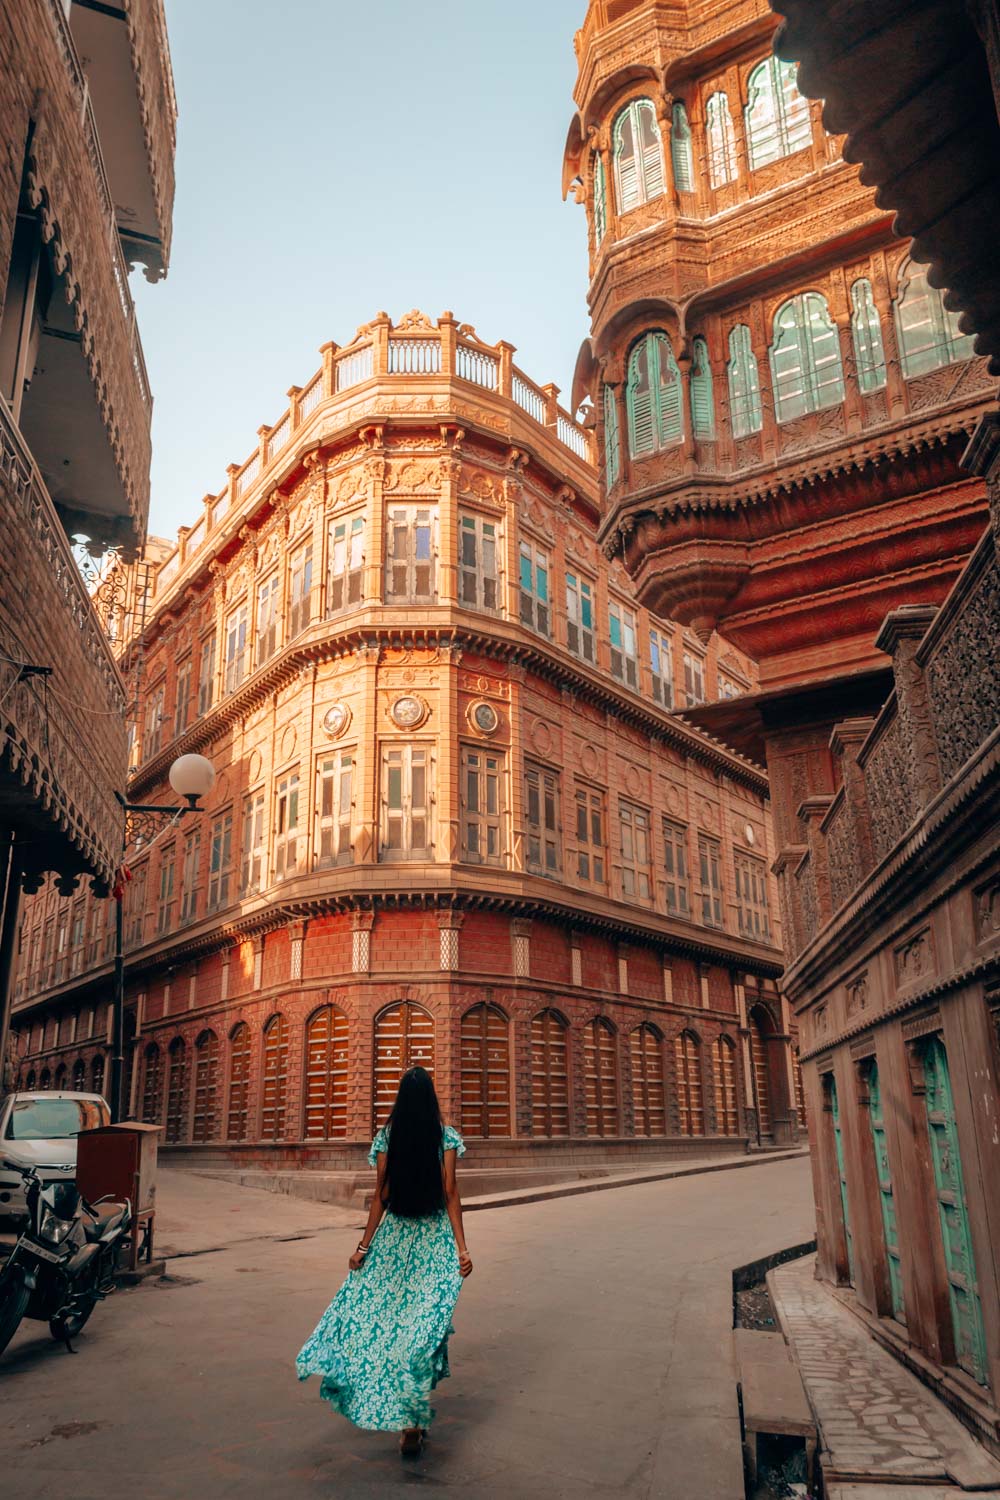
RAMPURIA HAVELI
Recognized as the pride of Bikaner, the Rampuria Haveli is a stunning cluster of seven ornate mansions that once belonged to a wealthy merchant family from a bygone era. Built in the 15th century with Bikaner’s signature Dulmera red sandstone, these havelis are celebrated for their intricate designs, jharokas, and detailed carvings.
I must admit, Rampuria Haveli was the highlight of my Bikaner trip. The traditional architecture and aesthetic colors had always intrigued me, drawing me to this city to explore the rich history behind its small, winding lanes. Now that I’ve finally visited, I can confidently say these havelis are even more breathtaking in person than they appear on Instagram.
If you’re short on time and can visit only one place in Bikaner, make it here. The area surrounding the havelis is a visual delight, especially for street photographers and door enthusiasts. Be prepared to encounter an array of Instagram-worthy doors and windows in hues ranging from turquoise and red to brown and gold. I loved the architecture so much that I returned twice!
How to get there: The most photographed Rampuria Haveli, which also operates as a homestay, is located on Joshiwara Street in the walled city. Given the narrow roads, it’s best to take an auto-rickshaw or hire one for a few hours. Alternatively, you can explore the area on foot as part of a heritage walking tour.
Opening times: Open all day.
Best time to go: Sunrise or early morning is the ideal time to visit Rampuria Haveli. All the havelis are situated along a narrow lane that experiences two-way traffic throughout the day. During my visit, we explored at both 6:30 AM and 10 AM. While the morning light is excellent for photography, the latter time can be a bit overwhelming due to the constant flow of vehicles. Early morning also allows you to avoid backlighting and shadows on the buildings.
Entrance Fee: Free.
JUNAGARH FORT
When you travel to Rajasthan, a picturesque fort is an absolute must-see, and Junagarh Fort fits the bill perfectly. Constructed in the late 16th century by Raja Rai Singh, this fort is one of Bikaner’s most famous landmarks, celebrated for the exquisite craftsmanship of the sixteen rulers who resided here over the years. The fort showcases a stunning blend of architectural styles influenced by both Rajput and British designs.
A visit to Junagarh Fort is not just a glimpse into the past; it’s a journey through time. You’ll discover parts of the fort dating back to the 16th century alongside other mahals and architectural features added by subsequent kings. My personal favorite was the Chandra Mahal, adorned with lavish gold-plated deities, stunning bedrooms, and intricate paintings. The wall detailing there was truly unlike anything I had ever seen!
From countless rooms and courtyards to temples and palaces each exhibiting unique decor, Junagarh Fort is undoubtedly a dream destination for Instagram enthusiasts. During the two hours my family and I spent exploring, I barely went a minute without capturing another photo!
How to get there: Junagarh Fort is conveniently located in the heart of Bikaner and can be easily reached by taxi, auto-rickshaw, or private car. Unlike many forts in Rajasthan that are perched on hilltops, you can even walk here if you’re staying nearby.
Opening times: 10 AM – 4:30 PM
Best time to go: While Bikaner is generally not very crowded, it’s advisable to arrive early, preferably by 10 AM, as this is the city’s most famous attraction. We visited at 3:30 PM and managed to capture some unobstructed shots after a brief wait at certain spots. However, arriving earlier would allow you to fully explore the expansive fort without feeling rushed.
Entrance Fee: INR 50 for Indian nationals and INR 300 for foreign tourists. A student discount is available with a valid ID.
CONCLUSION
Bikaner, a city steeped in history and culture, offers a plethora of Instagrammable spots that capture its essence. From majestic forts and intricate havelis to vibrant markets and serene temples, each location presents a unique opportunity to create stunning visuals. Whether you’re a photography enthusiast or simply seeking memorable experiences, Bikaner’s Instagrammable spots are sure to leave you captivated.