Are you tired of spending money on haircuts for men? With the right tools and techniques, cutting your own hair at home is easier than you think. Not only will it save you money, but it also gives you the freedom to experiment with different styles.
In this guide, we will walk you through the step-by-step process of how to cut men’s hair, from choosing the right tools to mastering different haircut styles. So grab your scissors and let’s get started!
Understanding Hair Types and Face Shapes
Hair Types:
- Straight: Hair that grows in a straight pattern without any noticeable waves or curls.
- Wavy: Hair that has a slight curl or wave, but is not as curly as curly hair.
- Curly: Hair that has a tight curl or coil pattern.
- Coily: Hair that has a very tight curl pattern, also known as kinky hair.
Knowing your hair type will help you determine which techniques and products will work best for your hair. For example, those with curly or coily hair may need to use hair thinning shears to avoid a bulky haircut.
Face Shapes:
- Oval: This is considered the ideal face shape, with balanced proportions and a slightly curved jawline.
- Square: A square-shaped face has strong, angular features and a straight jawline.
- Round: This face shape has soft angles, with the width and length of the face being almost equal.
- Heart: The face is widest at the forehead and tapering down to a narrow chin.
- Diamond: This face shape is widest at the cheekbones and has a narrow forehead and chin.
Understanding your face shape can help you choose a haircut style that will complement your features and balance out any imperfections.
Getting Started: Tools and Preparation
Tools:
- A pair of sharp scissors
- A clipper with various guard sizes
- A comb
- Hair clippers (optional)
- Haircut cape or towel
- Hair thinning shears (optional)
- Mirrors (at least two, one handheld and one wall-mounted)
Preparation:
- Start by washing and drying your hair. This will make it easier to cut and ensure that the hair is clean.
- Comb your hair in the direction you want it to lay.
- Put on your haircut cape or drape a towel over your shoulders to catch any loose hair.
- Set up mirrors in front of and behind you so you can see all angles of your head.
Basic Haircut Techniques
Now that you have your tools and understand your hair type and face shape, it’s time to start cutting! Here are some basic techniques that will come in handy when cutting men’s hair:
Technique 1: Blending
Blending is the process of seamlessly transitioning between different lengths of hair. It’s essential for achieving a natural-looking haircut. To blend, you will need to use different guard sizes on your clipper and gradually decrease the length of the hair from top to bottom. You can also use scissors to blend by cutting at an angle instead of straight across.
Technique 2: Texturizing
Texturizing is the process of creating movement and texture in the hair. This technique is essential for those with thick or curly hair, as it helps to remove bulk and create a more manageable style. You can texturize hair by using thinning shears or point-cutting with scissors.
Technique 3: Layering
Layering is the process of creating different lengths throughout the hair. It adds volume and dimension to the haircut. To layer, you will need to use scissors to cut sections of hair at an angle, starting from the shortest length and gradually increasing the length as you move up.
How to Cut Men’s Hair
Step 1: Trimming with Clippers
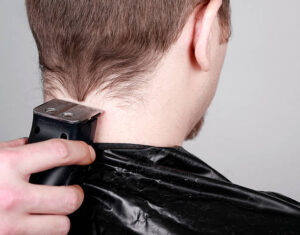
Begin the clipping process at the base of the neck. Position the clippers against the scalp and move them upwards from the nape of the neck to approximately halfway up the head. Round the clippers upwards and outwards to complete this portion. Proceed to the sides, cutting in an upward motion against the hair growth.
Methodically work around the entire head, taking care when cutting around the ears. Leave the top of the head for scissor work.
Use the clippers to line up the back of the head. Flip the clippers upside-down, align the blades perpendicular to the head, and cut in a downward direction.
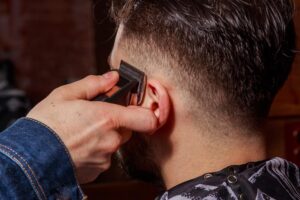
To line up the sides of the head, use the clippers to trim the hair above and around the ears. Hold the clippers on their side and employ the blade’s edge to cut the hair from the back to the front, going against the natural hair growth. Tilt the clippers at a 45-degree angle to achieve a smoother blend and fade.
Step 2: how to cut men’s hair with scissors

Begin by moistening the top of the hair. Lightly spritz the uncut hair on the top of the head using a spray bottle. Comb this hair forward and create a center parting, as if it were between the eyes, separating the right and left sides. You can use hair clips to section the hair if needed.
Trim the top hair with scissors. Lift a half-inch section of hair, starting at the back and moving forward along the part you just created. Hold the hair between your index and middle fingers and slide them up or down to the desired length. Leave the hair below your fingers on his head, and trim the hair above your fingers. To avoid a blunt or uneven appearance, cut the hair at a 45-degree angle using hair cutting scissors.
Make clean cuts perpendicular to the hair’s direction. Instead of making a single large cut with the entire scissor blade, use the scissor tips to make short, precise cuts.
When moving on to a new section of hair, always use a portion of the previously cut section as a guide length. Point cut the hair with the scissor tips to match the guide.
Step 3: Fading the hair
To achieve a faded look on the sides and back of the head, switch to a slightly shorter clipper attachment than the one you used in step two.
Continue the cutting process you followed at the front of the head, but this time, trim only about halfway up the sectioned hair. Remember to employ the flicking motion, as it plays a crucial role in blending the hair seamlessly.
Step 4: Blending at the Top of the Head
After you’ve completed the sides of the head, the next step in finalizing your men’s haircut involves removing the sectioning clips.
Take your scissors and slightly dampen the hair at the top of the head; a simple spray bottle can do the trick.
To create a smooth transition between the longer hair on top and the fade, envision a half-circle shape on the crown of the head. Use your comb and scissors to trim the hair shorter on the sides of this imaginary “circle.”
Popular Haircut Styles for Men
Now that you have the basic techniques down, it’s time to explore some popular haircut styles for men:
Style 1: The Buzz Cut
This classic style is ideal for those who want a low-maintenance haircut. It involves cutting the hair very short all over with clippers, usually with a guard size of
The buzz cut is perfect for those with oval or square-shaped faces.
Style 2: The Crew Cut
The crew cut is a variation of the buzz cut, with slightly longer hair on top and shorter sides. It’s a versatile style that can be styled in different ways, such as slicked back or textured. This style suits most face shapes, but especially those with round or diamond-shaped faces.
Style 3: The Undercut
The undercut is a trendy style that involves shaving the sides and back of the head while leaving longer hair on top. This creates a contrast between the two lengths and allows for various styling options. The undercut works well for all face shapes, but is especially flattering for those with heart-shaped faces.
FAQs
Q: Can I cut my own hair if I have curly hair?
A: Yes, you can cut your own curly hair as long as you understand your hair type and use the right techniques and tools.
Q: Is it necessary to use thinning shears when cutting thick hair?
A: Thinning shears are not necessary but can help to achieve a more manageable and lightweight haircut for those with thick hair.
Q: How often should I trim my hair?
A: It depends on your hair type and desired style, but generally every 4-6 weeks is recommended to maintain healthy hair.
Q: Can I use regular household scissors to cut my hair?
A: It’s not recommended to use regular scissors as they may be dull and lead to uneven cuts. Invest in a pair of sharp scissors specifically for cutting hair.
Q: Are there any specific products I should use after cutting my hair?
A: It’s always a good idea to use a styling product, such as a pomade or gel, to help achieve your desired style and keep the haircut in place.
Conclusion
Cutting men’s hair may seem intimidating at first, but with the right tools and techniques, it can be an easy and money-saving process. Remember to understand your hair type and face shape, start with basic techniques, and choose a haircut style that suits you best. With practice, you’ll become a pro at cutting your own hair!