How to Contour Nose: Step-By-Step Tutorial For Beginners

When it comes to makeup, contouring has become an essential part of women’s beauty routine. It is a technique that enhances and defines our facial features, making them appear sharper and more defined. The nose, being the focal point of the face, can greatly benefit from contouring. In this article, we will discuss how to contour nose effectively and achieve the perfect look.

What is Nose Contouring?

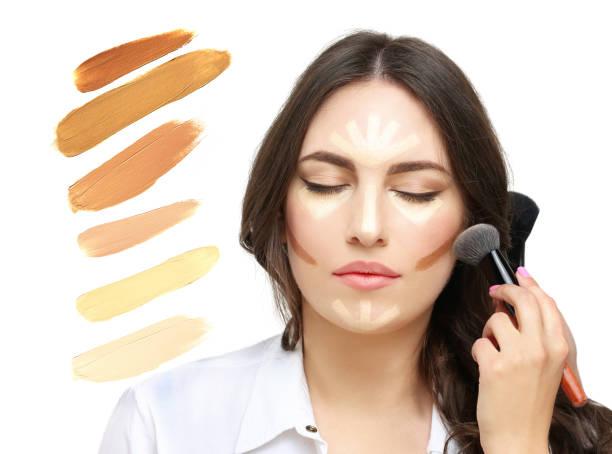
Nose contouring is a makeup technique used to sculpt and define the appearance of the nose. It involves using makeup products, typically foundation, concealer, and contouring powder or cream, to create the illusion of a more refined, slimmer, or straighter nose. This technique is often employed in makeup application to enhance facial features and create a more balanced overall look.

Contouring requires precision and attention to detail. It is essential to have a clear understanding of the shape of your face and the areas you want to highlight or reduce. The key to successful contouring is blending. You want to make sure that there are no harsh lines and that everything looks natural.

Types of Nose Shapes

The first step in learning how to contour nose is to identify the shape of your nose. There are several nose shapes, and each requires a different approach to contouring. Here are some of the most common nose shapes:

Straight Nose

A straight nose has a minimal curve and no bumps or humps. To contour a straight nose, focus on the sides of the nose. Apply a shade darker than your skin tone to the sides of your nose and blend it well. This will create an illusion of shadow, making your nose appear slimmer.

Bumpy Nose

A bumpy nose has visible bumps or humps on the bridge. To contour a bumpy nose, apply a darker shade on the bump or hump. Blend it well to make it look natural. Apply a lighter shade on the sides of the nose to create an illusion of slimmer nose.

Wide Nose

A wide nose has a broad bridge with flared nostrils. To contour a wide nose, apply dark shades on the sides of the nose and blend them well. Use a lighter tone down the center of your nose. This will give the illusion of a narrower nose.

Downturned Nose

A downturned nose is characterized by a drooping tip. To contour a downturned nose, apply a darker shade at the tip of your nose. Blend it well to make it look natural. Apply a lighter tone on the bridge of your nose.

How to Contour Nose Naturally

Step 1: Gather Your Makeup Products

Before you start, ensure you have the following makeup products ready: foundation, concealer, contour powder or cream (a shade or two darker than your skin tone), setting powder, and makeup brushes or sponges.

Step 2: Apply Your Base Makeup

Begin by applying your regular foundation or tinted moisturizer all over your face, including your nose. This provides a smooth canvas to work on.

Step 3: Highlight the Nose

Use a concealer that is slightly lighter than your skin tone. Apply it down the center of your nose, starting between your eyebrows and extending down to the tip. You can also apply a small amount to the area just above the tip of your nose. Blend the concealer well using a makeup brush or sponge.

Step 4: Contour the Nose

Choose a contour powder or cream that is a few shades darker than your skin tone. Apply the contour product to the sides of your nose to create shadows. Common areas to contour include the sides of the bridge of the nose and the area just under the tip. The key is to make the nose appear slimmer and more defined. Use a thin, angled makeup brush for precise application.

Step 5: Blend Thoroughly

Blending is crucial to make your nose contour appear natural. Use a clean makeup brush or sponge to blend the highlight and contour lines. Make sure there are no harsh lines or obvious distinctions between the two.

Step 6: Set Your Makeup

To ensure your makeup stays in place and doesn’t smudge, set your nose contour with a light dusting of translucent setting powder. You can use a small makeup brush or a makeup sponge to apply the powder.

Step 7: Final Check

Take a moment to check your makeup in different lighting conditions and from various angles to ensure your nose contour looks seamless and balanced. Make any necessary adjustments if you feel it’s needed.

To create a natural contour look,  start with a subtle contour and gradually build up to the intensity you desire. It’s essential to blend thoroughly for a natural appearance, and don’t be discouraged if it takes a few tries to perfect your technique. With practice, you’ll be able to achieve the desired nose shape that complements your overall makeup look.

Nose Contouring Tips

Choose the Right Shade

Select a contour product that is only a few shades darker than your natural skin tone. Avoid using a shade that is too dark, as it can create a harsh, unnatural look. For fair skin tones, opt for cool-toned contours, while warmer tones work well for medium to deep skin tones.

Blend, Blend, Blend

Blending is the key to achieving a natural and seamless nose contour. Use a makeup brush, sponge, or your fingertip to blend the contour lines thoroughly. Pay special attention to the edges where the highlight and contour meet to ensure there are no visible lines.

Less is More

It’s easier to add more product than to remove excess. Overly heavy contouring can make your nose look unnatural and detract from your overall makeup look.

Consider Your Nose Shape

Different nose shapes require different contouring techniques. For example, if you have a wide nose, focus on contouring the sides to create a slimming effect. If your nose is long, concentrate on contouring the tip to make it appear shorter. Analyze your nose shape and tailor your contouring accordingly.

Natural Lighting

Contour your nose in natural lighting whenever possible. Natural light provides the most accurate representation of how your makeup will appear in different settings. Step outside or near a window to check your makeup during the process and make any necessary adjustments.

Final Takeaway

Contouring is a great way to enhance your facial features, and knowing how to contour nose effectively can make a significant difference. It takes time and practice to perfect your technique, but with patience, you can achieve the perfect look. Remember to choose the right shade of contouring makeup that matches your skin tone, use natural light when applying makeup, and always blend well. With these tips and tricks, you will be able to contour your nose like a pro!

how to contour face: Makeup Artist tutorial

If you’re looking for a way to enhance your facial features and achieve a more defined look, then contouring is the answer. Contouring is a makeup technique that involves using darker and lighter shades to create shadow and highlight areas of your face. 

Read on to discover a step-by-step guide on how to contour your face and how tailor contour technique for your unique face shape.

What is Contouring?

Contouring is a makeup technique that has been around for decades. It involves using different shades of makeup to sculpt and define your facial features. By applying darker shades in the areas you want to recede, and lighter shades in the areas you want to emphasize, you can create the illusion of a slimmer nose, higher cheekbones, and a more defined jawline.

What’s the Difference Between Contouring and Bronzing?

Contouring and bronzing are both makeup techniques that enhance the structure and dimension of the face, but they serve distinct purposes and use different shades and placements. Contouring primarily focuses on creating shadows to define and sculpt the facial features. It typically involves using a matte, cool-toned product, often in a shade a few shades darker than your natural skin tone, to mimic the appearance of shadows in areas like the hollows of the cheeks, along the jawline, and on the sides of the nose. The goal is to create the illusion of more chiseled and defined features, making areas recede and appear slimmer.

On the other hand, bronzing is all about adding warmth and a sun-kissed glow to the face. It uses a warm-toned, matte or slightly shimmery product that’s often only a shade or two darker than your natural skin tone. Bronzer is typically applied to areas where the sun would naturally hit your face, such as the high points of the cheeks, the forehead, and the nose bridge. The aim is to create a healthy, radiant complexion and to mimic the effects of a sun-touched complexion. Unlike contouring, bronzing doesn’t aim to create shadows or alter the shape of your features but rather to add a healthy flush of color and warmth to your skin.

What You Need to Contour Your Face

  • Foundation
  • Concealer
  • Contour powder or cream
  • Highlighter
  • Blush
  • Angled brush
  • Beauty blender or makeup sponge
  • Powder brush

Here are some comparisons to help you choose the right products:

  • Powder vs. Cream: Powder contour is easier to use and blend, while cream contour provides a more natural finish and better coverage.
  • Angled Brush vs. Beauty Blender: An angled brush is great for precise application, while a beauty blender or makeup sponge is ideal for blending and creating a seamless finish.
  • Matte vs. Shimmer Highlighter: A matte highlighter creates a more natural look, while a shimmer highlighter adds a dewy finish and extra glow.

How to Contour Your Face

Step 1: Prepare Your Skin

Start with a clean, moisturized face. Apply your regular foundation or concealer to create a smooth base. This will even out your skin tone and provide a canvas for your contour and highlight.

Step 2: Choose the Right Contour Product

Select a contour product that is a few shades darker than your natural skin tone. It should have a matte finish and cool undertones. Contour products come in various forms, including cream, powder, and stick. Choose one that suits your preferences and skill level.

Step 3: Identify the Contour Areas

Determine the areas of your face you want to contour. The most common areas include:

  • Under the cheekbones: To create the illusion of higher cheekbones and a slimmer face.
  • Along the jawline: To define the jaw and create a more sculpted look.
  • Along the sides of the nose: To make the nose appear narrower.
  • Along the hairline: To add dimension and warmth to the forehead.
  • Under the chin: To minimize the appearance of a double chin.

Step 4: Apply the Contour

Using your chosen contour product, apply it to the areas you identified in step 3. Use a contour brush or a makeup sponge for precision. Apply the product sparingly at first; you can always add more if needed. Blend the contour into your skin using gentle strokes or circular motions. Make sure there are no harsh lines, and blend thoroughly for a natural look.

Step 5: Highlight

Now, it’s time to highlight the areas you want to bring forward. Use a highlighter that is a shade or two lighter than your skin tone. Common highlight areas include:

  • The tops of your cheekbones
  • The bridge of your nose
  • Your brow bone
  • The inner corners of your eyes
  • Your cupid’s bow (the area above your upper lip)
  • Apply the highlighter with a brush or sponge and blend it well. This will create contrast and make the contoured areas stand out more.

Step 6: Set with Powder

To ensure your contour and highlight stay in place, set your makeup with a translucent setting powder. Use a fluffy brush to apply the powder lightly over your entire face.

Step 7: Finish with Setting Spray (Optional)

For a long-lasting finish, you can use a setting spray to lock your makeup in place

Contouring Different face shapes

Oval Face

Contour: Apply contour shade along the sides of the forehead, under the cheekbones, and along the jawline to add dimension.

Highlight: Highlight the center of the forehead, tops of cheekbones, bridge of the nose, and chin for a balanced look.

Round Face

Contour: Apply contour along the sides of the forehead, under the cheekbones, and along the jawline to create angles and definition.

Highlight: Highlight the center of the forehead, tops of cheekbones, and chin to draw attention away from the roundness.

Square Face

Contour: Focus on softening the angles by applying contour to the sides of the jawline, along the hairline, and under the cheekbones.

Highlight: Highlight the center of the forehead, tops of cheekbones, and chin to balance the strong jawline.

Heart-Shaped Face

Contour: Apply contour along the hairline, under the cheekbones, and slightly along the jawline to balance the wider forehead.

Highlight: Highlight the center of the forehead, tops of cheekbones, and chin to enhance the lower half of the face.

Long or Oblong Face

Contour: Apply contour along the hairline, under the cheekbones, and at the chin to create the illusion of a shorter face.

Highlight: Highlight the center of the forehead, tops of cheekbones, and chin to add width to the face.

Diamond Face

Contour: Focus on softening the angles by applying contour to the sides of the forehead, under the cheekbones, and along the jawline.

Highlight: Highlight the center of the forehead, tops of cheekbones, and chin to balance the face’s angular features.

Triangle Face (Pear-Shaped)

Contour: Apply contour along the sides of the forehead, under the cheekbones, and along the jawline to balance the wider jaw.

Highlight: Highlight the center of the forehead, tops of cheekbones, and chin to draw attention away from the jaw.

Tips for perfect contouring

  • Choose the right shade of contour: It’s important to choose a shade that’s a few shades darker than your skin tone for a natural-looking effect.
  • Blend, blend, blend: Blending is the key to achieving a seamless and natural look.
  • Don’t overdo it: Less is more when it comes to contouring. Start with a little product and build up slowly until you achieve the desired effect.
  • Practice makes perfect: Contouring takes practice, so don’t get discouraged if you don’t get it right the first time.

FAQs

  1. Can I contour for everyday makeup? Yes, contouring can be adapted for everyday makeup, but the intensity can be adjusted. For a more natural look, use a lighter hand and subtle shades.
  1. Do I need to contour and highlight every time I wear makeup? Contouring and highlighting are optional steps in makeup. You can choose to contour and highlight when you want to enhance your features, but they are not required for every makeup look.
  1. How do I choose the right makeup brushes for contouring? Select brushes based on your preferences and the areas you want to contour. A contour brush with soft, dense bristles is great for precise sculpting. A smaller brush or sponge can be used for highlighting.
  2. Can contouring be used to change the shape of my face? Contouring can enhance and define your natural features, but it cannot drastically change the shape of your face. It is a makeup technique that adds dimension and highlights your existing bone structure.