How to Strip Hair Color at home

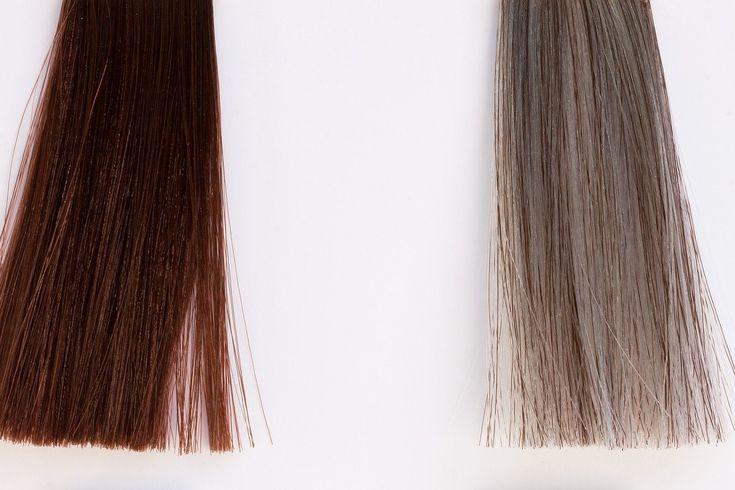
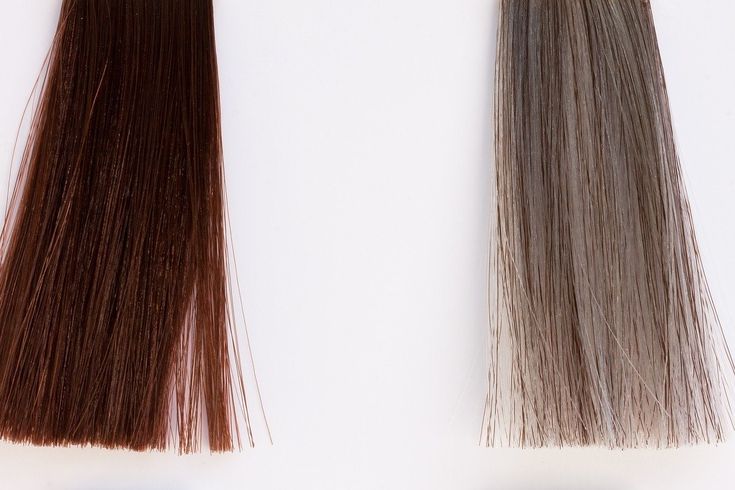
If you’re looking for a change in your hair color, you might want to start by stripping it off first. Stripping the hair color is a process that involves removing the current pigments from your hair. This can be done if you’ve got a previous dye job that turned out differently or if you just want to start anew. 

So, scroll down and check out how to strip hair color effectively and safely. Keep reading!

Hair Type Considerations when stripping color


When removing hair color, it’s crucial to take your hair type into account as different hair types react uniquely to stripping products and processes. Fine hair, being more vulnerable to damage and breakage, requires a gentle stripper and caution against over-processing. Following up with a deep conditioner can help restore moisture and strength. Thick hair, on the other hand, is resilient but might necessitate a stronger stripper or a longer processing time. However, over-processing should be avoided to prevent damage and dryness. Curly hair, often more porous, can absorb stripping products readily, making even color removal a challenge; hence, a gentle stripper is essential, and a patch test is advisable. Color-treated hair is inherently delicate, so professional assistance is wise to prevent damage.

If you are unsure about how to strip your hair color safely, it is always best to consult with a professional stylist.

Products for stripping hair color at home

Color Remover Kits

Color remover kits are specially formulated products designed to remove or lighten hair color. They are available in various brands and can be found in most drugstores or beauty supply stores. These kits typically consist of a color remover, developer, and sometimes a conditioning treatment. Brands like Color Oops, L’Oreal ColorZap, and One ‘n Only Colorfix offer such kits. 

Clarifying Shampoo

While not as effective as dedicated color removers, clarifying shampoos can help fade semi-permanent hair color gradually over several washes. When you apply a clarifying shampoo to your hair, it can also help to strip away some of the surface color molecules from the hair shaft. This action is more effective for semi-permanent or temporary hair dyes that sit on the hair’s surface. To diminish your hair color, avoid clarifying shampoos labeled as “color-safe.”

Vitamin C (Ascorbic Acid)

Vitamin C is an antioxidant, and it has the ability to break down the oxidative hair dye molecules. When vitamin C is mixed into a paste and applied to the hair, it starts to reduce the dye molecules, causing the color to fade. This effect is more pronounced with semi-permanent or direct dyes that are deposited on the hair shaft.

Baking Soda (Sodium Bicarbonate)

Baking soda is abrasive in nature and can physically scrub away color molecules from the surface of the hair shaft. It can also affect the pH level of the hair, making it slightly more alkaline. Hair dye molecules often require an acidic environment to remain stable. By increasing the pH level, baking soda can weaken the bond between the dye molecules and the hair.

White Vinegar

White vinegar is an acid, typically containing acetic acid. When applied to the hair, its acidic nature can help break down the color molecules in hair dye, causing them to loosen and fade. While white vinegar alone may not completely strip all hair color, it can help fade or remove some of the color, particularly if you’ve recently dyed your hair or if you have semi-permanent hair color

How to Strip Hair Color Effectively

Step 1: Determine Your Hair’s Condition

Before starting the stripping process, you need to determine your hair’s condition. If it’s weak, damaged, or brittle because of previous chemical treatments, it may not be suitable for hair stripping. It’s best to consult with a professional stylist to assess your hair’s health before proceeding.

Step 2: Choose the Right Product

There are several products available that can help strip off hair color as we mention above. Some of them are more effective than others, so it’s essential to choose the right one. Most hair color removers are made of chemicals, so make sure to read the product’s label and instructions carefully before using it.

Step 3: Prepare for the Process

Prepare for the hair stripping process by wearing gloves and old clothes. Chemicals used in hair color removers can be harsh and irritating to the skin, so it’s crucial to protect yourself while applying the product. You may also want to cover your work area with old towels or newspapers to avoid staining.

Step 4: Apply the Product

Apply the product according to the instructions on the package. Depending on the product you use, the waiting time can vary from 20 minutes to an hour. Make sure to follow the guidelines to ensure the product’s effectiveness and minimize damage to your hair.

Step 5: Rinse Thoroughly

After the recommended waiting time, rinse your hair thoroughly with warm water. Use a clarifying shampoo to help remove any remaining product from your hair. Make sure to rinse your hair completely to avoid any chemical buildup.

Step 6: Condition Your Hair

Hair stripping can leave your hair dry and damaged, so it’s essential to condition your hair after the process. It helps restore moisture and prevent breakage. You may also want to use a deep conditioning treatment or hair mask to provide extra nourishment to your strands.

Stripping vs. bleaching

Stripping and bleaching are two distinct methods for lightening or removing hair color. Hair stripping involves using a chemical product that breaks down the color molecules in the hair, making it fade or lighten. It’s generally less damaging than bleach and is often used for removing temporary or semi-permanent hair color. On the other hand, bleaching is a more aggressive method that uses hydrogen peroxide to lift and remove color from the hair shaft. While it can be highly effective for lightening hair, it can also cause significant damage, particularly if overused or applied incorrectly. The choice between stripping and bleaching depends on factors such as the desired result, the current hair color, and the condition of the hair, with stripping being a milder option for color removal.

tips for stripping hair color

Stripping off hair color may seem like a straightforward process, but it can cause damage if not done correctly. It’s best to seek professional help from a reputable salon or stylist who can assess your hair’s condition and recommend the appropriate product and procedure.

If you decide to do it yourself, make sure to read the product instructions carefully and follow them strictly. Before proceeding with the entire process, conduct a strand test on a small hair section to ensure the stripper is effective and doesn’t cause any adverse reactions. Furthermore, remember to provide your hair with deep conditioning post-stripping to counteract potential dryness and damage, restoring moisture and strength. Wear protective gloves and clothing and avoid leaving the product on your hair for longer than recommended.

FAQ

  1. Can you strip permanent hair dye? Yes, permanent hair dye can be stripped with a hair color remover. Keep in mind that the process can be damaging to the hair, so it’s crucial to take extra care of your strands after the procedure.
  2. How long should you wait before coloring your hair after stripping the previous color? It’s recommended to wait for at least two weeks before applying any new hair color after stripping the previous one. This allows your hair time to recover and prevents further damage.
  3. Can you use hair color remover on freshly dyed hair? It’s best to wait for at least a week before using a hair color remover on freshly dyed hair. This gives the pigments time to settle and ensures that the stripping process is more effective.
  4. Can you strip hair color from bleached hair? Yes, you can strip hair color from bleached hair using a hair color remover. However, bleached hair is already damaged and may become even more fragile after the stripping process. Make sure to condition your hair properly after the procedure.

Final Takeaway

Stripping off hair color may seem like a daunting task, but it can be achieved successfully with the right product and procedure. It’s essential to remember that the process can be damaging to the hair, so it’s crucial to take extra care of your strands before and after the stripping process.

Consulting with a professional stylist is always recommended, but if you decide to do it yourself, make sure to read the product instructions carefully and follow them strictly. With proper care and attention, you can achieve the hair color you desire.

K-tip Hair Extensions – Everything You Need to Know

K-tip hair extensions continue to grow in popularity thanks to their natural appearance and minimal damage to natural hair. If you’re considering K-tip extensions, there’s a lot you’ll want to know first about how they work, their pros and cons, cost, installation, and proper care and maintenance. This in-depth guide will cover everything you need to know about K-tip extensions to help you decide if they’re the right choice for you.

What Are K-Tip Hair Extensions?

K-tip hair extensions are a semi-permanent type of hair extension that are bonded to your natural hair using keratin protein. The extensions get their name from the small “k” shaped keratin bead at the end, which is used to bond the extension to your natural hair.

Unlike other bonding methods like glue or clips, K-tip extensions use a gentle keratin bond to fuse the extensions to your hair. This creates a strong hold that can last up to 6 months with proper care. The keratin bond is designed to minimize damage to your natural hair.

K-tip extensions are made with real human hair and are available in a variety of textures and colors to blend with your natural hair. The individual extensions come in small strands or wefts that can provide length, volume, thickness, or highlights to your current hair.

How Do K-Tip Hair Extensions Work?

  • Your stylist sections out a small row of your natural hair, usually 1-2 inches wide.
  • They apply a small drop of keratin bonding adhesive to the tip of the extension.
  • Using a special heat clamp, they bond the keratin bead at the end of the extension to your natural hair near the root.
  • The clamp uses heat to melt the keratin adhesive, fusing the extension to your hair.
  • This process is repeated until the desired number of extensions have been installed to achieve your hair goals.
  • Once installed, the keratin bonds remain strong through washing, brushing, styling, and other daily wear and tear.

The bonds are small and discrete, so they blend in seamlessly with your natural hair. And unlike other extensions like tape-ins or sewn-in wefts, K-tip extensions don’t require braids or cornrows that can damage your hair.

Benefits of K-Tip Hair Extensions

Natural-Looking Results

The keratin bonds are tiny, only 2-3mm wide, and well-disguised along the hair shaft. This makes the bonds less visible for a seamless blend with your natural hair. You can even wear your hair up without the bonds being detectable.

Long-Lasting Wear

With proper care, K-tip hair extensions can last 4-6 months before needing to be removed. The keratin bonds are durable enough to last through your daily hair washing, styling, and environmental exposure.

Versatile Styling

K-tip extensions move and behave just like your own hair, meaning you can still enjoy all your favorite hairstyles. Curling, straightening, and updos are all possible without compromising the bonds.

Low Maintenance

You care for K-tip extensions the same way you care for your own hair – with regular washing, drying, and styling. No special cleansers or treatments are needed. The keratin bonds are strong enough to withstand your hair’s regular maintenance.

Minimizes Damage

The keratin bond adheres the extensions to your hair without the need for glues, braids, or chemical treatments that can damage hair. The gentle bonding method leads to less hair breakage and shedding.

Good for Fine or Thin Hair

The discrete keratin beads make K-tip extensions ideal for those with fine or thin hair. The bonds lie flat and are less noticeable on hair with less volume.

Adds Volume and Fullness

K-tip extensions are an excellent way to add thickness and fullness to thin or limp hair. More density at the roots helps create the appearance of naturally voluminous hair.

Provides Length

If your goal is longer hair, K-tip extensions are a great solution. Several inches of length can be added instantly and safely to take your hair past your shoulders or even to your waistline.

Safe Removal

K-tip extensions can be safely removed at home by a professional stylist when it’s time for them to be replaced. The keratin bonds dissolve away, allowing the extensions to be removed without damage to your natural hair.

Who Are K-Tip Extensions Good for?

K-tip extensions are suitable for most hair types and textures, including:

  • Fine, thin hair
  • Short hair needing extra length and volume
  • Medium length hair wanting increased thickness and density
  • Long hair that needs a boost in fullness or highlights

Both women and men can benefit from K-tip extensions. When fitted and installed properly by a trained stylist, K-tip extensions are comfortable to wear and blend seamlessly with your natural hair.

People with hair that is weak, damaged, or chemically-treated should consult with their stylist first. Very curly or super straight hair may not be ideal for K-tip extensions which work best on hair with a natural texture.

How Much Do K-Tip Hair Extensions Cost?

The exact cost of K-tip extensions can vary greatly based on several factors:

  • Hair quality – Synthetic vs. real human hair, Remy human hair, virgin hair, etc.
  • Hair length – Pricing increases for longer hair extensions.
  • Amount of hair – More extensions equals higher cost.
  • Your stylist – Prices vary by salon.
  • Your location – Larger cities are often more expensive.

Some typical price ranges for K-tip extensions include:

  • Synthetic hair – $150 to $400
  • Real human hair – $250 to $800
  • Remy or virgin human hair – $500 to $1,200

It’s ideal to budget around $250 to $500 for a quality set of K-tip hair extensions installed by an experienced stylist. Be wary of very cheap extensions which are likely low quality.

Most salons offer free consultations where they can assess your hair’s needs and provide a price quote for the suggested amount of extensions.

What to Expect

The installation process for K-tip hair extensions takes 2 to 3 hours in most cases. Here’s what to expect during the salon visit:

Hair Assessment

Your stylist will examine the health and condition of your natural hair to recommend the amount of extensions needed. They also determine if your hair is suitable for K-tip extensions.

Sectioning the Hair

Your hair is divided into rows, usually 1 to 2 inches wide, and the top section clipped away. The extensions will be bonded to the bottom section first.

Bonding Extensions

Your stylist bonds each extension to your natural hair near the roots using the keratin adhesive and heat clamp. Row by row, extensions are fused to add length and fullness.

Smoothing Cuticle

Once bonded, your stylist will use a flat iron to seal the cuticle and smoothen the bonds and your natural hair together for decreased visibility.

Blending and Finish Work

The stylist carefully blends your natural hair with the extensions and makes any finishing trims for an even look from root to tip.

How to Care for K-Tip Extensions

Caring for your new K-tip extensions involves many of the same practices as caring for your own hair:

Gentle Handling

Avoid tugging, pulling, or twisting the bonds to prevent them from loosening or your hair tangling. Use a soft brush and handle gently.

Cleanse Regularly

Use a sulfate-free shampoo meant for extensions 1-2 times per week. Rinse thoroughly and air or blow-dry. Avoid wet brushing.

Limit Heat Styling

Allow hair to air dry when possible and keep heat tools on medium settings to maintain the integrity of the bonds.

No Chemical Processing

Avoid perms, dyes, bleaches or other chemical treatments while wearing the extensions to prevent bond damage.

Protect From Friction

Wear hair down or in loose styles more often than tight ponytails. The tension can weaken bonds over time. Sleep with hair in a loose braid.

Schedule Maintenance

Make occasional touch-up appointments with your stylist to check the health of your extensions and bonds every 6-8 weeks.

How Long Do K-Tip Extensions Last?

With proper maintenance and care, K-tip extensions typically last 4 to 6 months before needing removal and/or replacement.

Factors that affect the lifespan of your extensions include:

  • Your natural hair health and condition
  • Chemical processing or heat damage during wear
  • Frequency of washing, brushing and styling
  • How gently you care for the extensions
  • Exposure to environmental elements like sun, chlorine and pollution

Setting touch-up appointments with your stylist every 6 to 8 weeks ensures your extensions stay in optimal condition for maximum wear.

How to Remove K-Tip Extensions

K-tip extensions should only be removed by a trained stylist. Never attempt to remove them on your own.

Bond Dissolving

Your stylist applies a keratin remover solution to dissolve the bonds holding the extensions in place.

Gentle Detangling

Working from the bottom up, the stylist gently detangles and separates your natural hair from the extensions.

Sliding Off Extensions

Once loosened from the bonds, the stylist is able to slide off the extensions handily and smoothly.

Final Cleanse

A deep cleansing shampoo removes any remaining adhesive residue from your hair and scalp.

The removal process takes only 15 to 30 minutes and allows the extensions to be lifted away without breakage or loss of your natural hair when done properly.

Are Keratin Tip Extensions Safe?

K-tip extensions are considered generally safe for most people when applied by a qualified stylist. However, there are some risks to be aware of:

  • Potential allergic reaction to the keratin adhesive bonding, especially if you have an allergy to other keratin hair products.
  • Hair breakage or damage with improper installation or removal.
  • Headache or discomfort from wearing excessively heavy extensions.

To minimize risk, have a consultation with an experienced stylist who can determine if K-tip extensions are a suitable option for you. Take care of the extensions properly during wear, and have them removed promptly when needed.

Talk to your doctor before getting extensions if you have very fine hair or a history of skin irritation or allergies. Follow your stylist’s recommendations closely for ideal results and safety.

Are K-Tip Extensions Worth It?

For many people, the benefits of K-tip extensions are well worth the investment. You can achieve longer, thicker, more voluminous locks – often in just one salon visit.

The key is choosing a high quality of hair and having the extensions properly installed and cared for by a knowledgeable stylist. With proper maintenance, K-tip extensions can give you your desired look for months at a time.

If you want an instant hair transformation through safe, non-damaging methods, then K-tip extensions offer a lightweight, natural-looking way to get the long flowing locks you’ve always wanted. Take the time to find an experienced stylist and schedule a consultation to see if K-tip extensions make sense for achieving your hair goals.

FAQs

  1. Do K-tip extensions damage your hair? When installed properly by a trained stylist, K-tip extensions do not typically cause damage to your natural hair. The keratin bonds lie flat against the cuticle without using glues or chemicals, minimizing damage during application and removal. Can you reuse K-tip extensions? In most cases, K-tip extensions cannot be reused. The process of removing the bonds tends to damage the keratin beads at the tip, so the hair cannot be rebonded.
  2. How often should I get K-tip extensions retightened? Expect to have your K-tip extensions tightened or reapplied every 4 to 6 months. Schedule appointments with your stylist every 6 to 8 weeks to check that the bonds remain secure. They can reinforce any bonds that appear loose. Proactive maintenance helps the extensions last their maximum lifespan before needing full removal and replacement.
  3. Can I color or perm K-tip extensions? It’s not recommended. Chemical processing can greatly reduce the life of your K-tip extensions and damage the bonds. However, your stylist may be able to apply semi-permanent color or highlights, but this risks the wear and integrity of the extensions.
  4. Can I wear K-tip extensions in the pool or ocean? Yes, K-tip extensions are waterproof and can be worn while swimming. Chlorine and saltwater will not dissolve the keratin bonds. However, always wash hair with freshwater and deep condition after swimming to remove drying chemicals and minerals that can damage the hair over time.
  5. How long does the K-tip extension process take? The installation process takes 2 to 3 hours depending on the amount of extensions being applied. K-tip extensions don’t require the tight braids necessary with many other extensions, so the bonding method is relatively fast. Removal takes just 15 to 30 minutes.