21 STUNNING CHRISTMAS WREATHS TO BRIGHTEN YOUR HOLIDAY SEASON
Whether you’re a DIY enthusiast or prefer purchasing your Christmas decorations from experts, there are countless ways to incorporate the charm of Christmas wreaths into your home this holiday season.
We’ve curated a collection of 21 of the most stunning wreaths available, sourced from across the web. From creative DIY ideas found on Pinterest to beautifully crafted wreaths from retailers like Wayfair, Amazon, and Etsy, you’re sure to discover the perfect wreath to elevate your Christmas decor.
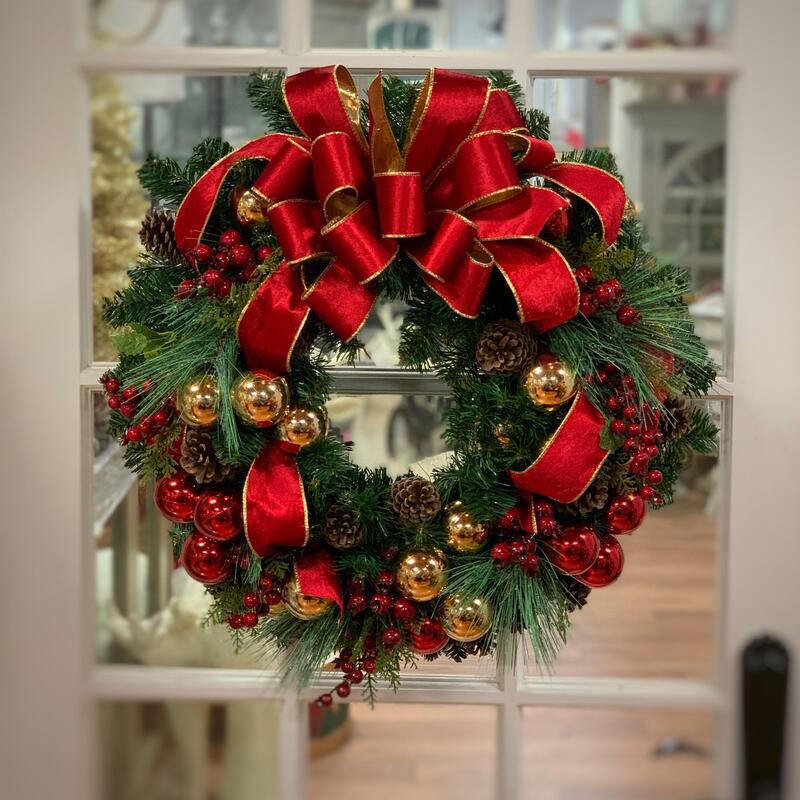
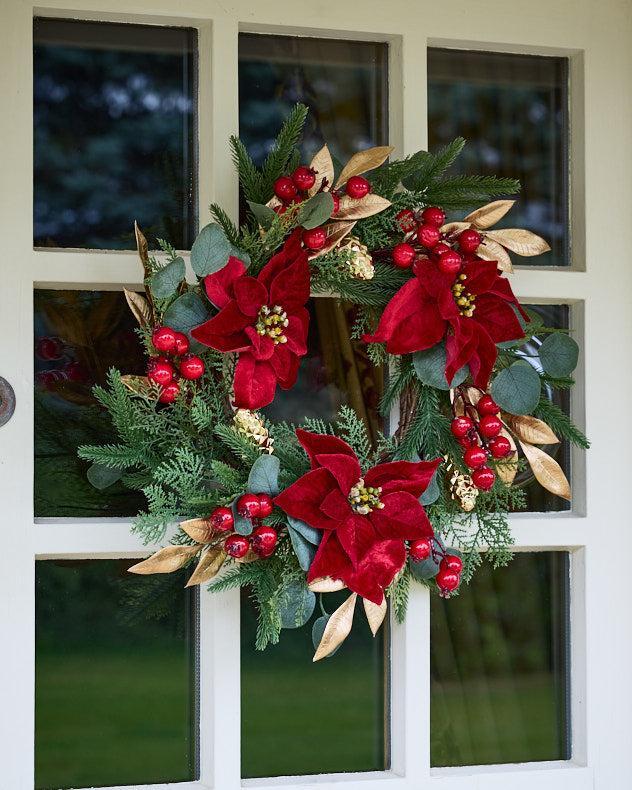
Red & Gold Christmas Wreath
This lavish and shimmering wreath features oversized poinsettia flowers combined with artificial magnolia, ribbons, gilded berries, and more, creating a lush and luxurious presentation that brings elegance to your holiday decor.
Elegant French Country Christmas Wreath
French Country elegance shines through in this delightful yet simple DIY Christmas wreath, bringing a touch of charm and sophistication to your holiday decor.
Snowman Twig Wreath
Two grapevine wreaths are painted white and beautifully decorated with white mini lights, vibrant floral sprays, ribbons, and topped off with a whimsical fabric top hat, creating a charming and festive look.
White Vintage Truck Wreath
This delightful Christmas wreath showcases a vintage truck parked at the center. If you take a closer look, you’ll spot a small pine Christmas tree nestled in the truck’s bed, adding a festive touch to the design!
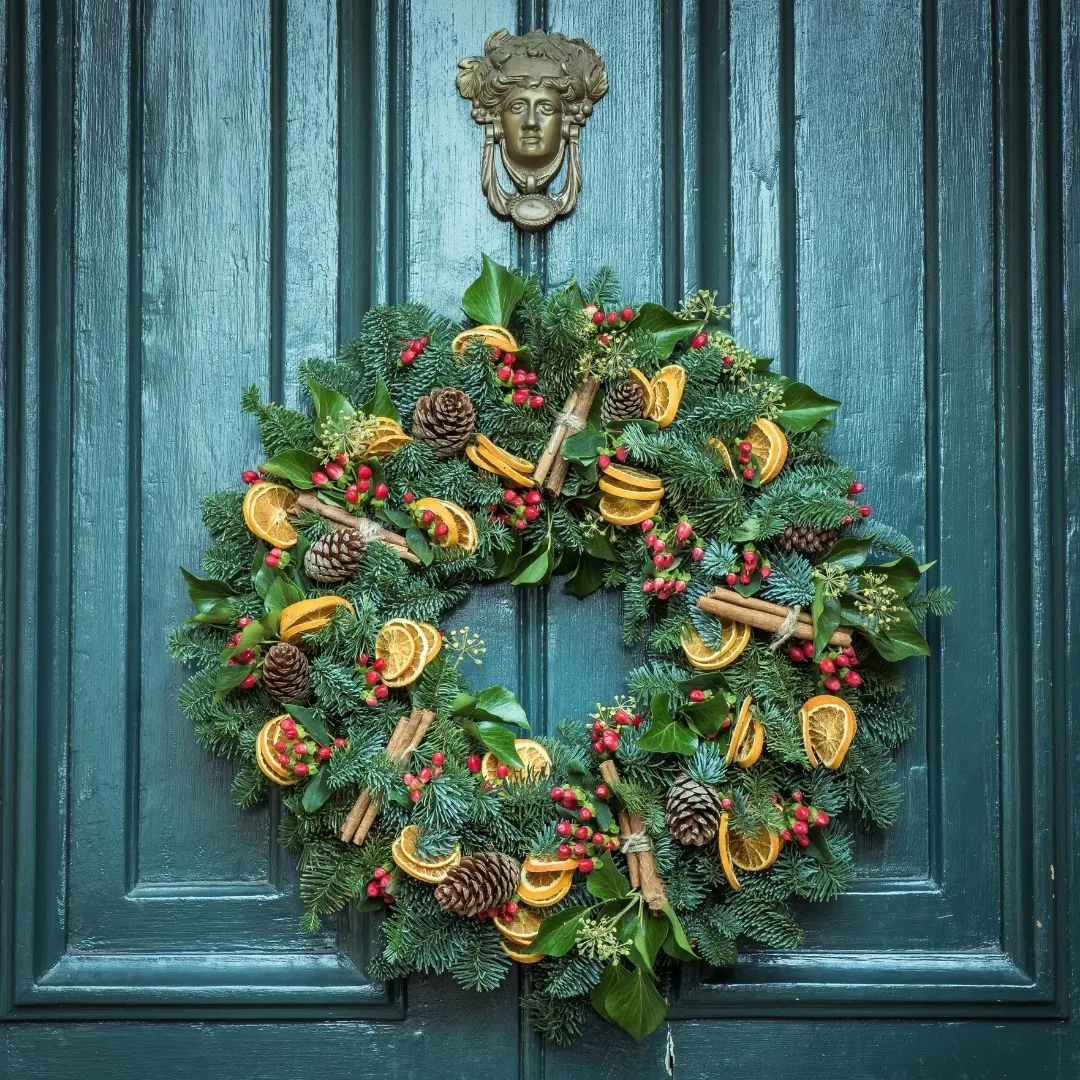
Dried Lemon Slices Christmas Wreath
Dried lemon slices and cinnamon sticks come together in this aromatic Christmas wreath, creating a fragrant potpourri. Plus, you’ll have some natural condiments on hand if you ever run low while making tea!
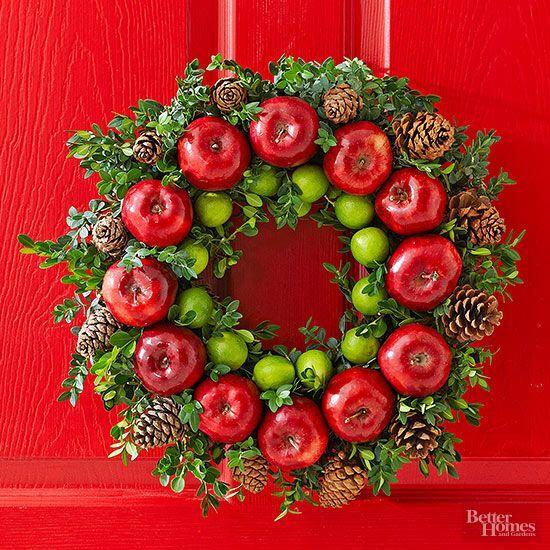
Colorful DIY Christmas Apple Wreath
This vibrant and rustic wreath is adorned with a variety of colorful fruits, including festive Christmas apples, and accented with twigs and pinecones. The result is a beautiful and unique twist on traditional Christmas decor.
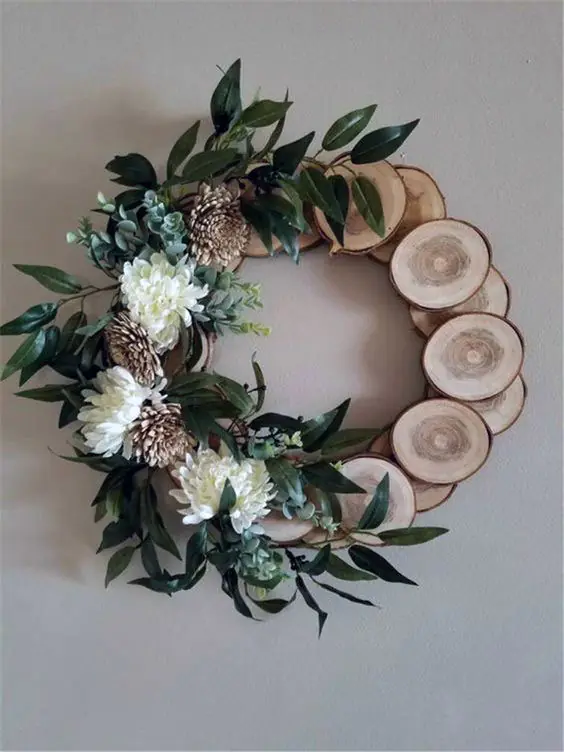
Rustic Wood Slice Wreath
This wreath, with its farmhouse or country charm, could easily be a year-round decoration. However, it also makes a lovely and subtle addition to a cozy Christmas cottage, enhancing the festive atmosphere with its timeless appeal.
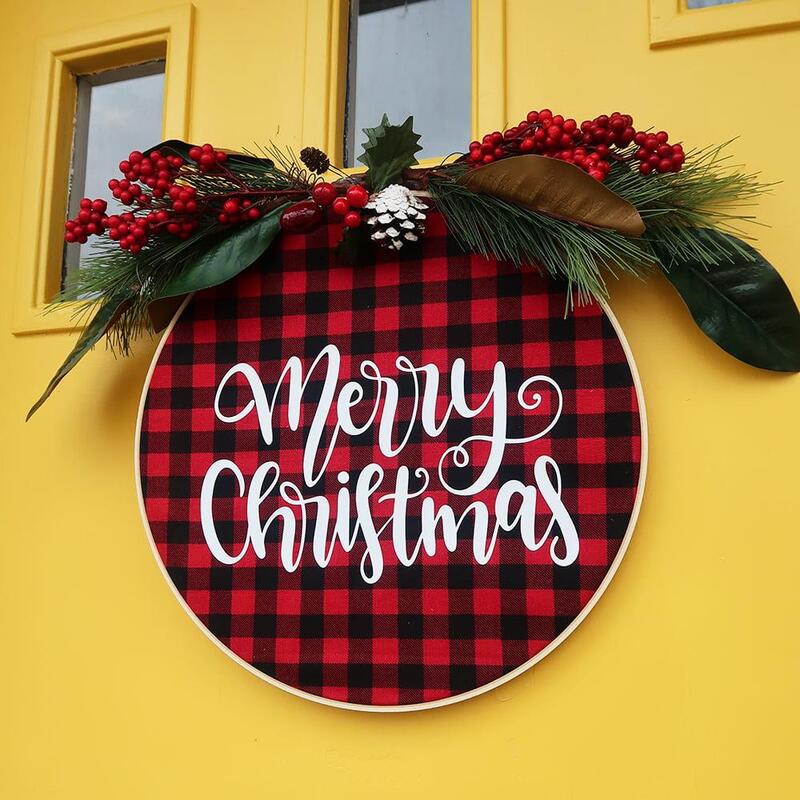
Merry Christmas Embroidery Hoop Wreath
A classic choice for crafters, this Merry Christmas wreath is creatively made using stretched fabric on a traditional embroidery hoop, offering a charming, handmade touch to your holiday decor.
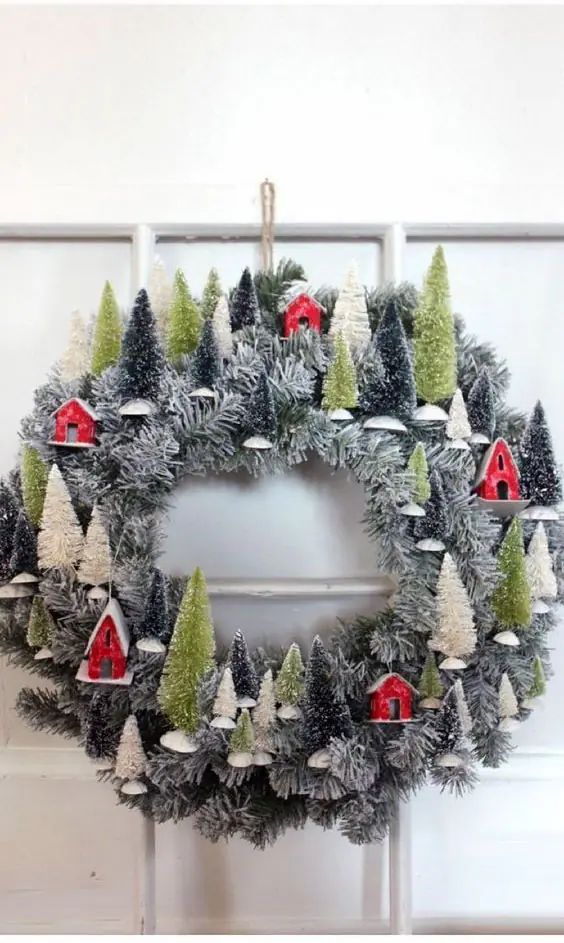
DIY Snow Village Christmas Wreath
A charming alpine village is beautifully recreated using dollar store pine Christmas trees, paired with tiny houses and chalets painted in bright white and red for a striking contrast, bringing a festive and cozy winter scene to life.
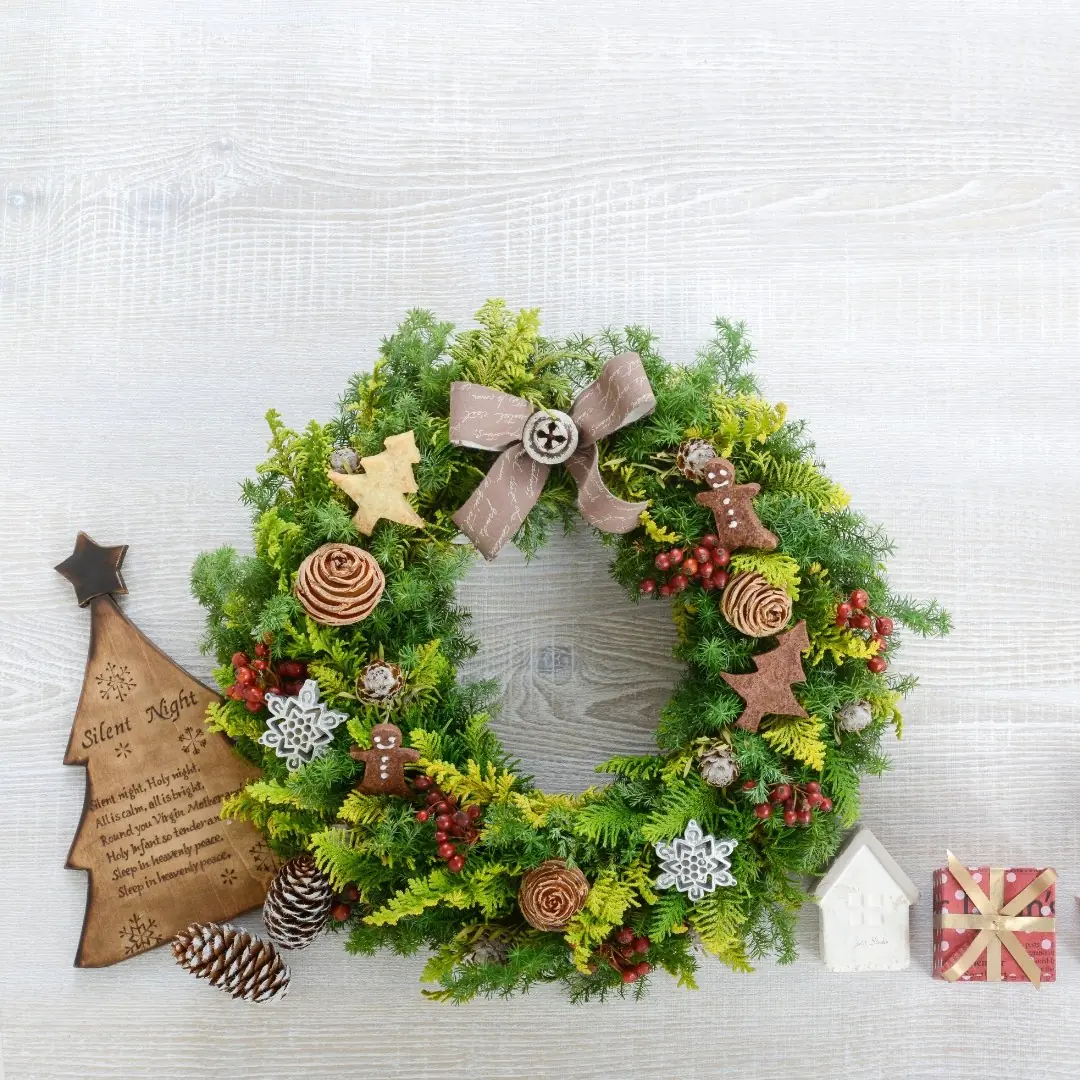
Cute and Easy DIY Christmas Wreath
I adore the charming details in this cute DIY wreath, especially the tiny gingerbread men ornaments that add a whimsical, festive touch.
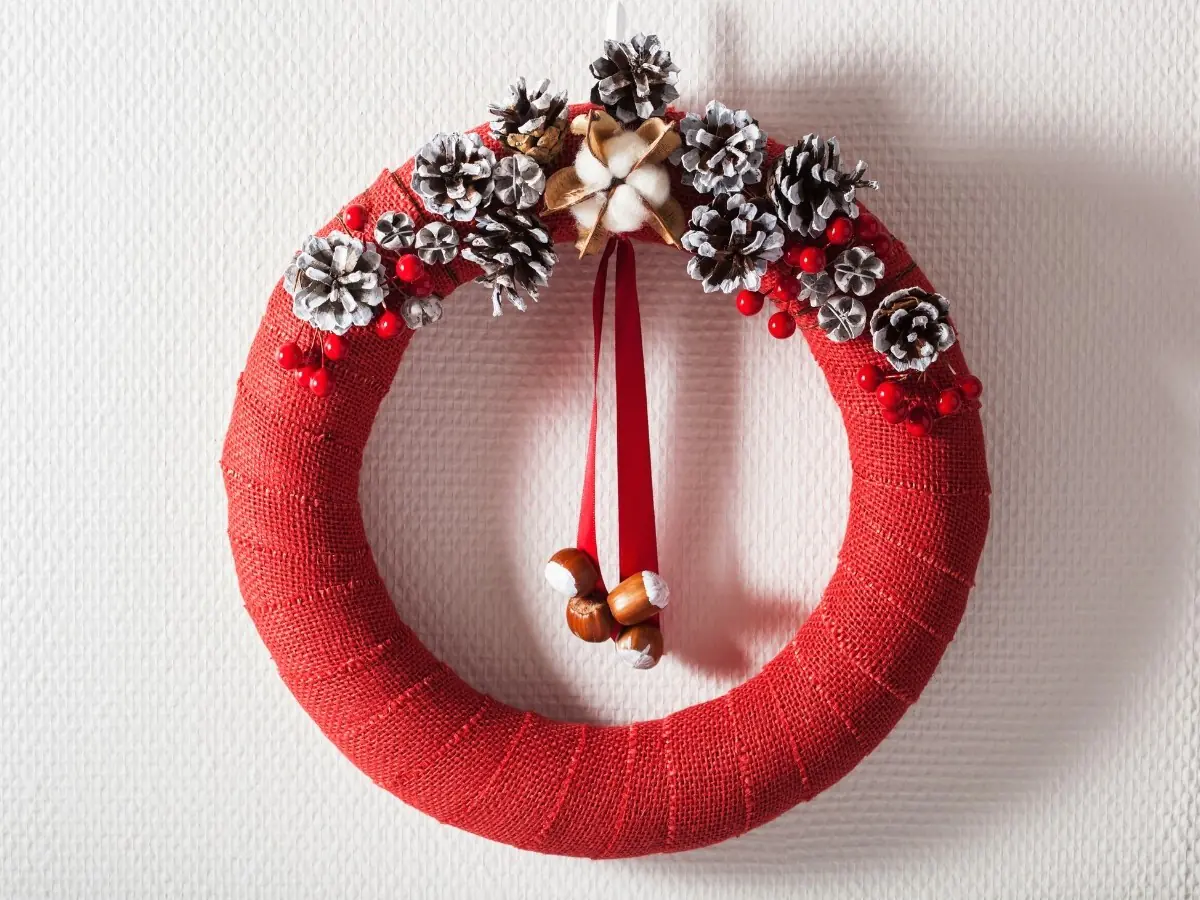
Red Wrapped Cloth Wreath
This simple yet beautiful DIY wreath features rich red cloth wrapped around a Styrofoam wreath form, and is decorated with pinecones, berries, cotton, and ribbons for a cozy, rustic holiday touch.
Fresh Accents DIY Christmas Wreath
You can almost smell the fresh pine and cedar boughs in this easy-to-make yet charming wreath. And don’t miss the bunch of cinnamon sticks tucked in, adding a perfect touch of warmth and spice to the festive design!
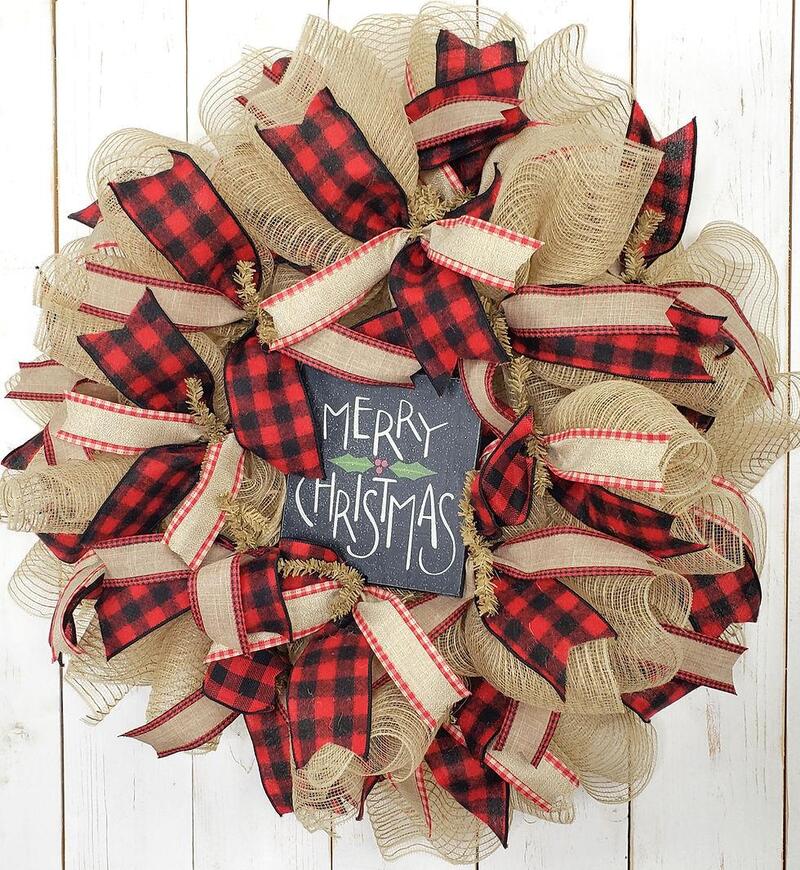
Merry Christmas Buffalo Check Wreath
This charming wreath features a combination of buffalo check fabric in black, white, and red, along with burlap and pinecone accents. At the center, a beautiful Merry Christmas plaque adds the perfect festive touch!
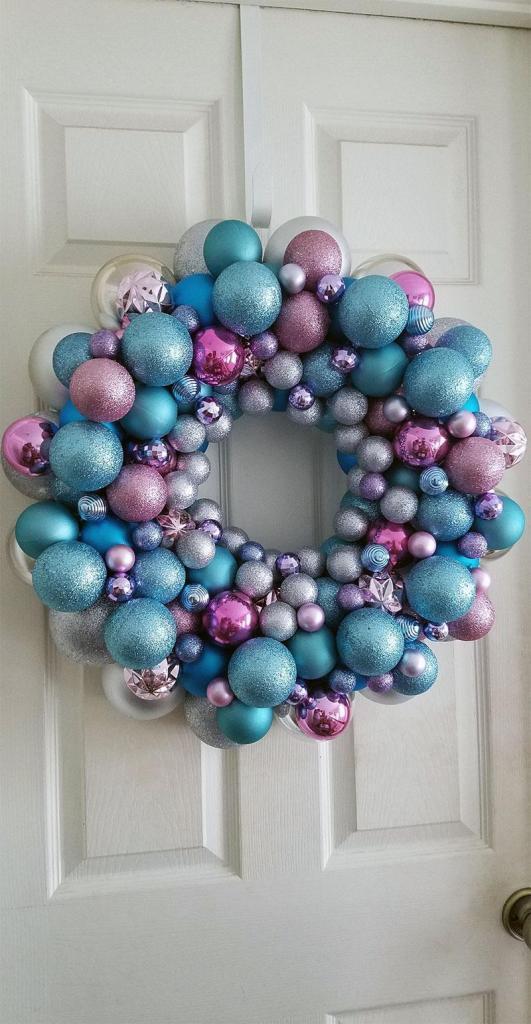
Silver and Pastel Christmas Bauble Wreath
This stunning wreath bursts with soft shades of pink, turquoise, blue, purple, and silver, making it a perfect choice for those who prefer to step away from traditional Christmas colors. Its versatility also allows it to be used in the spring or as a charming wreath for a baby shower or birthday celebration.
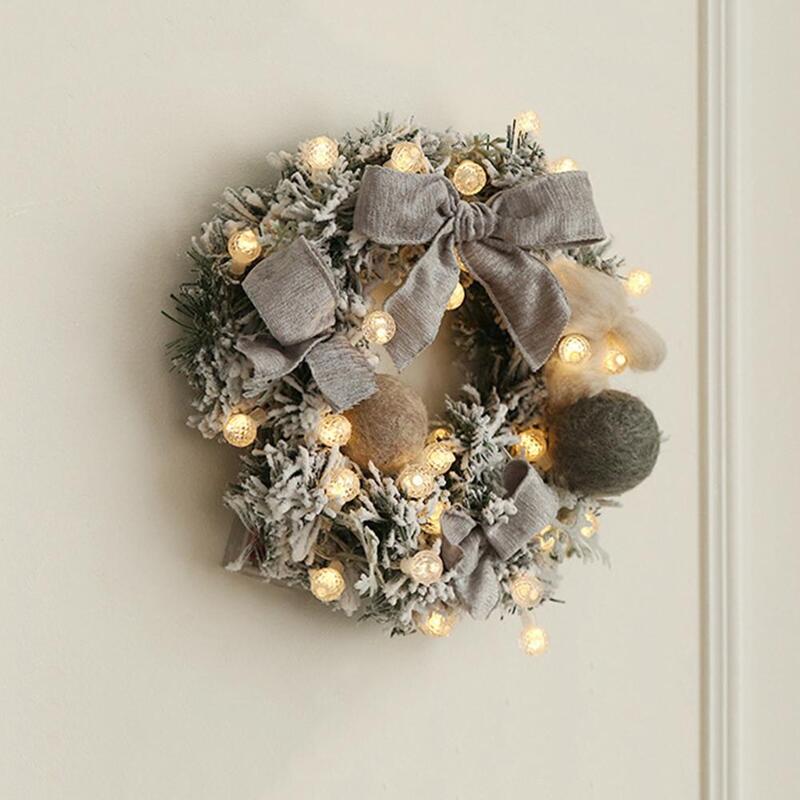
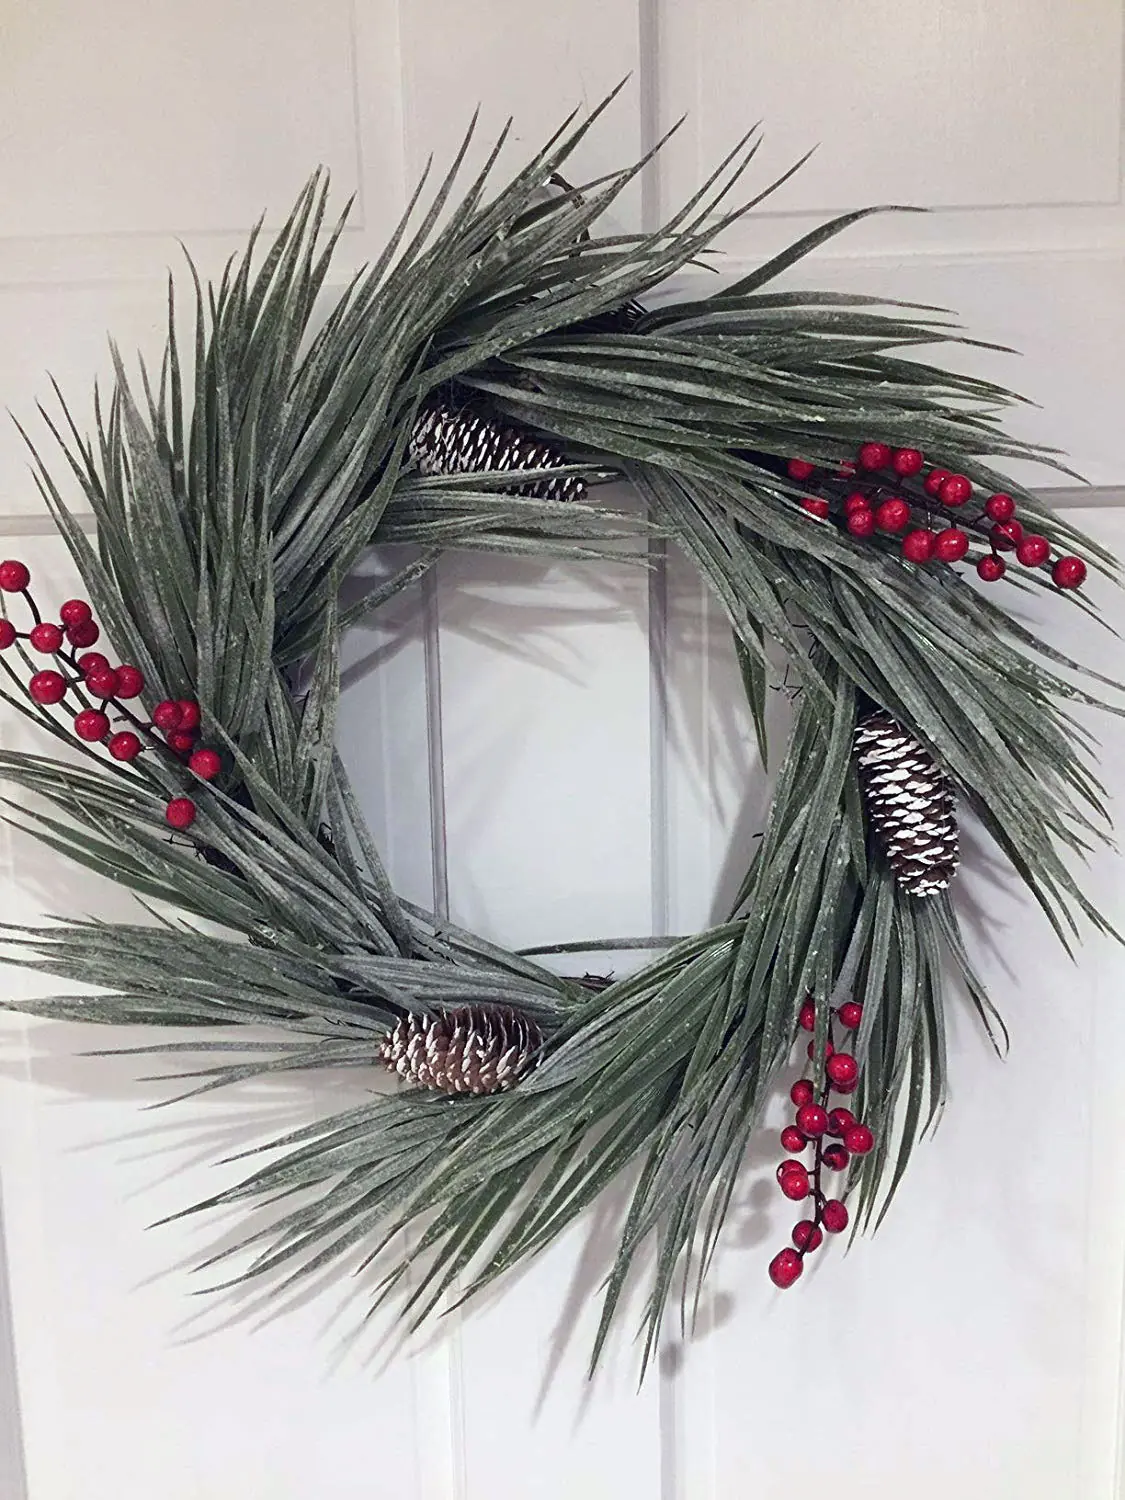
Flocked Sea Grass Winter White Christmas Wreath
This slim-profile wreath is ideal for fitting between your front door and storm door, a space many wreaths can’t manage. Simple yet effective, it adds a unique and charming touch to your Christmas porch decor.
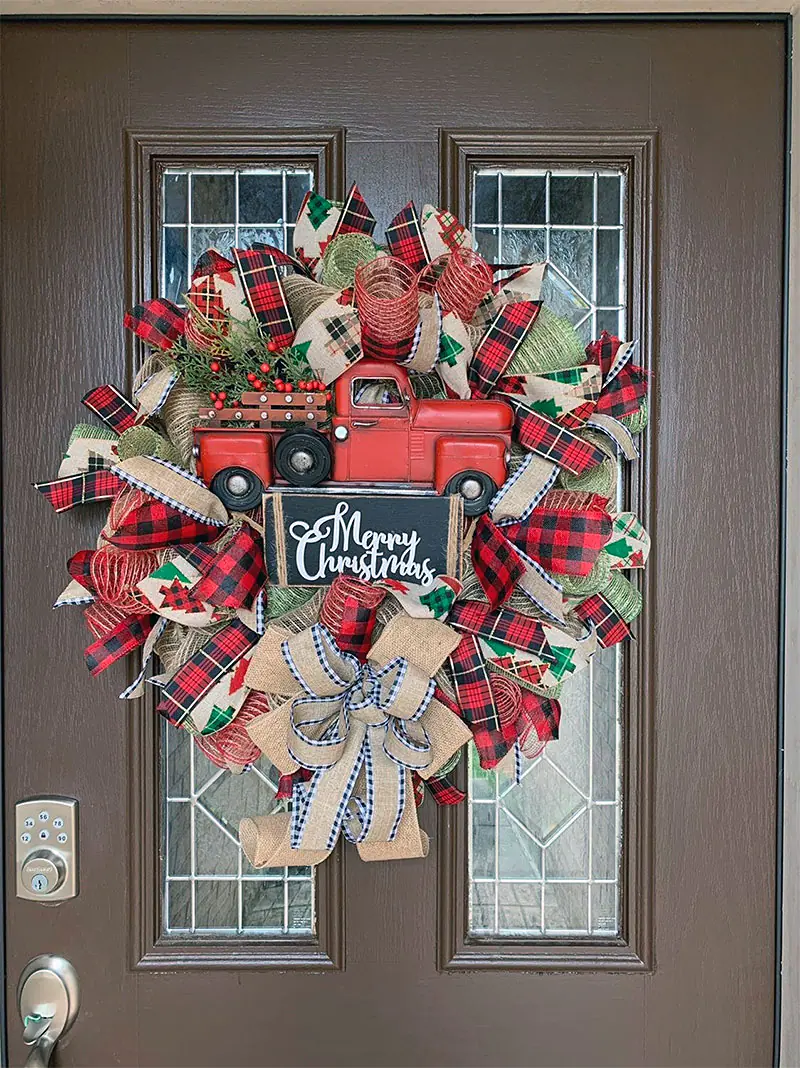
Red Truck Rustic Christmas Wreath
A perfect touch of country charm, this Merry Christmas wreath showcases a delightful red truck right in the center, adding a festive and nostalgic feel to your holiday decor.
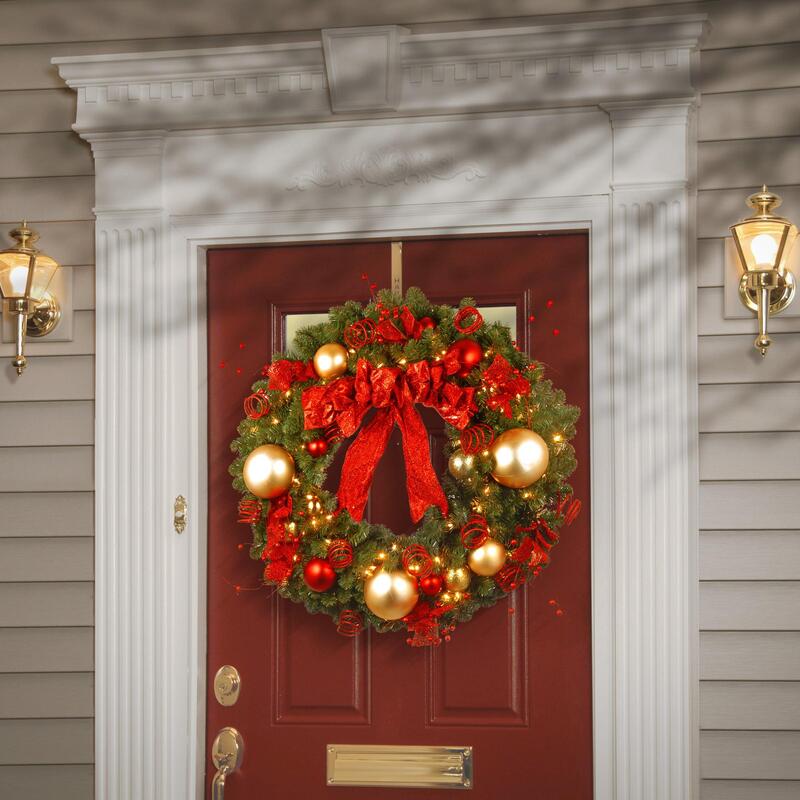
Cozy Christmas Lighted Wreath
A classic wreath with a festive twist, this beautiful green, red, and gold design features an array of ribbons, bows, and baubles in various sizes, along with 100 white LED lights to add an extra touch of sparkle and holiday magic!
Snowy Bethlehem Star Wreath
This battery-operated wreath is sure to make a striking display on your front door. With 90 branch tips illuminated by 50 warm-white LED lights, it’s a beautiful piece that can be enjoyed both indoors and outdoors.
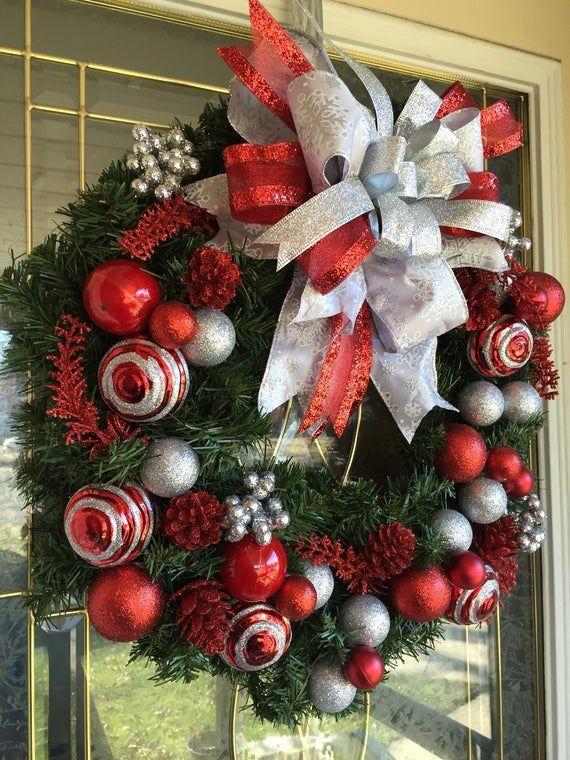
Silver & Red Christmas Ornament Wreath
A bright and lovely collection of sparkling red and silver baubles are combined to create this dazzling Christmas wreath.
Poinsettia Christmas Flower Wreath
This charming oversized poinsettia flower is beautifully crafted from a variety of burlap fabrics in different colors and patterns, creating a rustic yet elegant addition to your holiday decor.
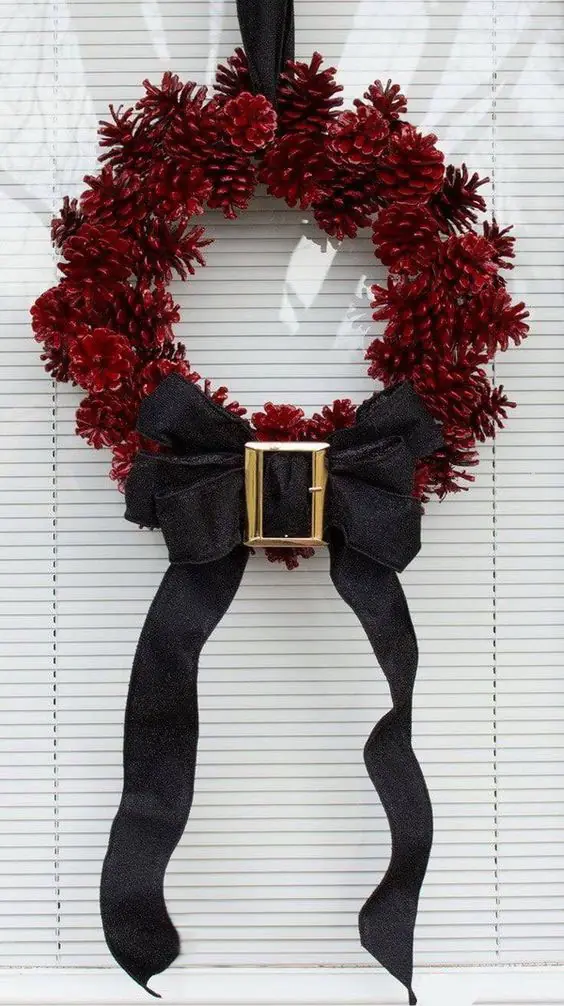
DIY Pinecone Santa Wreath
A deep-red pine cone wreath is decorated with a black and gold “belt/bow,” playfully paying tribute to the man of Christmas himself… Bob Barker. Just kidding, it’s a nod to Santa Claus, of course!
conclusion
In conclusion, Christmas wreaths come in a wide array of designs, from traditional to whimsical, rustic to elegant. Whether you choose a DIY project or purchase a beautifully crafted wreath, there’s a perfect option for every style and space. These festive decorations not only bring warmth and cheer to your home but also allow for creativity in showcasing your personal holiday spirit. From pine cones and cinnamon sticks to vibrant ribbons and lights, each wreath adds its own unique charm, making your Christmas season even more special.
40 BEST EASY NAIL DESIGNS FOR BEGINNERS
Ever looked at those stunning nail designs and wished you could create them yourself? Well, fret no more! Dive into the world of easy nail art with this list of 40 fantastic designs perfect for beginners. Whether you crave a classic look with a twist or something fun and funky, we’ve got you covered. With a little practice and these handy ideas, you’ll be a nail art pro in no time! Get ready to impress yourself and everyone around you with your beautiful fingertips.
WAVY REDS
Channel your inner beach babe with wavy reds! This design is perfect for those who love the bold pop of red but want something more interesting than a solid block color. You can create soft, flowing waves for a subtle effect, or go for a more dramatic look with thick, contrasting red lines. This design works well with different shades of red, allowing you to play with a cool-toned crimson or a fiery cherry red. For added flair, try incorporating a touch of white or gold to create a beautiful marbled effect that mimics the crest of a wave.
MULTI-COLORED STRIPES
Unleash your inner rainbow with multi-colored stripes! This playful design is a perfect beginner option because it’s all about having fun and expressing yourself. There are no wrong turns here! Use any colors that catch your eye, whether it’s a harmonious blend of pastels or a bold, contrasting mix. For a clean and crisp look, you can use striping tape or nail art stencils. If you’re feeling freehand-confident, grab a thin nail art brush and get creative! Thick stripes, thin stripes, zigzags, or even a mix of all three – the possibilities are endless. Don’t worry about perfect lines; a little imperfection adds to the charm of this design. Finish it off with a glossy top coat for a chip-resistant, eye-catching manicure!
WHITE STRIPES
Spruce up your nails with the timeless elegance of white stripes! This beginner-friendly design offers a chic and versatile look that complements any outfit. The beauty of white stripes lies in its simplicity. Opt for a single, bold white stripe down the center of your nail for a modern twist on the classic French manicure. Feeling adventurous? Create multiple thin stripes for a pinstripe effect, or play with diagonal stripes for a dynamic touch. No matter your preference, white stripes look polished and put-together. This design is perfect for those who want a touch of nail art without being too over-the-top. Because white polish can sometimes be streaky, apply thin coats and allow them to dry completely between applications for the best results.
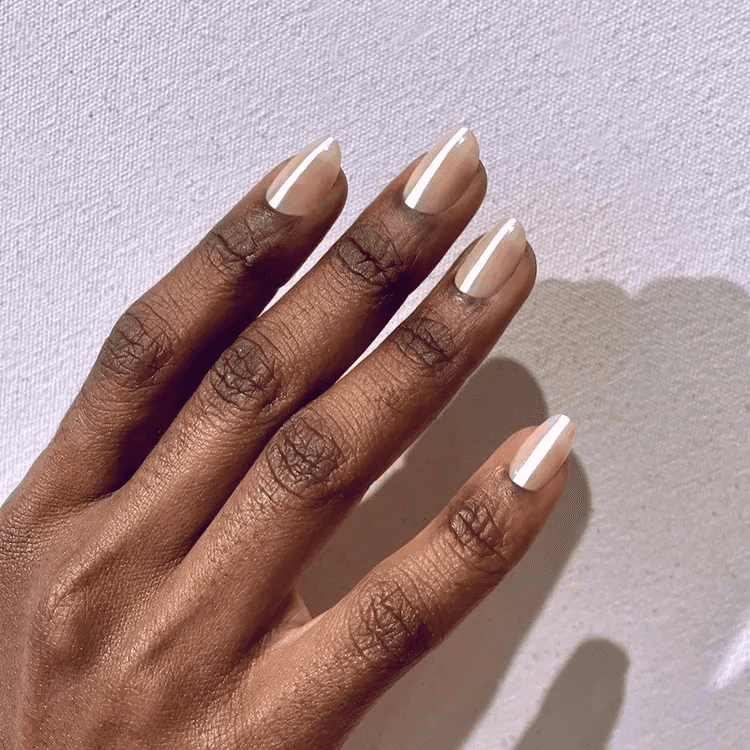
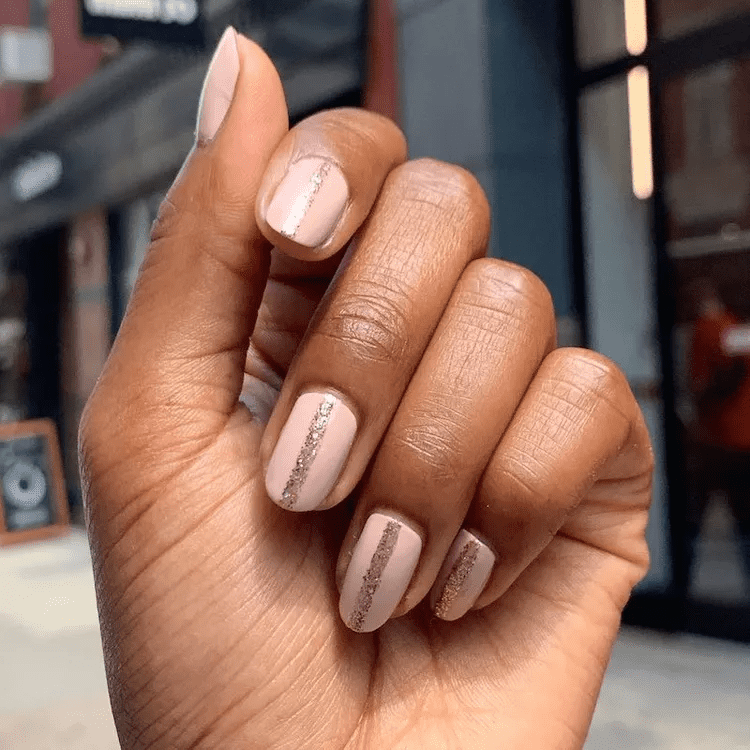
NEUTRAL, TWO-TONED NAILS
Keep it classy with neutral, two-toned nails! This sophisticated design is perfect for any occasion and flatters all skin tones. The beauty lies in its simplicity and versatility. Choose two complementary shades from the neutral palette, like creamy beige and soft taupe, or go for a touch of contrast with a pale pink and a chic latte shade. Paint all your nails in one color, then apply the other in a block design at the tip, on the accent nail, or even alternate them finger by finger for a playful twist. This design is easy to achieve and requires minimal cleanup, making it ideal for beginners. For a touch of extra elegance, consider a matte top coat to elevate the look.
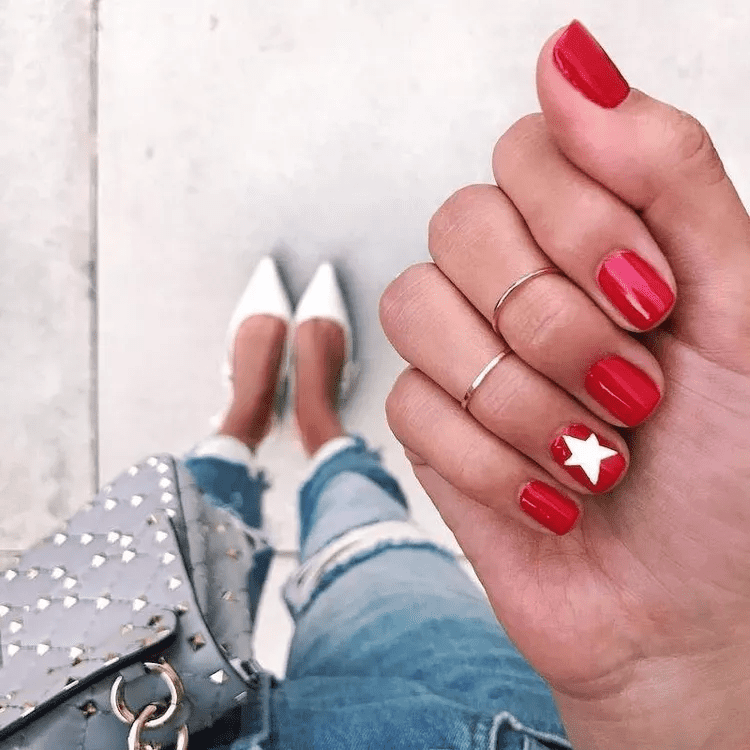
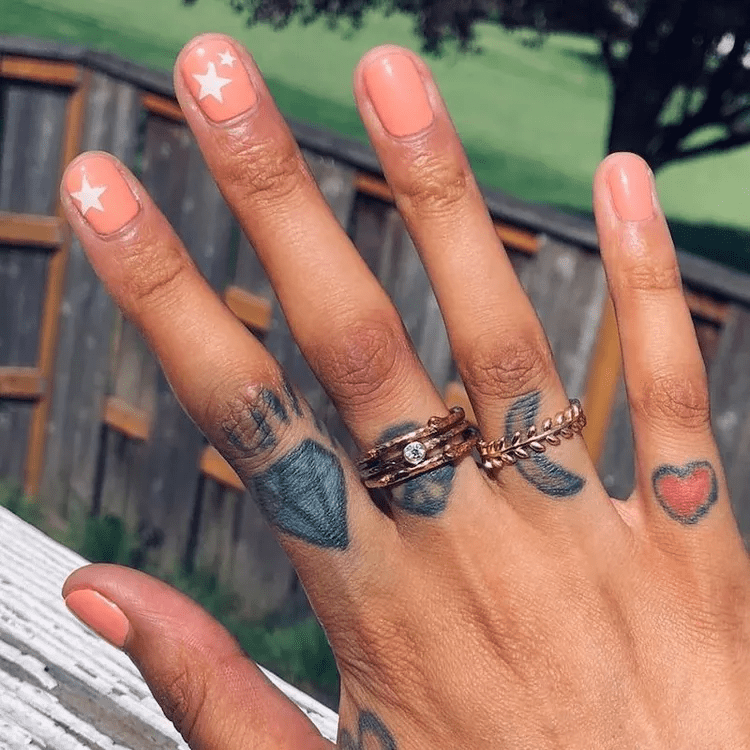
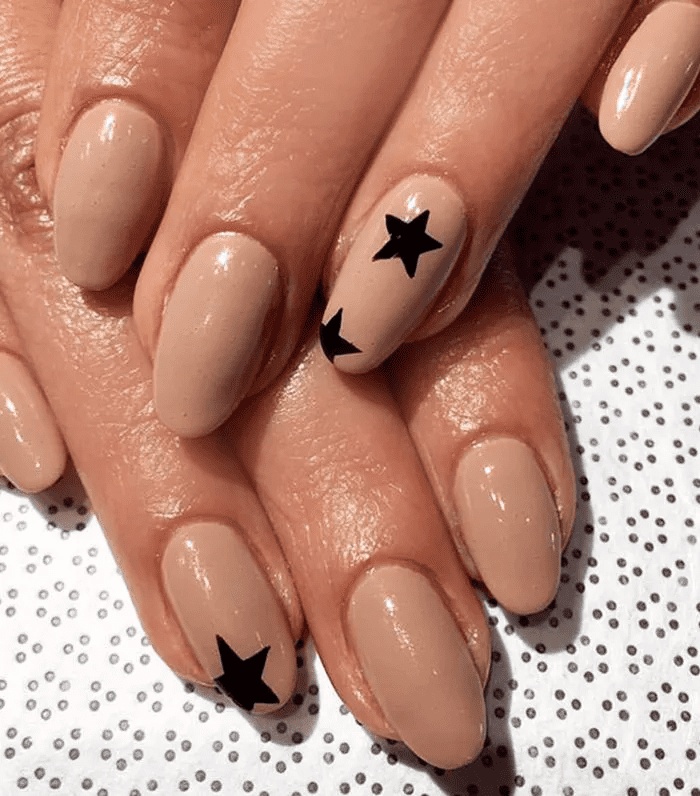
STATEMENT STAR
Make a dazzling statement with a single, bold “statement star”! This design is perfect for beginners who want a touch of nail art without the hassle of complex creations. All you need is a contrasting polish color and a thin nail art brush (or even a toothpick in a pinch!). Paint your nails in your favorite base color, then let your creativity shine. Draw a single, well-defined star on your accent nail, either in the center or slightly off-center for a touch of asymmetry. Play with size and color – a big, bold gold star on a black base makes a dramatic impact, while a tiny silver star on a pastel pink adds a whimsical touch. This versatile design allows you to personalize it to your style, making it perfect for any occasion.
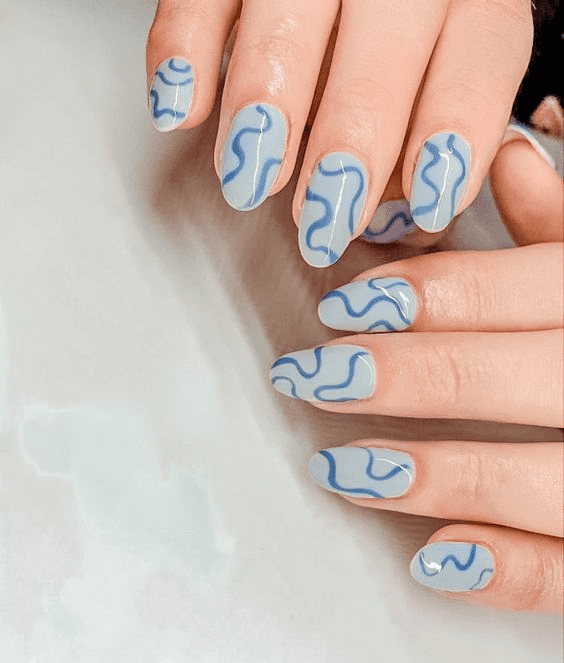
ABSTRACT WAVES
This design is perfect for beginners because it thrives on loose applications and a relaxed approach. Start with a base coat in a calming color like pale blue or soft white. Then, using various shades of blue, green, and even white, create wispy, curved lines that suggest the movement of waves. Don’t worry about precision – the beauty lies in the organic, fluid shapes. You can use a nail art brush or even a toothpick dipped in polish for a more textured effect. Layer and blend the colors for depth, or keep it simple with just a few strokes. For a touch of shimmer, add a hint of silver or gold glitter polish to the wave crests. Finish with a glossy top coat to create a captivating ocean scene on your fingertips.
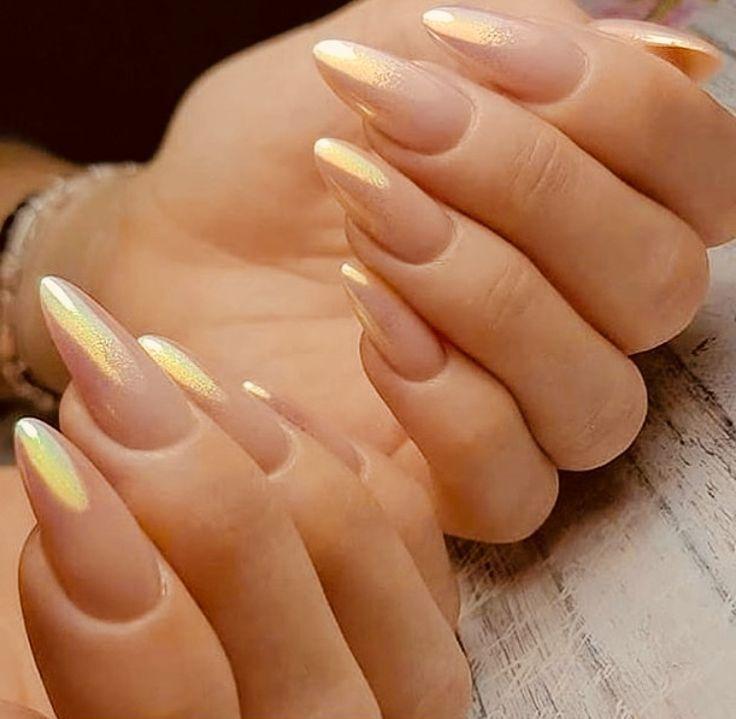
SHIMMERING TIPS
Dress up your nails with the subtle magic of shimmering tips! This elegant design adds a touch of glamour to any manicure and is surprisingly easy to achieve. Simply paint your nails in your favorite base color, from classic nudes to playful pastels. Once your base coat is dry, focus on the tips. Here’s where the shimmer comes in! You can use a special polish with built-in shimmer, or layer a regular polish with a coat of loose iridescent glitter. For a gradient effect, apply the shimmer more heavily at the very tips and blend it slightly inwards for a seamless transition. This design is perfect for adding a festive touch to a simple manicure or creating a touch of understated elegance for everyday wear.
DIY MARBLE STICKERS
Creating DIY marble stickers is a fun way to add a touch of trendy, patterned flair to your nails without the mess and difficulty of water marbling directly on your nails. While not technically real marble made from stone, these homemade decals mimic the beautiful swirls and veining of marble with nail polish. They’re perfect for beginners who want beautiful nail art designs without the commitment of a full manicure.
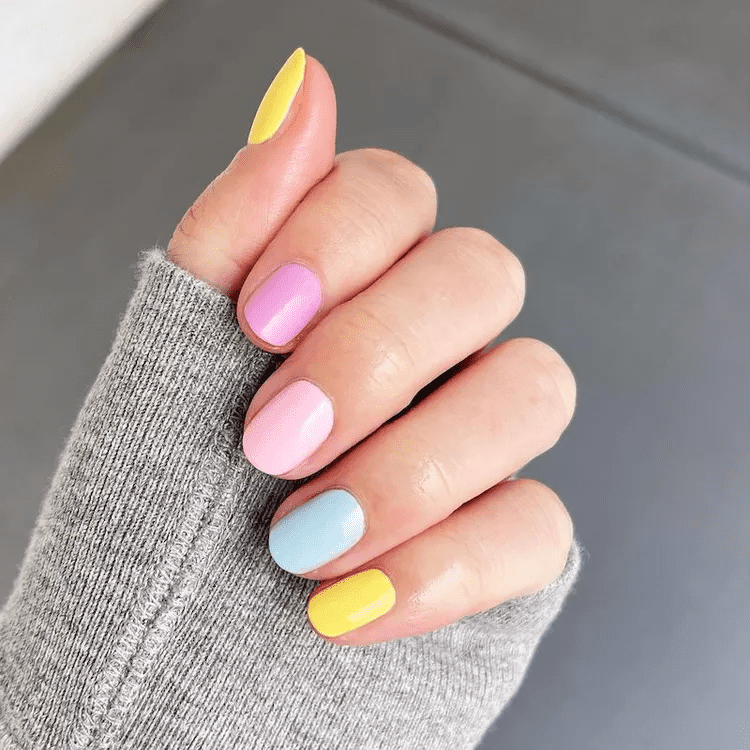
PASTEL MISMATCH
This adorable trend lets you ditch the traditional matchy-matchy look and create a unique manicure that reflects your personality. Pick out your favorite pastel shades, from soft lavenders and baby blues to delicate pinks and sunny yellows. Paint each nail a different color, creating a rainbow of springtime hues on your fingertips. Don’t be afraid to experiment – you can mix cool and warm tones, play with different finishes like matte and glossy, or even add a touch of nail art like tiny dots or glittery accents to a few nails for an extra pop of fun. This design is all about expressing yourself and having a blast with color!
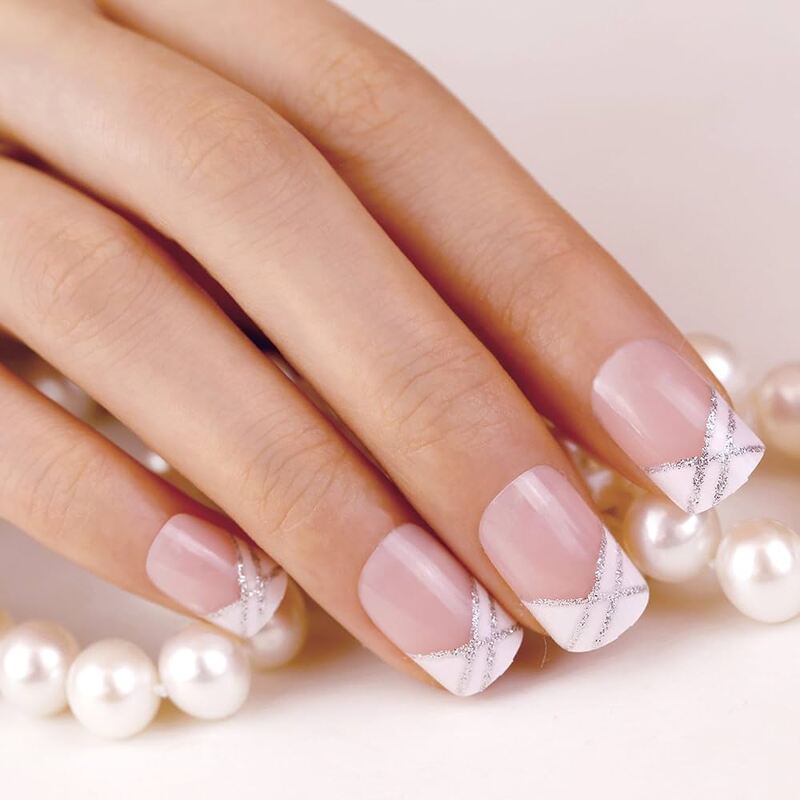
CRISS-CROSS FRENCH MANI
Put a modern twist on the classic French manicure with a criss-cross design! This eye-catching look is surprisingly beginner-friendly and adds a touch of playful sophistication to your fingertips. Start with a clean base coat and apply your favorite nude or sheer pink polish to all your nails. Once the base coat is dry, it’s time for the criss-cross action! Using a contrasting polish, like white or a bold color, create a thin diagonal line across the tip of your nail, reaching from one corner to the opposite. Then, repeat the process with another diagonal line going in the opposite direction, forming an “X” shape at the tip. For a clean finish, use a thin nail art brush or nail art striping tape.
GOLDEN STRIPES
Add a touch of luxury to your fingertips with golden stripes! This elegant design is surprisingly versatile and complements a variety of base colors. For a classic look, pair crisp gold stripes with a deep red or a chic black base. Feeling more playful? Golden stripes pair beautifully with soft pastels or even a vibrant coral. There are endless possibilities for creating your perfect golden striped manicure. Achieve clean, thin lines with striping tape or a nail art brush dipped in metallic gold polish. For a bolder statement, try thicker stripes or even create a chevron pattern using gold and another contrasting color.
FADED GOLD CHROME TIPS
Channel your inner goddess with faded gold chrome tips! This glamorous design offers a modern twist on the classic French manicure and is surprisingly achievable for beginners. Start with a clean base coat in a natural or slightly pinkish nude shade. Once dry, apply a chrome pigment powder in a soft, gold hue to the tips of your nails. The key here is to create a faded effect, so focus on applying the chrome more heavily at the very tips and blending it gently inwards towards the base color. A makeup sponge or eyeshadow applicator works well for achieving this gradient effect. For a bolder look, layer the chrome pigment over a white tip for a brighter gold base. Finish with a glossy top coat to add shine and protect your design. Faded gold chrome tips exude elegance and will turn heads wherever you go.
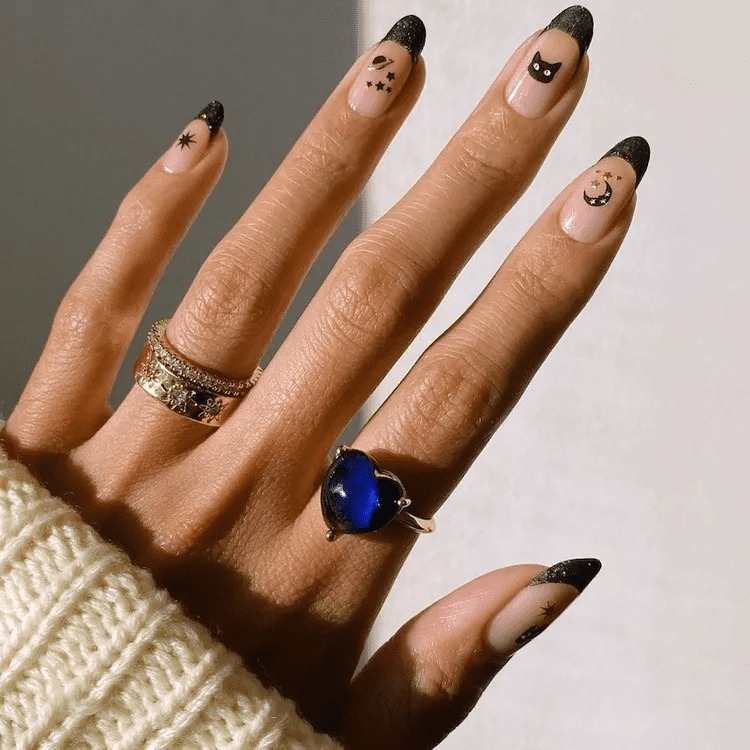
STARRY DETAILS
Take your nails on a celestial journey with starry details! This dreamy design allows you to unleash your inner astronomer and create a magical night sky on your fingertips. The beauty of starry details lies in its versatility. For a subtle look, scatter a few tiny white dots on a dark blue base using a dotting tool or even a toothpick. Feeling more adventurous? Craft constellations, paint crescent moons, or even add a splash of color with shimmering silver or neon pink stars. This design works well with glitter polishes, stamping techniques, or even tiny nail art stickers for beginners. No matter your skill level, you can create a starry masterpiece that reflects your unique style. Let your imagination be your guide and embrace the magic of the cosmos on your nails!
DIY HEART STICKERS
Add a touch of love to your manicure with DIY heart stickers! This adorable and customizable option allows you to create unique nail art that perfectly reflects your style. Here’s the best part: you don’t need any fancy equipment. With a little creativity and household supplies, you can whip up a batch of charming heart stickers in no time. There are multiple methods to explore. For a classic look, punch out hearts from self-adhesive contact paper in your favorite colors. Feeling fancy? Cut out hearts from patterned washi tape or paint your own designs on clear contact paper. If you have some nail polish remover on hand, you can even create clear heart stickers by painting a thin layer of polish onto non-stick craft paper and letting it dry completely before peeling it off. Once you have your heart stickers ready, simply apply them to your painted nails and seal them with a top coat for a long-lasting, heartfelt look!
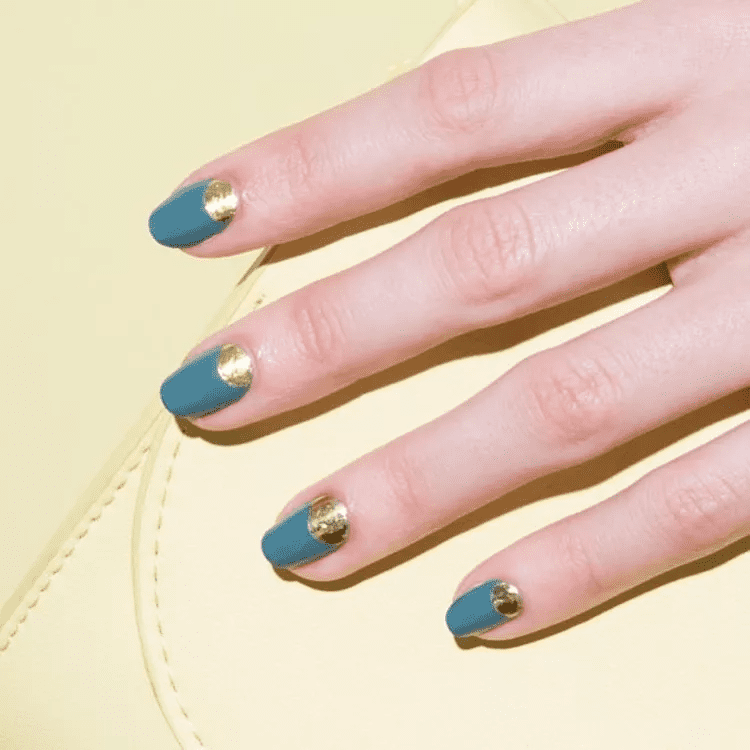
GILDED HALF MOONS
This sophisticated design adds a touch of glamor to your natural nails and is surprisingly beginner-friendly. Play up the natural crescent moon shape at the base of your nail (called the lunula) by accenting it with a touch of gold. Here’s how to achieve this look: Apply a thin coat of clear base coat to protect your nails. Then, paint your nails in your favorite neutral shade, like a soft pink, beige, or even a sheer nude. Once the base color is dry, comes the fun part! Using a thin nail art brush or a toothpick dipped in gold polish, carefully draw a crescent moon shape along the base of your nail, following the curve of your lunula. For a cleaner line, you can also use curved nail art stencils.
BLUE SKY & CLOUDS
Capture the feeling of a bright summer day with a blue sky and clouds nail art design! This cheerful look is perfect for beginners and can be as simple or intricate as you like. Start with a base coat of a clear or baby blue polish to create a clean canvas for your sky. Once dry, use a white polish and a thin nail art brush to create fluffy clouds of various shapes and sizes. Don’t worry about perfect circles – wispy, cotton-like clouds will add to the natural feel. For a touch of depth, you can even add a very light layer of gray or blue polish to create subtle shadows at the base of the clouds. Finish with a glossy top coat to make your sky shine and protect your design. This bright and airy manicure is sure to put a smile on your face and everyone who sees it!
PARTY DOTS
This fun and festive nail art design is perfect for any occasion that calls for a touch of whimsy. The beauty of party dots lies in its ease and endless customization options. All you need is a base coat in your favorite color and a selection of contrasting polishes for the dots. For a classic look, use a bright white base with bold pops of color like red, blue, and green. Feeling more playful? Experiment with neon shades or even metallic polka dots for an extra touch of sparkle.
There are no wrong ways to create party dots! Use a dotting tool for perfect circles, a toothpick for a more rustic touch, or even the blunt end of a bobby pin for a variety of dot sizes. Scatter the dots randomly across all your nails, or create a cluster on your accent nail for a more focused look. Finish with a glossy top coat to seal your design and add shine. Party dots are a guaranteed conversation starter and a fun way to show off your playful personality!
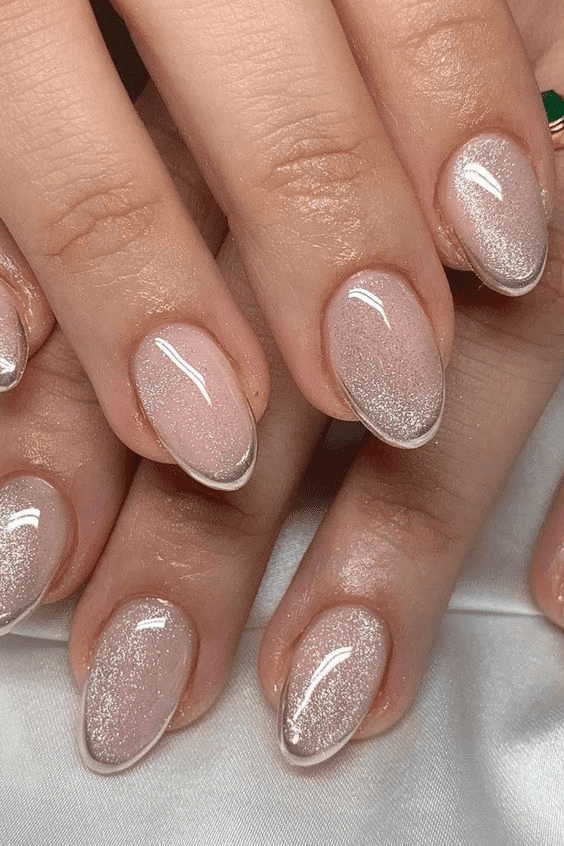
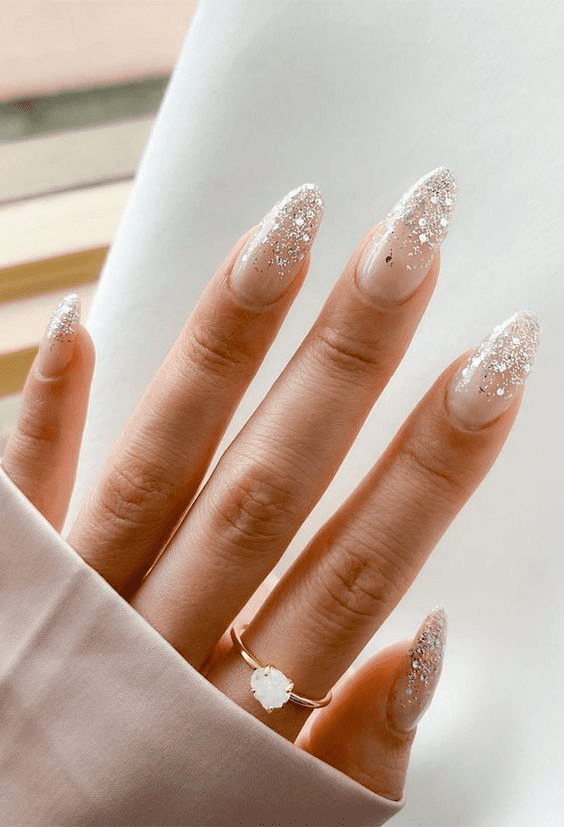
GLITTER GRADIENT
The Glitter Gradient nail design is a dazzling and glamorous approach to nail art that effortlessly combines elegance with a touch of sparkle. This design involves gradually applying glitter polish, starting heavily at the base of the nail and fading out towards the tip. The result is a gradient effect that gives the illusion of sparkling dust sprinkling downwards, much like a cascade of tiny stars. This design is a fantastic choice for those who want to add a bit of glitz and glamour to their everyday look, or for special occasions where a little extra sparkle is required. The Glitter Gradient design can be customized with any color combination, but using a clear or nude base will really allow the glitter to shine. With its blend of simplicity and sophistication, the Glitter Gradient nail design is sure to turn heads and add a touch of magic to any outfit.
COLORFUL LINES
Colorful Lines nail design is a fun and lively way to brighten up your nails. This design is all about drawing thin, straight lines of different colors on your nails. It’s like having a rainbow right at your fingertips! You can pick any colors you love, like red, blue, yellow, and green. The lines can go across, up and down, or even diagonally, and you can mix up the colors any way you like. The end result is a cheerful and unique look that can match any outfit or mood. The Colorful Lines design is easy to do but looks really cool. It’s a great way for you to show off your creative side and add some color to your day!
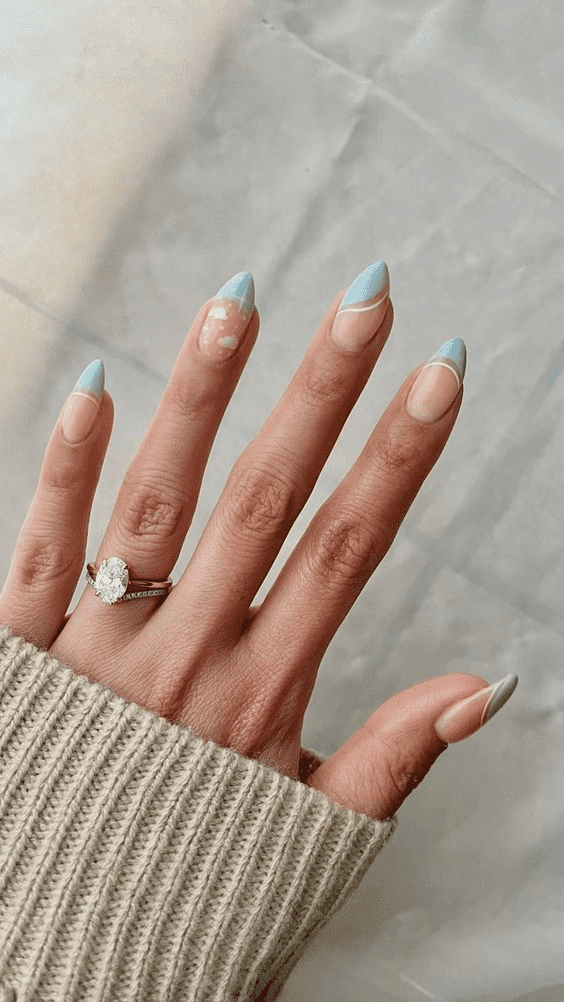
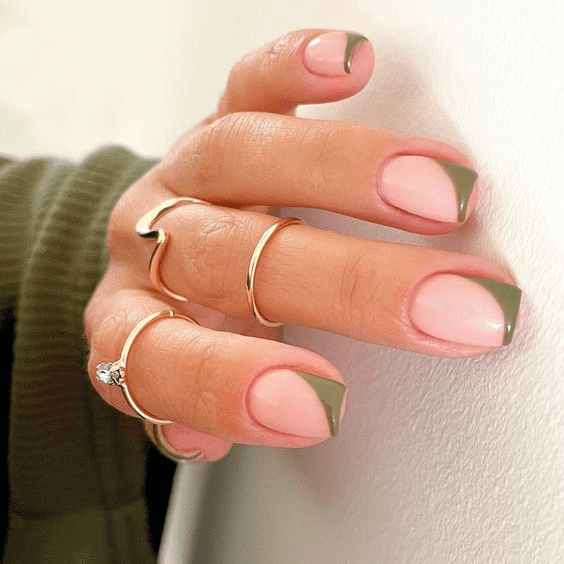
SIDE FRENCH
The Side French nail design is a cool twist on the classic French manicure. Instead of having the white tip at the end of the nail, the Side French design puts it on the side of the nail. It starts from the base of the nail and goes up to the tip, creating a neat, diagonal line. This design adds a fun and modern touch to the traditional look. The best part is, you can play around with different colors. You can stick to the classic white or try something bold like red or black. The Side French nail design is simple, stylish, and perfect for any occasion. Whether you’re going to a party or just hanging out with friends, this design will make your nails stand out in a classy way.
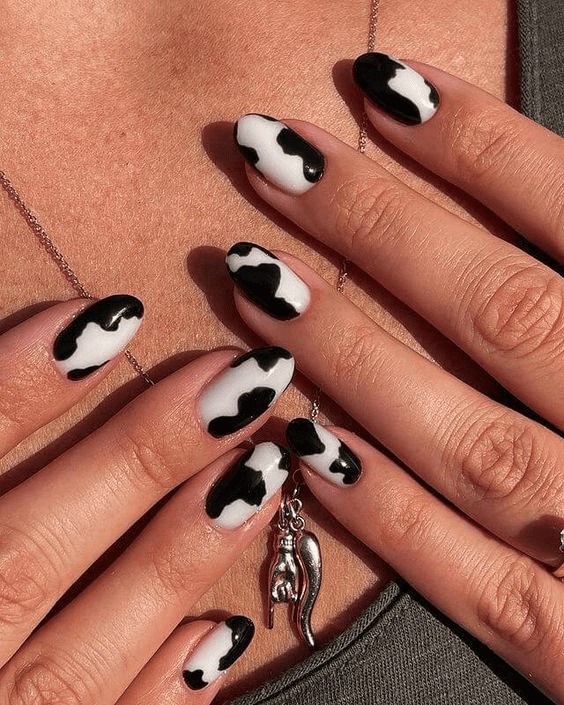
COW PRINT
The Cow Print nail design is a fun and quirky way to style your nails. It’s all about painting your nails to look like a cow’s skin, with a white base and black spots. The spots can be big, small, round, or irregular – just like on a real cow! This design is really cool because it’s different and eye-catching. Plus, it’s not too hard to do. You just need a good white polish for the base, a black one for the spots, and a steady hand to paint them on. The Cow Print nail design is perfect for anyone who likes to try funky and unique styles. Whether you’re going to a party or just want to spice up your everyday look, this design will surely make your nails moo-velous!
GRAPHIC NEON
The Graphic Neon nail design is a bold and vibrant way to express your personal style through nail art. This design involves using neon pigments in striking, graphic patterns against a dark or neutral base. The contrast between the bright neon colors and the subdued base makes the design pop, creating an eye-catching look. You can play with geometric shapes, lines, or even abstract patterns – the possibilities are endless! The graphic neon design is not just visually stunning, but it also exudes a sense of energy and youthfulness. It’s perfect for those who love standing out from the crowd or for anyone who wants to add a fun and funky flair to their look. Whether you’re going to a music festival, a night out with friends, or just want to brighten your day, the Graphic Neon nail design is sure to turn heads and make a statement.
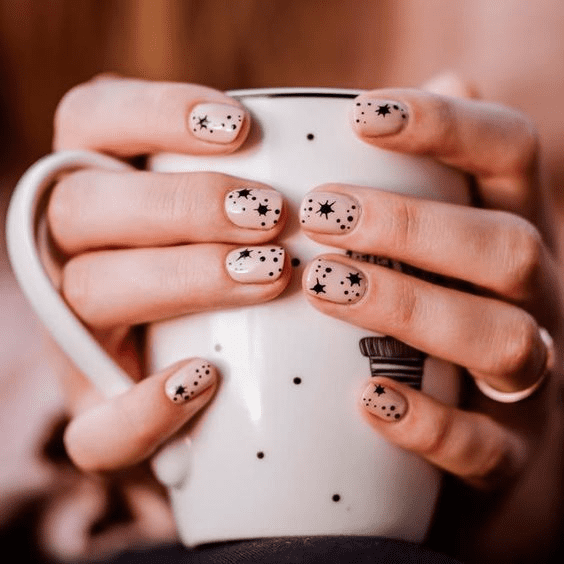
STAR NAILS
Star Nails is a delightful and charming nail design that brings a touch of the cosmic to your fingertips. This design revolves around painting small, shimmering stars on your nails. You can choose to have stars on a single nail as a centerpiece, or sprinkle them across all your nails like a night sky. The base color can be anything from a deep midnight blue to a soft pastel shade, depending on the look you’re going for. You can even add some glitter for an extra sparkly effect. Star Nails is a versatile design that can be both whimsical for a casual day out or sophisticated for a special event. It’s a wonderful way to express your love for all things celestial and add a dash of magic to your everyday look. With Star Nails, you’re sure to shine wherever you go!
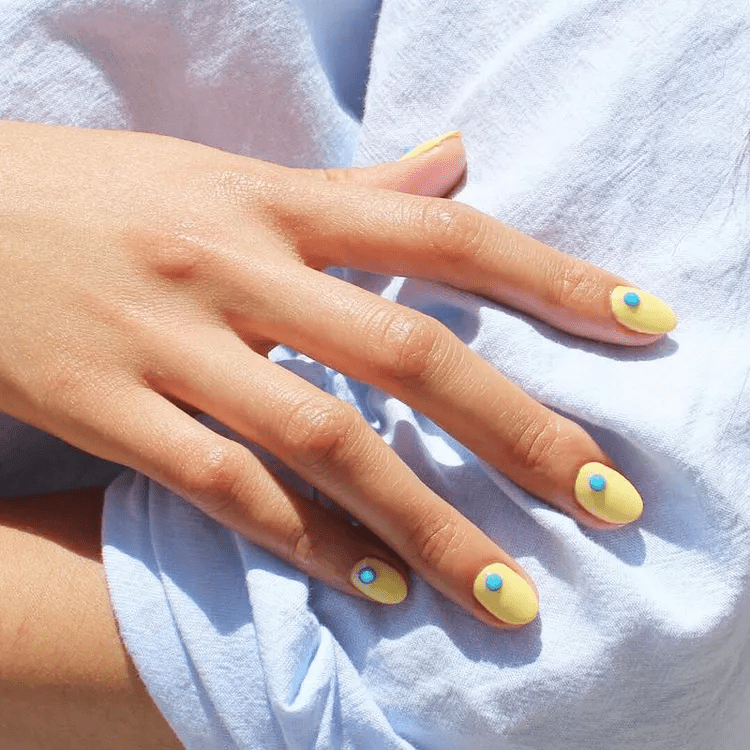
CANARY YELLOW
The Canary Yellow nail design is a sunny and cheerful option that’s perfect for beginners. It’s all about painting your nails with a bright, canary yellow color that instantly uplifts your mood. This design is very straightforward but makes a big impact. You simply need a good quality canary yellow nail polish to ensure a smooth and even application. For a little extra flair, you could add a single accent nail on each hand. This could be a glitter top coat, a simple white stripe, or even a small floral design. The Canary Yellow nail design is a fantastic choice for those who are starting out with nail art because it’s easy to do but still looks vibrant and stylish. It’s perfect for warm, sunny days, but it can also bring a burst of sunshine to your look on the gloomiest of days.
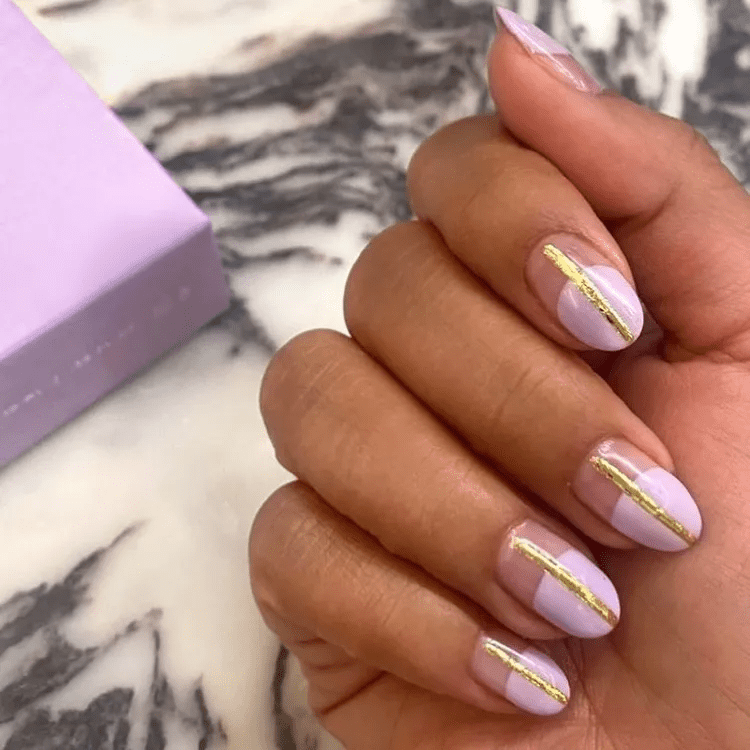
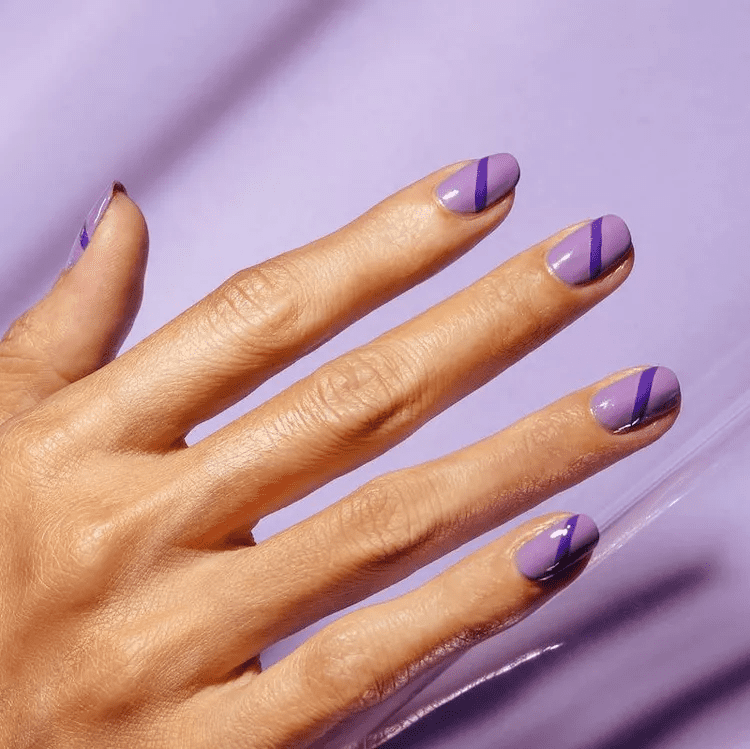
TWO-TONE PURPLE
The Two-Tone Purple nail design is a fantastic way to give your nails a stylish and trendy look. It involves painting your nails with two different shades of purple. You can choose any two shades that you like, but usually, one is lighter and the other one is darker. You can paint each nail with both colors, either in a diagonal, straight, or wave pattern. Another option is to paint some nails with the light purple and others with the dark purple. This design is simple to do but looks really cool and sophisticated. You just need two different purple nail polishes and a steady hand. The Two-Tone Purple nail design is perfect for those who love purple or for anyone who wants to try something a little different. It’s a fun and easy way to add some color to your look.
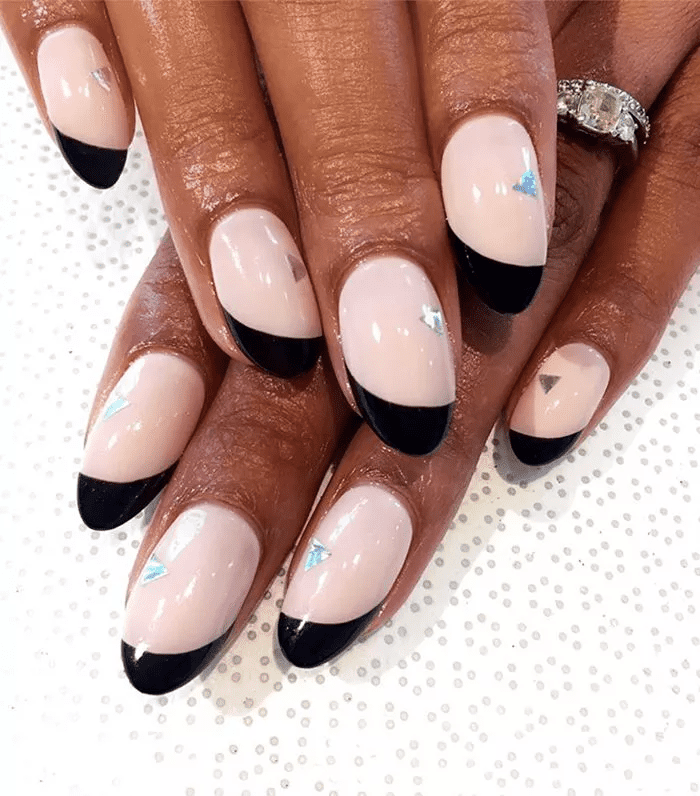
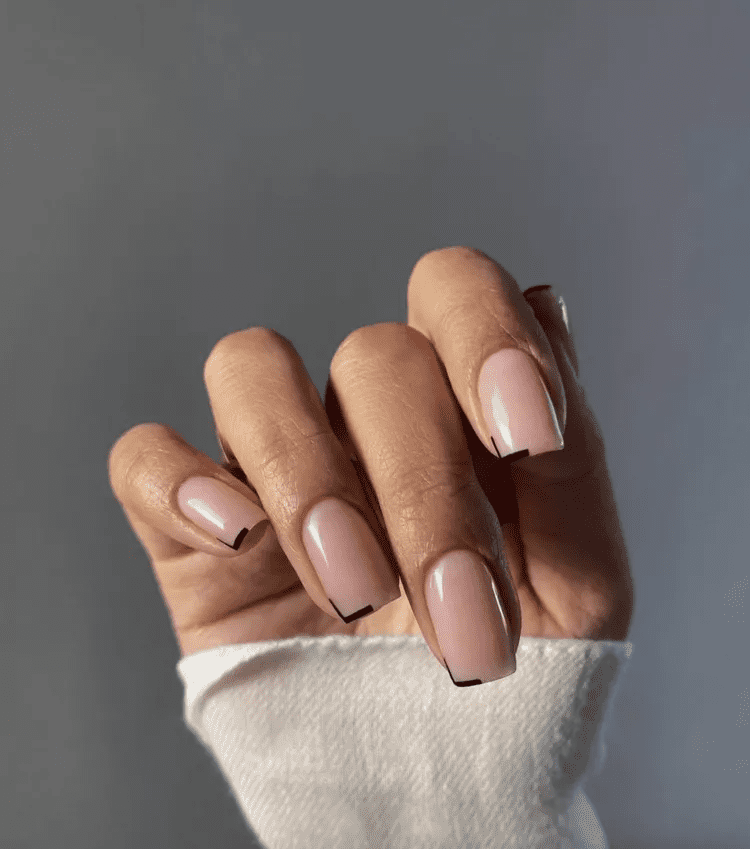
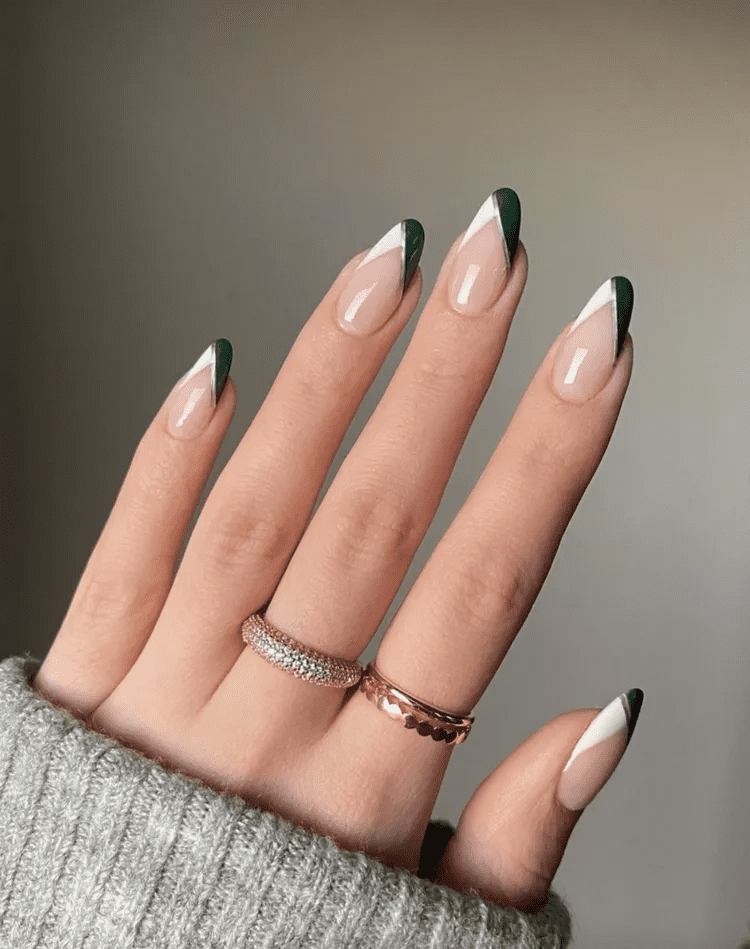
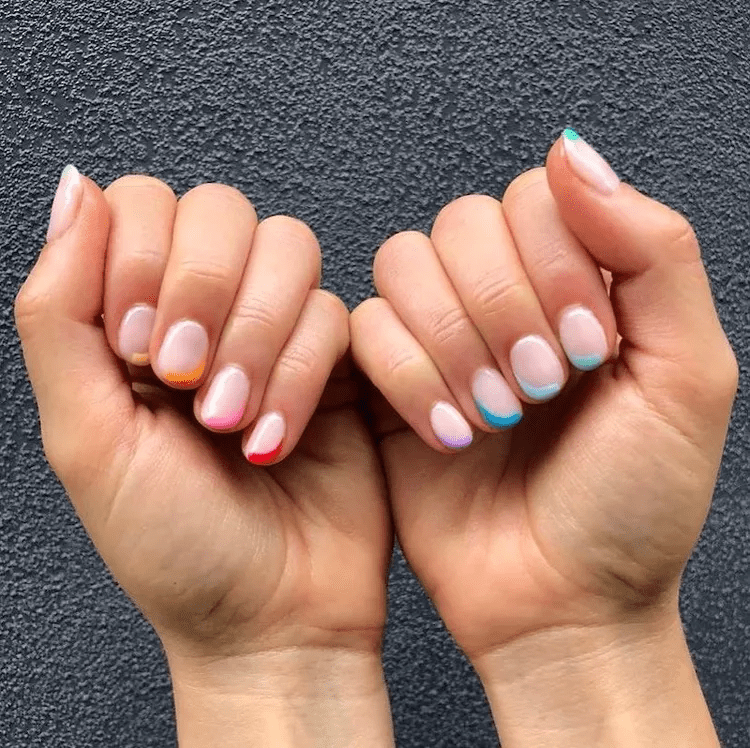
DIAGONAL FRENCH
The Diagonal French nail design is a modern and creative twist on the classic French manicure. This design involves painting the tips of your nails in a diagonal line instead of the traditional straight line. You can use the classic white for the tips or any other color that you like. The rest of the nail is usually left natural or painted with a light or nude color. The diagonal line gives your nails a unique and stylish look. This design is surprisingly easy to do, you just need a steady hand to paint the diagonal line. You can also use tape to help you get a perfect line. The Diagonal French nail design is perfect for anyone who loves the elegance of a French manicure but wants to try something a little different. It’s simple, chic, and sure to impress.
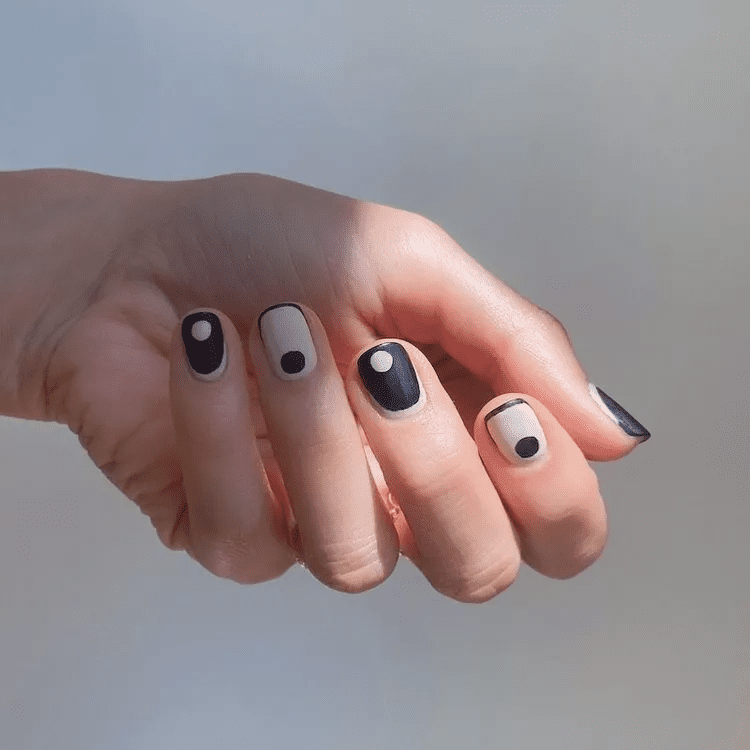
BLACK & WHITE
The Black & White nail design is a timeless and classic choice that never goes out of style. This design is all about using black and white nail polish to create interesting patterns and designs. You can paint some nails black and others white, or you can use both colors on each nail. Stripes, dots, chevrons, and checkerboard patterns are all popular choices. This design is simple but very eye-catching. It’s perfect for those who like a minimalistic look but still want their nails to stand out. You just need black and white nail polish and a little creativity to do this design. The Black & White nail design is versatile and matches with almost any outfit, making it a great choice for any occasion.
METALLIC LINES
The Metallic Lines nail design is a trendy and stylish option for anyone who loves a bit of sparkle. This design involves painting thin, metallic lines on your nails. You can do this on a bare nail for a minimalistic look or over a base color for something more vibrant. The metallic lines can be straight, curved, zigzagged, or any other pattern you like. It’s a simple design, but the shiny metallic lines make it really stand out. You just need a metallic nail polish and a thin brush to paint the lines. You can even use a toothpick if you don’t have a nail art brush. The Metallic Lines nail design is a fun and easy way to add a touch of glamour to your look. It’s perfect for parties, special occasions, or whenever you want your nails to shine.
STAND-OUT NAILS
The Stand-Out Nails design is a perfect choice for beginners who want their nails to be noticed. This design is all about choosing bold, bright colors that catch the eye. You could go for a single vibrant color on all nails, or use different colors on each nail for a fun, rainbow effect. Another option is to paint each nail with a base color and then add a simple pattern or design on top, like polka dots or stripes. Even though this design is simple, the bright colors make it really stand out. You just need a few different nail polishes and maybe a thin brush or toothpick for the patterns. The Stand-Out Nails design is perfect for anyone who is new to nail art but wants to make a bold statement. It’s a fun and easy way to express your personality through your nails.
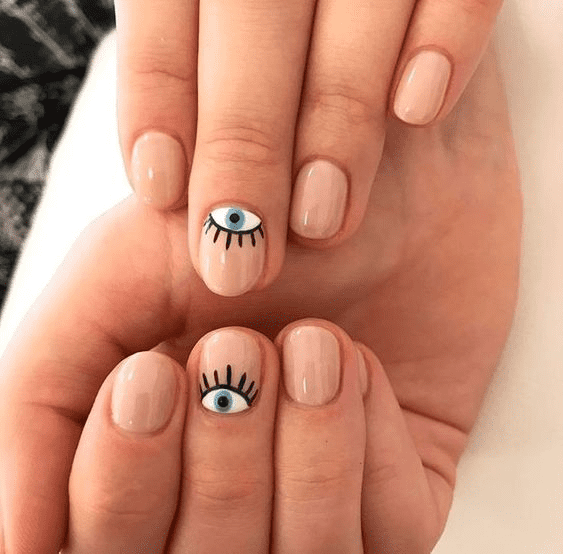
EVIL EYE MANICURE
The Evil Eye Manicure is a unique and striking nail design inspired by the ‘evil eye’ symbol, which is believed to ward off bad luck in many cultures. This design involves painting an ‘evil eye’ on each of your nails. The eye can be as simple or as detailed as you like. Typically, it consists of a light-colored circle for the eye, a smaller dark circle for the pupil, and then another small white dot for the reflection in the eye. You can paint the rest of the nail in any color you like, but blues and whites are traditional for the evil eye symbol. Creating this design requires a steady hand and a bit of patience, but the end result is definitely worth it. The Evil Eye Manicure is a great choice for anyone who wants a nail design that’s a bit different and has a bit of cultural significance. It’s a fun and interesting way to add a touch of good luck to your look.
GRAPHIC EDGE
The Graphic Edge nail design is all about bold, geometric patterns that really make a statement. This design involves painting different shapes and lines on your nails to create a graphic, edgy look. You can use any colors you like, but contrasting colors usually work best to make the patterns stand out. Think of your nails as a blank canvas and let your creativity flow. You could paint stripes, triangles, squares, or any other shapes you can think of. This design might require a steady hand and some patience, but the end result is definitely worth it. The Graphic Edge nail design is perfect for anyone who loves modern, abstract art and wants their nails to reflect that. It’s a fun and creative way to express your personal style.
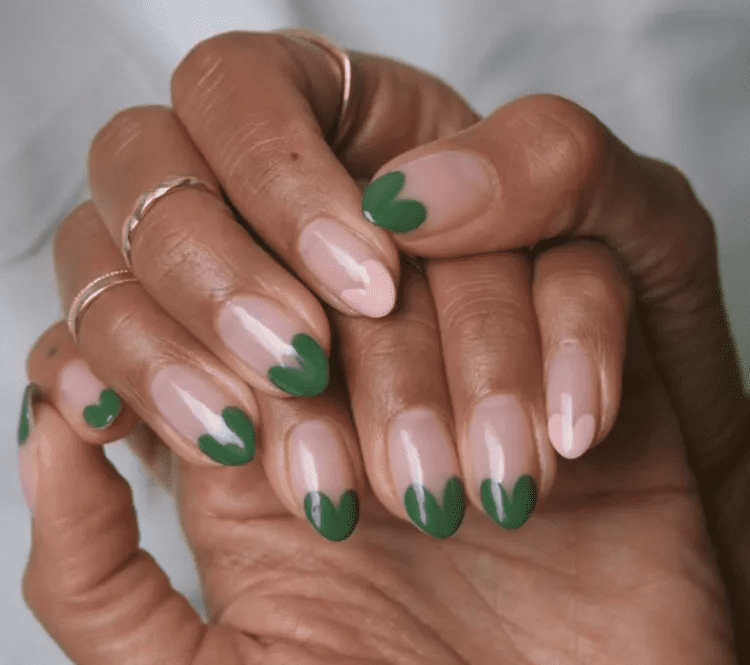
HEART-SHAPED TIPS
The Heart-Shaped Tips design is a sweet and simple option that’s perfect for beginners. This design involves painting the tips of your nails in the shape of a heart. You can do this on a bare nail for a minimalist look, or over a base color for something more vibrant. To create the heart shape, you start by painting two dots on your nail, then you draw the two sides of the heart down to the tip of the nail, meeting in a point. You just need nail polish in the color of your choice and a thin brush or toothpick to paint the hearts. The Heart-Shaped Tips design is a cute and fun way to show a little love on your nails. It’s perfect for Valentine’s Day, anniversaries, or any day you’re feeling a bit romantic.
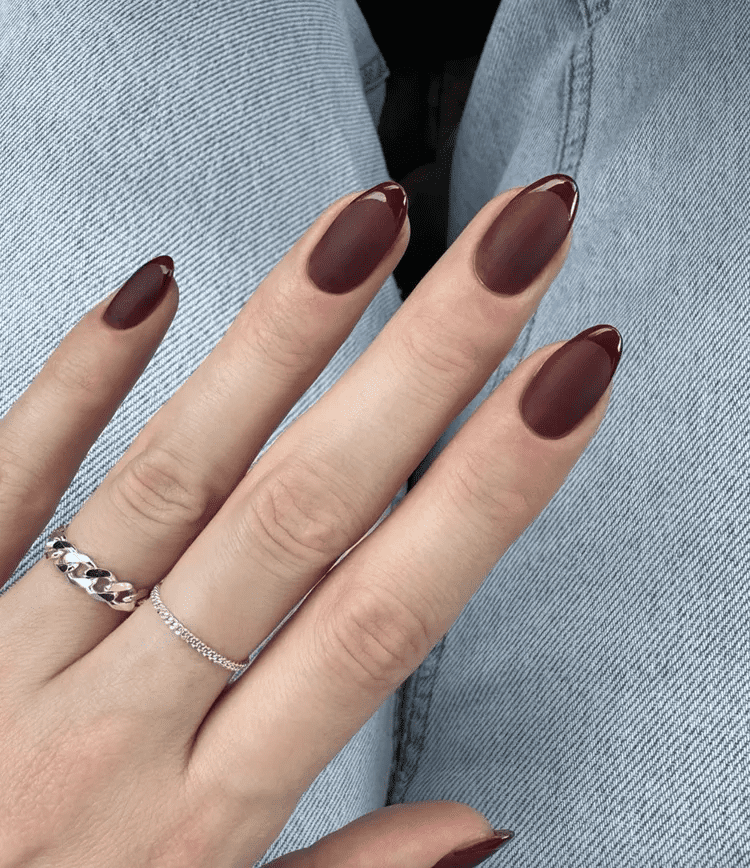
RED VELVET FRENCH
The Red Velvet French manicure is a fun and elegant twist on the classic French manicure that’s perfect for beginners. In this design, instead of the traditional white tips, you paint the tips of your nails with a rich, velvety red color. The rest of the nail is painted in a nude or clear polish to let the red really stand out. It’s a simple design, but the bold red color gives it a glamorous, sophisticated feel. You just need red nail polish and a nude or clear polish to create this look. You can use tape to get a clean line for the red tips, or if you have a steady hand, you can freehand it. The Red Velvet French manicure is a great choice for anyone who wants a simple, chic nail design that’s easy to do but still makes a statement. It’s perfect for a night out, a special occasion, or whenever you want to feel a bit glamorous.
CHEVRON TIPS
The Chevron Tips design is a fun and trendy nail art style that’s perfect for beginners. This design involves painting the tips of your nails in a V shape, also known as a chevron. You can do this over a bare nail for a sleek, modern look, or over a base color for something more vibrant. Creating the chevron shape might seem tricky at first, but with a little practice, it’s quite easy. You just need to paint two lines that meet at a point on the tip of your nail. You can use any color you like, but bold, contrasting colors often work best to make the chevron stand out. All you need is a nail polish in your chosen color and a thin brush or toothpick to paint the chevrons. The Chevron Tips design is a stylish and modern nail art option that’s easy to do but still looks impressive. It’s a great way to add a bit of edgy style to your look.
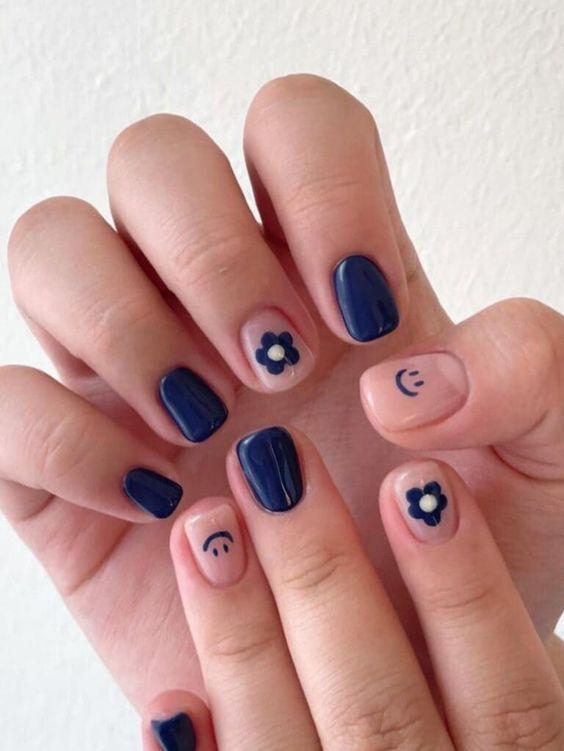
SMILEY FACES
The Smiley Faces nail design is a cheerful and easy choice for beginners that can brighten up any day. This design involves painting small smiley faces on each of your nails. You can do this on a bare nail for a minimalist look, or over a base color for a more vibrant style. To create the smiley faces, you simply paint two small dots for the eyes, and then a curve for the mouth. You can use any color you like for the smiley faces, but yellow is a classic choice. All you need is a thin brush or toothpick and some nail polish in your chosen color. The Smiley Faces design is a fun and playful nail art option that’s easy to create but still looks adorable. It’s a great way to add a bit of joy and positivity to your look.
’90S DAISIES
The ’90s Daisies nail design is a nostalgic and charming style that brings a touch of the past into the present. This design involves painting small, simple daisies on your nails, reminiscent of the popular flower patterns from the ’90s. You can choose to paint the daisies over a bare nail for a minimalist look, or over a base color for a more vibrant appearance. To create the daisies, you just need to paint small dots in a circle for the petals, and then a larger dot in the center for the middle of the flower. You can use any colors you like, but white petals with a yellow center is a classic choice. All you need is some nail polish in your chosen colors and a thin brush or toothpick for painting. The ’90s Daisies design is a sweet and simple nail art option that’s perfect for anyone who loves a bit of retro charm. It’s a delightful way to add a touch of whimsy to your look.
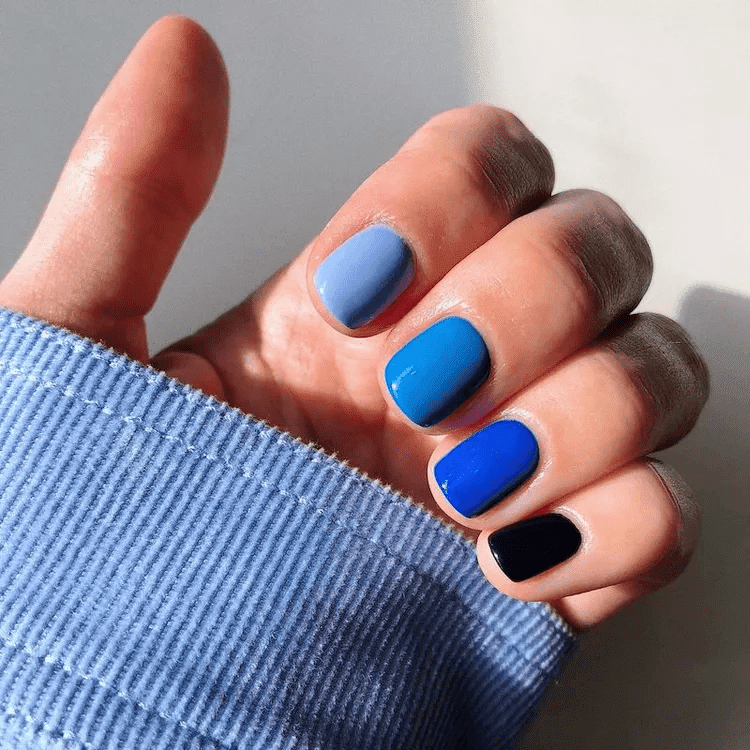
BLUE GRADIENT
The Blue Gradient nail design is a cool and stylish option that’s great for beginners. This design involves painting your nails in shades of blue that gradually change from light to dark (or vice versa), creating a beautiful gradient effect. You start by choosing several shades of blue nail polish, ranging from very light to very dark. Then, you paint each nail a different shade, starting with the lightest color and ending with the darkest, or the other way around. The key to a good gradient is to make sure the colors blend well into each other, so choosing shades from the same color family is important. The Blue Gradient design is a trendy and eye-catching nail art option that can be easily tailored to fit your personal style. It’s a fantastic way to add a touch of color and creativity to your look.
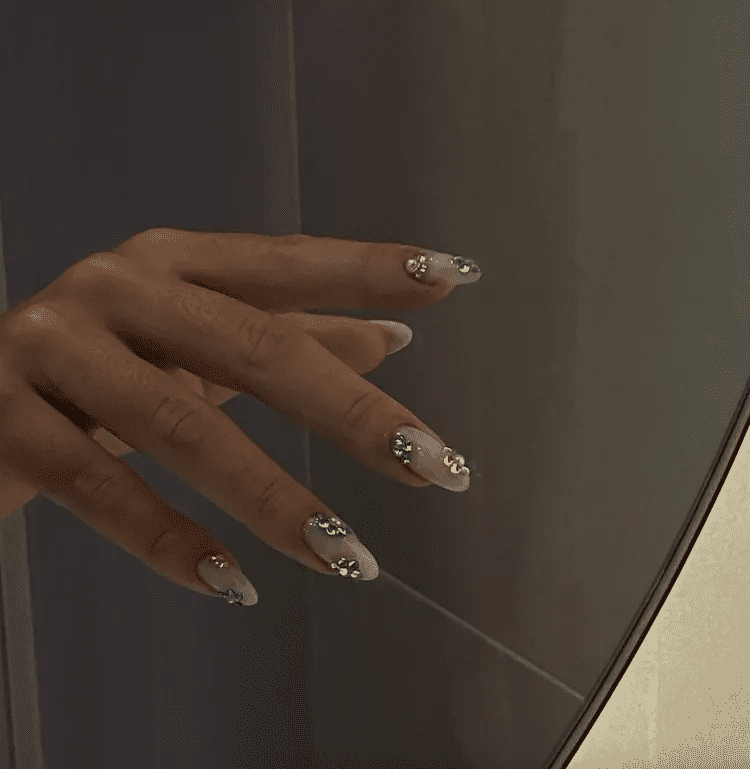
EMBELLISHED FRENCH TIPS
The Embellished French Tips nail design is an elegant and chic option that’s perfect for beginners wanting to add a little sparkle to their look. This design involves painting the tips of your nails in the classic French manicure style, and then adding small embellishments such as rhinestones, glitter, or tiny pearls for that extra touch of glamour. You start by painting your nails with a clear or nude polish, then add a white or colored tip. Once the polish is dry, you can apply the embellishments using a small amount of nail glue. You can choose to embellish just one nail for a subtle look, or all of them for full-on glamour. The Embellished French Tips design is a sophisticated and stylish nail art option that’s easy to create but looks absolutely stunning. It’s a great choice for special occasions or anytime you want to feel a bit glamorous.
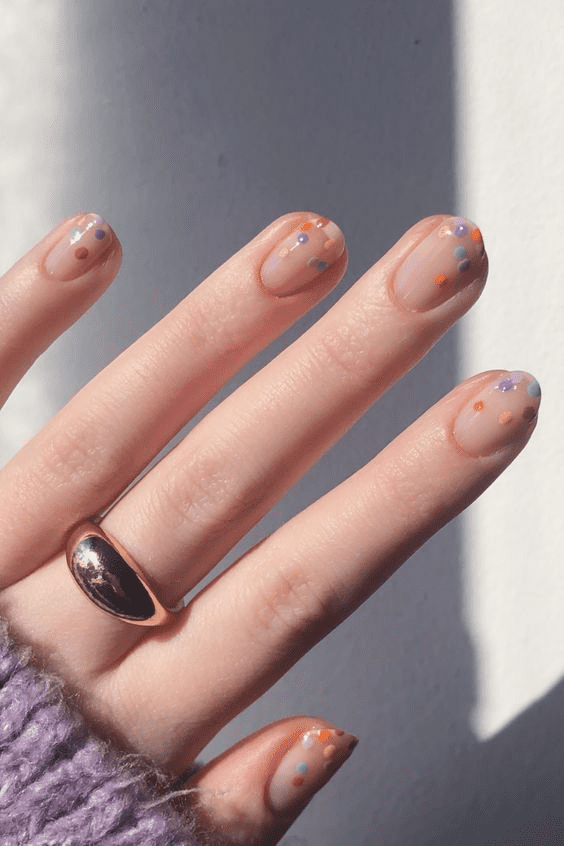
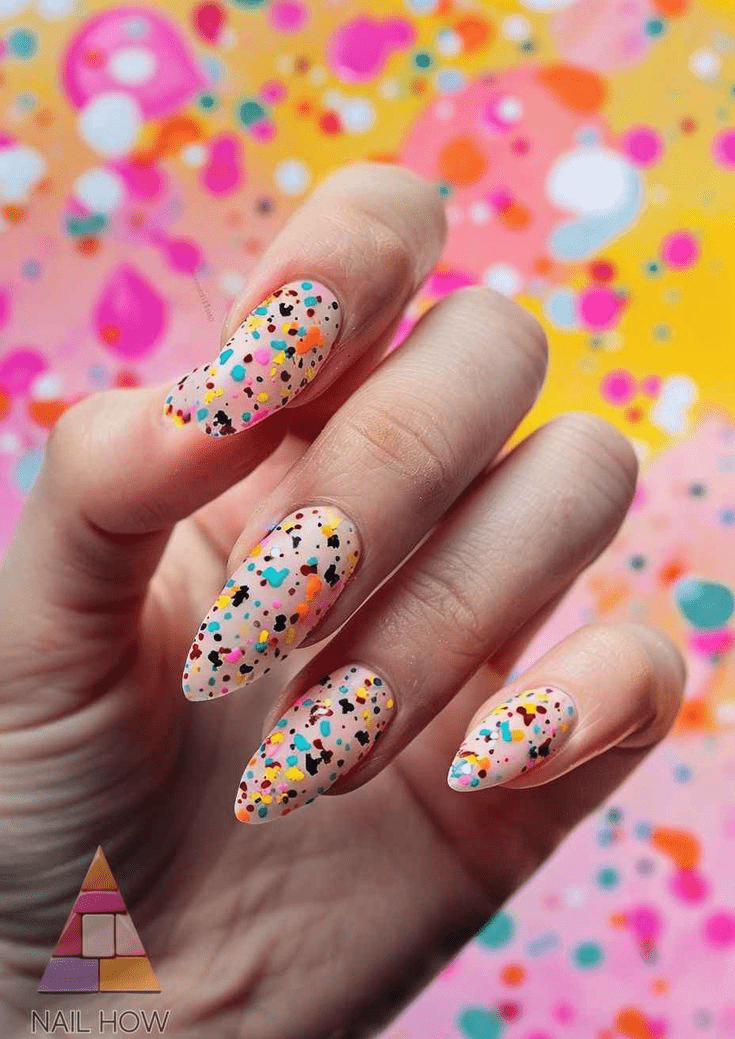
CONFETTI PARTY
The Confetti Party nail design is a fun and lively option that’s perfect for beginners wanting to add a festive touch to their look. This design involves painting your nails with polish that has small, multicolored pieces of glitter, creating the look of colorful confetti. You can choose to use a clear polish with multicolored glitter for a versatile look, or a colored polish with matching or contrasting glitter for something more unique. The key is to apply the polish evenly to get a good distribution of the glitter. The Confetti Party design is an exciting and playful nail art option that’s easy to create but looks dazzling. It’s a great choice for parties, celebrations, or anytime you want to bring a little sparkle and joy to your day.
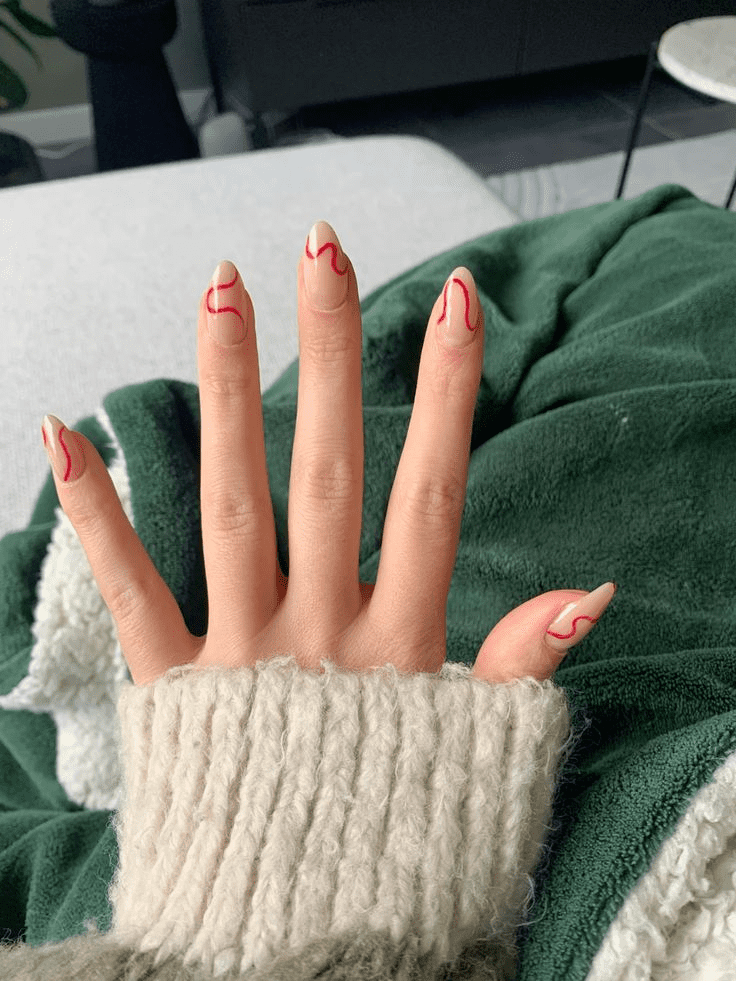
A SLEEK SWOOP
The Sleek Swoop nail design is a modern and minimalistic option that’s ideal for beginners looking for a sophisticated look. This design involves painting a curved line, or ‘swoop’, across each nail. You can do this on a bare nail for a subtle look, or over a base color for a more noticeable style. To create the swoop, you simply paint a curved line from one side of your nail to the other, starting at the base and ending at the tip. You can use any color you prefer for the swoop, but a contrasting color to your base will make it stand out more. All you need is a thin brush and some nail polish in your chosen color. The Sleek Swoop design is a chic and stylish nail art option that’s simple to create but still looks very elegant. It’s a fantastic way to add a modern twist to your look.
CONCLUSION
With this collection of 40 easy nail designs under your belt, you’re all set to experiment and create beautiful manicures at home, regardless of your experience level. Remember, practice makes perfect, so have fun, don’t be afraid to get creative, and enjoy rocking fabulous nails!