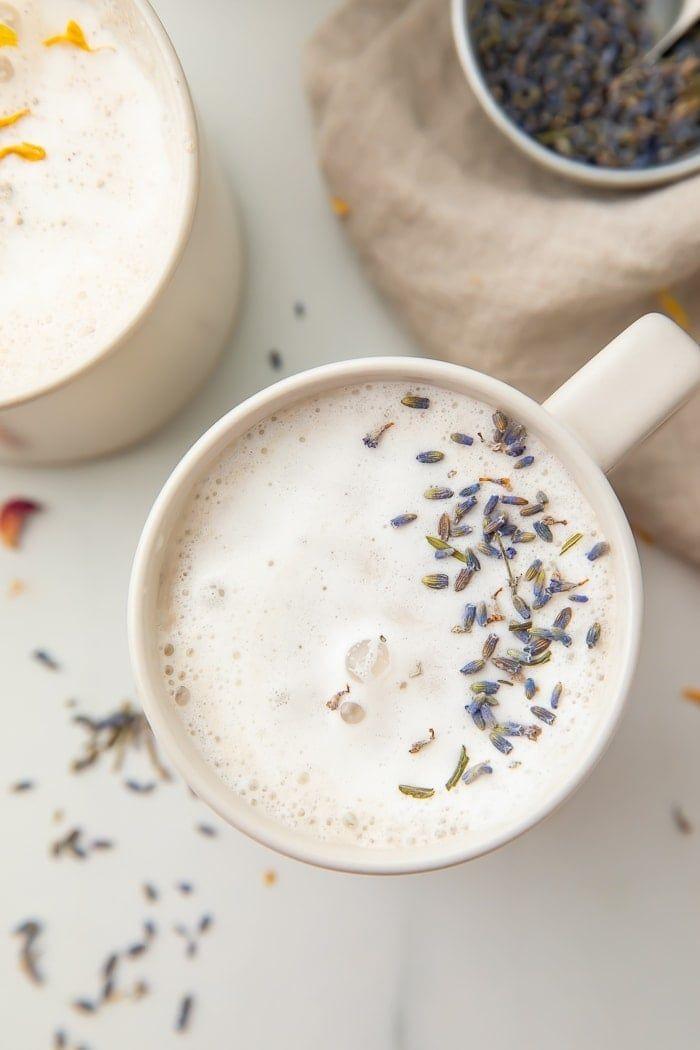
HOW TO UNCLOG YOUR NOSE INSTANTLY

You want relief from a congested, runny nose as soon as possible so that you can resume your regular breathing pattern painlessly. Sadly, drugs take time to work, and in order to effectively cure your congestion, you must correctly diagnose its source and select the appropriate active ingredients. If you are dying to know how to unclog your nose instantly, you’re in the right place.

CAUSES OF STUFFY NOSE

There are various causes of the clogged nose:

  • Bacterial, viral and fungal infection
  • Common cold
  • Sinusitis
  • Allergic
  • Asthma
  • Deviated nasal symptoms
  • Nasal polyp 

Different therapy modalities are available based on the underlying problem. You should visit a doctor if you experience nasal congestion or other stuffy nose symptoms that last longer than ten days, such as sneezing, fever, and postnasal drip. At an earlier stage, though, a stuffy nose can be easily cured with a variety of home remedies. The inflamed nasal passage can be effectively calmed with home remedies and palliative care.

HOW TO UNSTUFF YOUR NOSE INSTANTLY

HOLD YOUR BREATH

Holding your breath as long as you can is one simple and fast method for clearing your sinuses. Pinch your nose shut between your thumb and index finger, if that helps, and hold that position for as long as you can before inhaling deeply. You may notice a rapid clearing of your sinuses after taking a deep breath.

It is thought that the brain clears the sinuses when it senses a shortage of oxygen so that when you do regain access to air, there would be a clear channel from the nose to the brain. However, the precise mechanism and rationale behind this tactic remain unknown.

HOLD, TAP & LET GO

If you’re not comfortable restricting your oxygen intake to clear your nostrils, you can also use the “press, tap, release” method. You can do this anywhere, even on the metro, in bed, or in an office chair.

The tongue should be pressed and held against the roof of the mouth as the first step. Next, lightly tap your forehead, slightly above your nose, between your eyebrows with two fingers. Next, let go of your tongue and fingers and carry out the action once more. Your sinuses should feel less congested if you repeat the same movements (push, tap, release) for 20 seconds or so.

USE A HUMIDIFIER

Reducing sinus pain and nasal congestion can be achieved quickly and easily with the use of a humidifier.

The device turns water into moisture, which gradually permeates the atmosphere and raises the relative humidity of a space.

In your nose and sinuses, breathing in this wet air helps relieve inflamed tissues and enlarged blood vessels. Some people assert that clogged mucus can discharge more effectively when the air is warm and humidified.

Humidifiers can still be beneficial if you have nasal congestion symptoms and want to place them throughout your home or workplace.

TAKE A HOT SHOWER

Shower steam might help thin down mucus and lessen inflammation in your nose. For a short while, at least, taking a hot shower can help your breathing return to normal.

Inhaling steam from hot water in a sink will have the same effect. Here’s how to do it:

  • Switch on the hot water in the sink in the bathroom.
  • When the temperature is appropriate, cover your head with a towel and position it over the sink.
  • Breathe deeply while letting the steam rise.
  • Take care to avoid getting steam or hot water burns on your face.

STAY HYDRATED

If you think you may have the flu or think you could have a cold, it’s crucial to stay hydrated.

By keeping your body at its optimal level of hydration, you can help thin the mucus in your nasal passages, which will force fluids out of your nose and lower sinus pressure. Reduced pressure equals reduced discomfort and inflammation.

Warm beverages, such as tea, may also help relieve sore throats.

DRAIN YOUR SINUSES

Using a Neti pot to clear your congested nostrils is not glamorous, but it works. An apparatus called a neti pot is intended to remove fluids and mucus from your nasal passages.

Instead of utilizing tap water, the Food and Drug Administration (FDA) advises using distilled or sterile water:

  • Position your head above a sink.
  • Insert the neti pot’s spout into one nostril.
  • Once the water starts to enter your nasal canal, tilt the neti pot.
  • After entering your nostril, the water will exit via the other nostril and drain into the sink.
  • After about a minute, switch sides and repeat.

DECONGESTANTS

When you’re unwell, why do you feel stuffy? because your nose’s blood vessels enlarge and obstruct your airways. Decongestants available over-the-counter can constrict these arteries and facilitate breathing. Look for the components of pseudoephedrine or phenylephrine on the label. Nasal spray decongestants function in the same manner. But exercise caution! If you wear them for more than four or five days in succession, your nose may become even more congested. These products may occasionally cause you to feel anxious or agitated.

PEPPERMINT

Being a natural decongestant, peppermint and its primary active component, menthol, may even help thin out the muck in your chest. They are present in numerous cough drops and chest massages. Additionally, peppermint tea is available. Purchase it from the store or create it yourself: For ten minutes, steep one teaspoon of dried peppermint in one cup of hot water. Up to five cups should be consumed daily.

HONEY

Honey is useful for treating stuffy noses because it is adaptable and good for many different health issues. It contains a plentiful supply of essential nutrients, including minerals and vitamins. Additionally, it possesses antimicrobial qualities that aid in the defense against a range of bacterial illnesses. Honey has the ability to soothe inflamed throats, nasal passages, and remove mucus buildup. A cup of lukewarm water mixed with two tablespoons of honey will help unclog your nasal passages. In order to alleviate your symptoms, you can also add honey to milk or tea. 

APPLE CIDER VINEGAR

Apple cider vinegar contains all the key elements required to relieve stuffy noses. It also possesses antifungal and antibacterial qualities. Take two tablespoons of cider vinegar mixed with a cup of warm water three times a day. A tablespoon of honey can also be added to this beverage.

GINGER

Due to its strong antioxidant and anti-inflammatory content, ginger may help relieve stuffy noses. It works incredibly well to clear congested noses. Ginger can be applied as a compressor. You can boil two cups of water with chunks of ginger in it for the compressor. After soaking a clean washcloth in the mixture, gently apply it to your face for fifteen minutes. In addition, you can prepare a cup of ginger tea and consume it three times a day to get immediate relief from stuffy noses.
A blocked nose may be a genuine pain in the ass, no matter the season.  Allergies, a cold, or even some long-term illnesses can result in nasal congestion. For those who have been searching “How to unstuff your nose” on the internet for a few days straight, our article will provide you with everything you need to know that can help you treat your stuffy nose.

Whitening Trays from Dentist: Achieve a Dazzling Smile

Are you dreaming of a radiant, white smile that turns heads and boosts your confidence? While countless over-the-counter whitening products flood the market, sometimes it’s best to turn to the professionals for effective and safe teeth whitening. That’s where whitening trays from the dentist come into play. These customized trays, designed specifically for your teeth, offer a professional and convenient solution for achieving a dazzling smile. In this article, we will explore the benefits of whitening trays from the dentist and shed light on why they are a popular choice among individuals seeking remarkable teeth whitening results. Say goodbye to stained and discolored teeth as we dive into the world of professional teeth whitening with dentist-prescribed whitening trays. Get ready to unveil your brightest smile yet!

What Are Professional Teeth Whitening Trays?

Professional teeth whitening trays are custom-made dental devices designed to whiten and brighten the color of teeth. They are commonly used in dental clinics or under the supervision of a dentist, offering a more effective and personalized approach to teeth whitening compared to over-the-counter whitening products.

These trays are typically made from a flexible plastic material that molds to the shape of your teeth, ensuring a comfortable fit and even distribution of the whitening agent. The process of obtaining professional teeth whitening trays involves an initial consultation with a dentist or dental professional who will take impressions of your teeth. These images are then sent to a dental laboratory where the trays are fabricated to precisely fit your mouth.

One of the significant advantages of professional teeth whitening trays is their ability to reach deep stains and discoloration that are difficult to address with surface-level whitening methods. Furthermore, professional teeth whitening trays allow for a more controlled and customized whitening experience. Since the trays are tailored to your mouth’s unique shape, they provide consistent coverage, ensuring that every tooth receives an equal amount of whitening gel. This personalized approach helps avoid uneven results often associated with generic over-the-counter whitening products.

How Do They Work?

The active ingredient in most teeth whitening gels is hydrogen peroxide or carbamide peroxide. These chemicals penetrate the enamel of the teeth and break down the stains, leaving the tooth looking whiter and brighter. The trays hold the gel in place so that it can do its job effectively.

Teeth whitening gels typically contain either hydrogen peroxide or carbamide peroxide as their active ingredient. These chemicals are responsible for the whitening effect on teeth. When applied to the teeth, they are able to penetrate the enamel, which is the outer protective layer of the teeth.

Once the hydrogen peroxide or carbamide peroxide reaches the dentin, the layer beneath the enamel, it starts to break down the stains that have accumulated on the teeth. These stains can be caused by various factors such as consumption of colored foods and beverages, smoking, or poor oral hygiene.

The process of breaking down the stains involves a chemical reaction, where the peroxide molecules release oxygen ions. These oxygen ions are highly reactive and are able to react with the pigment molecules in the stains, causing them to break apart. As a result, the stains become less concentrated, and the overall appearance of the tooth becomes whiter and brighter.

To ensure that the teeth whitening gel is applied evenly and stays in contact with the teeth for an extended period, trays are commonly used. These trays are typically made of flexible material that conforms to the shape of the teeth. The gel is applied to the tray, and then the tray is placed over the teeth, holding the gel in place. This allows for optimal contact between the gel and the teeth, ensuring that the whitening process is effective.

Pros of Using Whitening Trays

Custom Fit

Since the trays are custom-made for your teeth, they offer a more precise fit than over-the-counter products. This ensures that the gel is evenly distributed and reduces the risk of gum irritation.

Stronger Formula

Professional-grade whitening gels contain a higher concentration of bleaching agents than over-the-counter products, which means they can achieve better results in a shorter amount of time.

Long-Lasting Results

With proper care, the results of professional teeth whitening can last for several years.

Cons of Using Whitening Trays

While there are many benefits to using professional teeth whitening trays, there are also some potential drawbacks to consider, including:

Cost

Professional teeth whitening can be expensive, with prices ranging from a few hundred to several thousand dollars depending on the type of treatment and the dentist you choose.

Sensitivity

Teeth whitening can cause temporary sensitivity or discomfort, especially if the gel comes into contact with the gums. This is more likely to occur if the trays are not properly fitted or if they are left on for too long.

Time Commitment

Professional teeth whitening trays require a time commitment, as they need to be worn for several hours each day over a period of several weeks. This may not be practical for everyone’s lifestyle.

Step-by-Step Guide to Using Whitening Trays

If you’ve decided to try professional teeth whitening trays, here’s how to use them:

  • Schedule an appointment with your dentist or dental hygienist to have the trays made.
  • Follow the instructions provided by your dentist for using the trays and the whitening gel. This may involve wearing the trays for a certain amount of time each day, usually for several weeks.
  • Be sure to brush and floss before using the trays to remove any food particles or debris that could interfere with the whitening process.
  • If you experience sensitivity or discomfort, take a break from using the trays or talk to your dentist about adjusting the treatment plan.

Comparing Different Types of Whitening Trays

Custom-Fit Trays

These trays are made specifically for your teeth and offer the most precise fit. They are usually more expensive than other options but also offer the best results.

Boil-and-Bite Trays

Boil-and-bite trays are heated in water and then molded to your teeth for a semi-custom fit. While they are less expensive than custom-fit trays, they may not be as effective or comfortable to wear.

One-Size-Fits-All Trays

One-size-fits-all trays are pre-made and designed to fit most people’s teeth. While they are the cheapest option, they may not be as effective or comfortable as custom-fit trays.

Tips for Getting the Best Results

Use a High-Quality Whitening Gel

Be sure to use a high-quality whitening gel that contains a sufficient amount of bleaching agent. Talk to your dentist about which products they recommend.

Follow the Instructions Carefully

Follow the instructions provided by your dentist carefully, including how long to wear the trays each day and how often to use them.

Avoid Staining Foods and Drinks

Avoid foods and drinks that can stain your teeth, such as coffee, tea, red wine, and tomato sauce, while using the trays.

Practice Good Oral Hygiene

Brush and floss regularly to maintain good oral hygiene and prolong the results of your teeth whitening treatment.

The Best Whitening Trays from Dentist

Opalescence PF Whitening System

This system uses a custom-fitted tray and a 35% carbamide peroxide gel to deliver fast, effective results.

Philips Zoom DayWhite

It has a custom-fitted tray and a hydrogen peroxide gel to whiten teeth in just 30 minutes a day.

GLO Brilliant Personal Teeth Whitening Device

This device uses a mouthpiece and an LED light to activate a hydrogen peroxide gel and produce visible results in just 8 days.

Conclusion

Professional teeth whitening trays can be an effective way to achieve a brighter, more beautiful smile. While there are some potential drawbacks, such as cost and sensitivity, the benefits of using custom-fit trays with a strong bleaching gel can outweigh the risks. If whitening trays aren’t right for you, there are several other options to consider, including over-the-counter products and in-office treatments. When using professional teeth whitening trays, be sure to follow the instructions carefully and practice good oral hygiene to get the best results.

FAQs

  1. Is teeth whitening safe? Yes, teeth whitening is generally considered safe when done under the supervision of a dentist or dental hygienist. However, some people may experience sensitivity or discomfort during or after treatment.
  2. How long do teeth whitening results last? The length of time that teeth whitening results last depends on a variety of factors, including the individual’s oral hygiene habits and diet. With proper care, the results of professional teeth whitening can last for several years.
  3. Can I whiten my teeth naturally? While there are many natural remedies that claim to whiten teeth, such as baking soda and activated charcoal, these methods may not be as effective as professional treatments. It’s always best to talk to your dentist before trying any new whitening method.
  4. How much does professional teeth whitening cost? The cost of professional teeth whitening varies depending on the type of treatment and the dentist you choose. Prices can range from a few hundred to several thousand dollars.
  5. Are there any side effects of teeth whitening? Some people may experience temporary sensitivity or discomfort during or after teeth whitening treatment. In rare cases, more serious side effects, such as chemical burns or gum irritation, may occur. Be sure to talk to your dentist if you have any concerns.