The world of makeup can be dazzling and daunting, especially for the uninitiated. Brushes, palettes, powders – it’s enough to make anyone’s head spin! But fear not, aspiring makeup mavens! This guide is your key to unlocking the secrets of beauty, one step at a time. Forget complicated rituals and intimidating jargon. We’ll break down the application process into simple, easy-to-follow steps, perfect for anyone starting their makeup journey. Whether you’re craving a natural glow or a glamorous statement look, you’ll find your perfect canvas right here.

WASH YOUR FACE CLEAN
Cleaning your face before applying makeup is an essential step in any skincare and beauty routine. The process of cleansing serves as a crucial foundation for achieving a flawless makeup application. When you clean your face, you remove excess oil, dirt, and impurities that may have accumulated throughout the day or night. This not only ensures a smooth canvas for makeup but also helps prevent clogged pores and potential skin issues. Clean skin allows makeup products to adhere better, promoting a more even and long-lasting application.
Moreover, a clean face enhances the effectiveness of skincare products by allowing them to penetrate the skin more effectively. In essence, incorporating a thorough face-cleansing ritual into your daily routine is a fundamental practice for maintaining healthy, radiant skin and achieving optimal makeup results.

APPLY MOISTURE
Just as you diligently remove your old makeup, it is equally important to cleanse your face. Employ a gentle facial cleanser to delicately cleanse your skin, taking approximately one minute to massage and eliminate bacteria and dead skin cells from your pores. Conclude the process by rinsing with cool water. Complete your skincare routine by applying a facial moisturizer, suitable for all skin types, to ensure your skin remains hydrated and nourished. This simple yet effective routine contributes to maintaining a fresh and healthy complexion.

PRIM YOUR FACE
Before applying any makeup, it’s essential to use a face primer. The primary role of a face primer is to elevate the overall look of your makeup and extend its durability. Applying the primer with your fingers, distribute a small amount evenly across your entire face. The primer not only enhances the staying power of your makeup throughout the day but is particularly crucial if you anticipate sweating, running, or engaging in activities that might otherwise cause your makeup to wear off or smudge. In such cases, a primer becomes a necessary step in ensuring your makeup maintains its integrity and longevity.

PUT ON A COAT OF FOUNDATION
Various foundation types exist, but their application generally follows the same principles. Liquid, cream, and powder foundations all aim to achieve a more uniform complexion, providing a smooth base for additional makeup. To apply foundation, utilize a foundation brush or a damp beauty sponge, ensuring even coverage extends to your neck and earlobes if needed. Select a foundation shade that closely matches your natural skin tone, avoiding shades that are significantly darker or lighter. Harmonizing your foundation with your chest and neck prevents any stark contrasts, creating a seamless transition between your face and the rest of your body. Avoid a harsh line along your jawline, as it results in an unnatural and unblended finish.
For stubborn blemishes, a concealer brush can be employed to add a touch of extra foundation. While liquid foundation can be applied with fingertips, it’s worth noting that this method may introduce bacteria, potentially leading to future breakouts.

APPLY SOME CONCEALER
Applying concealer is a transformative step in perfecting your makeup look. Concealer serves as a versatile tool, effectively camouflaging imperfections such as blemishes, dark circles, and uneven skin tones. Using a concealer brush or your fingertips, dot a small amount of concealer onto the areas that require extra coverage. Gently blend the product into your skin for a seamless and natural finish. Concealer not only provides an added layer of coverage but also brightens and highlights specific areas, enhancing your overall complexion. It’s a quick and efficient way to achieve a more refreshed and radiant appearance, contributing to a polished and flawless makeup finish.
Whether you’re aiming for a subtle everyday look or a more glamorized finish, the strategic application of concealer can make a significant difference in achieving a refined and well-balanced makeup result.

SET FOUNDATION AND CONCEALER
While optional, incorporating a setting powder into your makeup routine can significantly enhance longevity and prevent creasing. To set your foundation and concealer in place, employ a damp beauty sponge to pick up loose powder, pressing it into the under-eye area. Subsequently, gently sweep away any excess with a brush. For an all-over set, use a large, fluffy brush to apply a translucent or matching setting powder across your entire face.
This step proves especially beneficial when using liquid foundation, aiding in setting the foundation and eliminating any unwanted shine or tackiness, ensuring a lasting and flawless makeup finish.

APPLY A HIGHLIGHTER
This versatile product is designed to accentuate and illuminate specific areas of the face, providing a natural, healthy glow. Using a highlighter brush or your fingertips, apply the product to the high points of your face where light naturally hits—such as the tops of your cheekbones, the bridge of your nose, the cupid’s bow, and the brow bone. The subtle shimmer of the highlighter captures and reflects light, creating a flattering and dewy effect. Whether you prefer a subtle, everyday glow or a more intense and glamorous shine, the strategic application of highlighter enhances your facial features and adds a touch of dimension to your overall makeup look.

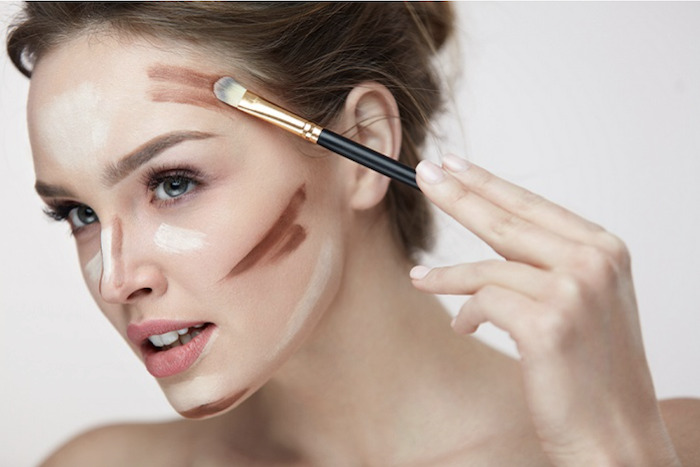
ADD CONTOURING
Contouring is like using makeup magic to define and shape your face. It involves applying darker and lighter makeup in specific areas to highlight your features and create shadows. To contour, use a contour product that is a bit darker than your skin tone to emphasize areas like the hollows of your cheeks, the sides of your nose, and your jawline. Blend it well to avoid harsh lines.
Then, use a lighter shade on areas you want to stand out, like the tops of your cheekbones and down the center of your nose. Blending is key to make it look natural and enhance your face’s natural structure, giving you a sculpted and polished appearance. Contouring is a fun way to play with makeup and accentuate your best features!
APPLY LITTLE BLUSH
The last touch in getting your face ready is to apply blush to your cheeks. Each person’s cheeks naturally have a hint of color, but it differs from one individual to another. Use a big brush to gently apply blush to the apples of your cheeks—the round part that appears when you smile. Keep the application light; add just enough to enhance the natural color that would naturally appear. This step adds a subtle and healthy flush to your complexion, completing the preparation of your face for the next stages of your makeup routine.

FILL EYEBROWS
Adding eyebrows to your makeup routine is like giving your face a finishing touch. Eyebrows frame your eyes and enhance your overall look. To fill in your eyebrows, use a pencil, powder, or gel that matches your natural hair color. With gentle strokes, follow the natural shape of your brows to create definition and fullness. Be careful not to go too heavy; the goal is to enhance, not overpower.
Well-groomed eyebrows can bring balance to your face and make your eyes stand out. Experiment with different products and find the method that suits you best. Adding eyebrows is a simple yet impactful step that completes your makeup and gives your face a polished and put-together appearance.

APPLY EYESHADOW PRIMER
Using an eyeshadow primer is another optional step, but it significantly contributes to achieving natural eye makeup looks that last longer. If you’ve skipped this, you might have observed your eyeshadow fading or becoming oily, accumulating in the creases of your eyelids over time. Apply the eyeshadow primer with your fingertip, blending it seamlessly from the base of your lashes to the top of your crease. Setting it with a powder creates an ideal foundation for seamlessly blending your eyeshadow, ensuring a prolonged and flawless appearance for your natural eye makeup looks.

PUT ON YOUR EYESHADOW
Enhancing your makeup with eyeshadow offers versatility, allowing you to choose between subtle neutrals or vibrant, bold colors. For either option, you’ll need two complementary eyeshadows: a lighter shade and a darker one.
Begin by dipping your eyeshadow brush into the lighter shade, tapping off any excess product. Apply this light shade across your entire eyelid, starting from the lash line and extending just above the crease.
Next, dip the brush into the darker color, ensuring to tap off excess product. Concentrate this darker shade at the outer corner of your eye, slightly above the lash line. Sweep the darker color along the crease, just below the brow bone, stopping around the center of your eyelid to avoid darkening the inner corners.
To seamlessly blend the two shades, use a clean shadow brush. For a more intensified look, you can reapply the darker shadow. This straightforward technique adds depth and dimension to your eyes, whether you’re aiming for a subtle enhancement or a more striking appearance.

APPLY EYELINER
This versatile cosmetic tool comes in various forms, including pencil, liquid, and gel, allowing for diverse looks ranging from subtle to dramatic. To begin, choose the type of eyeliner that suits your desired outcome and personal preference. For a more natural look, opt for a soft pencil and gently line the upper lash line, smudging slightly for a softer effect. Liquid eyeliner is ideal for achieving precision and creating bold, defined lines. Whether you prefer a classic winged look or a modern graphic design, mastering the technique takes practice. Remember to steady your hand, start with thin strokes, and gradually build up the intensity. Experimenting with different eyeliner styles can elevate your overall makeup routine, enhancing your eyes and expressing your unique sense of style.

FINISH OFF WITH MASCARA
Completing your eye makeup routine, the finishing touch is the application of mascara, a game-changer that adds volume and length to your lashes. Once your eyeliner is perfectly applied, carefully curl your lashes if desired, then reach for your favorite mascara. Wiggle the wand from the base of your lashes to the tips, ensuring each lash is coated for a defined and dramatic effect. For an extra boost, consider applying a second coat after the first one dries.
Mascara not only opens up your eyes but also beautifully frames them, creating a captivating and polished look. With the right mascara, your eyes will be the focal point of your makeup, providing the perfect finishing flourish to your overall beauty routine.

SMOOTH OUT LIPS
Prior to applying any lip products, consider using lip balm, primer, or sealer to enhance their longevity and vibrancy. Not only does this step contribute to a more enduring color payoff, but it also ensures the comfort of soft, supple lips throughout the day. Investing in a quality balm or salve serves the dual purpose of preventing lip flakiness and providing a smooth canvas for your chosen lip products.
Incorporating this simple yet effective pre-lipstick routine is a key step in achieving a flawless and comfortable finish to your overall makeup look.

APPLY LIP LINER
Outline your lips using a lip liner that complements either your natural lip shade or the color you intend to apply. Ensure your lip liner is sharpened and trace along the natural contours of your lips. Once outlined, proceed to fill in your lips with the pencil. This technique not only defines the lip shape but also evens out the color and texture, providing a smooth base for the effortless application of gloss or lipstick later on.

APPLY LIPSTICK OR LIP GLOSS
Enhancing your lips with the perfect shade of lipstick or the glossy allure of lip gloss is a transformative step in any makeup routine. The application process can be both an art and a personal expression, allowing you to play with colors and textures to complement your overall look. When applying lipstick, precision is key. Begin by outlining your lips with a matching lip liner to define their shape. Then, carefully fill in the color, ensuring even coverage. For a bolder appearance, you can experiment with vibrant hues, while subtle nudes provide a classic touch.
On the other hand, lip gloss offers a more lustrous and understated effect. Its glossy finish adds a delightful sheen, making your lips appear fuller and more radiant. Whether you opt for a matte lipstick or a shiny lip gloss, choosing the right product for the occasion can elevate your style and leave a lasting impression. So, dive into the world of lip makeup, experiment with different shades, and let your lips become the canvas for your self-expression.

SETTING SPRAY
The ideal conclusion to your makeup routine can be a setting spray or setting powder. Achieving a makeup look that lasts throughout the day without any unwanted greasing, creasing, or shine requires the use of a high-quality setting solution.
Setting sprays cater to all skin types and are versatile enough to set various makeup looks, whether it’s a light coverage or a full-face masterpiece. By keeping your makeup firmly in place, a setting spray minimizes the need for reapplication, ensuring your makeup remains impeccable for extended periods.
Applying setting spray is akin to the finishing touch hairspray provides to your hairstyle. Hold the bottle approximately 8 inches from your face and lightly spritz a few times to ensure even coverage. For comprehensive coverage, start by spritzing in an X shape across your face, followed by a T shape for thorough protection from forehead to chin. Invest in a quality setting solution to elevate the longevity and flawless finish of your makeup.

CONCLUSION
For beginners, the step-by-step guide provided here serves as a solid foundation, offering insights into each aspect of the makeup routine. From skincare preparation to the final touches of mascara and setting spray, this comprehensive guide aims to empower individuals to take their initial steps into the world of cosmetics. Remember, makeup is a form of self-expression, and the key is to embrace creativity, practice, and find what works best for you. As you hone your skills and experiment with different techniques, the process becomes not just a routine but a delightful exploration of your unique beauty.