Magic of 1ml Lip Filler Before and After Thin Lips

Are you tired of having thin lips that make your face look dull and lifeless? Do you wish to enhance your lips and make them fuller without undergoing invasive surgical procedures? If yes, then 1ml lip filler might be the solution you have been searching for.

1ml lip filler is a non-surgical cosmetic procedure that involves injecting hyaluronic acid into the lips to add volume and restore their natural plumpness. The treatment is quick, safe, and provides instant results that can last for up to six months. In this article, we will discuss everything you need to know about 1ml lip filler before and after thin lips.

What are thin lips?

Thin lips refer to lips that have a relatively smaller volume or less fullness compared to what is considered typical or desired in terms of aesthetics. Characteristics of thin lips may include:

  • Lack of Fullness: Thin lips often lack the plumpness or volume associated with more prominent lips.
  • Reduced Lip Proportions: In some cases, the upper and lower lips of individuals with thin lips may have proportions that are less balanced or less pronounced.
  • Fine Lip Lines: Thin lips can have more prominent fine lines or wrinkles, especially around the edges of the lips.
  • Lack of Definition: The borders of thin lips may not be as well-defined or sharp as fuller lips.

It’s important to note that lip size and shape vary greatly among individuals, and what is considered attractive or desirable can be subjective. Some people naturally have thinner lips due to genetics, while others may experience a reduction in lip volume as they age.

Art of Lip Augmentation

Luscious, fuller lips have been a symbol of beauty and sensuality for centuries. From classic Hollywood icons like Marilyn Monroe to modern-day celebrities like Angelina Jolie, plump lips have always been a coveted feature. This desire has fueled the evolution of lip augmentation techniques, each designed to achieve specific results.

Lip augmentation, the process of enhancing lip volume and shape, has gained significant popularity over the years. It’s a fascinating realm where science, aesthetics, and artistic precision converge to create stunning transformations. 

The quest for plumper, more voluminous lips has never been more accessible, thanks to the transformative power of lip fillers. Dermal fillers are injectable substances that can plump and shape the lips without the need for surgery. They offer versatility, precision, and relatively quick results, making them an increasingly popular choice.

Science Behind 1ml Lip Filler

Role of Hyaluronic Acid

Hyaluronic acid (HA) is a naturally occurring substance found in our skin, connective tissues, and eyes. It plays a crucial role in maintaining hydration and volume. Here’s how it works:

Hydration: HA has an exceptional capacity to hold water molecules, contributing to skin hydration. This property is essential for achieving plump lips.

Volume Restoration: As we age, our bodies produce less HA, leading to the loss of skin elasticity and volume. Dermal fillers, including 1ml lip filler, replenish this lost HA, restoring fullness and vitality to the lips.

Unique Appeal of 1ml Lip Filler

1ml lip filler is typically composed of a precise concentration of hyaluronic acid. Here’s why this specific formulation is so effective:

  • Customizable: The concentration of HA in 1ml lip filler allows for precise customization of lip volume. Practitioners can tailor the treatment to your unique preferences while ensuring a natural look.
  • Gradual Buildup: 1ml may not sound like much, but it’s an ideal starting point for those new to lip augmentation. It provides a subtle enhancement that can be gradually increased over subsequent sessions if desired.
  • Versatility: Beyond enhancing lip volume, 1ml lip filler can also be used to address asymmetry, define lip borders, and even soften fine lines around the mouth.
  • Minimal Downtime: Unlike surgical procedures, the recovery time for 1ml lip filler is minimal, often just a day or two of mild swelling or bruising.

Safety and Longevity

One of the reassuring aspects of 1ml lip filler is its safety profile. HA-based fillers have been extensively studied and are considered safe when administered by trained professionals. Additionally, the results of 1ml lip filler are not permanent. They typically last around 6 to 12 months, allowing individuals the flexibility to adjust their appearance over time

Lip Filler for Thin Lips: Before and After Results

Before the Procedure: Thin Lips and Self-Perception

Individuals with naturally thin lips or those experiencing age-related volume loss often find themselves longing for more defined, luscious lips. Thin lips can sometimes be associated with a lack of facial balance or contribute to a perception of aging. Many individuals with thin lips seek lip filler treatments not only for aesthetic reasons but also to boost their self-confidence and enhance their overall facial harmony.

The Procedure: Enhancing Thin Lips with 1ml Lip Filler

The journey from thin lips to fuller, more vibrant lips begins with a consultation with a qualified practitioner. During this initial meeting, patients discuss their goals, preferences, and any concerns with the practitioner. Together, they create a personalized treatment plan to ensure the best possible outcome.

The 1ml lip filler procedure is a non-invasive, minimally discomforting process that typically takes less than an hour to complete. Here’s a brief overview of what patients can expect:

Cleansing and Numbing: The practitioner starts by thoroughly cleansing the lips and surrounding areas. Local anesthesia or a numbing cream is applied to ensure patient comfort during the injections.

Precise Injections: Using a fine needle, the practitioner strategically injects the 1ml lip filler into specific areas of the lips, following the predetermined treatment plan. The process allows for precise customization to achieve a natural-looking result.

Massage and Evaluation: After the filler is injected, the practitioner may gently massage the area to ensure even distribution. They evaluate the results and make any necessary adjustments.

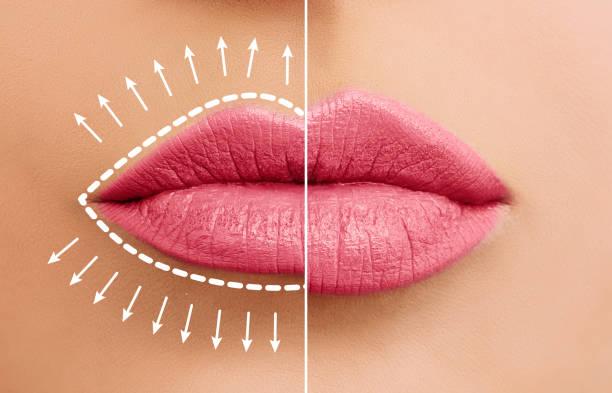
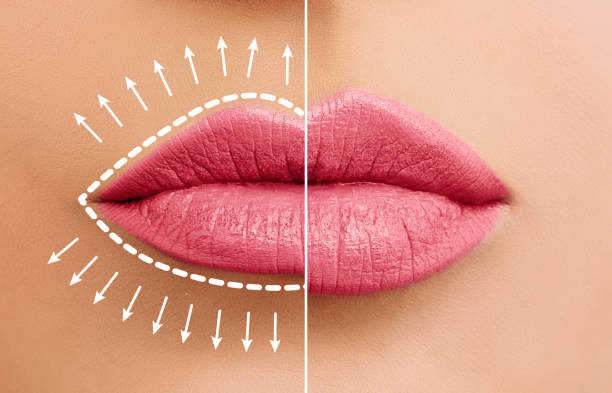
The Transformation: Before-and-After Photos

The most compelling aspect of the lip filler journey is witnessing the striking before-and-after results. These photographs serve as a testament to the expertise of practitioners and the profound impact on patients’ appearances and self-confidence.

Before

  • Thin Lips: In the “before” photos, patients typically exhibit naturally thin lips or lips that have lost volume with age.
  • Subtle Features: The lips may lack definition, and fine lines around the mouth might be more prominent.

After

  • Fuller, More Defined Lips: In the “after” photos, the lips appear noticeably plumper, with improved volume and definition.
  • Enhanced Facial Balance: The enhanced lips often contribute to improved facial symmetry and overall attractiveness.
  • Boosted Confidence: Perhaps most importantly, the “after” photos capture the radiant smiles and heightened self-confidence of individuals who have undergone 1ml lip filler treatments.

effects of 1ml lip filler on different lip conditions

  • Thin Lips: In individuals with naturally thin lips, 1ml lip filler can add volume and plumpness, making them look fuller and more defined. The treatment can also improve lip symmetry and proportion, creating a more balanced and harmonious facial appearance.
  • Aging Lips: As we age, our lips lose volume, firmness, and definition, resulting in wrinkles, fine lines, and sagging. 1ml lip filler can restore the lost volume, rejuvenate the lips, and reduce the signs of aging, making them look smoother, firmer, and more youthful.
  • Uneven Lips: If your lips are uneven due to genetics or injury, 1ml lip filler can correct the asymmetry by adding more volume to the thinner side or reducing it on the thicker one. The result is a more symmetrical and balanced lip contour, enhancing your overall facial harmony.
  • Flat Lips: Flat lips lack contour and definition, which can make your face look dull and lifeless. 1ml lip filler can add shape, structure, and fullness to flat lips, creating a more striking and appealing appearance.

Tips for natural-looking Lips

If you are considering 1ml lip filler treatment, here are some tips to ensure a successful and satisfying outcome.

  • Choose a qualified and experienced injector who specializes in lip fillers and has a good track record of delivering natural-looking results.
  • Discuss your lip concerns, goals, and expectations with your injector beforehand to ensure that they understand your needs and can tailor the treatment accordingly.
  • Avoid taking any blood-thinning medications, supplements, or alcohol before the procedure, as they can increase the risk of bruising and swelling.
  • Follow your injector’s post-treatment instructions carefully, such as avoiding hot drinks, sun exposure, and strenuous exercise for a few days after the procedure.
  • Be patient with the results, as it may take a few days to a week for the full effects of the treatment to show up.

FAQs 

  1. Is 1ml lip filler safe? Yes, 1ml lip filler is a safe and FDA-approved cosmetic treatment that uses hyaluronic acid, a natural substance found in the body, to enhance the lips. However, like any medical procedure, there may be some risks and side effects, such as bruising, swelling, redness, or allergic reactions. Hence, it is essential to choose a qualified injector who follows proper hygiene and safety protocols and discusses the possible risks and benefits of the treatment beforehand.
  2. How long does the 1ml lip filler last? The longevity of 1ml lip filler varies from person to person but typically lasts for six to nine months. Factors like metabolism, lifestyle, and injection technique can affect how long the results last. To maintain the desired lip volume, you may need touch-up injections every few months or so.
  3. Is 1ml too much for thin lips? The amount of 1ml lip filler required for thin lips depends on various factors, such as the extent of thinness, lip shape, age, and personal preference. While 1ml is a standard dose for lip enhancement, your injector may recommend a lower amount if you have very thin lips or want a more subtle effect. Let’s discuss your goals and expectations with your injector beforehand to determine the appropriate amount and achieve a natural-looking result.
  4. Does 1ml lip filler hurt? Most people report little to no pain during the 1ml lip filler procedure, as the injector uses a numbing cream or local anesthesia to minimize discomfort. However, some individuals may experience mild to moderate discomfort, swelling, or bruising after the treatment, which usually resolves within a few days. If you have a low pain threshold or are concerned about pain, you can ask your injector to use additional anesthesia or ice packs to reduce discomfort.
  5. Can I wear lipstick after 1ml lip filler? Yes, you can wear lipstick after 1ml lip filler, but it is recommended to wait for at least 24 hours before applying any makeup or other lip products. This allows the filler to settle into its final position and reduces the risk of infection or irritation. You should also avoid using matte or long-wearing lipsticks, as they can dry out the lips and make them look unnatural. Instead, opt for hydrating and moisturizing lip products that enhance the fullness and shine of your new lips.

THE HISTORY AND TUTORIAL OF AUTHENTIC 1940S MAKEUP

1940s makeup is one of the most “vintage” looks, and is rather simple to recreate. There was a push for all things natural, unlike the 1930s and 1950s, which favored reshaping eyebrows and contouring the face. 1940s makeup enhanced natural beauty with just a few tools.

During the war, European women dealt with huge cosmetics shortages, since petroleum and alcohol – some of the main ingredients in makeup at the time – were used for the war effort. When makeup ran out, women turned to home remedies to substitute, such as using beetroot juice to stain lips and petroleum jelly to darken lashes and shape eyebrows.

In the United States, cosmetics continued to be manufactured throughout the war and were seen by the government as a morale booster for the busy women on the home front. Women were encouraged to wear makeup all the time to hide sadness and attract men, even while at work. Athletes even wore makeup. Color films had a big impact on the market, as women could now imitate the shades worn by Hollywood starlets. By 1948, between 80 and 90 percent of women wore lipstick, two thirds wore rouge, and a quarter wore eye makeup.

The 1940s makeup look exudes classic sophistication and is surprisingly easy to recreate. The emphasis was on a flawless, fresh-faced appearance—natural, never overly done. Less was definitely more, which worked out well, especially during the war years when many women had to make do with fewer products and resources.

Although the final result seems simple, a woman’s 1940s makeup routine could take some time—quick five-minute makeup wasn’t a thing! The process began with applying and blending thick foundation. Women were encouraged to shape their face with both light and dark shades of foundation—darker tones could be used to contour areas like a large nose, broad forehead, or square jaw, while lighter shades on the cheeks would add a fuller, plumper appearance.

Next, eye shadow was applied, followed by moist rouge. This was often used not only for color but also for subtle shaping, always ensuring the look remained natural. Afterward, a generous application of powder was pressed into the face with a large velour or wool puff. The powder was applied heavily to ensure a matte finish, covering the entire face. Excess powder was then brushed away with a powder brush to reveal a smooth, polished look.

If the moist rouge needed extra reinforcement, a powdered version was applied on top of the powder. The final steps included defining the eyebrows with an eyebrow pencil, applying mascara for fuller lashes, and finishing with the signature bold lipstick.

What You’ll Need:

  • Foundation: Choose a shade that closely matches your skin tone.
  • Powder: Loose powder that matches your skin tone to set the foundation.
  • Cream Rouge: Go for a rose-pink cream rouge (avoid powder if possible, unless that’s all you have).
  • Eyebrow Pencil: Choose a pencil that matches your natural brow color, or one shade darker than your hair.
  • Eye Shadow: (Optional, for evening wear) Use matte shadows that match your eye color—avoid shimmer.
  • Mascara: Dark brown or black mascara, or you can even use petroleum jelly (like Vaseline) for a more subtle lash effect.
  • Lipstick: A classic, matte red lipstick for that bold, vintage look.

1940s Foundation and Powder

Foundations in the 1940s were quite different from today’s lightweight options. There were fewer shades available, and most foundations had a pinkish tint, which worked well for white women, but wasn’t always suitable for women of color. Many Black women, for instance, either mixed their own makeup or often went without powder.

Foundations during this time were much thicker and creamier compared to today’s formulations. Liquid foundations as we know them didn’t exist, and the creamier formulas helped provide a fuller coverage. Face powder, which was essential, was used to set the foundation and keep the face matte throughout the day. It matched the skin tone but was also used to help the foundation adhere better to the face—foundation alone would often cause powder to slip off.

The foundation and powder were extended down the neck and onto the blouse or dress line, as it was common for the foundation shade to not perfectly match the skin on the rest of the body. This helped create a seamless, blended look.

Tip: For a smooth application, lightly coat your face with baby oil (or mineral oil) before applying foundation. This helps create a smooth base and allows the foundation to blend more easily.

1940S FACE POWDER

Powders should match your natural skin tone as much as possible. Light shades kept a woman looking fresh and youthful, while a slightly bronzed shade added a sun kissed glow, popular with movie stars. Almost all makeup lines carried a sun kissed color or two.

If you are over 40, your skin is prone to yellowing, in which case a powder with a pink tinge will work better for you.  To apply, use a puff to dust your face all over and then brush from the neck up to the forehead. Only brush down once to finish and smooth out face fuzz.

Tip: A fluffy face puff makes a difference. Don’t use compressed powder with a flat pad for early 1940s looks. Pan-cake compressed makeup came out in the mid 1940s with big success. To women who could afford it, it provided more coverage applied in less time. Just remember to always brush up, never down.

1940s Blush

In the 1940s, blush (referred to as rouge) was applied sparingly to create a natural, rosy glow. The shades of rouge were limited, typically ranging from peach and coral to raspberry tones, with darker shades for those with bronze or deeper skin tones. Cream rouge (moist rouge) was the preferred choice, giving a more natural look, and was often blended directly into the foundation. Powdered rouges were also used lightly over the cheeks to give a soft flush.

Although rouge was an important part of the look, it wasn’t strictly necessary for achieving the 1940s style. You could still achieve the desired effect without it.

Tip: If you can’t find cream rouge, a light matte lipstick in a pink or peach shade works well. Simply apply it with your fingers, dab it on the cheeks, and blend it in until it seamlessly matches your skin tone.

Cream or liquid rouges were sometimes found in theatrical costume makeup stores and, in modern times, can be found in some makeup brands on platforms like Amazon.

1940s Eyebrows

The 1940s eyebrows were a continuation of the 1930s style, with thin, beautifully arched brows being the key feature. Eyebrows were kept natural-looking, with only stray hairs removed to maintain a soft, even arch. The arch itself was well-groomed but not overly thin—most women didn’t over-pluck.

Eyebrows were often defined with a pencil that was slightly darker than the hair color, or some women simply applied a bit of petroleum jelly to keep the brows in place and enhance their natural shape. For daywear, this softer look was more common, while in the evening, brows might be more defined.

As the decade progressed, the full, more defined brows of the late ’40s began to take hold, but they were never as thick as modern-day brows.

1940s Eye Makeup

Eye makeup in the 1940s was quite minimal, especially during the daytime. Most women wore just a light coat of mascara, often in dark brown or black. Some even used petroleum jelly (Vaseline) to achieve a subtle lash definition. Mascara came in different forms—liquid, paste, or cake—often built up by adding a little water or spit to the cake to get the desired consistency. Mascara was applied to both the upper and lower lashes for a fuller look.

For evening looks, eye shadow could be used, but only in neutral tones. The colors were typically chosen to match the eye color—blue-grey for blue eyes, grey for green eyes, and brown for brown or hazel eyes. The eyeshadow was applied in a single color, blended from the lash line up to the brow for an elegant and simple look. No smoky eyes or contouring here—just one shade blended well. For evening looks, sometimes silver or gold was added to create a little extra glamour.

Eyeliner wasn’t commonly used in the early 1940s; it was considered too harsh and “fake-looking.” It didn’t make an appearance until the late ’40s, and even then, it was applied only to the top lash line.

1940s Lipstick

Lips were the focal point of 1940s makeup, especially during the war years, when red lipstick was seen as a mood booster. Lipstick shades varied from bluish reds to orange-toned reds, but they were all red! Bright pinks weren’t worn until the 1950s, so reds were a constant. In the fall, red lipstick tended to get darker, and in the spring, it lightened up a bit.

Most lipsticks of the time were matte, and women were advised to moisturize their lips before applying. After applying lipstick, they would often blot their lips with a tissue to ensure the color stayed put. By 1948, lipstick pencils were introduced, allowing for a more precise application and a perfect outline around the lips.

The ideal lip shape was full and even, with a smooth contour on the top and bottom lips. The “Hunter’s Bow” lip shape, popularized by Joan Crawford, involved slightly over-drawing the lips to make them appear plumper. However, actresses like Lauren Bacall and Ingrid Bergman embraced their naturally thin lips and didn’t over-draw them.

Tip: To achieve a perfectly shaped lip, start with the cupid’s bow and draw the pencil out to the corners of the mouth. Fill in with lipstick and gently rub your lips together to ensure an even finish. Touch up any uneven spots on the bottom lip.

1940s Fingernail Polish

In the 1940s, nails were always neatly trimmed, often filed into a long oval shape. During wartime, nails were kept a bit shorter for safety, but they were still manicured regularly. Cuticles were carefully trimmed and moisturized for a polished look.

Nail polish in the ’40s was almost always red, and matching your nails to your lipstick was the norm. Other shades like pink, coral, rose, and burgundy were also popular. A clear topcoat was always used for durability, and some women embraced the “half-moon” style, where the base of the nail (around the cuticle) was left unpainted.

Tip: To create a half-moon shape on your nails, apply paper reinforcements to the base of each nail, aligning the top of the hole with the cuticle. Paint your nails, then remove the reinforcements before the polish fully dries for a neat, vintage look.

1940s Makeup Products to Buy Today

To create an authentic 1940s look today, you don’t need a complicated routine. A bit of face powder, black mascara, well-defined brows, and red lipstick will give you that classic, vintage style. Modern makeup tends to have more shine and glitter, but for a true 1940s look, opt for matte products—especially for your lips, cheeks, and eyes.

Tip: Many modern makeup lines offer matte formulas, but brands like Revlon and Max Factor (which were popular in the 1940s) still offer products that capture that vintage style. Besame is another brand that specializes in recreating vintage makeup colors and formulas from the ’40s.

For a more subtle daytime look, keep your makeup light—just a dusting of powder, a touch of blush, and a swipe of mascara. For a more dramatic evening or pinup style, go heavier on the lipstick and mascara, and use a little more rouge for that retro glam.