BABY BEAR LOVEY FREE CROCHET PATTERNS

A baby bear lovey is a small, soft blanket or toy that is designed to provide comfort and security to babies and young children. It is often made from soft, cuddly materials such as cotton or fleece, and may have a variety of features such as a small stuffed animal attached to it, or a crinkled texture.

Baby bear loveys can be a great way to help babies feel safe and secure, and can also be a fun and stimulating toy. They make a great gift for newborns or toddlers, and can be used for many years. Try following our method to get a beautiful bear like that.

MATERIALS YOU’LL NEED

To get started making this free crochet snuggler pattern, you’ll want to gather all your materials first.

  • 200g Premier Basix Chenille in the color Sand 
  • Small amount Premier Basix Chenille Winter White
  • Small amount of black yarn for the embroidered eyes
  • Embroidery thread for eyebrows
  • 18mm safety eyes, if you prefer
  • Crochet Hook in Size 4.5mm
  • Tapestry Needle
  • Polyfil
  • stitch marker

NOTES

Notes: This snuggler pattern is made from the feet up. You will make two feet, fastening off one and then attaching them together from the second one. The body will decrease and then increase into the head. This video shows how to strengthen the neck. This has a double use in this pattern- keeping the head from being overly floppy and to allow the head to be stuffed without losing the stuffing in the body. Because of the nature of this pattern, the head will still “flop” but that is what I expect of the lovey/blanket form.

The arms are attached with a long needle. You can find the video for that here.

I embroidered the eyes so it would be safe for a baby/toddler. You can find my collection of embroidery videos here.

Substitute yarns could be Bernat Blanket yarn or Big Twist from Joann’s. You may need to change the hook size if you change the yarn.

Free Bear Crochet Lovey Pattern

Neck Support Piece:

Begin with a magic circle and work 7 single crochets (SC). Continue to SC in each stitch around for a total of 10 rows. Fasten off, leaving a long tail—this will be needed before stuffing the head. Check out this tutorial to see how it all comes together!

Beginning with the feet and using the body color:
Round 1: In a magic circle, SC 6.
Round 2: SC INC in each around. (12)
Round 3: SC in the first, SC INC in the next. Repeat around. (18)
Rounds 4-7: SC in each around. (18) *4 total rows*
Round 8: SC in the first, INV DEC in the next. Repeat around. (12)
Round 9: INV DEC in each around. (6)

Stuff the foot part, but not the next chain rows.
From here on, you will be chaining 2, DC in the same stitch and crochet around. Then attach to the first stitch with a slip stitch. This creates the part of the leg that you will knot. You can knot before you attach the legs or afterwards. The foot may be “squished” a bit as you tie, but there should be enough length. I created a video to show the next part of the leg, and you can see that here.
Rounds 10-18: DC in each around. (6) *9 total rows*
Round 19: SC INC in each around. Attach to the first stitch with a slip stitch and chain 1 (12)
Round 20: SC in each around. (12)
Fasten off the first foot. On the second foot, chain 4 and slip stitch to the first leg where you fastened off.

Click here for a video and photo tutorial of this next part! (note that the numbers are different for this mini version, but the method is the same)
Round 21: Chain 1 and SC in each stitch around on the leg (12). SC in each chain across. (4) SC in each stitch around the second leg. (12) SC on the other side of the chain. (4) Attach to the first SC with a slip stitch. (a total of 32)
Rounds 22-26: SC in each around. (32) *5 total rows*
Round 27: SC in the first two. INV DEC in the next. Repeat around. (24)
Rounds 28-31: SC in each around. (24) *4 total rows*
Round 32: SC in the first. INV DEC in the next. Repeat around. (16)
Round 33: INV DEC in each around. (8)
Round 34: SC INC in each around. (16)
Round 35: SC in the first stitch, SC INC in the next. Repeat around. (24)
Round 36: SC in the first two stitches, SC INC in the next. Repeat around. (32)
Round 37: SC in the first three stitches, SC INC in the next. Repeat around. (40)
Rounds 38-40: SC in each around. (40) *3 total rows*
Round 41: SC in the the first three, INV DEC in the next. Repeat around. (32)
Round 42-43: SC in each around. (32) 2 total rows
Begin to stuff here. If you haven’t already, attach the neck strengthener! If you choose to use safety eyes, attach them around rounds 38-39.
Round 44: SC in the first two, INV DEC in the next. Repeat around. (24)
Round 45: SC in each around. (24)
Round 46: SC in first, INV DEC in the next. Repeat around. (16)
Round 47: INV DEC in each around. (8)
Fasten off and sew the remaining hole closed.

Crochet Lovey Bear Snout, Ears, and Arms
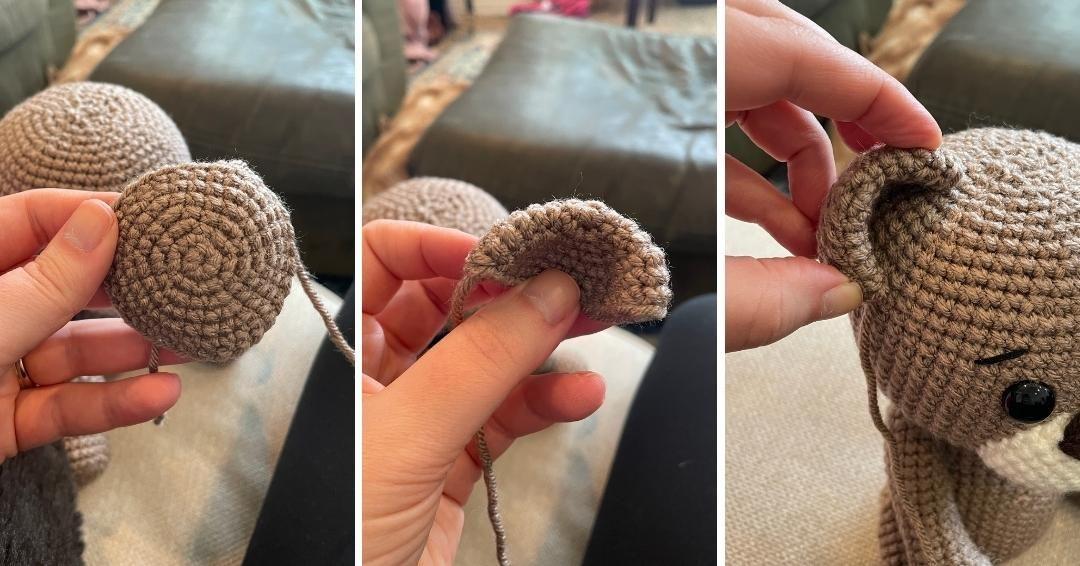
Ears (Make 2):

Round 1: Start with a magic circle and work 8 single crochets (SC).
Round 2: Increase (SC INC) in each stitch around. (16)
Round 3: SC in the first stitch, SC INC in the next. Repeat around. (24)
Round 4: SC in each stitch around. (24)

Fasten off, leaving a long tail. Fold each ear in half before attaching. Sew through both halves of the ear and secure them to the head, positioning them about 3 rows from the top. The ears will naturally curve, spanning approximately 5 rows across each side.

Note: The photo below shows my worsted weight yarn bear, but the technique remains the same even with thicker yarn. If you’d like to see the video tutorial for the worsted weight bear in action, check it out here!

Snout
Round 1: In a magic circle, SC 6
Round 2: SC INC in each stitch around (12)
Round 3: SC in first, SC INC in next. Repeat around. (18)
Rounds 4: SC in each around. (18)
Fasten off and leave a long tail to sew on to the face, with the bottom around round 34 and the top just under round 38. Lightly stretch the snout into an oval shape before you attach.
Using a long piece of brown yarn. Embroider the nose on about row 4, making about 4-5 passes through the same stitches. Bring the needle up from the back, and cover about 4-5 stitches.

Eyes
I embroidered the eyes to make them safe for babies. If you want to see the video and picture tutorials for those, you can find the collection here.

Arms

NOTE: I highly suggest you visit this post before attaching the arms and the legs. This is my favorite method by far to attach limbs, and is worth watching the video and seeing the tutorial pictures!

Round 1: In a magic circle, SC 7.
Round 2: SC INC in each around. (14)
Round 3-4: SC in each around. (14)
Round 5: INV DEC in the first. SC in the next 5. INV DEC. SC in the remaining 5. (12)
Round 6: SC in each around. (12)
Round 7: INV DEC in the first. SC in the next 4. INV DEC. SC in the remaining 4. (10)
Round 8: SC in each around. (10)
Round 9: INV DEC in the first. SC in the next 3. INV DEC. SC in the remaining 3. (8)
Rounds 10-11: SC in each around.
Fasten off and leave an extra long tail. Sew the opening closed (leave unstuffed!).
Attach the arms between rows 31 and 32 of the body. Use the yarn through method outlined, or if you prefer you can do it the traditional way.

THE HISTORY AND TUTORIAL OF AUTHENTIC 1940S MAKEUP

1940s makeup is one of the most “vintage” looks, and is rather simple to recreate. There was a push for all things natural, unlike the 1930s and 1950s, which favored reshaping eyebrows and contouring the face. 1940s makeup enhanced natural beauty with just a few tools.

During the war, European women dealt with huge cosmetics shortages, since petroleum and alcohol – some of the main ingredients in makeup at the time – were used for the war effort. When makeup ran out, women turned to home remedies to substitute, such as using beetroot juice to stain lips and petroleum jelly to darken lashes and shape eyebrows.

In the United States, cosmetics continued to be manufactured throughout the war and were seen by the government as a morale booster for the busy women on the home front. Women were encouraged to wear makeup all the time to hide sadness and attract men, even while at work. Athletes even wore makeup. Color films had a big impact on the market, as women could now imitate the shades worn by Hollywood starlets. By 1948, between 80 and 90 percent of women wore lipstick, two thirds wore rouge, and a quarter wore eye makeup.

The 1940s makeup look exudes classic sophistication and is surprisingly easy to recreate. The emphasis was on a flawless, fresh-faced appearance—natural, never overly done. Less was definitely more, which worked out well, especially during the war years when many women had to make do with fewer products and resources.

Although the final result seems simple, a woman’s 1940s makeup routine could take some time—quick five-minute makeup wasn’t a thing! The process began with applying and blending thick foundation. Women were encouraged to shape their face with both light and dark shades of foundation—darker tones could be used to contour areas like a large nose, broad forehead, or square jaw, while lighter shades on the cheeks would add a fuller, plumper appearance.

Next, eye shadow was applied, followed by moist rouge. This was often used not only for color but also for subtle shaping, always ensuring the look remained natural. Afterward, a generous application of powder was pressed into the face with a large velour or wool puff. The powder was applied heavily to ensure a matte finish, covering the entire face. Excess powder was then brushed away with a powder brush to reveal a smooth, polished look.

If the moist rouge needed extra reinforcement, a powdered version was applied on top of the powder. The final steps included defining the eyebrows with an eyebrow pencil, applying mascara for fuller lashes, and finishing with the signature bold lipstick.

What You’ll Need:

  • Foundation: Choose a shade that closely matches your skin tone.
  • Powder: Loose powder that matches your skin tone to set the foundation.
  • Cream Rouge: Go for a rose-pink cream rouge (avoid powder if possible, unless that’s all you have).
  • Eyebrow Pencil: Choose a pencil that matches your natural brow color, or one shade darker than your hair.
  • Eye Shadow: (Optional, for evening wear) Use matte shadows that match your eye color—avoid shimmer.
  • Mascara: Dark brown or black mascara, or you can even use petroleum jelly (like Vaseline) for a more subtle lash effect.
  • Lipstick: A classic, matte red lipstick for that bold, vintage look.

1940s Foundation and Powder

Foundations in the 1940s were quite different from today’s lightweight options. There were fewer shades available, and most foundations had a pinkish tint, which worked well for white women, but wasn’t always suitable for women of color. Many Black women, for instance, either mixed their own makeup or often went without powder.

Foundations during this time were much thicker and creamier compared to today’s formulations. Liquid foundations as we know them didn’t exist, and the creamier formulas helped provide a fuller coverage. Face powder, which was essential, was used to set the foundation and keep the face matte throughout the day. It matched the skin tone but was also used to help the foundation adhere better to the face—foundation alone would often cause powder to slip off.

The foundation and powder were extended down the neck and onto the blouse or dress line, as it was common for the foundation shade to not perfectly match the skin on the rest of the body. This helped create a seamless, blended look.

Tip: For a smooth application, lightly coat your face with baby oil (or mineral oil) before applying foundation. This helps create a smooth base and allows the foundation to blend more easily.

1940S FACE POWDER

Powders should match your natural skin tone as much as possible. Light shades kept a woman looking fresh and youthful, while a slightly bronzed shade added a sun kissed glow, popular with movie stars. Almost all makeup lines carried a sun kissed color or two.

If you are over 40, your skin is prone to yellowing, in which case a powder with a pink tinge will work better for you.  To apply, use a puff to dust your face all over and then brush from the neck up to the forehead. Only brush down once to finish and smooth out face fuzz.

Tip: A fluffy face puff makes a difference. Don’t use compressed powder with a flat pad for early 1940s looks. Pan-cake compressed makeup came out in the mid 1940s with big success. To women who could afford it, it provided more coverage applied in less time. Just remember to always brush up, never down.

1940s Blush

In the 1940s, blush (referred to as rouge) was applied sparingly to create a natural, rosy glow. The shades of rouge were limited, typically ranging from peach and coral to raspberry tones, with darker shades for those with bronze or deeper skin tones. Cream rouge (moist rouge) was the preferred choice, giving a more natural look, and was often blended directly into the foundation. Powdered rouges were also used lightly over the cheeks to give a soft flush.

Although rouge was an important part of the look, it wasn’t strictly necessary for achieving the 1940s style. You could still achieve the desired effect without it.

Tip: If you can’t find cream rouge, a light matte lipstick in a pink or peach shade works well. Simply apply it with your fingers, dab it on the cheeks, and blend it in until it seamlessly matches your skin tone.

Cream or liquid rouges were sometimes found in theatrical costume makeup stores and, in modern times, can be found in some makeup brands on platforms like Amazon.

1940s Eyebrows

The 1940s eyebrows were a continuation of the 1930s style, with thin, beautifully arched brows being the key feature. Eyebrows were kept natural-looking, with only stray hairs removed to maintain a soft, even arch. The arch itself was well-groomed but not overly thin—most women didn’t over-pluck.

Eyebrows were often defined with a pencil that was slightly darker than the hair color, or some women simply applied a bit of petroleum jelly to keep the brows in place and enhance their natural shape. For daywear, this softer look was more common, while in the evening, brows might be more defined.

As the decade progressed, the full, more defined brows of the late ’40s began to take hold, but they were never as thick as modern-day brows.

1940s Eye Makeup

Eye makeup in the 1940s was quite minimal, especially during the daytime. Most women wore just a light coat of mascara, often in dark brown or black. Some even used petroleum jelly (Vaseline) to achieve a subtle lash definition. Mascara came in different forms—liquid, paste, or cake—often built up by adding a little water or spit to the cake to get the desired consistency. Mascara was applied to both the upper and lower lashes for a fuller look.

For evening looks, eye shadow could be used, but only in neutral tones. The colors were typically chosen to match the eye color—blue-grey for blue eyes, grey for green eyes, and brown for brown or hazel eyes. The eyeshadow was applied in a single color, blended from the lash line up to the brow for an elegant and simple look. No smoky eyes or contouring here—just one shade blended well. For evening looks, sometimes silver or gold was added to create a little extra glamour.

Eyeliner wasn’t commonly used in the early 1940s; it was considered too harsh and “fake-looking.” It didn’t make an appearance until the late ’40s, and even then, it was applied only to the top lash line.

1940s Lipstick

Lips were the focal point of 1940s makeup, especially during the war years, when red lipstick was seen as a mood booster. Lipstick shades varied from bluish reds to orange-toned reds, but they were all red! Bright pinks weren’t worn until the 1950s, so reds were a constant. In the fall, red lipstick tended to get darker, and in the spring, it lightened up a bit.

Most lipsticks of the time were matte, and women were advised to moisturize their lips before applying. After applying lipstick, they would often blot their lips with a tissue to ensure the color stayed put. By 1948, lipstick pencils were introduced, allowing for a more precise application and a perfect outline around the lips.

The ideal lip shape was full and even, with a smooth contour on the top and bottom lips. The “Hunter’s Bow” lip shape, popularized by Joan Crawford, involved slightly over-drawing the lips to make them appear plumper. However, actresses like Lauren Bacall and Ingrid Bergman embraced their naturally thin lips and didn’t over-draw them.

Tip: To achieve a perfectly shaped lip, start with the cupid’s bow and draw the pencil out to the corners of the mouth. Fill in with lipstick and gently rub your lips together to ensure an even finish. Touch up any uneven spots on the bottom lip.

1940s Fingernail Polish

In the 1940s, nails were always neatly trimmed, often filed into a long oval shape. During wartime, nails were kept a bit shorter for safety, but they were still manicured regularly. Cuticles were carefully trimmed and moisturized for a polished look.

Nail polish in the ’40s was almost always red, and matching your nails to your lipstick was the norm. Other shades like pink, coral, rose, and burgundy were also popular. A clear topcoat was always used for durability, and some women embraced the “half-moon” style, where the base of the nail (around the cuticle) was left unpainted.

Tip: To create a half-moon shape on your nails, apply paper reinforcements to the base of each nail, aligning the top of the hole with the cuticle. Paint your nails, then remove the reinforcements before the polish fully dries for a neat, vintage look.

1940s Makeup Products to Buy Today

To create an authentic 1940s look today, you don’t need a complicated routine. A bit of face powder, black mascara, well-defined brows, and red lipstick will give you that classic, vintage style. Modern makeup tends to have more shine and glitter, but for a true 1940s look, opt for matte products—especially for your lips, cheeks, and eyes.

Tip: Many modern makeup lines offer matte formulas, but brands like Revlon and Max Factor (which were popular in the 1940s) still offer products that capture that vintage style. Besame is another brand that specializes in recreating vintage makeup colors and formulas from the ’40s.

For a more subtle daytime look, keep your makeup light—just a dusting of powder, a touch of blush, and a swipe of mascara. For a more dramatic evening or pinup style, go heavier on the lipstick and mascara, and use a little more rouge for that retro glam.