10 POPULAR HAIRCUTS FOR SCHOOL BOYS

Mornings can be a challenge, especially when it comes to taming your son’s unruly hair before school. But worry no more—our guide to the “10 Best Boys’ Haircuts for School” will make styling a breeze!

In this article, we’ll explore the latest trends and timeless classics in boys’ haircuts, ensuring your little one walks into the classroom with confidence every day.

We’ll kick things off with eye-catching haircut ideas that are sure to turn heads on the playground. Then, we’ll break down why these styles work, offering practical tips based on hair type and face shape.

Plus, you’ll get easy maintenance and styling tips, so you can recreate these looks effortlessly at home. Say goodbye to morning battles and hello to stress-free, stylish school days!

WAVY HAIRCUTS FOR SCHOOL BOYS

For boys with naturally wavy hair, this short haircut is a top trending choice for school. Inspired by classic Indian styles, it embraces the hair’s thick, wavy texture while delivering a polished and sophisticated look. This versatile and timeless Asian haircut is effortlessly stylish and always a reliable option.

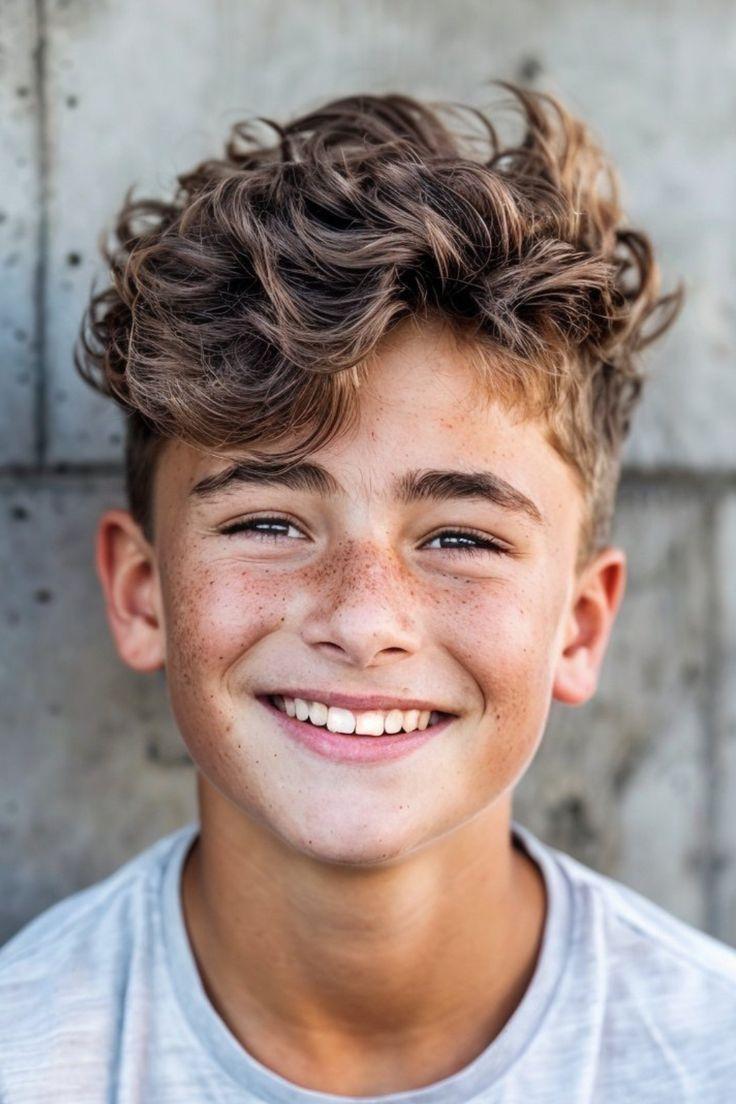
School Boy Haircut for Short Curly Hair

This schoolboy haircut is an excellent choice for those with naturally curly black hair. It enhances the hair’s dense texture, offering a simple yet effortlessly stylish look that suits boys of all ages. The slightly messy finish adds to its charm, making it both trendy and easy to maintain.

Rolled-up Hairstyle for Your Boys

This trendy middle school boy’s haircut is a must-try! It’s also a great option for younger kids, making it a stylish addition to our list of popular boys’ hairstyles. Featuring a subtle rolled-up look on top and a slight undercut on the sides, this cut adds a sharp and modern touch. Give it a try to keep your boy looking smart and confident!

Best Season to Try: Ideal for summer.
Suitable Face & Hair Type: Works well for boys with round or square-shaped faces and short hair.
Perfect Outfit & Occasion: Pair with casual shirts and shorts for a relaxed yet stylish look when heading out with family.

The Smart and Nice Boy Side Hairstyle

This classic boy’s hairstyle has stood the test of time and remains one of the trendiest and most popular choices for schoolboys. Simple yet stylish, it only requires neatly combing the hair to the side in a short cut. For an added touch of style, lift the hair slightly for a modern, polished look. Quick and effortless, this hairstyle is perfect for busy mornings!

Best Season to Try: Suitable for any season.
Suitable Face & Hair Type: Works well for all face shapes with short hair.
Perfect Outfit & Occasion: Ideal for pairing with a school uniform, making it a go-to hairstyle for school days.

Classy Style for Young Boys

This trendy schoolboy haircut is a must-try! As one of the most stylish looks of the year, it offers a perfect blend of fashion and charm. While it’s commonly seen on young boys, it’s now making waves as a go-to style for school kids as well. Your boy is sure to love this fresh and attention-grabbing haircut!

Best Season to Try: Ideal for winter and monsoon.
Suitable Face & Hair Type: Works well for all face shapes with short hair.
Perfect Outfit & Occasion: Pair with casual T-shirts and pants or shorts for a stylish yet effortless look during playtime with friends.

Buzz Cut

The buzz cut is a sharp, no-fuss hairstyle featuring uniformly clipped short hair, achieved with electric clippers.

Ideal for boys who prefer a hassle-free grooming routine, this ultra-low-maintenance style is both practical and stylish. With its clean and even appearance, the buzz cut remains a favorite among parents and kids alike.

Requiring little to no styling, it allows boys to focus on school and activities without worrying about their hair. Timeless and effortlessly cool, the buzz cut is a classic choice that never goes out of style.

Nice Side Slick Style for Boys

This classic schoolboy haircut is one of the most popular and timeless choices. Simple and easy to style, it only requires neatly brushing the hair evenly on all sides. Adding a subtle fade on the sides enhances the look, giving it a polished and smart appearance.

Widely embraced by kids for its stylish yet practical appeal, this haircut remains a go-to option that never goes out of trend.

Best Season to Try: Ideal for monsoon and winter.
Suitable Face and Hair Type: Works well with all face shapes and hair types.
Perfect Dress and Occasion: Pairs well with casual outfits for family outings or as a neat school hairstyle with a uniform.

Messy Haircut for School Boys

This popular medium-length hairstyle is a great choice for school kids who love to showcase their style. Perfect for boys who enjoy a fashionable yet effortless look, this cut adds a touch of charm and confidence. It enhances their natural hair texture while keeping things neat and stylish for everyday wear.

Best Season to Try: Ideal for winter.
Suitable Face and Hair Type: Best for medium-length hair with a round or oval-shaped face.
Perfect Dress and Occasion: Pairs well with casual shirts and pants, making it a great choice for family events or outings.

Mohawk

The Mohawk is a bold and attention-grabbing hairstyle featuring a strip of hair running from the forehead to the nape, with the sides shaved or closely cropped.

This edgy look is perfect for boys who want to stand out and showcase their individuality at school.

With its versatility, the Mohawk can be styled in various ways—spiked up with gel for a punk-rock feel or softened for a more subtle appearance. No matter the variation, this hairstyle exudes confidence and personality, making it a daring yet stylish choice for boys who love to express themselves through their hair.

Spiky Hair

Spiky hair is a fun and lively hairstyle where the hair is styled into distinct spikes using a styling product and tousled or combed upward.

This energetic look is perfect for boys who want to add personality to their school appearance. With its versatility, spiky hair can be customized—whether with subtle spikes for a neat look or bold, edgy spikes for a standout style.

Using gel, wax, or pomade, this hairstyle exudes confidence and playfulness, making it a popular choice for boys who love to express their adventurous side in the classroom.

CONCLUSION

In essence, school haircuts for boys are about finding a style that is both practical and personally satisfying. By considering these factors, boys can confidently rock a haircut that complements their personality and lifestyle.

15 CHIC HAIRSTYLES FOR GIRLS WITH CURLY HAIR

Curly hair is wild, free, and undeniably beautiful, making it worthy of showcasing! However, managing and styling curly locks can be more challenging than wavy hair. Environmental factors often leave curls frizzy, tangled, and lackluster. The right hairstyles can not only protect your curls but also highlight their full potential.

Celebrity hairstylist Emilio Uribe shares, “I personally think letting natural curly hair run loose and free is the most beautiful look when styled with the proper products.” He emphasizes that “hydrating your locks” is essential for maintaining their health, bounce, and sheen.

Before diving into styling, it’s crucial to choose hairstyles that complement your face shape and features. Read on to discover which curly hairstyles suit you best, and then scroll down for some stunning styling ideas!

HOW TO PICK A CURLY HAIRSTYLE ACCORDING TO YOUR FACE SHAPE

If you have a round face, the goal is to create the illusion of length. Hairstyles that add height, such as top knots, can help achieve this effect. For those with a square face, layered hairstyles are a great choice, as they soften the angles of your face.

Diamond-shaped faces look fantastic with short, edgy hairstyles that draw attention to the forehead and cheeks instead of the jawline. Oval faces can pull off virtually any hairstyle with ease.

If you have a heart-shaped face and want to minimize the appearance of your forehead, consider curly hairstyles with bangs, like arched side-swept bangs. For those with an inverted triangle face shape, bangs can help divert attention from the wider forehead.

Triangle face shapes shine with full, long hair featuring thick curls. Layered curly bobs, fringed bangs, choppy layers, and long layered hairstyles are all stunning options. Long faces look great with layered haircuts and side bangs.

For a high forehead, full side-swept bangs work well to draw focus away from it, emphasizing the cheekbones and jawline instead. A lob with thick bangs is particularly flattering in this case. If your forehead is short, long blunt hairstyles or side bangs can help make the cheeks appear smaller. Bouffant hairstyles can also add height to your face.

Remember, your curl type also influences which hairstyles will suit you best. Here’s a breakdown of the different types of curls to consider.

TYPES OF CURLS

Just as people come in all shapes and sizes, so do curls. Curl types vary, ranging from 2A, which is slightly wavy, to 4C, characterized by tightly coiled curls. Next, we’ll explore hairstyles that cater to various curl types, from soft waves to tight ringlets. And if you don’t have naturally curly hair, don’t worry! Grab your trusty curling irons, heat protectants, and styling products to try out these 15 best hairstyles for curly hair!

15 AMAZING HAIRSTYLES FOR CURLY HAIR FOR GIRLS

LOOSE BEACHY WAVES

What You Need

  • Heat protectant
  • Sectioning clips
  • Comb
  • Curling iron
  • Texturizing spray

Procedure

  • Start by ensuring your curly hair is clean and damp.
  • Apply heat protectant to shield your hair from heat damage.
  • Use sectioning clips to divide your hair into manageable sections.
  • Wrap small sections of hair around the curling wand, holding for a few seconds before releasing. For a more natural look, alternate the direction of the curls.
  • After curling, gently run your fingers through your hair to loosen the curls.
  • Finish with a spritz of texturizing spray and scrunch your hair to enhance that beachy effect.

YouTube vlogger Sophie Marie shares her tips for styling curly hair using a banana clip. She suggests, “The best hack I can give you is to actually tie it first so tying your hair up just in a loose scrunchie… Do not close the clip too far apart, so go a little closer to reduce the amount of hair you’re pulling. Now clip at the top, putting the tie around the ball.” This technique creates an easy hairstyle for curly hair.

Curly hair is more susceptible to damage than other hair textures due to its coiled structure, requiring extra moisture to stay nourished and hydrated. While straight hair allows oil to distribute evenly, curly hair struggles because the coil shape prevents the ends from receiving enough oil. Here are some tips to maintain your curls for a consistently beautiful look.

THE BRAID AND TWIST

What You Need

  • Hairpins
  • Elastic bands
  • Comb

Procedure

  • Begin by separating the front section of your hair and securing the rest of your hair at the back with a clip. Part this front section to one side.
  • Braid the front section into two side French twisted braids, or feel free to experiment with other braid patterns. Pin the braids at the back to secure them in place.
  • To complete the look, gather the hair at the back and tie it into a half ponytail.

THE VOLUMINOUS PONYTAIL

What You Need

  • Hairpins
  • Elastic bands
  • Comb

Procedure

  • Quick Start: This hairstyle can be done in just a minute! Begin by parting your bangs to one side.
  • Ponytail: Comb through the rest of your hair and gather it into a high ponytail, securing it with an elastic band.
  • Wrap It Up: Take a small section of hair from the ponytail and wrap it around the base of the ponytail to conceal the elastic band.
  • Secure: Tuck the ends of the wrapped section into the elastic band to hold it in place.

THE SCARF PINEAPPLE

What You Need

  • Head scarf
  • Elastic bands
  • Comb

Procedure

  • Ponytail: Start by tying all your hair into a high ponytail at the crown of your head using an elastic band. Your curls will likely fall in various directions.
  • Add the Scarf: Take a scarf and tie it around the top of your head, positioning it near the base of the ponytail.
  • Spread It Out: Spread the scarf out at the back to cover the back of your hair.
  • Secure the Scarf: Take the loose ends of the scarf hanging in the front and tie them at the back, ensuring the knot is tucked beneath the scarf.
  • Final Touch: Let your hair cascade over the scarf for a stylish and chic look.

THE SOPHISTICATED PONYTAIL

What You Need

  • Elastic bands
  • Comb

Procedure

  • Detangle: Start by detangling your hair using a wide-toothed comb to enhance your curls’ natural texture.
  • Half Ponytail: Tie the top half of your hair into a high half ponytail.
  • Lower Ponytail: While holding the half ponytail up, take the lower half of your hair and tie it into another ponytail directly below the first one. Ensure both ponytails are aligned with each other.
  • Blend: Let the half ponytail fall over the lower ponytail and arrange your hair to create the appearance of one large, voluminous ponytail.

THE FRO HAWK

What You Need

  • U-pins
  • Bobby pins
  • Elastic bands
  • Comb

Procedure

  • Section Your Hair: Start by dividing your hair into four sections down the center of your head.
  • Create Ponytails: Tie each section (except the first one near your hairline) into ponytails using elastic bands.
  • Connect Sections: Use U-pins to connect each section of hair with the others. Adjust your hair and fluff it up to create a mohawk effect.
  • Secure: Use bobby pins to pin the sections of hair in place, ensuring they stay intact. Don’t forget to pin up any loose strands.
  • Final Touch: Adjust the front section so that some of it falls over your face, while pinning the back to another section of hair for a polished look.

TWISTED FISHTAIL BRAID

What You Need

  • Hairpins
  • Elastic bands
  • Comb

Procedure

  • Detangle: Start by combing your hair to detangle it thoroughly.
  • Twist Sections: Take two small sections of hair from both sides of your head and twist them together. Tie them at the back of your head, creating a half ponytail.
  • Fishtail Braid: Begin weaving the loose hair from the half ponytail into a fishtail braid.
  • Braid to the End: Continue braiding the half ponytail until you reach the end and secure it with an elastic band.
  • Pancake the Braid: Gently pancake the braid to make it look fuller and neater, completing your curly blonde hairstyle.

THE DOUBLE BOHO BRAID

What You Need

  • Hairpins
  • Clips
  • Elastic bands
  • Comb

Procedure

  • Detangle: Start by combing your hair to detangle it thoroughly.
  • Divide Hair: Divide your hair vertically into two halves.
  • Dutch Braid One Side: Begin weaving one half into a Dutch braid just above your ear. Braid it down to the nape of your neck and clip it to keep it in place.
  • Repeat on Other Side: Repeat the same process on the other side of your head.
  • Combine Braids: Join the two braids together and tie them in a low ponytail.
  • Messy Ponytail: Fluff up the ponytail to create a messy, voluminous look.
  • Pancake the Braids: Gently pancake both braids to enhance their fullness and achieve a boho chic vibe.
  • Wrap Hair Around Elastic: Take a small section of hair from the ponytail and wrap it around the elastic band to cover it, then tuck the ends within the band to secure.

THE BOHO BRAID

What You Need

  • Hairpins
  • Elastic bands
  • Comb

Procedure

  • Choose the Right Hair: Start with hair that hasn’t been washed for two days for added texture.
  • Tease the Hair: Pick up half of your hair and tease it to create volume.
  • Fishtail Braid: Braid this teased section into a fishtail braid and secure it at the end with an elastic band.
  • Pancake the Fishtail: Gently pancake the fishtail braid to add dimension and fullness.
  • Regular Braid: Braid the rest of your hair into a regular braid and secure it at the end with an elastic band.
  • Pancake the Regular Braid: Similarly, pancake this braid to enhance its appearance.
  • Combine Braids: Wrap the fishtail braid around the regular braid and tie them both together at the end with an elastic band.

WARRIOR PRINCESS

What You Need

  • Hairpins
  • Elastic bands
  • Wide-toothed comb
  • Curl defining cream

Procedure

  • Detangle: Start by detangling your hair using a wide-toothed comb.
  • Divide Hair: Divide your hair into two parts: a top half and a bottom half.
  • Braid Top Section: Braid the top section of hair and secure it at the end with an elastic band.
  • Create a Bun: Wrap the braid around itself to form a bun and pin it in place with hairpins.
  • Define Curls: Apply curl defining cream to the rest of your hair for enhanced texture and hold.

SOCK BUN

What You Need

  • Hairpins
  • Elastic bands
  • Comb
  • Hair donut

Procedure

  • Detangle Hair: Start by detangling your hair thoroughly with a comb.
  • Create a Ponytail: Tie your hair into a high ponytail using an elastic band.
  • Insert the Hair Donut: Take the hair donut and place it at the base of your ponytail.
  • Wrap Hair Around Donut: Carefully wrap and roll your ponytail around the donut until it is completely concealed.
  • Secure the Style: Use hairpins to pin the rolled hair in place, ensuring a secure hold.

BRAIDED LOW PONYTAIL

What You Need

  • Hairpins
  • Elastic bands
  • Comb
  • Fancy headband

Procedure

  • Detangle and Part Hair: Start by detangling your hair and creating a side part.
  • French Braid: Take a section of hair from the side with more volume and French braid it along the curve of your head, continuing until you reach your ear. Braid the remaining hair down to the end and secure it with an elastic band.
  • Gather Hair: Take the rest of your hair, including the braid, and tie it into a low side ponytail using another elastic band.
  • Accessorize: Finish the look by accessorizing with a fancy headband.

HALF UP CROWN BRAID

What You Need

  • Hairpins
  • Comb

Procedure

  • Detangle Hair: Start by combing your hair to detangle it.
  • Braid Hair: Take a section of hair from one side of your head and braid it all the way to the end. Repeat this step on the other side.
  • Secure Braids: Lay the braids across the back of your head and pin them behind your ear on the opposite side to secure them in place.

WATERFALL BRAIDS

What You Need

  • Hair pins
  • Elastic bands
  • Comb

Procedure

  • Prep Hair: For best results, try this hairstyle a day after washing your hair. Use a wide-toothed comb to detangle your hair.
  • Part Hair: Part your hair in your natural parting.
  • Start Braiding: Take a section of hair from the front on one side and divide it into three sections. Weave about three stitches of a normal braid to secure it.
  • Add Sections: Drop the top section of the braid and add a new section from the front of your hair, making it the top section. Weave two more stitches of the braid, then repeat this process.
  • Continue Weaving: As you braid, make sure to weave it along your head like a halo until you reach the other side.
  • Secure the Braid: Once you reach the other side, pin the braid in place. If your hair is long, you can either leave the rest of your hair loose or braid it to the end and let the rest fall naturally.

Pro Tip

Hide the pins by covering them with a few strands of hair that fall naturally over the pins. You can also enhance the look with flowers or other hair accessories for added flair!

TWISTED HALF PONYTAIL

What You Need

  • Curling iron
  • Hair clips
  • Elastic bands
  • Comb
  • Ribbon

Procedure

  • Curl Hair: Use a curling iron to curl all your hair for added texture.
  • Twist Sections: Take a section of hair from one side, twist it tightly, and secure it with a hair clip. Repeat this on the other side, taking an identical section of hair and twisting it.
  • Create Half Ponytail: Use an elastic band to tie both twisted sections together, forming a twisted half ponytail. If needed, use hair pins to keep the twists intact.
  • Pancake Twists: Gently pancake the twists by pulling them apart to add volume and create a fuller look.
  • Accessorize: Finish off the style by tying a colorful ribbon around the base of the twists or the ponytail for a fun touch!

CURLY HAIR MAINTENANCE TIPS

  • Avoid Heat Styling Tools: Steer clear of heat tools, as they can damage your hair and ruin your natural curl pattern.
  • Use Leave-In Conditioner: After washing your hair, apply an organic leave-in conditioner to moisturize and maintain hair thickness.
  • Opt for Gel: If you have thick, curly hair, use gel for styling. It spreads easily on curls compared to mousse, helping to define your curls without weighing them down.
  • Try Heatless Curling: Instead of heat styling, use rollers along with a curl defining or enhancing cream for beautiful, defined curls.
  • Heat Protectant: If you decide to use heat styling tools, always apply a generous amount of heat protectant to shield your hair from damage.
  • Dry Gently: Avoid vigorous towel drying, which can lead to breakage. Instead, pat your hair dry with a microfiber or cotton towel for a gentler approach.
  • Use a Diffuser: When blow-drying, use a diffuser attachment. This helps distribute heat evenly and enhances curl definition.

CONCLUSION

As you’ve seen throughout this article, there are countless ways to style curly hair and celebrate its unique beauty. From effortless updos to glamorous waves, the possibilities are endless. So, embrace your curls, experiment with different styles, and most importantly, have fun! Your natural beauty shines through when you feel confident and comfortable in your own skin.