11 BEST HAIR BRUSHES FOR THIN HAIR

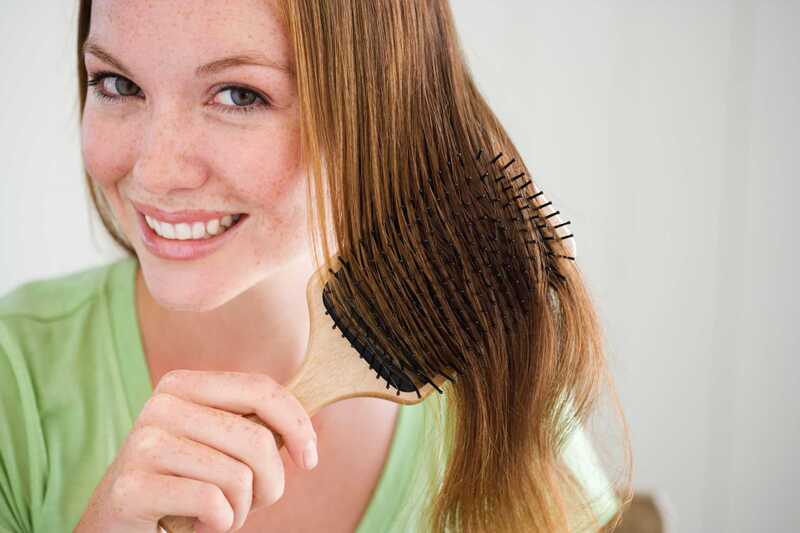
Whether your hair is straight or curly, preventing needless damage to it is likely your top hair-related worry. Fine hair is especially vulnerable to damage. While sulfate-free shampoos and heat-styling equipment are well-known causes of breakage, poor-quality hair brushes are also to blame. The best brushes for thin hair are kind to the hair, won’t pull on strands or tangles, and aid in distributing the natural oils from your scalp throughout the shaft of the hair.

CROWN AFFAIR THE BRUSH NO. 003

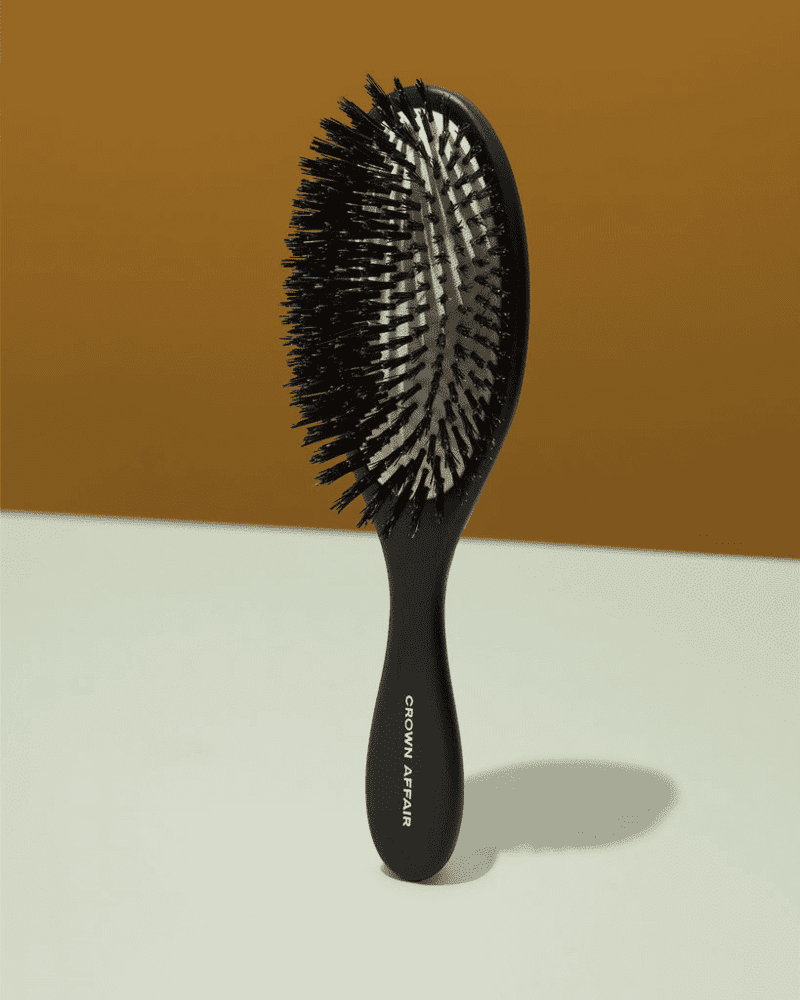
Crown Affair’s The Brush No. 003 is a delight for delicate hair. It is manufactured by hand in Italy with pure boar bristles, which gently work on hair, enveloping every strand in the natural oils of the scalp from root to tip. Every stroke gives the scalp a pleasant massage as well as preventing dry, brittle hair. With each application, those with fine or thinning hair will feel an increase in volume and luster, making it one of the best hair brushes for thin hair.

The flexible, cushioned pad with a breathing hole that holds the boar bristles lessen pressure on the scalp. The ergonomic handle made of natural beechwood offers a comfortable and solid grip. Utilize it just on dry hair to avoid any harm. If you want to detangle and restore shine to your hair, brush it from the scalp to the roots.

BLACK EGG WOODEN BOAR BRISTLE BRUSH

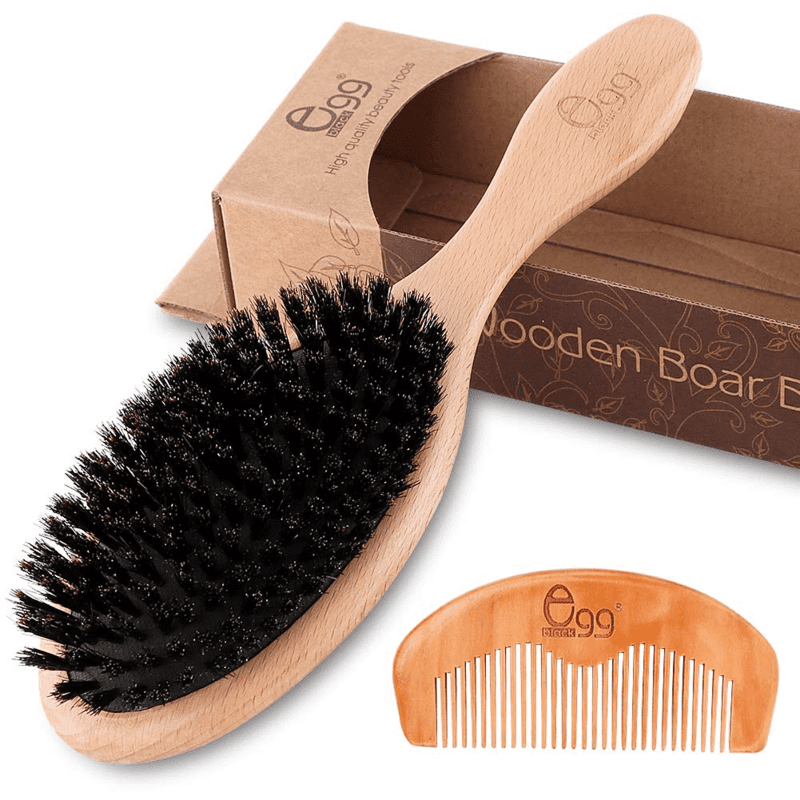
The lightweight beechwood handle of this oval brush is pleasant to hold. The adult boar hair used to manufacture the soft bristles is put through a thorough screening procedure, which leaves the hair silky and full of natural shine. In actuality, this procedure eliminates a significant portion of the oil from those natural bristles, leaving just enough behind to aid in balancing the oil in your own hair and scalp with each brushing. 

Together with a wide-tooth mahogany comb that’s great for detangling and distributing product throughout wet hair, the soft bristles help to gently eliminate frizz. In fact, the company suggests using the comb to untangle and defrizz your hair before using the boar brush on a regular basis if you’re new to utilizing natural brushes. 

TANGLE TEEZER THE ULTIMATE DETANGLER FINE & FRAGILE

Whatever the hair type, wet hair has to be properly cared for, but fine and delicate hair especially needs to be treated gently. If you’re familiar with Tangle Teezer’s Ultimate Detangler, you should know that this model is much softer than the original and is designed for delicate hair.

This oblong brush has flexible, soft bristles despite being made of plastic. They also don’t have any points that might break off and grip your hair. Wet hair is easily detangled by the widely spaced bristles, and the thin handle offers an ergonomic grip. The long and short teeth work in tandem to remove knots and smooth hair, reducing breakage and frizz. There are many more cool colors of this brush, such as Lilac/Mint and Hypnotic Heather.

SISLEY-PARIS THE RADIANCE BRUSH

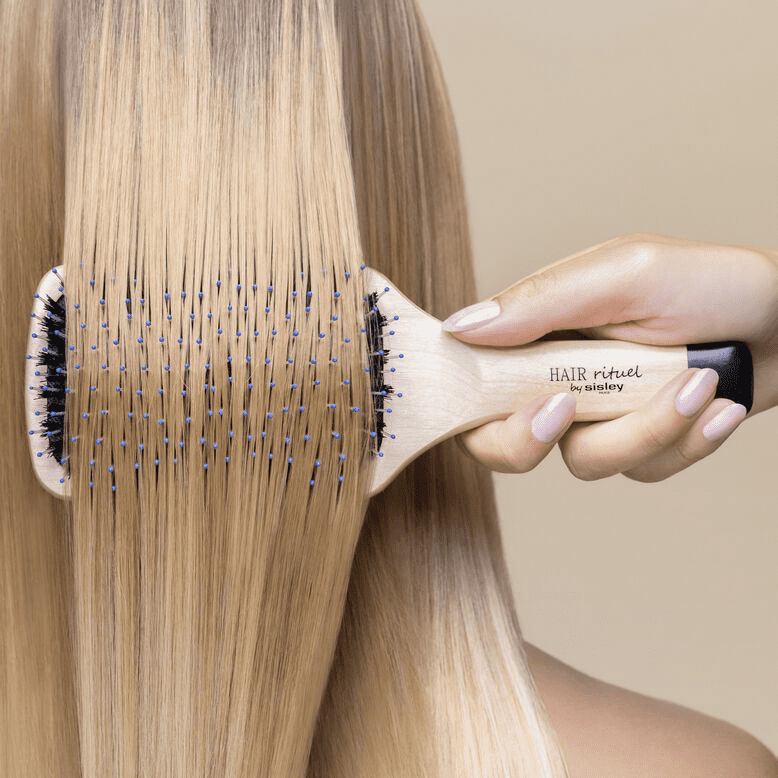
An excellent paddle brush is a fantastic tool for scalp stimulation and hair smoothing. Soft, supple bristles of the Sisley-Paris Radiance Brush gently work on both types of hair, making it easier to untangle hair and prevent frizz. This works on all hair types, both wet and dry, and with continued application, you should see shinier, more voluminous hair. It seems sense that you would be a little shocked by the sticker price, but the investment is worthwhile. 

DYSON DYSON DESIGNED PADDLE BRUSH

This paddle brush would be a terrific addition to your haircare collection whether you’re seeking a new brush to pair with your Dyson Supersonic hair dryer or if you’re finally saving up for one. Because the flexible bristles are arranged in an oval shape on a padded base, the scalp is not as stressed. When styling, the weighted grip makes the tool seem balanced in the hand. 

This brush is quite robust and mild enough for all hair types. When it’s time for a blowout at home, this brush is ideal since it can withstand temperatures as high as 302°F. We also appreciate that this brush is available in five distinct colors: Prussian blue, black, rosé, fuchsia, and purple.

BELULA BOAR BRISTLE ROUND BRUSH FOR BLOW DRYING SET

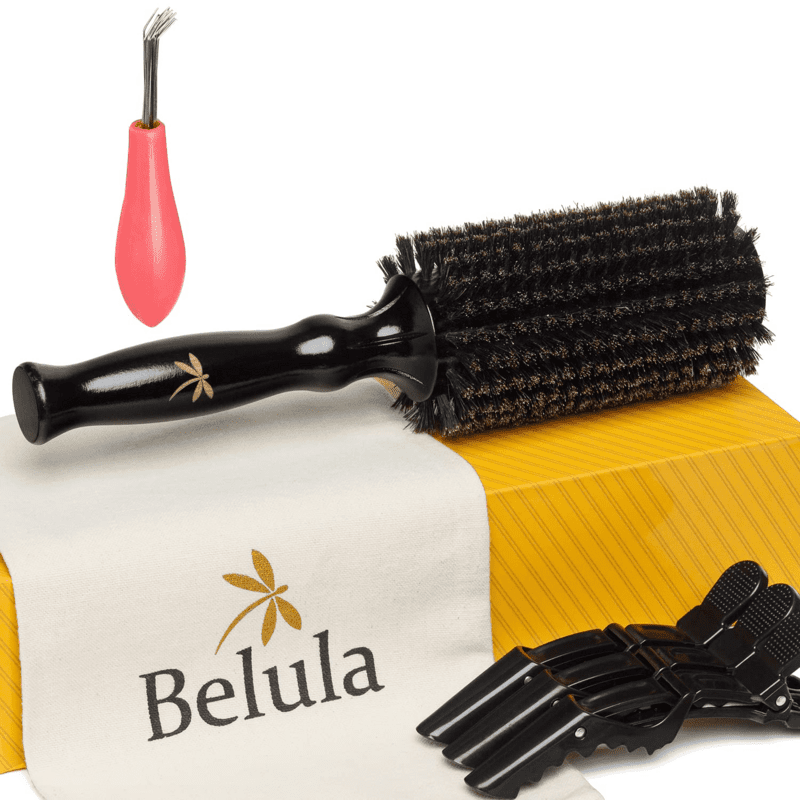
For sensitive hair, a circular brush might be problematic, however, this one seems to be soothing. Its nylon and boar blend of bristles is gentle on delicate strands. Because of its size, the 2.7-inch barrel is ideal for blowouts since you don’t have to worry about it being tangled. This round brush distributes the natural oils from your scalp into your hair strands, making your hair seem smooth and shining, in contrast to other brushes with harsher bristles.  

Three crocodile hair clips are provided with this brush to assist divide your hair for effortless style, and a hair cleaner tool makes cleaning the bristles between usage simple.

SHASH BOAR BRISTLE CLASSIC HAIR BRUSH

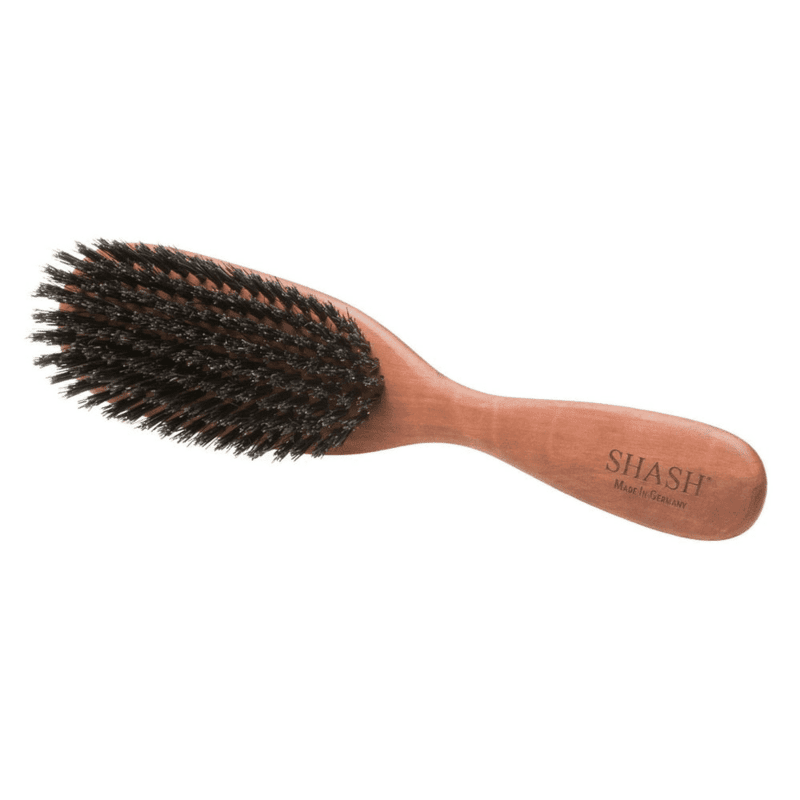
We chose a brush from Shash, a firm that has been producing boar bristle brushes since 1869 since natural boar bristles work best on hair that needs some TLC. Hundreds of natural bristles on this German-made brush are ready to transfer the natural oils from your scalp through your hair in a gentle and equal manner. 

This brush not only reduces dandruff and other irritations of the scalp, but also encourages healthy hair development. Every time you apply it, it’s like giving your scalp a little exfoliation. When brushing or styling, the ergonomically designed smooth handle feels good in your hand. 

WET BRUSH ORIGINAL DETANGLER

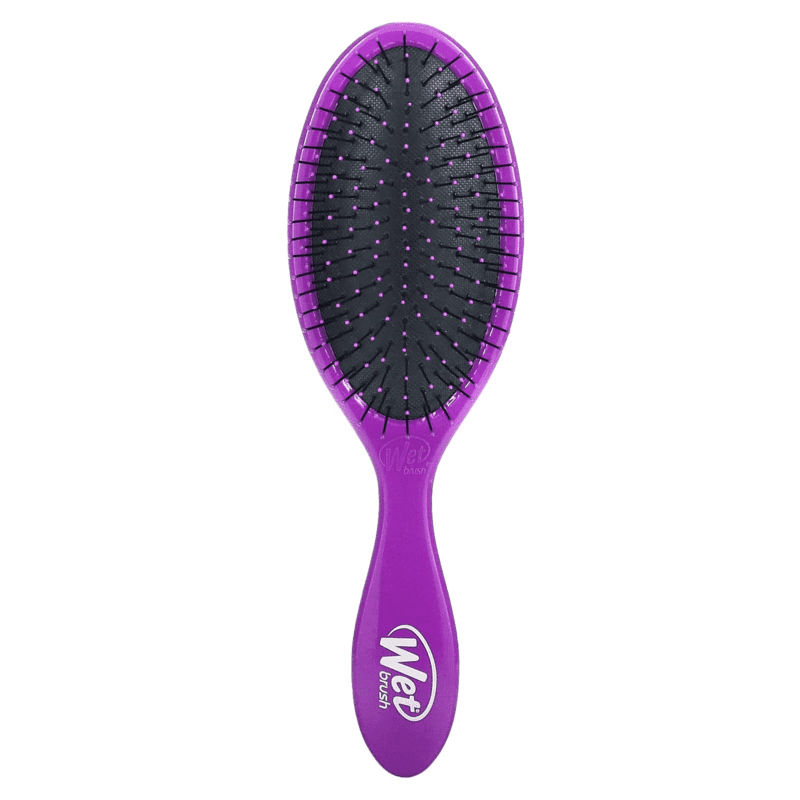
In addition to being excellent for detangling wet hair, the appropriately called Wet Brush is also terrific for removing knots from dry hair. Without worrying about snagging delicate or brittle hair, the IntelliFlex bristles are tucked into a cushioned base that eases tension as it runs through your hair, wet or dry.

For a pleasant detangling experience, the bristles are robust but flexible enough to go through all types of hair. In fact, you’ll need to work 55% less to get your hair silky and have 45% less breakage. Although the fact that it comes in a range of colors is appealing, the performance of this brush is actually what makes it worthwhile. 

AVEDA WOODEN PADDLE BRUSH

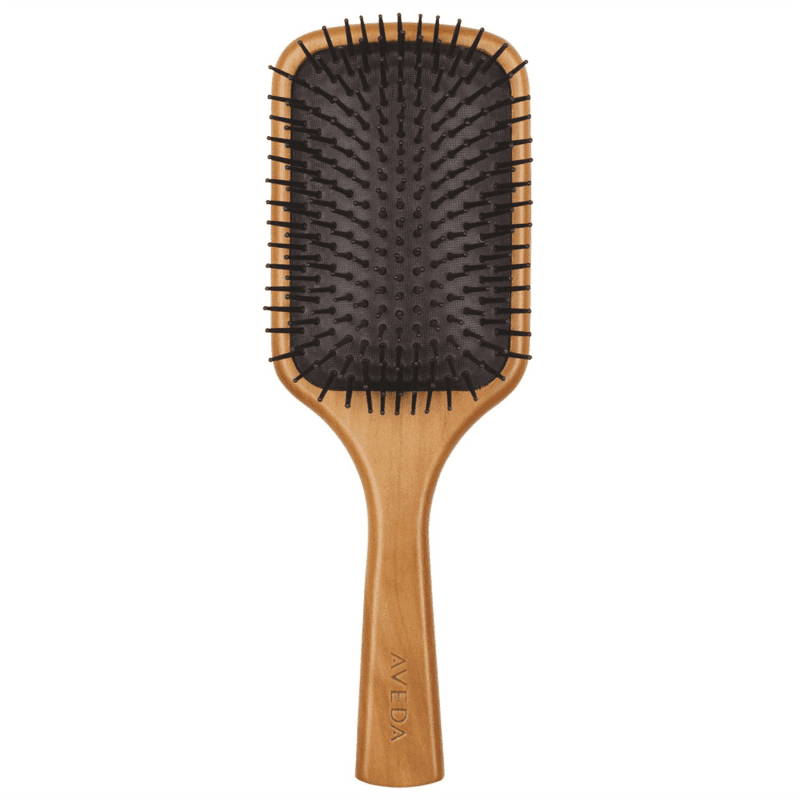
The flexible, cushioned base of the Aveda Wooden Paddle Brush eases the strain on your scalp as it works through your hair. This rectangular paddle’s long bristles stimulate and massage the scalp gently to encourage healthy hair growth. Because of their broad spacing, knots in all types of hair may be easily and swiftly removed. While you brush and style your hair, you won’t experience hand tiredness thanks to the long wooden handle’s comfortable grip and the lightweight design of the entire item. Smooth, straight styles can be achieved with this brush rather well.

PAUL MITCHELL PRO TOOLS 413 SCULPTING BRUSH

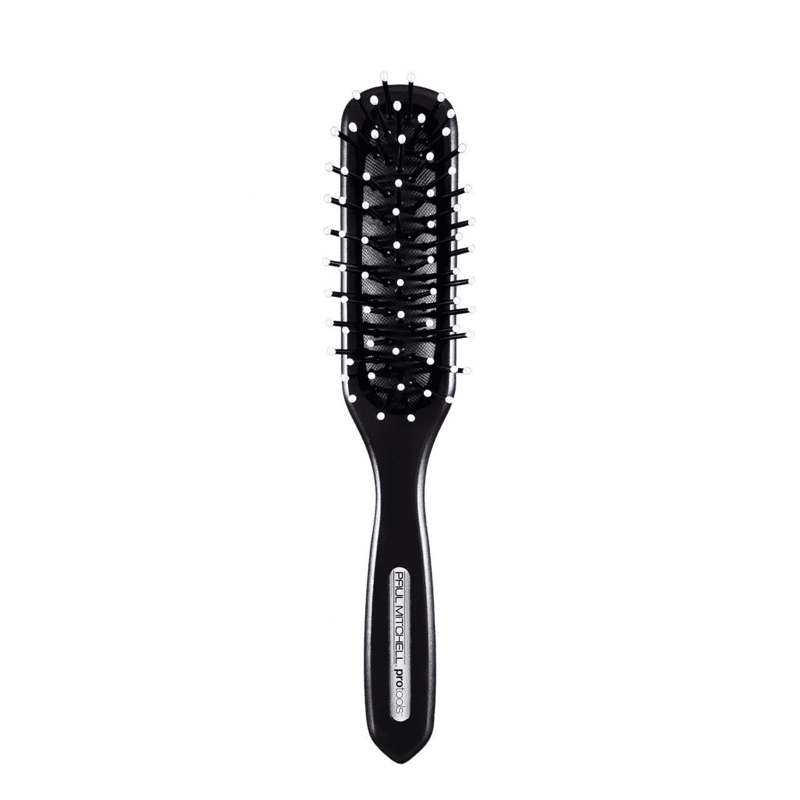
Paul Mitchell’s compact yet effective fine-hair hair brush is an affordable way to up your hair care game. Its flexible, widely spread bristles softly smooth and untangle hair, whether it’s damp or dry. It’s ideal for adding the final touches to any hairstyle or blow-drying hair. 

To lessen hand strain when brushing and styling, the design is lightweight and thin. It’s ideal for travel as well because of its small size, which makes it fit in most cosmetic bags. For home use, this Paul Mitchell brush should be used in addition to your collection of hair tools rather than as your only choice, but considering the price, it’s an easy choice.

TANGLE TEEZER BRUSH

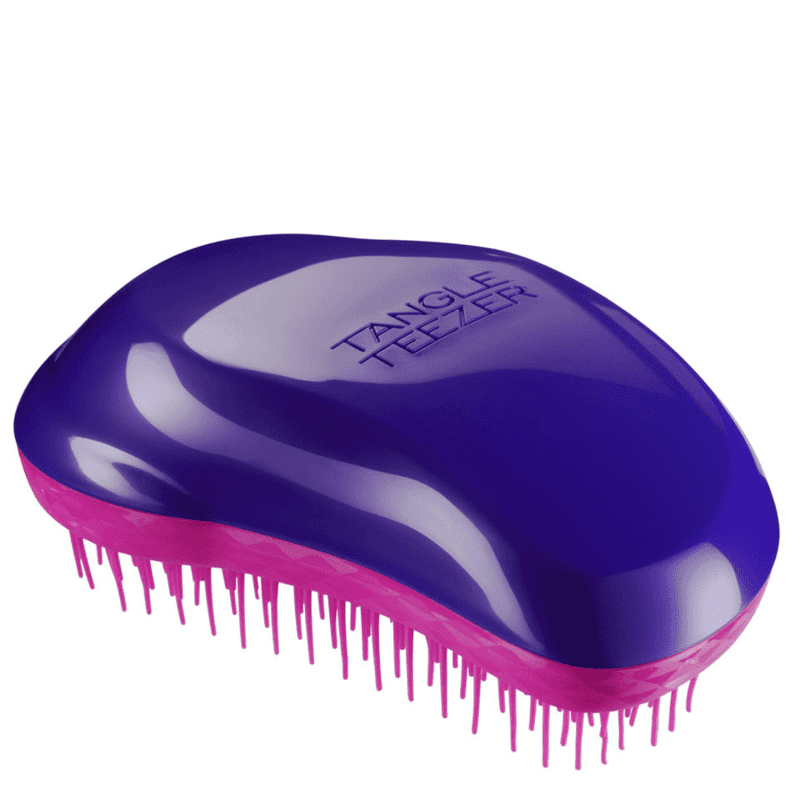
Any hair type can experience breakage from knots and snarls, but fine hair is particularly vulnerable to their destructive effects. For this reason, it’s critical to invest in a high-quality detangling brush, such as this Tangle Teezer brush that has won several awards. This brush works well on both wet and dry hair because of its memory-flex bristles, which are tough but kind to delicate hair strands. Its design combines long and short teeth, the former for smoothing and the latter for detangling hair. The brush is mild enough, according to the makers, to be used on wigs, weaves, and hair extensions. Overall, this is the best brush for fine thin hair.

FINAL TAKEAWAY

If you know where to search, you may find the best brush for thin hair, which can create volume and make hair care a thousand times simpler and more effective. If you belong to the fine hair family, you are certainly well aware of the advantages and disadvantages that come with this type of hair. It may be styled using a wash-and-go method, making it potentially less upkeep than other hair types. However, you may have limp, oily roots and hair that is too obstinate to curl. The good news is that you don’t need to be an expert to obtain the sort of hairstyle you like; you simply need to know what you’re working with.

How to Do Box Braids: A Beginner’s Tutorial

Box braids are a popular and stylish protective hairstyle that has been around for decades. They are versatile, low-maintenance, and can last for weeks with proper care. If you’re looking to try out box braids for the first time or simply want to improve your technique, this article will provide you with a comprehensive guide on how to do box braids.

Choosing the Right Hair Extensions

The first step in creating box braids is selecting the right type of hair extensions. You can choose between synthetic or human hair extensions, depending on your budget and preference. Here are some factors to consider when choosing:

  • Texture: Look for hair extensions that match your hair’s texture as closely as possible.
  • Length: Choose extensions that are at least three inches longer than your natural hair to allow for braiding.
  • Color: Pick a color that complements your skin tone and personal style.

You should buy 6-8 packs of synthetic hair if you’re aiming for long, thick braids. For shorter and thinner box braids, you might require fewer packs. Seek out smooth and soft synthetic hair, which is less prone to frizz, either at your local beauty supply store or through online retailers. The commonly used synthetic hair types for box braids are the soft-pressed Kanekalon Expression hair and pre-stretched Kanekalon hair. Alternatively, you can opt for human hair extensions or yarn hair. When uncertain about the quantity, it’s wise to purchase more hair than you think you’ll need. Any leftover hair can be saved for future styles or returned if the retailer permits.

Preparing Your Natural Hair

  • Wash and Condition: Start by washing your hair with a sulfate-free shampoo and a nourishing conditioner. Ensure that you rinse thoroughly to remove any product residue. Follow up with a deep conditioning treatment to hydrate and strengthen your hair. Leave the conditioner on for the recommended time to allow your hair to absorb all the moisture and nutrients it needs.
  • Detangle: Gently detangle your hair using a wide-tooth comb or a detangling brush. Start from the tips and work your way up to the roots to minimize breakage and pain. If your hair tends to tangle easily, feel free to use a rat-tail comb for those stubborn knots.
  • Stretch: If you have very curly or coily hair, you may choose to stretch it before braiding to make the process more manageable. You can do this by blow-drying your hair on a low-heat setting or using stretching techniques like banding or braiding.

How to Do Box Braids on yourself

Now that you have your hair extensions and natural hair prepped, it’s time to start braiding. Follow these steps:

Materials You’ll Need

  • Wide-tooth comb
  • Rat-tail comb (optional)
  • Hair clips or hair ties
  • Hair extensions (kanekalon or synthetic braiding hair)
  • Hair mousse or styling gel
  • Hair oil or moisturizer (optional)
  • Scissors (for trimming)

Step 1: Section Your Hair

Begin by using a wide-tooth comb to create four distinct box-shaped sections in your hair. Start by parting your hair down the middle, from your forehead to the nape of your neck, and then create another part from ear to ear. Leave the first section you plan to braid undone. Ensure that these sections are evenly partitioned, resulting in a neatly defined box shape with a straight line at the roots. Employ three large hair clips to secure the other three sections, keeping them conveniently out of your way. This initial division into four sections helps streamline the braiding process and prevents unworked hair from getting in your way as you braid. It might be helpful to use a mirror to ensure precision while creating these sections.

Step 2: Prepare the Braiding Hair

Take a portion of your sectioned hair, roughly measuring 1.5 to 2 inches (3.8 to 5.1 cm), and divide it further into thirds. Next, select a section of synthetic hair that’s slightly thicker than your natural hair section. Within the synthetic hair section, remove approximately one-third of it, leaving you with two strands—one thicker and one thinner. Alternatively, you can split the entire synthetic extension into three equally sized strands and then combine two of them to create the thicker and thinner sections.

Cross the 2 sections of hair at their centers, and fold the thinner strand backward upon itself. This action results in three hair strands of approximately equal thicknesses since the thin strand has been folded to create a single, thicker strand. To maintain a secure grip on the extension, use your thumb and forefinger to hold it firmly at the base of the loop.

Step 3: Start Braiding

Place the synthetic hair atop your natural hair, right at the roots. While keeping the three distinct synthetic hair strands, select one strand to act as your central or anchor strand, which you’ll merge with your natural hair. Align the loop of your partitioned hair directly over your natural hair’s roots, gently pinching your anchor strand together with your natural hair.

Step 4: Add More Braiding Hair

With the anchor strand of synthetic hair and your natural hair strand held together, initiate the braiding process with the synthetic hair. Guide the right-hand strand beneath the anchor strand, shifting the right-hand strand to the middle position. Subsequently, pull the left-hand strand under the center strand (which was previously the right-hand strand), positioning it now in the center. To keep things looking seamless, make sure to blend the braiding hair with your natural locks.

Step 5: Braid to the End

Continue braiding until you’ve reached your desired braid length. You can choose to leave a small portion of your natural hair unbraided at the ends for a more natural look or braid all the way to the ends.

Step 6: Secure the End

Continue this sequence throughout the entire length of your hair, and once you’ve reached the end, secure it in place using a hair elastic. If the braid holds its shape without an elastic, you can skip this step. Maintain consistent tension to achieve a tight, orderly braid, making sure it’s secure but not uncomfortably tight. Applying even, gentle pressure as you braid ensures a uniform and smooth appearance for your braid.

Step 7: Repeat

Braid your hair section by section, allowing yourself breaks whenever necessary. Begin with one section and progress from the lower part of your scalp towards the crown for easier management. As doing an entire head of box braids can be a time-consuming task, taking breaks between sections or when needed is essential. Ensure you braid each section swiftly and consistently to prevent frizziness. Maintain uniform pressure throughout the braiding process to achieve braids of the same thickness and shape.

Step 8: Trim and Style (Optional)

If desired, you can trim any uneven ends and style your box braids. Common styles include leaving them loose, pulling them into a ponytail, or creating updos and buns

Care and Maintenance

Once you’ve completed your box braids, it’s essential to take care of them properly to ensure they last for as long as possible. Here are some tips:

  • Keep Your Scalp Clean: Use a diluted sulfate-free shampoo to clean your scalp. Dilute the shampoo with water to prevent residue buildup between braids. Gently massage your scalp with your fingertips and rinse thoroughly. Focus on cleansing your scalp every 2-4 weeks or as needed.
  • Moisturize Your Braids: Use a water-based moisturizer or leave-in conditioner to hydrate your braids and natural hair. Apply it directly to your scalp and braids, concentrating on the ends. Be cautious not to oversaturate, as excessive moisture can lead to frizz.
  • Protect Your Braids at Night: Invest in a satin or silk bonnet or scarf to protect your braids while you sleep. Cotton pillowcases can create friction, which may cause frizz and damage.
  • Avoid Overstyling: Constantly pulling your braids into different styles or over-manipulating them can weaken your natural hair and cause breakage. Stick to simple styles to minimize stress on your hair.

FAQs

  1. What type of hair extensions are best for box braids? Human hair extensions are best for a natural look and feel, but they can be expensive. Synthetic hair extensions are more affordable and come in a wide range of colors and textures.
  2. How often should I wash my box braids? You should wash your box braids every two weeks to keep them clean and fresh.
  3. Can I swim with box braids? Yes, you can swim with box braids, but it’s essential to wear a swim cap and rinse your hair thoroughly afterward.
  4. How long do box braids last? Box braids can last four to eight weeks, depending on how well you care for them.
  5. Can I do box braids on short hair? Yes, you can do box braids on short hair, but the length of the extensions you choose will depend on how short your natural hair is.

Final Takeaway

Box braids are a beautiful and protective hairstyle that can be done at home with the right tools and techniques. By following this guide, you can create perfect box braids that will last for weeks and keep your hair healthy and protected. Remember to take care of your braids by moisturizing, cleansing, and protecting them from tight hairstyles. Happy braiding!