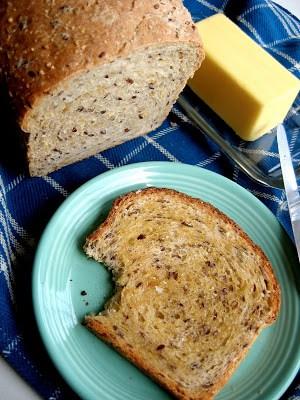
This multi-grain sandwich bread is loaded with whole grains and seeds, yet remains light and springy, all while being quick and easy to make.
INGREDIENTS
- 1/4 cup millet
- 1/4 cup steel-cut oats
- 1/4 cup dry polenta
- 2 tablespoons butter
- 2 tablespoons honey (1 1/4 ounces)
- 1 1/2 cups boiling water
- 1 tablespoon fresh yeast (or 2 teaspoons active dry or 1 1/2 teaspoons instant yeast)
- 1/4 cup whole flaxseeds
- 1/2 cup whole wheat bread flour
- 1 3/4 teaspoons salt
- 2 cups white bread flour, plus extra for kneading
- Vegetable oil for greasing the bowl
- Butter for greasing the pan

INSTRUCTIONS
- Soak the Grains:
- Pulse the millet and oats in a coffee grinder until they resemble a coarse meal or sand texture. Combine them in a large bowl with the polenta, butter, and honey. Pour in the boiling water and stir gently. Let it sit for about 30-45 minutes, stirring once or twice, until the mixture is warm to the touch (not too hot, as it could kill the yeast).
- Make the Dough:
- Crumble in the fresh yeast and stir. If using active dry yeast, let the mixture sit for 10 minutes. Add the flaxseeds, whole wheat flour, and salt. Gradually add the white flour, about 1/4 cup at a time, stirring after each addition. After about 1 1/4 cups of flour, the dough should start to come together in a rough, sticky mass. If it’s too dry, sprinkle a bit of water and continue mixing until it becomes sticky again. Scrape down the sides of the bowl, cover with plastic wrap, and let it sit for 15-20 minutes (this is called autolyse, which helps make the dough smoother and easier to knead).
- Knead the Dough:
- Uncover the dough and turn it out onto a lightly floured surface. Knead for about 10 minutes, adding flour as needed to prevent sticking. The dough should feel smooth and a bit tacky but not overly sticky.
- First Rise:
- Shape the dough into a ball (boule) and place it in a large, lightly oiled bowl. Turn the dough to coat it with oil, then cover with plastic wrap. Let it rise until doubled in size, about 1-2 hours.
- Shape the Loaf:
- Grease an 8×4″ or 9×5″ loaf pan with butter. Turn the dough out onto a lightly floured surface and gently pat it into an 8×14″ rectangle. Roll it up snugly, like a cinnamon bun, and pinch the seam closed. Tuck the ends under and roll the log a few times to smooth it out. Place the loaf in the greased pan and put the whole pan into a large plastic vegetable bag (or small garbage bag). Tie the bag closed, leaving it inflated to allow room for the dough to expand.
- Second Rise:
- Let the dough rise until it has doubled in size and is about 2″ above the rim of the pan, 45-60 minutes.
- Prepare the Oven:
- Position a rack in the lower third of the oven and preheat to 400ºF. If you have a baking stone, place it on the rack. Put a metal or cast-iron pan on the oven floor to catch the ice cubes for steaming.
- Bake the Bread:
- Remove the bag from the pan. Fill a 1/2 cup measure with ice cubes. Quickly place the loaf pan on the baking stone and toss the ice cubes into the pan on the oven floor. Close the oven door and don’t open it for 20 minutes. After 20 minutes, reduce the oven temperature to 350ºF. Rotate the pan and bake for 30-40 minutes more, for a total baking time of 50-60 minutes. The bread is done when it reaches an internal temperature of 195-200ºF. For an extra-crisp crust, you can remove the bread from the pan after 45 minutes and bake it directly on the stone for the final 15 minutes.
- Cool the Bread:
- Remove the bread from the oven and the pan. Let it cool completely on a rack before slicing (about 1-2 hours).
- Storage:
- Store the bread in a plastic bag or other airtight container at room temperature for up to a week.
NOTES
- This simple, user-friendly multi-grain bread recipe is perfect for beginners, even if you’re a bit hesitant about working with yeast. Feel free to substitute any multi-grain hot cereal blend for the millet, oats, and polenta.
Nutritional Information (per serving):
- Calories: 220 kcal
- Carbohydrates: 36g
- Protein: 6g
- Fat: 5g
- Saturated Fat: 2g
- Cholesterol: 6mg
- Sodium: 433mg
- Potassium: 105mg
- Fiber: 3g
- Sugar: 3g
- Vitamin A: 85 IU
- Calcium: 20mg
- Iron: 1.1mg