

When browsing Instagram for photos of the Dolomites, you’ll often come across a stunning viewpoint featuring people standing on a rocky outcrop, gazing out over a mountain range adorned with sharp pinnacles. This breathtaking spot is part of the Cadini di Misurina hike, a lesser-known trail that offers incredible rewards for those who venture there.
In this post, I’ll provide a step-by-step guide to reaching the famous Cadini di Misurina viewpoint, share what to expect along the hike, and offer valuable tips for visiting the area. Let’s dive in!
Key Metrics of the Cadini di Misurina Hike

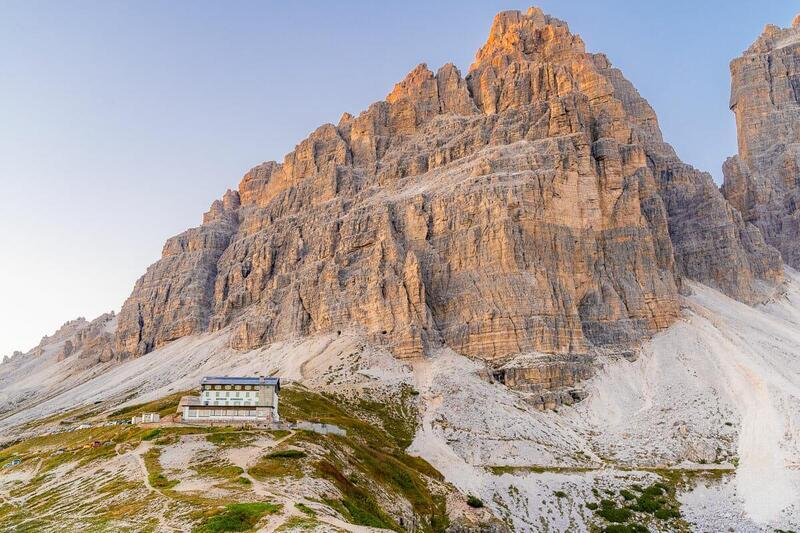
Starting point: Rifugio Auronzo
Ending point: Cadini di Misurina viewpoint
Distance: 2 km (1.2 miles)
Elevation gain: 112 m (370 feet)
Lowest elevation: 2,254 m
Highest elevation: 2,350 m
Duration: 30-45 minutes
Difficulty: Easy, although people with a fear of heights might find it challenging
Overview of the Cadini di Misurina Hike
The Cadini di Misurina hike is a short and accessible trail that begins at Rifugio Auronzo and leads to the stunning Cadini di Misurina viewpoint. Spanning just 2 km (1.2 miles), this hike offers breathtaking views throughout, making it a rewarding experience.
While the hike is relatively easy, the second half presents a bit more of a challenge as you navigate narrow pathways with steep drop-offs on one side. However, the panoramic views are well worth the effort. Expect to spend about 30 to 45 minutes completing the hike one way, making it suitable for those with an average fitness level.
Keep in mind that some sections involve steep drops, so if you have a fear of heights, this hike may not be ideal for you. Fortunately, there is an alternate route that bypasses the more challenging areas while still leading to the same breathtaking viewpoint—I’ll share more details about this option later!
Upon reaching the top, you’ll be rewarded with one of the most incredible views in the Dolomites. This hike is definitely one you won’t want to miss when visiting the region!
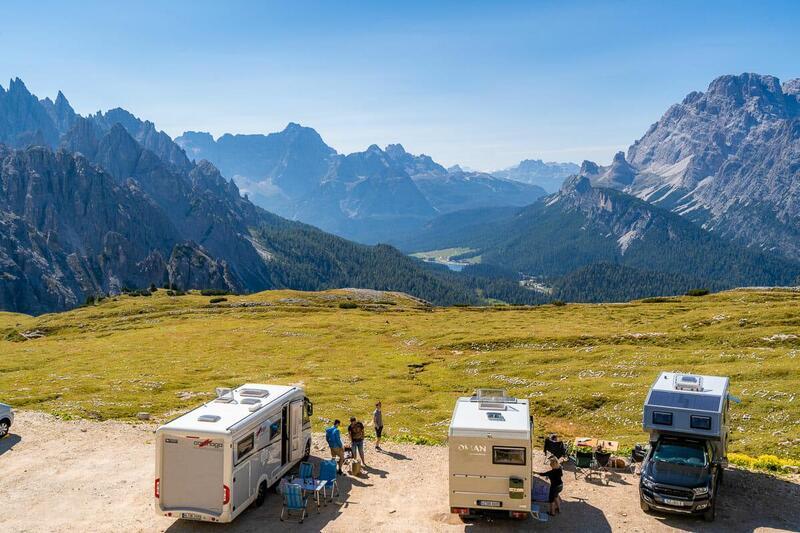
Getting to the Cadini di Misurina Trailhead (Rifugio Auronzo)
The Cadini di Misurina viewpoint hike begins and ends at Rifugio Auronzo. To reach Rifugio Auronzo, you have three options: you can hike up from Lake Antorno—one of the most beautiful lakes in the Dolomites—take a public bus, or drive there.
Below, I’ll provide all the details you need about each option, helping you choose the one that works best for you!
Option 1: Hiking from Lake Antorno to Rifugio Auronzo

Starting point: Lake Antorno
Ending point: Rifugio Auronzo
Distance: 4 km (2.5 miles)
Elevation gain: 461 m (1,512 ft)
Lowest elevation: 1,872 m (6,142 ft)
Highest elevation: 2,333 m (7,654 ft)
Duration: 1.5-2 hours
Difficulty: Moderate
The first option is to hike from Lake Antorno to Rifugio Auronzo. I recommend this route only for experienced hikers, as it involves a significant elevation gain of 461 m (1,512 ft) over a distance of 4 km (2.5 miles).
The trailhead for this hike is located about a 5-minute walk from Lake Antorno. Simply follow the road leading up to Tre Cime di Lavaredo, and after passing the toll gate, you’ll find the signs for Trail No. 101.
The hike to Rifugio Auronzo takes approximately 1.5 to 2 hours, so be sure to start early if you plan to complete this hike in addition to the Cadini di Misurina hike (and possibly after the Tre Cime di Lavaredo hike as well).
Option 2: Taking a bus to Rifugio Auronzo
The second option is to take the bus from Dobbiaco to Rifugio Auronzo. If you don’t have your own car, this is the option I recommend, as it’s much easier and faster.
At the Dobbiaco bus station, look for bus No. 444, which goes directly to Rifugio Auronzo. The bus has six stops along the way, including Dürrensee, Lake Misurina, and Lake Antorno, allowing you to board at any of these stops if it’s more convenient for you.
For example, if you’re staying in Cortina d’Ampezzo, you’ll first need to get to Dürrensee by taking bus No. 445, and then transfer to bus No. 444 to reach Rifugio Auronzo.
The bus ride from Dobbiaco takes approximately 45 minutes, and ticket prices are as follows:
- One-way ticket: €10 for adults, €5 for children (free for children under 14 when accompanied by an adult), and €5 for dogs.
- Round trip ticket: €16 for adults, €9 for children (free for children under 14 when accompanied by an adult), and €9 for dogs.
Since Rifugio Auronzo is also the starting point for the popular Tre Cime di Lavaredo hike, the bus tends to fill up quickly during peak season. Therefore, it’s best to book your tickets online in advance.
If you don’t pre-purchase your tickets, you can buy them at the bus station in Dobbiaco, but availability is not guaranteed.
Buses typically operate from early June to early October, running between 7:30 AM and 6 PM. However, schedules may vary from year to year, so be sure to check in advance.
Option 3: Driving to Rifugio Auronzo
The third and final option is to drive to Rifugio Auronzo. This is the most convenient choice if you have your own car, as the road takes you directly to the doorstep of the hut.
I strongly recommend renting a car when visiting the Dolomites, as it provides greater flexibility and access to the many incredible places to explore in the region.
Driving time to Rifugio Auronzo goes as follows:
- From Lake Antorno: 13 minutes, 5.5 km (3.4 miles)
- From Lake Misurina: 17 minutes, 7.5 km (4.6 miles)
- From Dobbiaco: 40 minutes, 27 km (16.8 miles)
- From Cortina d’Ampezzo: 40 minutes, 22 km (13.8 miles)
Just after passing Lake Antorno, you’ll encounter a toll gate where you must pay a fee to use the road. Both cash and credit cards are accepted, and the current prices are as follows:
- Cars: €30
- Motorcycles: €20
- Campervans: €45
The road is typically open from early June to late October, depending on the weather. During peak season, the toll booth operates 24 hours a day. Outside of peak times, the gate is automated; you can obtain a ticket by pressing the button at the gate and pay when you return.
It’s important to arrive early, as the toll road may close unexpectedly if the parking lot at Rifugio Auronzo is full, which is a common occurrence during peak season.
Step-by-Step Guide to Finding the Cadini di Misurina Viewpoint
Starting the Cadini di Misurina hike
Since Rifugio Auronzo is also the starting point for the Tre Cime di Lavaredo hike, it’s easy to overlook the Cadini di Misurina trailhead if you simply follow the crowds.
On the right side of the hut, you’ll find a long, well-marked trail that loops around the Tre Cime. This is Trail No. 101, but it is NOT the trail you’re looking for.
To find the correct path, walk past Rifugio Auronzo until you see a sign on the right side of the road. There, you’ll find a small trail leading down to the valley marked as Trail No. 117; this is the one you want to take.
If you’re parked in the lower parking lot or along the side of the road, you don’t need to walk up to Rifugio Auronzo to start the hike. You can access Trail No. 117 directly from the parking lot/road by heading down to the valley on your right.
The entire trail is 9.2 km (5.7 miles) long and ends at Rifugio Col de Varda, but don’t worry—you won’t need to walk the whole distance!
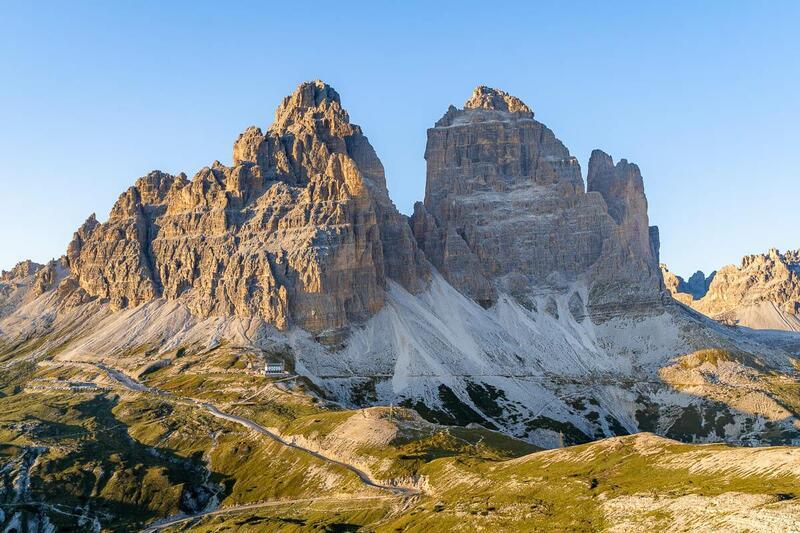
From Rifugio Auronzo, you’ll already see the peaks of Cadini di Misurina with their sharp pinnacles to the south, indicating the direction you need to head.
It’s important to note that while most people will be hiking towards the Tre Cime, you’ll need to walk AWAY from the Tre Cime in the opposite direction.
Hiking to the iconic Cadini di Misurina viewpoint
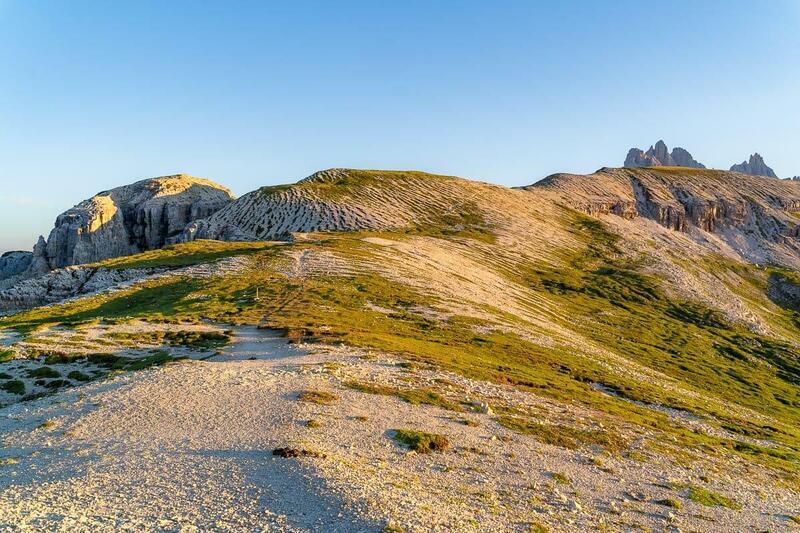
The hike begins with a short downhill section before it turns steeply uphill again. This uphill portion can be quite challenging, so if you have hiking poles, now is the time to use them.
There are several red and white trail markers along the path to guide you in the right direction, but the hike is straightforward even without them.
Just before you reach the top of the hill, you’ll notice the trail splitting into two different paths.
If you choose the path on the left side, you’ll hike a bit further uphill before the trail begins to loop around the ridgeline on the southern side of the hill.
This trail is undoubtedly more scenic, but it’s also more challenging, as you’ll be walking along a narrow path with a steep drop-off on one side. When we first did the Cadini di Misurina hike, we took this trail because we weren’t aware of the alternative route (which we discovered on our way back). Let me tell you, it was anything but comfortable!
If you have a fear of heights or if the trail is slippery, I recommend taking the path on the right side instead. This route contours around the northern side of the hill, allowing you to skip the scariest part of the hike.
It’s a small, rocky trail that becomes even narrower as you go, so proceed with caution! The path can only accommodate one person at a time and runs right next to the cliffs, but if you watch your steps, you’ll be fine.
Before long, you’ll catch a glimpse of the viewpoint in the distance. Just follow the path in that direction, and you’ll rejoin hiking Trail No. 117. The last section can be a bit daunting due to the sheer drops beside it, but trust me, it’s nothing compared to the other trail.
Regardless of which route you take, both will lead to the same viewpoint, and it shouldn’t take more than 30 to 45 minutes to get there from Rifugio Auronzo, depending on your pace.
Climbing up to the viewpoint
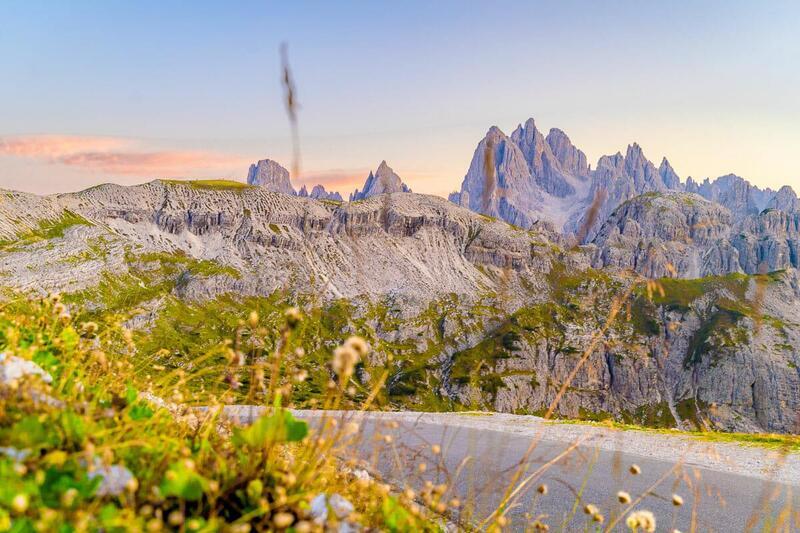
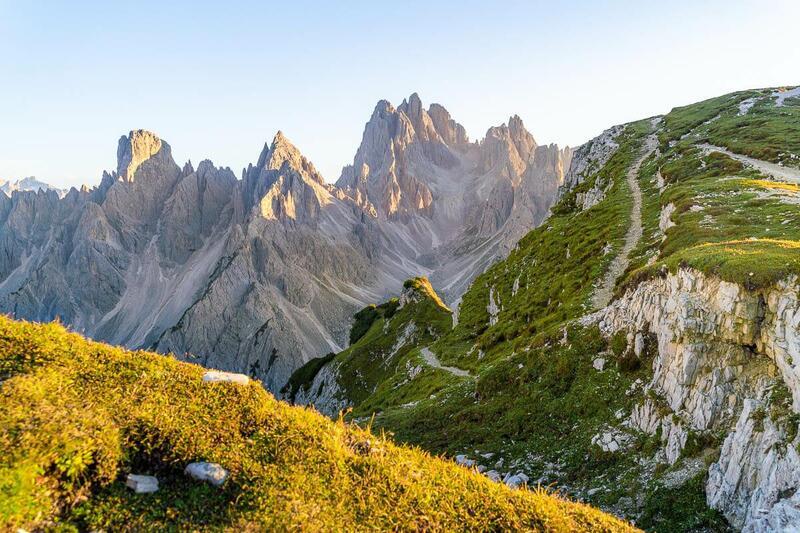
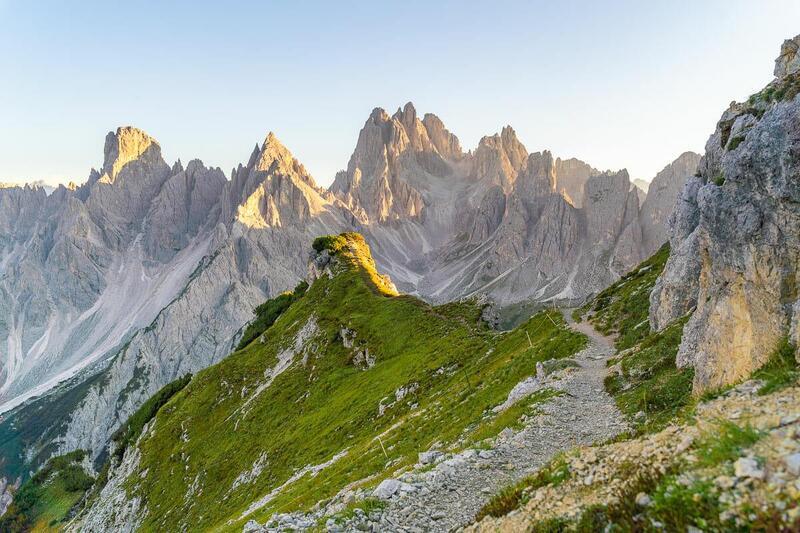
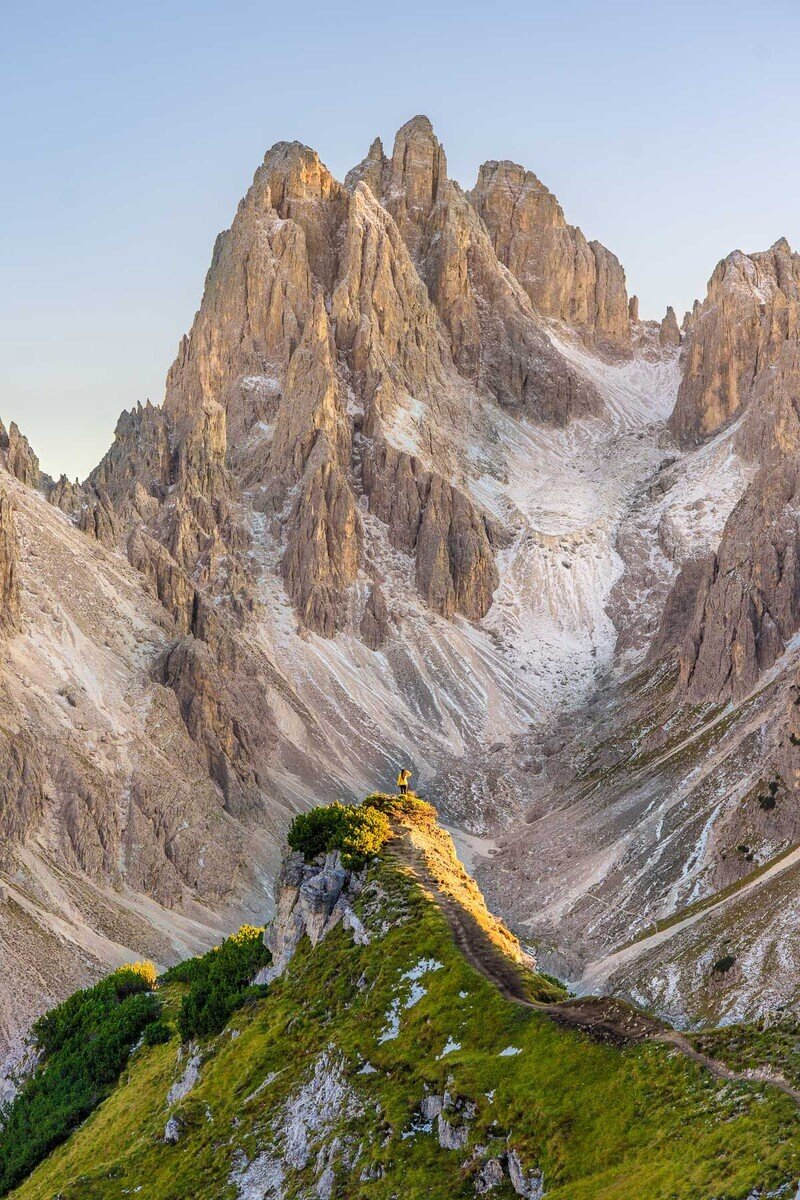
The Cadini di Misurina viewpoint is essentially a small ridge that slopes upwards, offering breathtaking views of the sharp pinnacles of the Cadini group. Once you’ve seen a photo of it, you won’t be able to miss it in real life!
To reach the ridge, you’ll need to leave the official hiking trail and ascend the narrow path leading up to it. This section can be a bit sketchy, as it features a steep slope with loose gravel, but the path is wide enough for one person, so it shouldn’t pose a significant issue.
Please only climb up if you feel comfortable and confident, as a misstep could lead to serious injury or worse. If the trail is too slippery or you don’t feel at ease, I recommend enjoying the stunning views from below.
Once you make it to the ridge, the vistas open up in all directions, revealing the entire Cadini di Misurina range right before you. It’s a magnificent sight and undoubtedly one of the best in the Dolomites!
How to photograph the Cadini di Misurina viewpoint
This hike is typically much less crowded than the Tre Cime di Lavaredo hike; however, you may encounter a few fellow hikers on the trail, especially in the late afternoon and before sunset.
Since the viewpoint is quite small and the path leading up to it accommodates only one person at a time, hikers often line up along the main trail, waiting for their turn to ascend to the viewpoint. Please be patient and wait your turn—there’s no need to rush; safety is the top priority!
When it’s your turn, your photographer can accompany you to the viewpoint to capture your photos. However, you might achieve better compositions if you climb up alone while your photographer stays on the main trail.
An even better option is for your photographer to step back a bit on the main trail and use a good zoom lens. This way, the mountain range will appear larger in the photos due to the compression effect, resulting in stunning shots!
Also, if you have a drone, you can capture some truly unique perspectives of the viewpoint! Just be sure to launch your drone only when it’s your turn to ascend, so you don’t disturb others who are enjoying the views.
The views are stunning at any time of day, but the best time to photograph the Cadini di Misurina viewpoint is in the late afternoon, about 1-2 hours before sunset. Due to the nearby mountains, the sun sets approximately one hour earlier than the official sunset time, so be sure to arrive early enough to capture the beautiful light on the viewpoint.
Getting back to Rifugio Auronzo
Once you’ve finished enjoying the views and capturing photos, it’s time to hike back to Rifugio Auronzo. You can simply retrace your steps, and within 35-40 minutes, you’ll be back at the parking lot.
On your return, you’ll have a clear view of the Tre Cime di Lavaredo the entire way, so be sure to take a few snapshots of this iconic mountain range.
If you timed your hike well and visited Cadini di Misurina 1-2 hours before sunset, you’ll be rewarded with stunning sunset views from Rifugio Auronzo.

Map for the Cadini di Misurina hike
Below is a customized map that highlights the key checkpoints along the Cadini di Misurina hike, along with important locations such as parking spots and mountain huts.
If you open this post on your phone and click the bracket in the upper right corner of the map, it will open in your Google Maps app, allowing you to have it easily accessible during your hike.
Where to Stay Near Cadini di Misurina
Rifugio Auronzo
If you’re planning to hike to Cadini di Misurina for sunset or sunrise and want to stay as close as possible, the most convenient option is to stay at Rifugio Auronzo.
The guesthouse features 25 rooms, accommodating 2 to 6 beds each, for a total capacity of 104 guests. Since the Tre Cime hike is one of the most popular hikes in the Dolomites, it’s best to book your spot well in advance to secure a bed for the night.
Rifugio Auronzo also has a restaurant where you can enjoy traditional Ladin dishes after your hike. Alternatively, you can opt for a half-board option, which is the best choice unless you prefer to bring your own food.
Dobbiaco
If you prefer to stay in a town, one of the most convenient options is Dobbiaco. Located just a 40-minute drive from Tre Cime, it’s also connected to the three peaks via a direct bus route.
Dobbiaco serves as a great base for exploring the area, offering a variety of nice hotels, restaurants, and cafes. Additionally, it’s close to Lago di Braies, one of the most famous lakes in the Dolomites.
Best Places to Stay in Dobbiaco:
- Luxury: Skyview Chalets am Camping Toblacher See
- Mid-range: Hotel Rosengarten
- Budget: Guesthouse Rosengarten
Cortina d’Ampezzo
Cortina d’Ampezzo is another great option as it’s also just a 40-minute drive from Tre Cime di Lavaredo.
Surrounded by the majestic peaks of the Dolomites, Cortina d’Ampezzo is one of the most popular mountain towns in Italy. It’s one of the best places to stay in the Dolomites if you want to explore the area and it has a lot of nice hotels, restaurants, cafes, and high-end shops.
If you’re looking for a more upscale experience, Cortina is definitely the place to be!
Best places to stay in Cortina d’Ampezzo
- Luxury: Grand Hotel Savoia Cortina d’Ampezzo
- Mid-range: HOTEL de LEN
- Budget: Hotel Meuble Oasi
CONCLUSION
Embarking on a hike to the Cadini di Misurina viewpoint is an unforgettable experience that showcases the breathtaking beauty of the Dolomites. With its stunning landscapes, diverse trails, and opportunities for breathtaking photography, this adventure caters to both seasoned hikers and beginners alike. Whether you choose to access the viewpoint by bus, car, or on foot, each method offers its own unique charm and convenience.
As you navigate the well-marked trails, you’ll encounter the awe-inspiring Cadini peaks, rich with sharp pinnacles and dramatic vistas. The journey encourages exploration, from the challenging routes to the more accessible paths, allowing hikers to select their adventure based on their comfort level. Remember to pack wisely, respect the environment, and prepare for changing weather conditions.
Timing your hike to coincide with sunrise or sunset can elevate your experience, offering magical moments filled with stunning light and color. Whether you choose to stay at the nearby Rifugio Auronzo or in the charming town of Dobbiaco, you’ll have ample opportunities to unwind and savor the rich local culture after your adventure.
Ultimately, hiking to the Cadini di Misurina viewpoint is more than just a physical journey; it’s a chance to connect with nature and create lasting memories amidst one of the world’s most picturesque mountain ranges. So lace up your hiking boots, grab your camera, and get ready to explore the breathtaking beauty that awaits you in the Dolomites!


