
If you’ve ever wanted to add length or volume to your hair, then clip-in extensions are the perfect solution. They’re affordable, easy to install, and can be removed just as easily. But putting in clip-in extensions can seem daunting if you’ve never done it before.
We have created a step by step instruction on how to put in clip-in extensions, so you can achieve a flawless look every time. Keep reading!

What are Clip-In Hair Extensions?
Clip-in hair extensions are wefts of hair that are attached to clips. These clips are then placed onto your natural hair, adding length, volume, or both. They come in various lengths, colors, and textures, so you can choose the right set to match your hair type and style.
You Will Need
- Clip-in hair extensions
- A fine-toothed comb
- Hair clips or ties
- A mirror
How to Put in Clip-In Extensions

Step 1: Prepare Your Natural Hair
Start with clean, dry hair. Extensions are best applied to freshly washed and styled hair.
Use a fine-toothed comb to remove any tangles or knots. This will ensure a smooth base for attaching the extensions.
Step 2: Section Your Hair
Create a horizontal parting just above the nape of your neck and secure the rest of your hair above it with a hair clip or tie. This will be the first section where you’ll attach the extensions.
Step 3: Choose the Right Extension Piece
Select the clip-in extension piece that matches the width of the section you created. Clip-in extensions typically come with different sized wefts to fit various areas of your head.
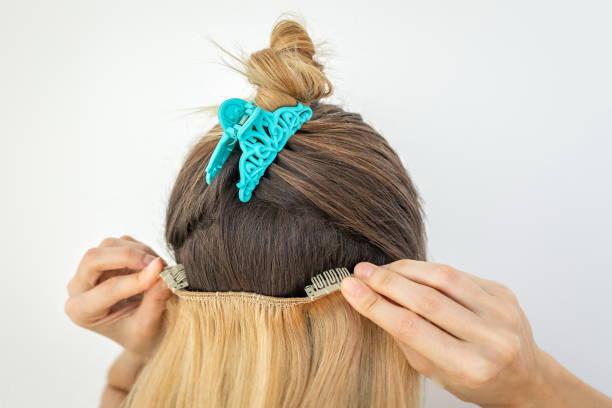
Step 4: Attach the Extension
Holding the extension piece by the clips, open the clips by pressing them inward.
Position the open clips along the parting you created, close to the scalp, and then snap them shut securely.
Ensure that the clips are evenly spaced and lie flat against your scalp to prevent any discomfort.
Step 5: Create Another Section
Release a new section of your natural hair just above the first extension, securing the rest of your hair above it.
Choose the appropriate extension piece for this section, attach it following the same process, and ensure the clips are secure.
Step 6: Continue Adding Extensions
Repeat the process of releasing sections of your natural hair, attaching extensions, and securing them in place until you reach the top of your head.
For the sides and front sections, you may need smaller wefts or individual extensions to blend seamlessly with your natural hair.
Step 7: Blend and Style
Once all the extensions are in place, use your fingers or a comb to blend your natural hair with the extensions. This will create a seamless, natural look.
Style your hair as desired, whether it’s straightening, curling, or adding waves to both your natural hair and the extensions.
Step 8: Final Check
Look in the mirror and ensure that the extensions are evenly distributed, secure, and well-blended with your natural hair.
Make any necessary adjustments to the placement or styling.
How Much Do Clip In Hair Extensions Cost?
The price of clip-in hair extensions can vary significantly and is influenced by several factors, including the hair’s quality, the length and thickness of the extensions, and the brand.
Generally, synthetic clip-in hair extensions available online can range from $10 to $100, whereas human hair clip-in extensions may cost between $200 and $500 or more. Premium-quality human hair clip-in extensions can even reach prices of $1,000 or higher.
It’s essential to note that the total cost of clip-in hair extensions can also be influenced by the number of pieces included in the set. Additionally, certain brands offer customization options, such as the ability to choose specific lengths and colors, which can impact the overall price.
Tips for a Flattering Hairstyle
- Choose the right clip-ins for your hair type and style. If you have fine hair, look for clip-ins that are lightweight and won’t weigh down your natural hair. If you have curly hair, choose clip-ins that match your curl pattern.
- Practice makes perfect. Don’t be discouraged if it takes a few tries to get the hang of installing your clip-in extensions. The more you do it, the easier it will become.
- Be gentle when placing the clips near your scalp. You don’t want to tug or pull on your natural hair, as this can cause damage or discomfort.
- Match the color of the clip-ins to your natural hair as closely as possible. If the colors don’t match perfectly, it can be noticeable and detract from the overall look.
- Use a mirror to check that the clip-ins are placed evenly and look natural.
FAQs
- Can I sleep with clip-in extensions? Yes, but it’s not recommended. Sleeping with clip-ins can cause them to tangle or shift out of place, which can be uncomfortable.
- How long do clip-in extensions last? Clip-in extensions can last for several months with proper care and maintenance.
- Can I dye my clip-in extensions? It depends on the type of clip-ins you have. Some clip-ins can be dyed, while others cannot. Check with the manufacturer before attempting to dye your extensions.
- Do I need to wash my clip-in extensions? Yes, you should wash your clip-in extensions periodically to remove any buildup or dirt that may accumulate over time.
- Can I swim with clip-in extensions? It’s generally not recommended to swim with clip-in extensions, as the chlorine or saltwater can damage the extensions and your natural hair.
Final Takeaway
Putting in clip-in extensions is a great way to add length and volume to your hair without committing to a more permanent option. With the tips and tricks outlined in this article, you can achieve a flawless look every time. Remember to choose the right clip-ins for your hair type and style, practice installing them until you get the hang of it, and be gentle when clipping them near your scalp. And with proper care and maintenance, your clip-in extensions can last for months. So, there you have it – everything you need to know about how to put in clip-in extensions. By following the steps outlined above, you can achieve a gorgeous, full head of hair that looks natural and beautiful.
Remember, putting in clip-in extensions takes practice, so don’t get discouraged if you don’t get it right the first time. Just keep trying, and soon enough, you’ll be a pro!


