
Cleaning out your closet may seem overwhelming, especially when you have a lot of clothes to go through. However, the feeling of accomplishment once it’s done is well worth the effort. A thorough closet clean-out can transform not only how you view your wardrobe but also how you shop, while giving you a refreshed sense of style and organization. In this post, I’ll guide you through 10 practical steps to help you efficiently declutter and organize your closet for a more streamlined and satisfying space.
STEP 1 – TAKE A BEFORE PHOTO
Before you start cleaning out your closet, I highly recommend snapping a picture of your wardrobe as it looks right now. It might be tempting to skip this step—after all, who wants a visual reminder of the current chaos? But trust me, when you finish, you’ll be grateful you have that “before” shot. It will serve as a powerful reminder of how much progress you’ve made. Plus, when you’re halfway through the process and feeling like giving up, looking back at that photo can be just the motivation you need to keep pushing forward.
STEP 2 – EMPTY OUT YOUR WARDROBE
Start by taking everything out of your wardrobe. While it might seem overwhelming at first, laying all your clothes out will give you a clearer sense of just how much you have—and how much you actually use. If your wardrobe is large or space is limited, you can approach this task in sections. It’s normal for things to look worse before they improve, but don’t worry—the mess is temporary, and soon we’ll have everything neatly organized!
STEP 3 – SEPARATE EVERYTHING INTO PILES
Separate your clothes into three piles: yes, no, and maybe. Be strict but mindful during this step. For example, make sure you’re not getting rid of something you’ll end up wanting to repurchase later. This is where the ‘maybe’ pile can really come in handy.
Pro tip: Ask yourself specific questions as you sort your clothes into these piles:
- Do I wear this item? If not, could I wear it more often?
- Does this item fit my current style?
- Would I buy this item today?
- Don’t hold onto things just because they’re new—if you don’t wear it, it’s not worth keeping.
Feel free to try things on as you go. Sometimes the best way to decide if you still like something is to see how it looks and makes you feel.
For high-quality items you like but that need repairs or alterations, consider setting them aside for tailoring. I’ve done this with several pieces, and while it may seem like extra work, it’s often cheaper than replacing the item. Plus, tailoring can give new life to older pieces. For instance, I’ve had trousers and jeans taken in for a better fit, and they’ve since become some of my favorite pieces—something rarely achieved when buying off-the-rack.
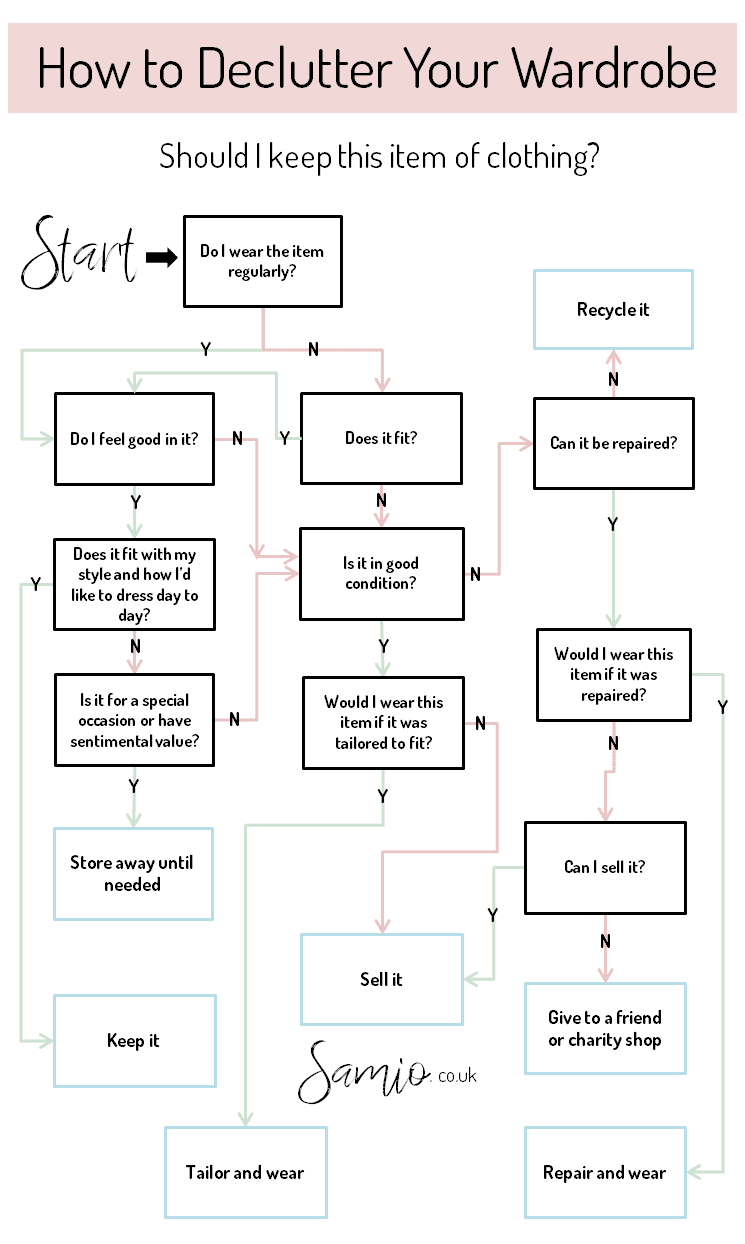
If you’re still unsure about what to keep or get rid of, I’ve created a helpful flow chart to guide you through the process of deciding which items to keep, donate, or recycle.
STEP 4 – REPEAT THE SAME PROCESS FOR SHOES, BAGS AND ACCESSORIES
You know the routine: go through the rest of your wardrobe, including shoes, bags, and accessories, and sort them into ‘yes,’ ‘no,’ and ‘maybe’ piles. Apply the same approach, being mindful of what you actually use and what aligns with your style.
STEP 5 – CREATE A SEPARATE STORAGE SPACE FOR SENTIMENTAL ITEMS
You may come across a few sentimental pieces that you really want to keep, and that’s perfectly fine—just create a designated space to store them. However, be careful not to hold onto items simply because you once loved them. If it’s something you’ll never wear again, take a moment to reflect on why you still want to keep it.
I understand that letting go of certain items can be tough, especially if you’re someone who attaches emotions and memories to clothing. I’ve been there myself, struggling to separate memories from items. But once I learned to do this, it felt incredibly freeing. What helped me let go was finding comfort in knowing the items would have a new home where they’d be appreciated. The more I decluttered, the easier it became.
I did allow myself to keep a small number of items purely for sentimental reasons. For instance, I kept my high school leaver’s shirt signed by my classmates and the dress I wore on my first date with Damien. It’s important not to throw away family heirlooms or items with real sentimental value, but try to be strict with yourself during the process. Don’t hold onto things out of a sense of obligation.
Remember, the goal is to declutter, so don’t keep things just for the sake of it. It’s okay if you can’t part with everything right away, but be mindful of what you’re holding onto and why. And if you can pass something along to someone who will love and use it just as much as you did, don’t hesitate to let it go.
STEP 6 – RE-ORGANISE YOUR ‘YES’ PILE
If you haven’t already organized your clothes by season, now is a great time to do so. This will help you avoid feeling overwhelmed by clothes you can’t currently wear. Of course, this tip may be more relevant depending on where you live. For instance, if you live somewhere like the UK, where you experience all four seasons, your wardrobe will change throughout the year based on the weather.
Set aside a specific area or create storage for out-of-season clothing or items you won’t need soon, like special occasion wear. I suggest using storage bins or boxes so you can easily tuck these items away until they’re needed again.
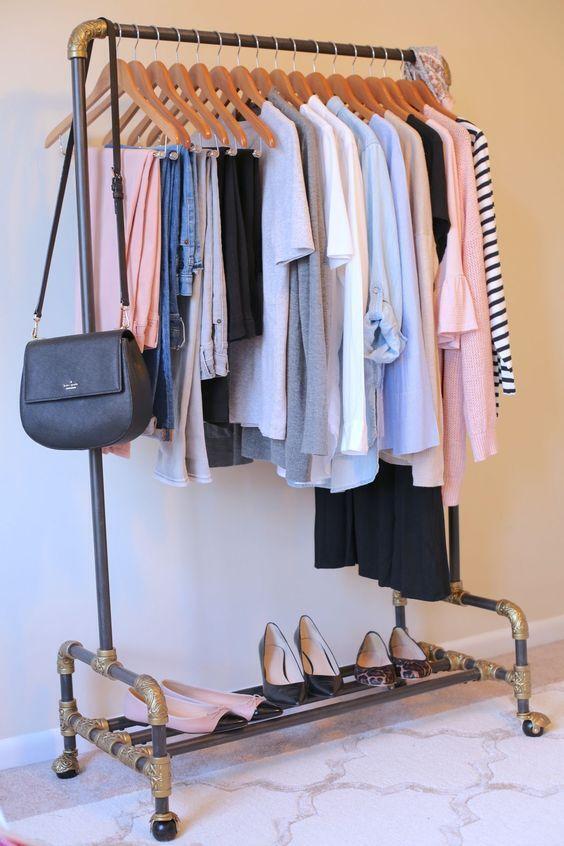
STEP 7 – PUT ALL THE ITEMS YOU LOVE BACK INTO YOUR WARDROBE
Begin placing the items from your ‘yes’ pile back into your wardrobe, organizing them as you go.
Top Tip: Consider replacing mismatched or wire hangers with uniform ones for a more cohesive look. I personally prefer white wooden hangers for their sturdiness, but velvet hangers are also a great option—especially if you’re short on space or need something that holds slippery fabrics, like satin, in place.
STEP 8 – GO THROUGH YOUR ‘NO’ PILE
Go through your ‘no’ pile and decide what can be donated to friends or family, sent to a charity shop, or thrown away. When disposing of old clothes, remember it’s important to recycle them whenever possible to avoid contributing to landfills.
Now, grab your bags and start sorting unwanted clothes into categories such as:
- Items to sell
- Charity shop donations
- Items for friends and family
- Items to recycle
This will help you stay organized and ensure everything finds the right place.
STEP 9 – ASSESS YOUR ‘MAYBE’ PILE
Examine your ‘maybe’ pile and try on each piece if you haven’t done so already. Consider what you like and dislike about them. If the cons outweigh the pros, you’ll know what to do. Don’t forget to refer back to the flow chart for guidance.
If you’re still unsure about some items, avoid making hasty decisions. Instead, bag these pieces up or store them in a place that doesn’t disrupt your organized wardrobe—somewhere out of sight, like under your bed, could work well.
I recommend giving it at least a four-week period. If you find that you haven’t missed or searched for any items from the ‘maybe’ pile by the end of that time, it’s a good indication that those pieces are ready to be passed on or recycled.
Top Tip: To remind yourself to check back on your ‘maybe’ pile, set a reminder on your phone or mark it in your calendar for one month later. This will help ensure you don’t forget to revisit those items!
STEP 10 – RE-VISIT YOUR ‘MAYBE’ PILE
Now that you’ve lived with your newly decluttered wardrobe for a month, it’s time to revisit that ‘maybe’ pile you set aside. By now, you should have a clearer sense of whether to keep or part with these items. If you’re still unsure, your hesitation might stem from old sentimental attachments. Remember why you started this process and reflect on the benefits you’ve experienced since decluttering.
If you haven’t missed any items from the ‘maybe’ pile over the past four weeks, it’s time to re-home or recycle them.
You Did It!
Take a moment to celebrate your accomplishment! Snap a picture of your newly organized wardrobe and compare it to the before photo you took. This visual reminder will help you appreciate how far you’ve come and can motivate you if clutter starts to creep back in.
Hopefully, this decluttering journey has rekindled your love for your wardrobe. As you add new items in the future, you’ll be better equipped to assess what truly belongs in your space, keeping it well-organized, cherished, and clutter-free!


