
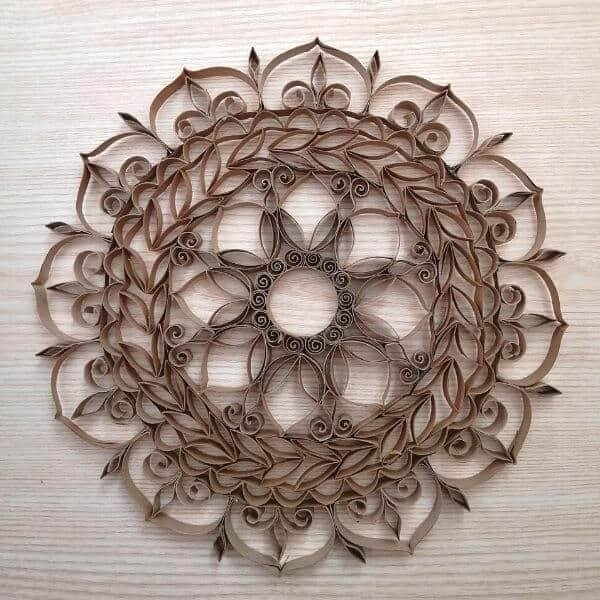
Create Stunning and Affordable Mandala Wall Art from Toilet Paper Rolls. Do you ever find yourself thinking, “I can’t throw that away; it might be useful later”? I can definitely relate! I tend to hold onto items my spouse considers trash, like toilet paper rolls. If you’re a Pinterest enthusiast like I am, you’ve probably stumbled upon various toilet paper roll crafts. While many are geared towards kids, there are also some fantastic ideas for wall decor.
With a big bag of toilet paper rolls on hand, I decided it was time to put them to good use. Mandalas are beautiful, and I love everything about them—coloring, drawing, and creating them.
You might also enjoy my other craft project: the leaf mandala papercraft!
What is a mandala?
Mandalas are symbols found in Hinduism and Buddhism, characterized by their concentric, circular designs. They represent the universe and embody the idea that life is eternal.
Due to their captivating nature, mandalas have become a popular choice in home decor. You can find them in various forms, such as tapestries, throw pillows, rugs, and canvas art. Nearly every bohemian-styled room features mandala accents.
This was my first project using toilet paper rolls, but it certainly won’t be my last! As a former special education teacher, I’ve painted toilet paper rolls with my students, but I hadn’t created anything for my home until now. I appreciate how versatile and free these rolls are, making them easy to shape, much like working with wire.

Tools and supplies for the mandala art:
- toilet paper rolls
- scissor
- plier
- ruler
- pencil
- glue gun
- glue gun stick
- stapler
- the tube from one gift paper wrap roll.
Tip: Before diving into your craft, ensure you’ve collected enough toilet paper rolls. For this project, you’ll need around 20 to 25 rolls. It’s also important to check that the rolls have a consistent color and thickness. If you regularly use the same brand of toilet paper, this should be easy!
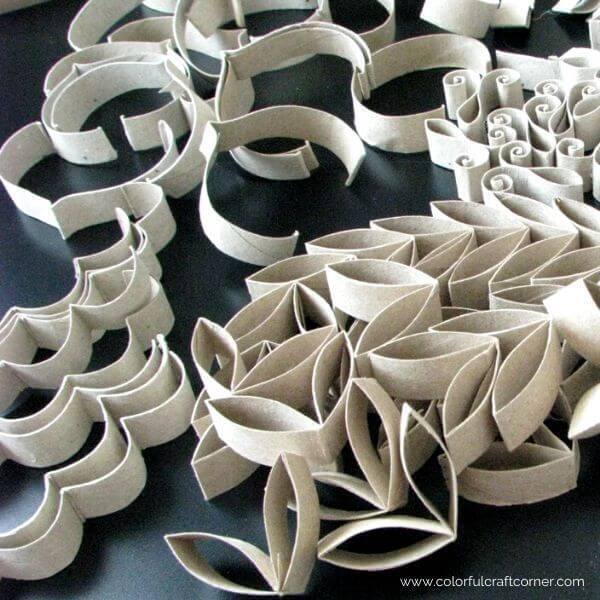
For my mandala, I utilized eight different shapes. In the photo below, you’ll see the pieces from the first column. Feel free to choose your preferred shapes and create your own unique wall decor. The names of these shapes come from my imagination, so you won’t find them labeled anywhere else!

Cut up the toilet paper rolls
Press the toilet paper roll and mark 1.5 cm intervals on both sides. Cut the roll into 1.5 cm wide strips. Once you have a good number of paper rings, you can begin assembling your pieces. For my mandala, I used a total of 121 pieces, along with five long strips cut from a gift wrapping paper roll.
To create your design, you will need the following:
- 1 ring
- 14 shells
- 8 teardrops
- 8 fish
- 34 pairs of leaves
- 8 mounds
- 12 petals
- 12 spikes
- 12 tendrils
- 12 buds
Tip: For a beautifully sharp look, use pliers to press down on each pointy part. I found that using pencils, my fingers, and the end of a brush helped to roll the ends of the paper and create the curvy shapes.
If you want to ensure consistency, you can draw your pieces on paper and use them as templates to make each one identical. This method will help you achieve a perfectly symmetrical design. You can find my free template sheet in the resource library.
How to shape the toilet paper rolls
How to assembly the toilet paper roll mandala:
Now, let’s get to the fun part! Gluing everything together is much faster than creating the individual elements, but be careful not to burn yourself with the glue gun while holding and pressing the pieces.
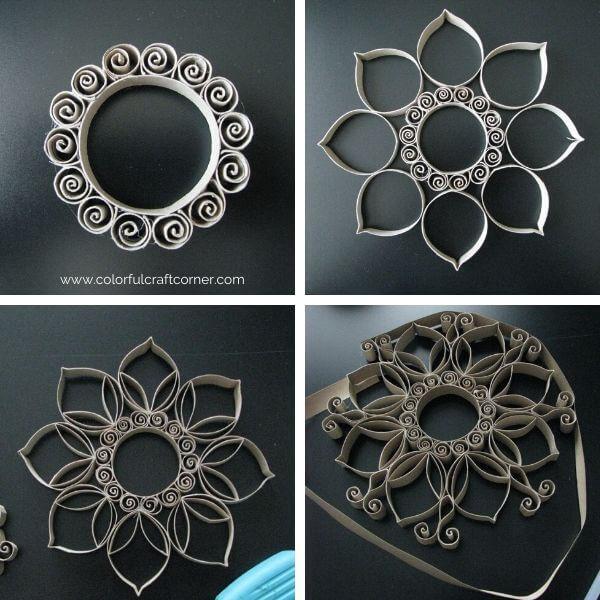
- Glue the shells to the ring: Attach each shell one by one, gluing them at the bottom and along the sides for maximum strength.
- Arrange the teardrops: Position the teardrops around the swirls and glue their bottoms and sides.
- Add the leaves: Place one pair of leaves inside each teardrop and secure them with glue.
- Attach the fish: Glue the fish where the teardrops meet on the outside.
- Wrap with a long strip: Take one long strip and glue it around the arrangement to finish off the design.
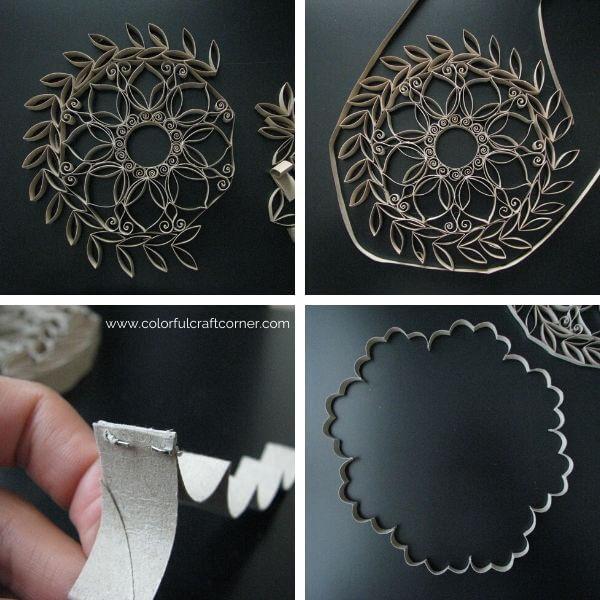
6. Arrange the leaves: Grab your leaves and position them around the mandala, then glue them down securely.
7. Wrap with long strips: Glue two long strips together, then wrap them around the mandala again. Be sure to glue the strip to every piece for added stability.
8. Secure the mounds: Use a stapler to clip together the ends of the mounds, ensuring everything stays in place.
9.Align the mounds: Arrange the mounds in line with the teardrops. Start by gluing down the parts you clipped, then secure all of their bottoms.
10.Wrap with additional strips: Glue two more long strips together and wrap them around the mandala. Attach the mounds at each hump for support.
11.Add petals and buds: Position the petals and buds in a large circle around the design. Glue them down to the base, aligning them with the teardrops in the middle for a cohesive look.

12.Assemble tendrils and spikes: Glue the tendrils and spikes together to create combos.
13. Attach to petals: Place one tendril and spike combo in each petal. Glue down the tips and the sides of the swirls for added stability.
Voila! You’ve created a beautiful mandala wall decor piece.

Tips and Tricks:
- Coloring the Rolls: If you want your mandala to be colorful, paint the toilet paper rolls before cutting them up and shaping them. Acrylic paint or spray paint works well for this.
- Choose Quality Rolls: Inspect your paper rolls before starting the project. Select ones in better condition; if the layers are peeling, the shapes may turn out uneven. It’s common to need to glue them in places, but starting with good quality rolls can minimize this.
- Use Teardrops as a Guide: When gluing the outer layers, use the teardrops as a reference to achieve a more symmetrical look.
- Watch the Glue: Be cautious with the amount of glue you use. Applying too much can create flying filaments, making a mess.
You can create stunning mandala crafts by making beautiful stencils. I have an article that guides you on how to easily create a stencil. Once you have your mandala design, you can apply it to a variety of surfaces, including walls, paper, fabric, wood, tiles, and more.
Final thoughts about the toilet paper roll mandala wall art:
This craft is both easy and inexpensive, and I’m thrilled with how the mandala turned out!
One downside is that it can be time-consuming; you’ll likely spend a few hours making the pieces. However, I believe it’s totally worth the effort. Just be prepared for some finger soreness from all the shaping, pressing, and cutting. I recommend making the pieces in batches to make the process more manageable.
Still have some toilet paper rolls lying around? I’ve discovered a collection of amazing toilet paper roll wall art by Architecture Art Design—check it out [here](insert link).
Did you enjoy this craft? Would you like a step-by-step tutorial on how to make the shapes? What’s your favorite paper roll craft?
conclusion
In conclusion, creating a toilet paper roll mandala wall art piece is a fun, easy, and budget-friendly craft that allows you to unleash your creativity. While the process can be time-consuming and may leave your fingers a bit sore, the satisfaction of seeing your beautiful mandala come to life makes it all worthwhile. Remember to take your time and enjoy the journey of crafting! If you have any leftover toilet paper rolls, don’t forget to explore the endless possibilities for wall art. I hope this tutorial has inspired you to try your hand at this project. Happy crafting, and feel free to share your creations or ask any questions!


