
Have you ever dreamed of bringing your favorite animated character to life? Creating your own Celina doll is a fun and rewarding project that can spark your creativity and imagination. In this guide, we’ll walk you through the process, from gathering materials to adding the finishing touches. Whether you’re a seasoned crafter or a beginner just starting out, this tutorial will provide you with clear instructions and helpful tips. Let’s get started on your one-of-a-kind Celina doll!

MATERIALS
- DK or light worsted weight yarn in light blue, orange and your chosen color for skin
- 2.50mm crochet hook or size needed to match your yarn
- Stuffing
- 10mm safety eyes
- Scissors
- Tapestry needle
STITCH ABBREVIATIONS (US TERMS)
- st: stitch
- sc: single crochet
- inc: sc increase
- dec: sc decrease
- ch: chain
- slst: slip stitch
- hdc: half double crochet
- dc: double crochet
- dc-inc: dc increase
- BLO: back loop only
NOTE
The doll’s body is created without any sewing. You begin with the legs and crochet upwards into the body. Then, you crochet the arms and body simultaneously. Finally, you work on the head, making increases for the neck as you go.
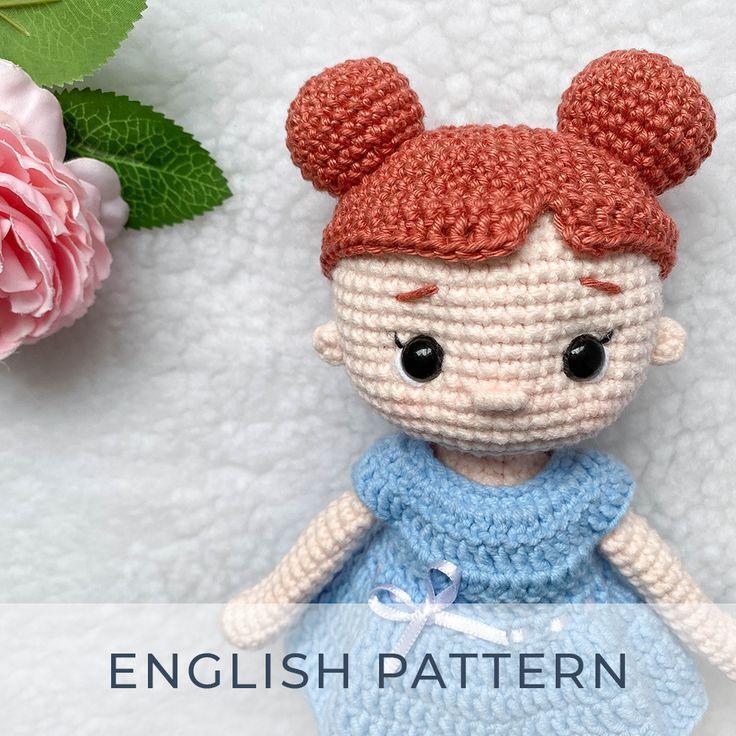
Size (Height): 23 Cm
THE STEP-BY-STEP GUIDE TO MAKE
ARMS
Skin Color:
- Row 1: Start with 5 single crochets (sc) in a magic ring.
- Row 2: Increase: (inc) 5 times [10 stitches].
- Rows 3-16: Single crochet in each stitch around [10 stitches].
- Row 17: (3 sc, dec) 2 times [8 stitches]. The arms do not require stuffing.
- Row 18: Fold the last round and single crochet both sides together to close, resulting in 4 stitches.
LEGS
Start with Light Blue:
- 6 single crochets (sc) in a magic ring.
- Increase: (inc) 6 times [12 stitches].
- (1 sc, inc) 6 times [18 stitches].
- Rows 4-6: Single crochet in each stitch around [18 stitches].
- Row 7: 4 sc, 5 decreases (dec), 4 sc [13 stitches].
- Row 8: Single crochet in each stitch around [13 stitches].
Change to Skin Color:
- Row 9: Back loop only (BLO) single crochet in each stitch around [13 stitches].
- Row 10: 3 sc, inc, 5 sc, inc, 3 sc [15 stitches].
- Row 11: Single crochet in each stitch around [15 stitches].
- Row 12: (3 sc, inc) 3 times, 3 sc [18 stitches].
- Rows 13-18: Single crochet in each stitch around [18 stitches].
Make 2. Stuff the leg, then fasten off and hide the yarn tail of one leg. Leave the working yarn on the other leg. Now, we’ll join both legs to form the body.
BODY
- Row 19: Continue on the other leg, sc on the next 6 stitches – this will make the last stitch stay in the middle of the side of the leg. If your last stitch isn’t on the middle, make 1 more st or undo 1 st. Now ch 3, sc in the 14th st in the first leg to join, sc in each st around this leg, sc in each 3 chains, sc in each st around of the second leg, sc in each other side of 3 chains [42].
Make sure the legs are facing forward when you join them, if not, make that join on the first leg one st before or after.
This will bring you to a total of [42 stitches].
Note: Ensure the legs are facing forward when you make the join. If they aren’t aligned, adjust the join on the first leg by moving it one stitch before or after.
Continue with the Body:
- Row 20: (6 single crochets (sc), inc) 6 times [48 stitches].
- Rows 21-26: Single crochet in each stitch around [48 stitches].
- Row 27: (6 sc, dec) 6 times [42 stitches].
- Row 28: Single crochet in each stitch around [42 stitches].
- Row 29: (5 sc, dec) 6 times [36 stitches].
- Rows 30-32: Single crochet in each stitch around [36 stitches].
- Row 33: (4 sc, dec) 6 times [30 stitches].
- Rows 34-37: Single crochet in each stitch around [30 stitches].
Stuff the body. Now we’ll join the arms to the body.
- Row 38: Continue working on the body, sc in next 6 sts, sc in 4 sts of one arm and body at the same time, sc in next 11 sts on the body, sc in 4 sts of other arm and body at the same time, sc in next 5 sts on the body [30]
- Row 39: Single crochet in each stitch around [30 stitches].
- Row 40: (3 single crochets (sc), dec) 6 times [24 stitches].
- Row 41: (2 sc, dec) 6 times [18 stitches].
- Row 42: (1 sc, dec) 6 times [12 stitches].
- Rows 43-44: Single crochet in each stitch around [12 stitches].
HEAD
- Row 45: Increase (inc) 12 times [24 stitches].
- Row 46: (1 single crochet (sc), inc) 12 times [36 stitches].
- Row 47: (5 sc, inc) 6 times [42 stitches].
- Row 48: (6 sc, inc) 6 times [48 stitches].
- Row 49: (7 sc, inc) 6 times [54 stitches].
- Rows 50-60: Single crochet in each stitch around [54 stitches].
Safety Eyes:
Insert the safety eyes between rounds 52 and 53, spaced 7 stitches apart.
- Row 61: (7 sc, dec) 6 times [48 stitches].
- Row 62: (6 sc, dec) 6 times [42 stitches].
- Row 63: (5 sc, dec) 6 times [36 stitches].
- Row 64: (4 sc, dec) 6 times [30 stitches].
Support for the Head:
You will likely need additional support for the doll’s head to keep it stable. To do this, follow the pattern for the doll’s arm and make a third arm. Stuff it very firmly and insert it into the doll’s neck to create a sturdy support.
- Row 65: (3 sc, dec) 6 times [24 stitches].
- Row 66: (2 sc, dec) 6 times [18 stitches].
- Row 67: (1 sc, dec) 6 times [12 stitches].
- Row 68: Decrease (dec) 6 times [6 stitches].
Finishing:
Close the remaining 6 stitches with a tapestry needle, fasten off, and hide the yarn tail.
Embellishments:
Embroider the nose, eyebrows, and any other facial details as desired.
The doll’s body is now complete!
DRESS
In Light Blue:
At the end of each row, always chain 2 (ch 2) and turn your work.
- Row 1: Chain 31, single crochet (sc) in the 2nd chain from your hook and in each chain to the end [30 stitches].
- Row 2: (2 double crochets (dc), dc increase (dc-inc)) 10 times [40 stitches].
- Row 3: (4 dc, dc-inc) 8 times [48 stitches].
- Row 4: 8 dc, skip 8 stitches, 16 dc, skip 8 stitches, 8 dc [32 stitches].
- The skipped stitches create openings for each arm.
- Rows 5-6: Double crochet in each stitch around [32 stitches].
- Row 7: dc-inc in each stitch around [64 stitches].
Join the round by slip stitching (slst) on top of the first dc. Now, you’ll work in rounds. Always slst on top of the first dc to join and ch 2 to start a new round.
- Rows 8-11: Double crochet in each stitch around [64 stitches].
HAIR
- Row 1: Start with a magic ring and make 6 single crochets (sc) inside.
- Row 2: Increase (inc) 6 times [12 stitches].
- Row 3: (1 sc, inc) 6 times [18 stitches].
- Row 4: (2 sc, inc) 6 times [24 stitches].
- Row 5: (3 sc, inc) 6 times [30 stitches].
- Row 6: (4 sc, inc) 6 times [36 stitches].
- Row 7: (5 sc, inc) 6 times [42 stitches].
- Row 8: (6 sc, inc) 6 times [48 stitches].
- Row 9: (7 sc, inc) 6 times [54 stitches].
- Rows 10-12: Single crochet in each stitch around [54 stitches].
Creating the Fringe/Bangs:
- Row 13: Single crochet in the next 30 stitches, then turn your work.
- Row 14: Skip one stitch, then single crochet in the next 53 stitches, and turn your work.
- Row 15: Skip one st, dc in next 2 sts, hdc in next 2 sts, sc in next 42 sts, hdc in next 3 sts, dc in next 4 sts, ch 1 and slst into the same st of the last dc you made, fasten off and hide the yarn tail.
BUN
- Row 1: Make a Magic Ring and work 6 single crochets into it.
- Row 2: Increase: (inc x6) [Total: 12 stitches]
- Round 3: (1 sc, inc) x6 [Total: 18 stitches]
- Round 4: (2 sc, inc) x6 [Total: 24 stitches]
- Rounds 5-8: Single crochet in each stitch around [Total: 24 stitches]
- Round 9: (2 sc, dec) x6 [Total: 18 stitches]
Stuff lightly. Fasten off, leaving a long tail for sewing.
Bun Options:
- Create 1 bun and sew it to the center of the hair.
- Alternatively, make 2 buns and sew them on each side of the hair.
Celina sounds adorable! I’m glad you enjoyed the process of creating her. It’s always special to see a project come to life. If you have any more projects or ideas you’d like to share or work on, feel free to let me know! ♥


